如何使用 Java 的佇列儲存體
概觀
本指南將示範如何使用 Azure 佇列儲存體服務為一般案例進行編碼。 相關範例是以 Java 撰寫並使用 Azure Storage SDK for Java。 涵蓋的情況包括插入、瞄核、取得和刪除佇列訊息。 此外,建立和刪除佇列的程式碼也涵蓋在內。 如需佇列的詳細資訊,請參閱後續步驟一節。
什麼是佇列儲存體?
Azure 佇列儲存體是一項儲存大量訊息的服務,全球任何地方都可利用 HTTP 或 HTTPS 並透過驗證的呼叫來存取這些訊息。 單一佇列訊息的大小上限為 64 KB,而一個佇列可以包含數百萬個訊息,以儲存體帳戶的總容量為限。 佇列儲存體通常用來建立要以非同步方式處理的待處理項目。
佇列服務概念
Azure 佇列服務包含下列元件:
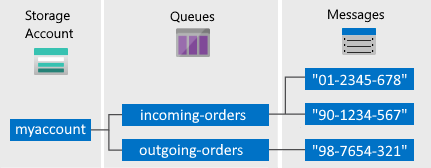
儲存體帳戶: 一律透過儲存體帳戶來存取 Azure 儲存體。 如需儲存體帳戶的詳細資訊,請參閱儲存體帳戶概觀。
佇列: 佇列包含一組訊息。 所有訊息都必須放在佇列中。 請注意,佇列名稱必須是小寫。 如需為佇列命名的詳細資訊,請參閱 為佇列和中繼資料命名。
訊息: 大小上限為 64 KB 的訊息 (任何格式)。 訊息可保留在佇列中的時間上限為 7 天。 如需版本 2017-07-29 或更新版本,最大存留時間可以是任何正數,或是表示訊息未過期的 -1。 如果省略此參數,則預設存留時間為 7 天。
URL 格式:您可以使用以下 URL 格式來定址佇列:http://
<storage account>.queue.core.windows.net/<queue>下列 URL 可定址圖中的佇列:
http://myaccount.queue.core.windows.net/incoming-orders
建立 Azure 儲存體帳戶
建立您第一個 Azure 儲存體帳戶最簡單的方法,就是使用 Azure 入口網站。 若要深入了解,請參閱 建立儲存體帳戶。
您也可以使用 Azure PowerShell、Azure CLI,或 Azure Storage Resource Provider for .NET 來建立 Azure 儲存體帳戶。
如果您不想此時在 Azure 中建立儲存體帳戶,也可以使用 Azure 儲存體模擬器在本機環境中執行並測試您的程式碼。 如需詳細資訊,請參閱使用 Azure 模擬器進行本機 Azure 儲存體開發。
建立 Java 應用程式
首先,請確認您的開發系統符合適用於 Java 的 Azure 佇列儲存體戶端程式庫 v12 中所列的必要條件。
若要建立名為 queues-how-to-v12 的 Java 應用程式:
在主控台視窗中 (例如 cmd、PowerShell 或 Bash),使用 Maven 建立名為
queues-how-to-v12的新主控台應用程式。 輸入下列mvn命令,以建立 "hello world" Java 專案。mvn archetype:generate \ --define interactiveMode=n \ --define groupId=com.queues.howto \ --define artifactId=queues-howto-v12 \ --define archetypeArtifactId=maven-archetype-quickstart \ --define archetypeVersion=1.4mvn archetype:generate ` --define interactiveMode=n ` --define groupId=com.queues.howto ` --define artifactId=queues-howto-v12 ` --define archetypeArtifactId=maven-archetype-quickstart ` --define archetypeVersion=1.4產生專案的輸出應該看起來像這樣:
[INFO] Scanning for projects...
[INFO]
[INFO] ------------------< org.apache.maven:standalone-pom >-------------------
[INFO] Building Maven Stub Project (No POM) 1
[INFO] --------------------------------[ pom ]---------------------------------
[INFO]
[INFO] >>> maven-archetype-plugin:3.1.2:generate (default-cli) > generate-sources @ standalone-pom >>>
[INFO]
[INFO] <<< maven-archetype-plugin:3.1.2:generate (default-cli) < generate-sources @ standalone-pom <<<
[INFO]
[INFO]
[INFO] --- maven-archetype-plugin:3.1.2:generate (default-cli) @ standalone-pom ---
[INFO] Generating project in Batch mode
[INFO] ----------------------------------------------------------------------------
[INFO] Using following parameters for creating project from Archetype: maven-archetype-quickstart:1.4
[INFO] ----------------------------------------------------------------------------
[INFO] Parameter: groupId, Value: com.queues.howto
[INFO] Parameter: artifactId, Value: queues-howto-v12
[INFO] Parameter: version, Value: 1.0-SNAPSHOT
[INFO] Parameter: package, Value: com.queues.howto
[INFO] Parameter: packageInPathFormat, Value: com/queues/howto
[INFO] Parameter: version, Value: 1.0-SNAPSHOT
[INFO] Parameter: package, Value: com.queues.howto
[INFO] Parameter: groupId, Value: com.queues.howto
[INFO] Parameter: artifactId, Value: queues-howto-v12
[INFO] Project created from Archetype in dir: C:\queues\queues-howto-v12
[INFO] ------------------------------------------------------------------------
[INFO] BUILD SUCCESS
[INFO] ------------------------------------------------------------------------
[INFO] Total time:  6.775 s
[INFO] Finished at: 2020-08-17T15:27:31-07:00
[INFO] ------------------------------------------------------------------------
切換至新建立的
queues-howto-v12目錄。cd queues-howto-v12
安裝套件
在文字編輯器中開啟 pom.xml 檔案。 將下列相依性元素加入至相依性群組。
<dependency>
  <groupId>com.azure</groupId>
  <artifactId>azure-storage-queue</artifactId>
  <version>12.6.0</version>
</dependency>
設定您的應用程式以存取佇列儲存體
將下列 import 陳述式新增到您要在其中使用 Azure 儲存體 API 存取佇列的 Java 檔案頂端:
// Include the following imports to use queue APIs
import com.azure.core.util.*;
import com.azure.storage.queue.*;
import com.azure.storage.queue.models.*;
設定 Azure 儲存體連接字串
Azure 儲存體用戶端會使用儲存體連接字串來存取資料管理服務。 取得 Azure 入口網站中列出的儲存體帳戶名稱和主要存取金鑰。 使用其作為連接字串中的 AccountName 和 AccountKey 值。 本範例將示範如何宣告靜態欄位來存放連接字串:
// Define the connection-string with your values
final String connectStr =
    "DefaultEndpointsProtocol=https;" +
    "AccountName=your_storage_account;" +
    "AccountKey=your_storage_account_key";
下列範例假設您有包含儲存體連接字串的 String 物件。
作法:建立佇列
QueueClient 物件包含與佇列互動的作業。 下列程式碼將建立 QueueClient 物件。 使用 QueueClient 物件來建立您要使用的佇列。
public static String createQueue(String connectStr)
{
    try
    {
        // Create a unique name for the queue
        String queueName = "queue-" + java.util.UUID.randomUUID();

        System.out.println("Creating queue: " + queueName);

        // Instantiate a QueueClient which will be
        // used to create and manipulate the queue
        QueueClient queue = new QueueClientBuilder()
                                .connectionString(connectStr)
                                .queueName(queueName)
                                .buildClient();

        // Create the queue
        queue.create();
        return queue.getQueueName();
    }
    catch (QueueStorageException e)
    {
        // Output the exception message and stack trace
        System.out.println("Error code: " + e.getErrorCode() + "Message: " + e.getMessage());
        return null;
    }
}
作法:將訊息新增至佇列
若要將訊息插入現有佇列中,請呼叫 sendMessage 方法。 訊息可以是字串 (UTF-8 格式) 或位元組陣列。 以下是將字串訊息傳送至佇列的程式碼。
public static void addQueueMessage
    (String connectStr, String queueName, String messageText)
{
    try
    {
        // Instantiate a QueueClient which will be
        // used to create and manipulate the queue
        QueueClient queueClient = new QueueClientBuilder()
                                    .connectionString(connectStr)
                                    .queueName(queueName)
                                    .buildClient();

        System.out.println("Adding message to the queue: " + messageText);

        // Add a message to the queue
        queueClient.sendMessage(messageText);
    }
    catch (QueueStorageException e)
    {
        // Output the exception message and stack trace
        System.out.println(e.getMessage());
        e.printStackTrace();
    }
}
作法:查看下一個訊息
透過呼叫 peekMessage,您可以在佇列前面查看訊息,而無需將其從佇列中移除。
public static void peekQueueMessage
    (String connectStr, String queueName)
{
    try
    {
        // Instantiate a QueueClient which will be
        // used to create and manipulate the queue
        QueueClient queueClient = new QueueClientBuilder()
                                    .connectionString(connectStr)
                                    .queueName(queueName)
                                    .buildClient();

        // Peek at the first message
        PeekedMessageItem peekedMessageItem = queueClient.peekMessage();
        System.out.println("Peeked message: " + peekedMessageItem.getMessageText());
    }
    catch (QueueStorageException e)
    {
        // Output the exception message and stack trace
        System.out.println(e.getMessage());
        e.printStackTrace();
    }
}
作法:變更佇列訊息的內容
您可以在佇列中就地變更訊息內容。 如果訊息代表工作作業,則您可以使用此功能來更新狀態。 下列程式碼將使用新的內容更新佇列訊息,並將可見度逾時設定延長 30 秒。 延伸可見度逾時可讓用戶端有額外 30 秒繼續處理訊息。 您也可以保留重試計數。 如果訊息重試超過 n 次,您會將其刪除。 此案例可防止每次處理時便觸發應用程式錯誤的訊息。
下列程式碼範例會在訊息佇列中搜尋,找出內容符合搜尋字串的第一個訊息內容,然後修改訊息內容並結束。
public static void updateQueueMessage
    (String connectStr, String queueName,
    String searchString, String updatedContents)
{
    try
    {
        // Instantiate a QueueClient which will be
        // used to create and manipulate the queue
        QueueClient queueClient = new QueueClientBuilder()
                                    .connectionString(connectStr)
                                    .queueName(queueName)
                                    .buildClient();

        // The maximum number of messages to retrieve is 32
        final int MAX_MESSAGES = 32;

        // Iterate through the queue messages
        for (QueueMessageItem message : queueClient.receiveMessages(MAX_MESSAGES))
        {
            // Check for a specific string
            if (message.getMessageText().equals(searchString))
            {
                // Update the message to be visible in 30 seconds
                queueClient.updateMessage(message.getMessageId(),
                                          message.getPopReceipt(),
                                          updatedContents,
                                          Duration.ofSeconds(30));
                System.out.println(
                    String.format("Found message: \'%s\' and updated it to \'%s\'",
                                    searchString,
                                    updatedContents)
                                  );
                break;
            }
        }
    }
    catch (QueueStorageException e)
    {
        // Output the exception message and stack trace
        System.out.println(e.getMessage());
        e.printStackTrace();
    }
}
下列程式碼範例只會更新佇列上第一個可見的訊息。
public static void updateFirstQueueMessage
    (String connectStr, String queueName, String updatedContents)
{
    try
    {
        // Instantiate a QueueClient which will be
        // used to create and manipulate the queue
        QueueClient queueClient = new QueueClientBuilder()
                                    .connectionString(connectStr)
                                    .queueName(queueName)
                                    .buildClient();

        // Get the first queue message
        QueueMessageItem message = queueClient.receiveMessage();

        // Check for a specific string
        if (null != message)
        {
            // Update the message to be visible in 30 seconds
            UpdateMessageResult result = queueClient.updateMessage(message.getMessageId(),
                                                                   message.getPopReceipt(),
                                                                   updatedContents,
                                                                   Duration.ofSeconds(30));
            System.out.println("Updated the first message with the receipt: " +
                    result.getPopReceipt());
        }
    }
    catch (QueueStorageException e)
    {
        // Output the exception message and stack trace
        System.out.println(e.getMessage());
        e.printStackTrace();
    }
}
作法:取得佇列長度
您可以取得佇列中的估計訊息數目。
getProperties 方法會傳回數個值,包括目前在佇列中的訊息數目。 此計數只是一個約略值,因為要求之後仍可新增或移除訊息。
getApproximateMessageCount 方法會傳回呼叫 getProperties 所擷取的最後一個值,而不需要呼叫佇列儲存體。
public static void getQueueLength(String connectStr, String queueName)
{
    try
    {
        // Instantiate a QueueClient which will be
        // used to create and manipulate the queue
        QueueClient queueClient = new QueueClientBuilder()
                                    .connectionString(connectStr)
                                    .queueName(queueName)
                                    .buildClient();

        QueueProperties properties = queueClient.getProperties();
        long messageCount = properties.getApproximateMessagesCount();

        System.out.println(String.format("Queue length: %d", messageCount));
    }
    catch (QueueStorageException e)
    {
        // Output the exception message and stack trace
        System.out.println(e.getMessage());
        e.printStackTrace();
    }
}
作法:清除下一個佇列訊息
您的程式碼可以使用兩個步驟來清除佇列訊息。 呼叫 receiveMessage 時,您會取得佇列中的下一個訊息。 從 receiveMessage 傳回的訊息,對於從此佇列讀取訊息的任何其他程式碼而言,將會是不可見的。 依預設,此訊息會隱藏 30 秒。 若要完成從佇列中移除訊息,您還必須呼叫 deleteMessage。 如果您的程式碼無法處理訊息,則此兩步驟程序可確保您可以取得相同的訊息,然後再試一次。 您的程式碼會在處理完訊息之後立即呼叫 deleteMessage。
public static void dequeueMessage(String connectStr, String queueName)
{
    try
    {
        // Instantiate a QueueClient which will be
        // used to create and manipulate the queue
        QueueClient queueClient = new QueueClientBuilder()
                                    .connectionString(connectStr)
                                    .queueName(queueName)
                                    .buildClient();

        // Get the first queue message
        QueueMessageItem message = queueClient.receiveMessage();

        // Check for a specific string
        if (null != message)
        {
            System.out.println("Dequeing message: " + message.getMessageText());

            // Delete the message
            queueClient.deleteMessage(message.getMessageId(), message.getPopReceipt());
        }
        else
        {
            System.out.println("No visible messages in queue");
        }
    }
    catch (QueueStorageException e)
    {
        // Output the exception message and stack trace
        System.out.println(e.getMessage());
        e.printStackTrace();
    }
}
清除佇列訊息的其他選項
自訂從佇列中擷取訊息的方法有兩種。 首先,您取得一批訊息 (最多 32 個)。 接下來,設定較長或較短的可見度逾時,讓您的程式碼有較長或較短的時間可以完全處理每個訊息。
下列程式碼範例將使用 receiveMessages 方法,在一次呼叫中取得 20 個訊息。 接著其會使用 for 迴圈處理每個訊息。 它也會將可見度逾時設定為每個訊息五分鐘 (300 秒)。 所有訊息的逾時都是同時啟動的。 呼叫 receiveMessages 後的五分鐘之後,任何未刪除的訊息都會重新顯示。
public static void dequeueMessages(String connectStr, String queueName)
{
    try
    {
        // Instantiate a QueueClient which will be
        // used to create and manipulate the queue
        QueueClient queueClient = new QueueClientBuilder()
                                    .connectionString(connectStr)
                                    .queueName(queueName)
                                    .buildClient();

        // The maximum number of messages to retrieve is 20
        final int MAX_MESSAGES = 20;

        // Retrieve 20 messages from the queue with a
        // visibility timeout of 300 seconds (5 minutes)
        for (QueueMessageItem message : queueClient.receiveMessages(MAX_MESSAGES,
                Duration.ofSeconds(300), Duration.ofSeconds(1), new Context("key1", "value1")))
        {
            // Do processing for all messages in less than 5 minutes,
            // deleting each message after processing.
            System.out.println("Dequeing message: " + message.getMessageText());
            queueClient.deleteMessage(message.getMessageId(), message.getPopReceipt());
        }
    }
    catch (QueueStorageException e)
    {
        // Output the exception message and stack trace
        System.out.println(e.getMessage());
        e.printStackTrace();
    }
}
作法:列出佇列
若要取得目前佇列的清單,請呼叫 QueueServiceClient.listQueues() 方法,此方法會傳回 QueueItem 物件的集合。
public static void listQueues(String connectStr)
{
    try
    {
        // Instantiate a QueueServiceClient which will be
        // used to list the queues
        QueueServiceClient queueServiceClient = new QueueServiceClientBuilder()
                                    .connectionString(connectStr)
                                    .buildClient();

        // Loop through the collection of queues.
        for (QueueItem queue : queueServiceClient.listQueues())
        {
            // Output each queue name.
            System.out.println(queue.getName());
        }
    }
    catch (QueueStorageException e)
    {
        // Output the exception message and stack trace
        System.out.println(e.getMessage());
        e.printStackTrace();
    }
}
作法:刪除佇列
若要刪除佇列及其內含的所有訊息,請在 QueueClient 物件上呼叫 delete 方法。
public static void deleteMessageQueue(String connectStr, String queueName)
{
    try
    {
        // Instantiate a QueueClient which will be
        // used to create and manipulate the queue
        QueueClient queueClient = new QueueClientBuilder()
                                    .connectionString(connectStr)
                                    .queueName(queueName)
                                    .buildClient();

        System.out.println("Deleting queue: " + queueClient.getQueueName());

        // Delete the queue
        queueClient.delete();
    }
    catch (QueueStorageException e)
    {
        // Output the exception message and stack trace
        System.out.println(e.getMessage());
        e.printStackTrace();
    }
}
下一步
了解佇列儲存體的基礎概念之後,請參考下列連結以了解有關更複雜的儲存工作。
如需使用已取代 JAVA 第 8 版 SDK 的相關程式碼範例,請參閱 使用 JAVA 第 8 版的程式碼範例。