這很重要
自 2025 年 5 月 1 日起,Azure AD B2C 將不再可供新客戶購買。 在我們的常見問題中深入瞭解。
開始之前,請使用此頁面頂端的 [選擇原則類型] 選取器,選擇您要設定的原則類型。 Azure Active Directory B2C 提供兩種方法來定義使用者如何與您的應用程式互動:透過預先定義的使用者流程,或透過完全可設定的自訂原則。 此文章中所需的步驟隨各方法而異。
在本文中,您會在 Azure Active Directory B2C (Azure AD B2C) 的註冊旅程中收集新的屬性,例如城市。 您會取得使用者的城市、將其設定為下拉式清單,並定義是否需要提供。
這很重要
此範例使用內建宣告 『city』。 相反地,您可以選擇其中一個支援的 Azure AD B2C 內建屬性 或自定義屬性。 若要使用自定義 屬性,請啟用自訂屬性。 若要使用不同的內建或自定義屬性,請將 『city』 取代為您選擇的屬性,例如內建屬性 jobTitle 或自定義屬性,例如 extension_loyaltyId。
先決條件
- 建立使用者流程,讓使用者能夠註冊並登入您的應用程式。
- 註冊 Web 應用程式。
- 完成開始使用 Active Directory B2C 中的自定義原則中的步驟。 本教學課程會引導您更新自定義原則檔案,以使用您的 Azure AD B2C 租用戶設定。
- 註冊 Web 應用程式。
將使用者屬性新增至您的使用者流程。
- 登入 Azure 入口網站。
- 如果您有多個租用戶的存取權,請使用頂端功能表中的 [設定] 圖示,從 [目錄 + 訂用帳戶] 功能表切換至您的 Azure AD B2C 租用戶。
- 在 [Azure 服務] 底下,選取 [Azure AD B2C]。 或使用搜尋方塊來尋找並選取 [Azure AD B2C]。
- 在您的 Azure AD B2C 租戶中,選取 使用者流程。
- 選擇您的政策(例如「B2C_1_SignupSignin」)來打開。
- 選取 [用戶屬性 ],然後選取使用者屬性(例如「城市」)。
- 選取 [儲存]。
為您的應用程式提供可選的聲明
應用程式宣告是傳回給應用程式的值。 更新您的使用者流程,以包含所需的宣告:
- 選擇您的政策(例如「B2C_1_SignupSignin」)來打開。
- 選取 應用程式宣告。
- 選取您要傳送回應用程式的屬性(例如「城市」)。
- 選取 [儲存]。
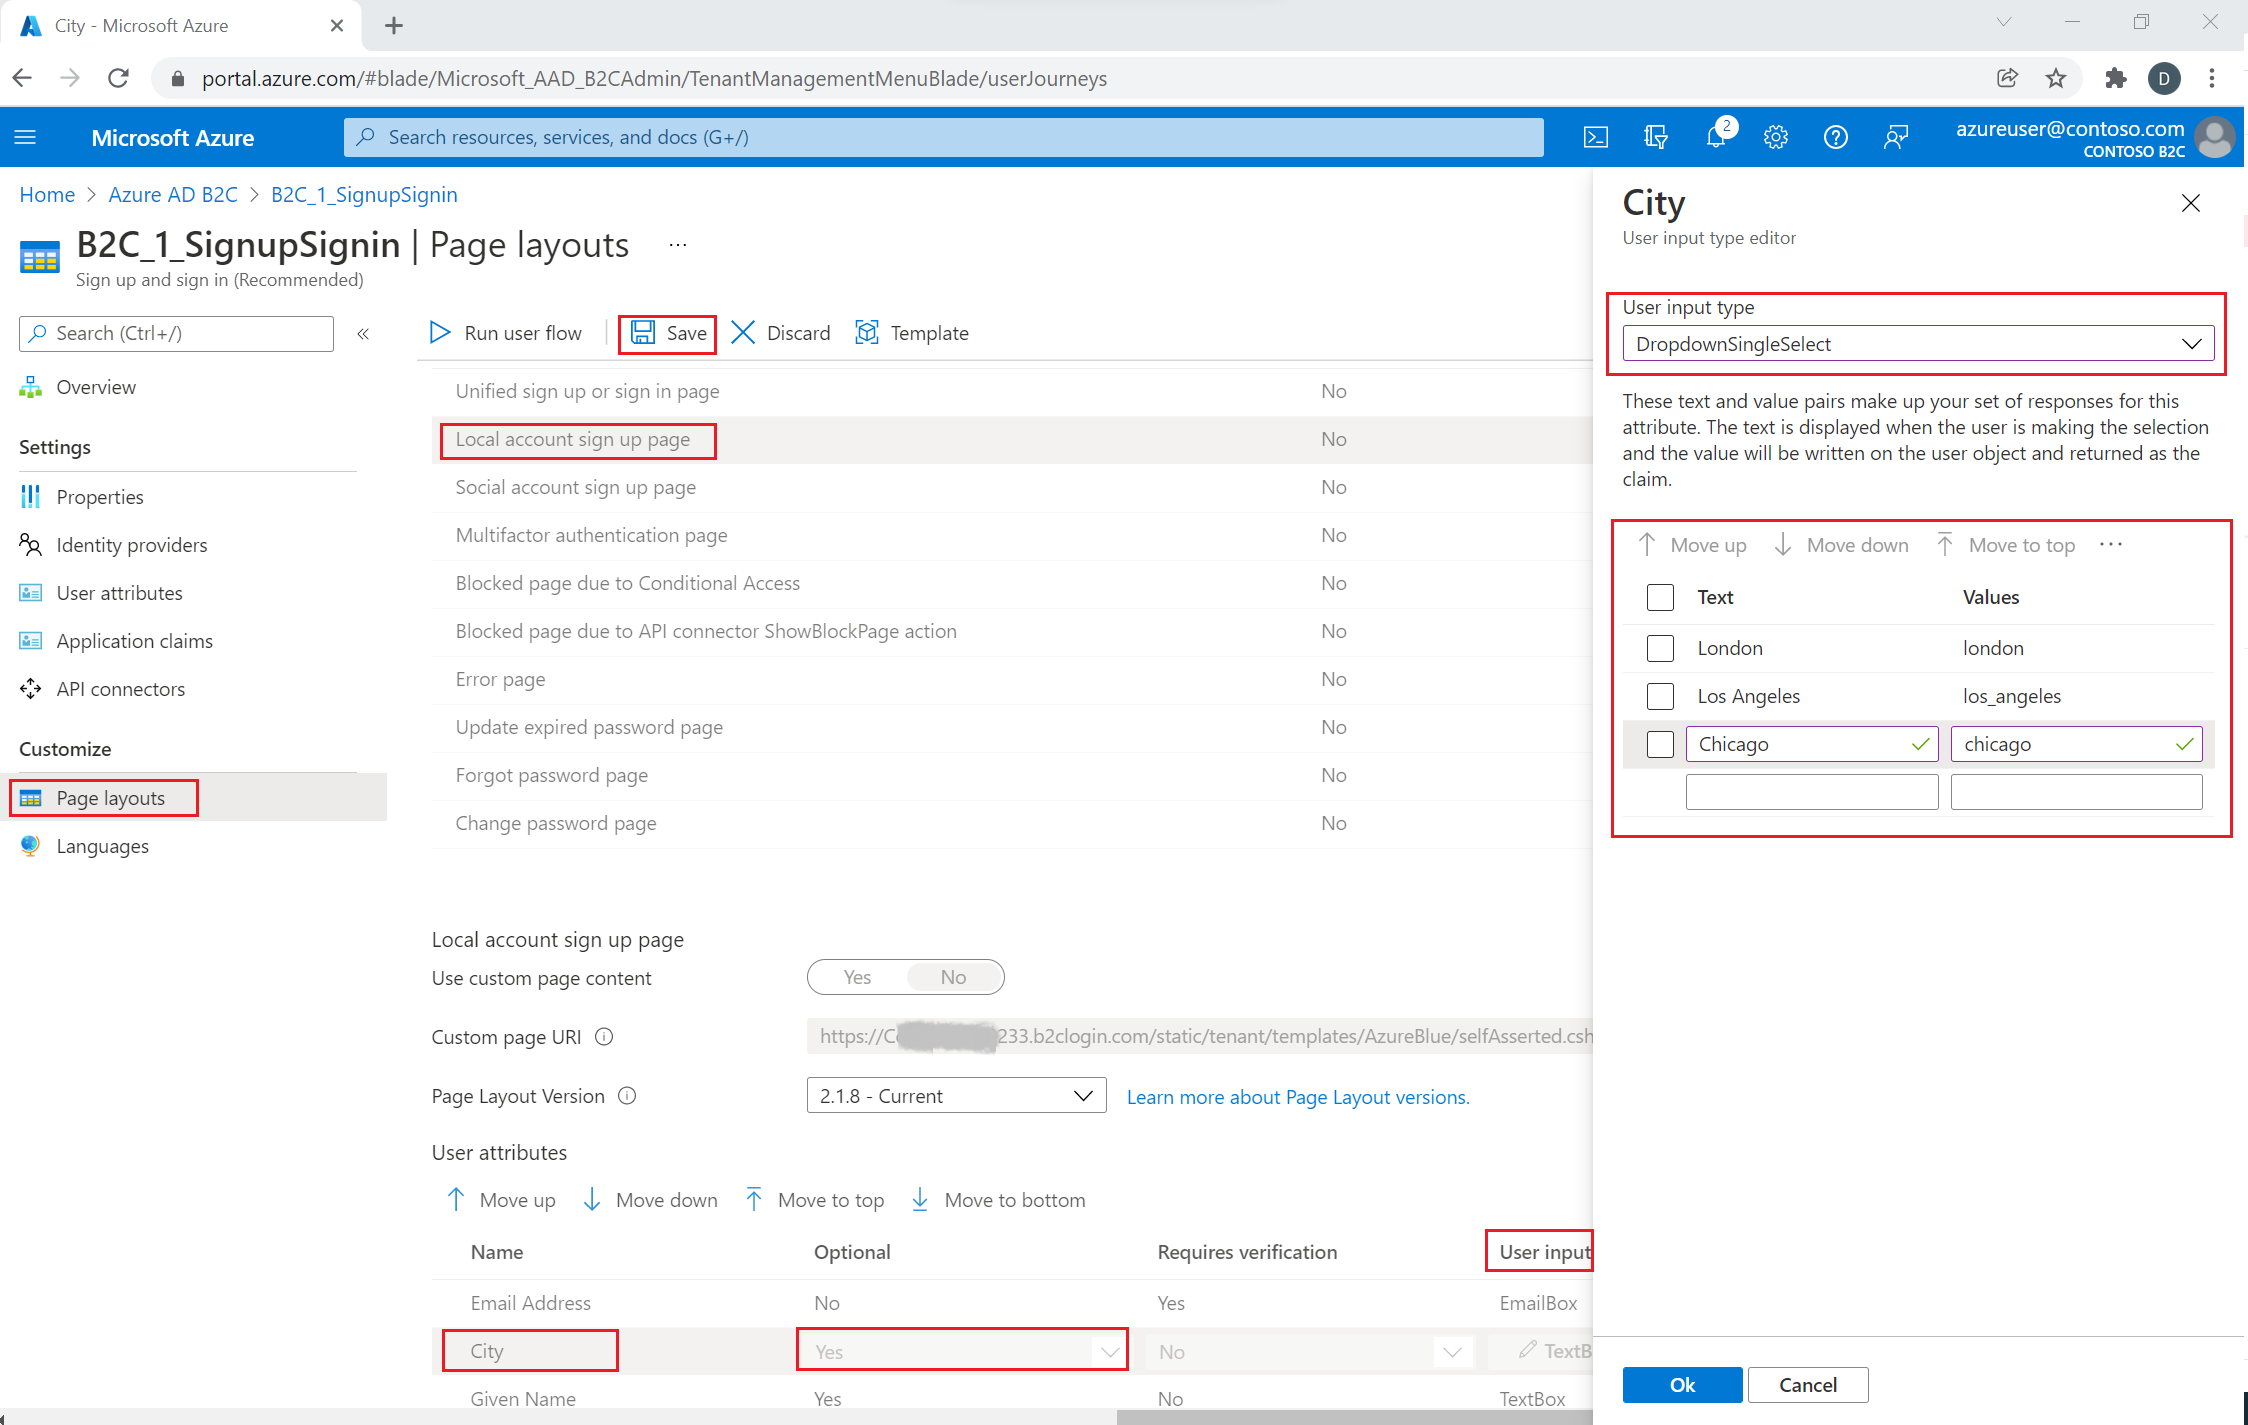
設定使用者屬性輸入類型
選擇您的政策(例如「B2C_1_SignupSignin」)來打開。
選取 [版面配置]。
選取 本機帳戶註冊頁面。
在 [用戶屬性] 底下,選取 [ 城市]。
- 在 [ 選擇性 ] 下拉式清單中,選取 [ 否]。
- 在 [ 使用者輸入類型] 中,選取目前的使用者輸入類型,例如 TextBox,以開啟 [使用者輸入類型編輯器 ] 視窗窗格。
- 在 使用者輸入類型 下拉式清單中,選擇 DropdownSingleSelect。
- 在 [文字 ] 和 [ 值] 中,輸入組成屬性回應集的文字和值組。 文字會顯示在您的流程的 Web 介面中,而值將會儲存至 Azure AD B2C,供選擇的文字使用。 可選擇性:使用「上移/下移」按鈕來重新排列下拉式選單項目。
選取 [確定]。 選用:使用 [上移/下移] 按鈕,在註冊頁面中重新排序用戶屬性。
選取 [儲存]。
使用本地化集合提供值清單
若要提供城市屬性的一組值清單:
- 在使用者流程上啟用語言自定義
- 選擇您的政策(例如「B2C_1_SignupSignin」)來打開。
- 在使用者流程的 [語言] 頁面上,選取您想要自訂的語言。
- 在 [頁面層級資源檔案] 底下,選取 [ 本機帳戶註冊] 頁面。
- 選取 [下載預設值] (如果您先前編輯的這個語言,請按一下 [下載覆寫])。
- 建立
LocalizedCollections屬性。
LocalizedCollections 是由 Name 和 Value 配對組成的陣列。 項目的順序是其顯示的順序。
-
ElementId是使用者屬性,而其回應則是這個LocalizedCollections屬性。 -
Name是向用戶顯示的值。 -
Value是選取此選項時在宣告中所傳回的內容。
{
  "LocalizedStrings": [...],
  "LocalizedCollections": [
    {
      "ElementType": "ClaimType",
      "ElementId": "city",
      "TargetCollection": "Restriction",
      "Override": true,
      "Items": [
        {
          "Name": "Berlin",
          "Value": "Berlin"
        },
        {
          "Name": "London",
          "Value": "London"
        },
        {
          "Name": "Seattle",
          "Value": "Seattle"
        }
      ]
    }
  ]
}
上傳您的變更
- 完成 JSON 檔案的變更之後,請返回 B2C 租使用者。
- 選取 使用者流程,然後選擇您的設定(例如 (B2C_1_SignupSignin)),以開啟它。
- 選取 [語言]。
- 選取您想要轉譯成什麼語言。
- 在 [頁面層級資源檔案] 底下,選取 [ 本機帳戶註冊] 頁面。
- 選取資料夾圖示,然後選取要上傳的 JSON 檔案。 這些變更會自動儲存到您的使用流程。
測試您的使用者流程
- 選擇您的政策(例如「B2C_1_SignupSignin」)來打開。
- 若要測試您的原則,請選取 [ 執行使用者流程]。
- 針對 [應用程式],選取您先前註冊的名為 testapp1 的Web應用程式。
Reply URL 應顯示
https://jwt.ms。 - 選取 [執行使用者流程]
概觀
您可以使用註冊或登入使用者旅程圖,從使用者收集初始數據。 您可以稍後透過使用者旅程編輯設定檔來收集更多宣稱。 每當 Azure AD B2C 以互動方式從使用者收集資訊時,就會使用 自我聲明技術設定檔。 在這個範例中,您會:
- 定義「城市」宣告。
- 詢問用戶他們的城市。
- 將城市持久保存至 Azure AD B2C 目錄中的使用者配置檔。
- 在每次登入時,從 Azure AD B2C 目錄中讀取城市聲明。
- 登入或註冊之後,將城市傳回您的信賴憑證者應用程式。
定義宣告
宣告會在 Azure AD B2C 原則執行期間提供數據的暫存記憶體。 索賠架構是您提出索賠的地方。 以下元素用來定義索賠:
- DisplayName - 定義使用者面向標籤的字串。
- DataType - 宣告的類型。
- UserHelpText - 協助用戶瞭解所需的專案。
- UserInputType - 輸入控件的類型,例如文本框、單選選取範圍、下拉式清單或多個選取範圍。
開啟您政策的延伸檔案。 例如: SocialAndLocalAccounts/TrustFrameworkExtensions.xml 。
- 搜尋 BuildingBlocks 元素。 如果元素不存在,加以新增。
- 找出 ClaimsSchema 元素。 如果元素不存在,加以新增。
- 將城市宣告新增至 ClaimsSchema 元素。
<!--
<BuildingBlocks>
  <ClaimsSchema> -->
    <ClaimType Id="city">
      <DisplayName>City where you work</DisplayName>
      <DataType>string</DataType>
      <UserInputType>DropdownSingleSelect</UserInputType>
      <Restriction>
        <Enumeration Text="Berlin" Value="berlin" />
        <Enumeration Text="London" Value="london" />
        <Enumeration Text="Seattle" Value="seattle" />
      </Restriction>
    </ClaimType>
  <!--
  </ClaimsSchema>
</BuildingBlocks>-->
在元素中包含 Enumeration 屬性,以在頁面第一次載入時預設選取它。 例如,若要預先選取 倫敦 專案,請變更 Enumeration 元素,如下列範例所示:
<Restriction>
  <Enumeration Text="Berlin" Value="berlin" />
  <Enumeration Text="London" Value="london" SelectByDefault="true" />
  <Enumeration Text="Seattle" Value="seattle" />
</Restriction>
將要求新增於使用者介面
當使用者預期提供輸入時,會叫用下列技術配置檔:
- LocalAccountSignUpWithLogonEmail - 本機帳戶註冊流程。
- SelfAsserted-Social - 同盟帳戶第一次使用者登入。
- SelfAsserted-ProfileUpdate - 編輯個人資料流程。
若要在註冊期間收集城市宣告,必須將它新增為技術設定檔的 LocalAccountSignUpWithLogonEmail 輸出宣告。 在擴充檔案中覆寫這個技術設定檔。 指定輸出宣告的完整清單,以控制在畫面上呈現宣告的順序。 尋找 ClaimsProviders 元素。 新增 ClaimsProviders,如下所示:
<ClaimsProvider>
  <DisplayName>Local Account</DisplayName>
  <TechnicalProfiles>
    <!--Local account sign-up page-->
    <TechnicalProfile Id="LocalAccountSignUpWithLogonEmail">
      <OutputClaims>
       <OutputClaim ClaimTypeReferenceId="email" PartnerClaimType="Verified.Email" Required="true" />
       <OutputClaim ClaimTypeReferenceId="newPassword" Required="true" />
       <OutputClaim ClaimTypeReferenceId="reenterPassword" Required="true" />
       <OutputClaim ClaimTypeReferenceId="displayName" />
       <OutputClaim ClaimTypeReferenceId="givenName" />
       <OutputClaim ClaimTypeReferenceId="surName" />
       <OutputClaim ClaimTypeReferenceId="city"/>
     </OutputClaims>
   </TechnicalProfile>
  </TechnicalProfiles>
</ClaimsProvider>
要在使用聯合帳戶初次登入後收集城市宣告,必須將其新增為技術設定檔 SelfAsserted-Social 的輸出宣告。 若要讓本機和同盟帳戶使用者稍後能夠編輯其個人資料,請將輸入和輸出宣稱新增至 SelfAsserted-ProfileUpdate 技術描述檔。 覆寫擴充檔案中的這些技術設定檔。 指定輸出宣告的完整清單,以控制在畫面上呈現宣告的順序。 尋找 ClaimsProviders 元素。 新增 ClaimsProviders,如下所示:
<ClaimsProvider>
  <DisplayName>Self Asserted</DisplayName>
  <TechnicalProfiles>
    <!--Federated account first-time sign-in page-->
    <TechnicalProfile Id="SelfAsserted-Social">
      <InputClaims>
        <InputClaim ClaimTypeReferenceId="city" />
      </InputClaims>
      <OutputClaims>
        <OutputClaim ClaimTypeReferenceId="displayName"/>
        <OutputClaim ClaimTypeReferenceId="givenName"/>
        <OutputClaim ClaimTypeReferenceId="surname"/>
        <OutputClaim ClaimTypeReferenceId="city"/>
      </OutputClaims>
    </TechnicalProfile>
    <!--Edit profile page-->
    <TechnicalProfile Id="SelfAsserted-ProfileUpdate">
      <InputClaims>
        <InputClaim ClaimTypeReferenceId="city" />
      </InputClaims>
      <OutputClaims>
        <OutputClaim ClaimTypeReferenceId="displayName"/>
        <OutputClaim ClaimTypeReferenceId="givenName" />
        <OutputClaim ClaimTypeReferenceId="surname" />
        <OutputClaim ClaimTypeReferenceId="city"/>
      </OutputClaims>
    </TechnicalProfile>
  </TechnicalProfiles>
</ClaimsProvider>
讀取和寫入宣告
下列技術設定檔是 Active Directory 技術設定檔,可讀取和寫入數據到 Microsoft Entra ID。
使用 PersistedClaims 將數據寫入使用者配置檔,以及 OutputClaims 從個別 Active Directory 技術設定檔內的使用者設定檔讀取數據。
覆寫擴充檔案中的這些技術設定檔。 尋找 ClaimsProviders 元素。 新增 ClaimsProviders,如下所示:
<ClaimsProvider>
  <DisplayName>Azure Active Directory</DisplayName>
  <TechnicalProfiles>
    <!-- Write data during a local account sign-up flow. -->
    <TechnicalProfile Id="AAD-UserWriteUsingLogonEmail">
      <PersistedClaims>
        <PersistedClaim ClaimTypeReferenceId="city"/>
      </PersistedClaims>
    </TechnicalProfile>
    <!-- Write data during a federated account first-time sign-in flow. -->
    <TechnicalProfile Id="AAD-UserWriteUsingAlternativeSecurityId">
      <PersistedClaims>
        <PersistedClaim ClaimTypeReferenceId="city"/>
      </PersistedClaims>
    </TechnicalProfile>
    <!-- Write data during edit profile flow. -->
    <TechnicalProfile Id="AAD-UserWriteProfileUsingObjectId">
      <PersistedClaims>
        <PersistedClaim ClaimTypeReferenceId="city"/>
      </PersistedClaims>
    </TechnicalProfile>
    <!-- Read data after user resets the password. -->
    <TechnicalProfile Id="AAD-UserReadUsingEmailAddress">
      <OutputClaims>
        <OutputClaim ClaimTypeReferenceId="city" />
      </OutputClaims>
    </TechnicalProfile>
    <!-- Read data after user authenticates with a local account. -->
    <TechnicalProfile Id="AAD-UserReadUsingObjectId">
      <OutputClaims>
        <OutputClaim ClaimTypeReferenceId="city" />
      </OutputClaims>
    </TechnicalProfile>
    <!-- Read data after user authenticates with a federated account. -->
    <TechnicalProfile Id="AAD-UserReadUsingAlternativeSecurityId">
      <OutputClaims>
        <OutputClaim ClaimTypeReferenceId="city" />
      </OutputClaims>
    </TechnicalProfile>
  </TechnicalProfiles>
</ClaimsProvider>
在令牌中包含主張
若要將城市宣告傳回至信賴方應用程式,請將輸出宣告新增至 SocialAndLocalAccounts/SignUpOrSignIn.xml 檔案。 輸出宣告會在成功的使用者旅程後被添加到令牌中,並將傳送至應用程式。 修改信賴方區段中的技術設定元素,以城市作為輸出宣告新增。
<RelyingParty>
  <DefaultUserJourney ReferenceId="SignUpOrSignIn" />
  <TechnicalProfile Id="PolicyProfile">
    <DisplayName>PolicyProfile</DisplayName>
    <Protocol Name="OpenIdConnect" />
    <OutputClaims>
      <OutputClaim ClaimTypeReferenceId="displayName" />
      <OutputClaim ClaimTypeReferenceId="givenName" />
      <OutputClaim ClaimTypeReferenceId="surname" />
      <OutputClaim ClaimTypeReferenceId="email" />
      <OutputClaim ClaimTypeReferenceId="objectId" PartnerClaimType="sub"/>
      <OutputClaim ClaimTypeReferenceId="identityProvider" />
      <OutputClaim ClaimTypeReferenceId="tenantId" AlwaysUseDefaultValue="true" DefaultValue="{Policy:TenantObjectId}" />
      <OutputClaim ClaimTypeReferenceId="city" DefaultValue="" />
    </OutputClaims>
    <SubjectNamingInfo ClaimType="sub" />
  </TechnicalProfile>
</RelyingParty>
上傳並測試您已更新的自訂策略
- 如果您有多個租用戶的存取權,請使用頂端功能表中的 [設定] 圖示,從 [目錄 + 訂用帳戶] 功能表切換至您的 Azure AD B2C 租用戶。
- 搜尋並選取 Azure AD B2C。
- 在 [ 原則] 底下,選取 [ 身分識別體驗架構]。
- 選取 上傳自定義政策。
- 上傳您先前變更的原則檔案。
測試自定義原則
- 選取您的受信方政策,例如
B2C_1A_signup_signin。 - 針對 [應用程式],選取您 先前註冊的 Web 應用程式。
Reply URL 應顯示
https://jwt.ms。 - 選取 [ 立即執行] 按鈕。
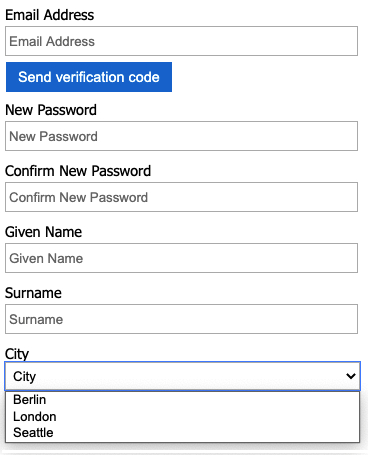
- 從註冊或登入頁面,選取 [ 立即 註冊] 以註冊。 完成輸入使用者資訊,包括城市名稱,然後選取 [ 建立]。 您應該會看到傳回之令牌的內容。
註冊畫面看起來應該類似下列螢幕快照:
傳回至應用程式的令牌包含 city 宣告。
{
  "typ": "JWT",
  "alg": "RS256",
  "kid": "X5eXk4xyojNFum1kl2Ytv8dlNP4-c57dO6QGTVBwaNk"
}.{
  "exp": 1583500140,
  "nbf": 1583496540,
  "ver": "1.0",
  "iss": "https://contoso.b2clogin.com/aaaabbbb-0000-cccc-1111-dddd2222eeee/v2.0/",
  "aud": "00001111-aaaa-2222-bbbb-3333cccc4444",
  "acr": "b2c_1a_signup_signin",
  "nonce": "defaultNonce",
  "iat": 1583496540,
  "auth_time": 1583496540,
  "name": "Emily Smith",
  "email": "joe@outlook.com",
  "given_name": "Emily",
  "family_name": "Smith",
  "city": "Berlin"
  ...
}
[選擇性]將 UI 當地語系化
Azure AD B2C 可讓您將原則納入不同的語言。 如需詳細資訊, 請參閱自定義語言體驗。 若要將註冊頁面本地化, 請設定支持的語言清單,並提供 特定語言的標籤。
下列範例示範如何提供英文和西班牙文的城市清單。 兩者都會使用英文和西班牙文的項目清單來設定 Restriction 索引 城市 的集合。
SelectByDefault 會在頁面第一次載入時預設選取專案。
<!--
<BuildingBlocks>-->
  <Localization Enabled="true">
    <SupportedLanguages DefaultLanguage="en" MergeBehavior="Append">
      <SupportedLanguage>en</SupportedLanguage>
      <SupportedLanguage>es</SupportedLanguage>
    </SupportedLanguages>
    <LocalizedResources Id="api.localaccountsignup.en">
      <LocalizedCollections>
        <LocalizedCollection ElementType="ClaimType" ElementId="city" TargetCollection="Restriction">
          <Item Text="Berlin" Value="Berlin"></Item>
          <Item Text="London" Value="London" SelectByDefault="true"></Item>
          <Item Text="Seattle" Value="Seattle"></Item>
        </LocalizedCollection>
      </LocalizedCollections>
    </LocalizedResources>
    <LocalizedResources Id="api.localaccountsignup.es">
      <LocalizedCollections>
        <LocalizedCollection ElementType="ClaimType" ElementId="city" TargetCollection="Restriction">
          <Item Text="Berlina" Value="Berlin"></Item>
          <Item Text="Londres" Value="London" SelectByDefault="true"></Item>
          <Item Text="Seattle" Value="Seattle"></Item>
        </LocalizedCollection>
      </LocalizedCollections>
    </LocalizedResources>
  </Localization>
<!--
</BuildingBlocks>-->
新增本地化項目之後, 請使用當地語系化來編輯內容定義。 在下列範例中,會將英文 (en) 和西班牙文 (es) 自定義本地化資源新增至註冊頁面:
<!--
<BuildingBlocks>
  <ContentDefinitions> -->
   <ContentDefinition Id="api.localaccountsignup">
    <LocalizedResourcesReferences MergeBehavior="Prepend">
        <LocalizedResourcesReference Language="en" LocalizedResourcesReferenceId="api.localaccountsignup.en" />
        <LocalizedResourcesReference Language="es" LocalizedResourcesReferenceId="api.localaccountsignup.es" />
    </LocalizedResourcesReferences>
   </ContentDefinition>
  <!--
  </ContentDefinitions>
</BuildingBlocks>-->
後續步驟
- 深入瞭解 IEF 參考中的 ClaimsSchema 元素。
- 瞭解如何 在 Azure AD B2C 中使用自訂屬性。