這很重要
自 2025 年 5 月 1 日起,Azure AD B2C 將不再可供新客戶購買。 在我們的常見問題中深入瞭解。
Azure Active Directory B2C (Azure AD B2C) 自定義原則不僅可讓您強制使用者輸入,還能驗證它們。 您可以將使用者輸入的資料標示為必要的,例如<DisplayClaim ClaimTypeReferenceId="givenName" Required="true"/>,但這並不意味著您的使用者將輸入有效的資料。 Azure AD B2C 提供各種方法來驗證用戶輸入。 在本文中,您將瞭解如何撰寫自定義原則,以收集使用者輸入,並使用下列方法加以驗證:
提供要挑選的選項清單,以限制使用者輸入的數據。 此方法會使用 列舉值,您可以在宣告索賠時新增這些值。
定義使用者輸入必須相符的模式。 此方法使用正則表達式,您可以在宣告時新增此正則表達式。
定義一組規則,並要求使用者輸入遵守一或多個規則。 此方法使用謂詞,您可以在宣告索賠時新增。
使用特殊宣告類型 reenterPassword 來驗證使用者在使用者輸入集合期間正確重新輸入其密碼。
設定 驗證技術配置檔 ,定義無法在宣告宣告層級定義的複雜商務規則。 例如,您會收集使用者輸入,而該輸入必須針對另一個宣告中的某個值或一組值進行驗證。
先決條件
如果尚未擁有,請建立與您的 Azure 訂用帳戶連結的 Azure AD B2C 租戶。
您的計算機中必須安裝 Visual Studio Code (VS Code)。
完成 使用 Azure AD B2C 自定義原則收集和操控用戶輸入中的步驟。 本文是 建立及執行您自己的自定義原則作指南系列的一部分。
備註
本文是 Azure Active Directory B2C如何操作指南系列中創建並運行自訂策略的一部分。 建議您從第一篇文章開始此系列。
步驟 1 - 藉由限制使用者輸入選項來驗證使用者輸入
如果您知道使用者可以針對指定輸入輸入輸入的所有可能值,您可以提供使用者必須選取的有限值集。 您可以針對此目的使用 DropdownSingleSelect、 CheckboxMultiSelect 和 RadioSingleSelectUserInputType 。 在本文中,您將使用 RadioSingleSelect 輸入類型:
在 VS Code 中,開啟 檔案
ContosoCustomPolicy.XML。在
ClaimsSchema元素的ContosoCustomPolicy.XML檔案中,宣告下列宣告類型:<ClaimType Id="accountType"> <DisplayName>Account Type</DisplayName> <DataType>string</DataType> <UserHelpText>The type of account used by the user</UserHelpText> <UserInputType>RadioSingleSelect</UserInputType> <Restriction> <Enumeration Text="Contoso Employee Account" Value="work" SelectByDefault="true"/> <Enumeration Text="Personal Account" Value="personal" SelectByDefault="false"/> </Restriction> </ClaimType>我們已聲明 accountType 聲明。 當從使用者收集要求的值時,使用者必須為工作值選擇Contoso 員工帳戶,或為個人值選擇個人帳戶。
Azure AD B2C 也可讓您將原則納入不同的語言,並提供多種語言的帳戶類型限制。 如需詳細資訊,請參閱UI 的當地語系化和新增用戶屬性文章。
找出包含
Id="UserInformationCollector"的技術配置檔,並使用下列程式碼將 accountType 宣告新增為顯示宣告。<DisplayClaim ClaimTypeReferenceId="accountType" Required="true"/>在技術配置檔案
Id="UserInformationCollector"中,使用以下程式碼將accountType索賠新增為輸出索賠:<OutputClaim ClaimTypeReferenceId="accountType"/>若要在存取令牌中包含帳戶類型宣告,請找出
RelyingParty元素,使用下列程式代碼將 accountType 宣告新增為令牌宣告:<OutputClaim ClaimTypeReferenceId="accountType" />
步驟 2 - 使用正規表示式驗證使用者輸入
當無法事先知道所有可能的使用者輸入值時,您可以讓使用者自行輸入數據。 在此情況下,您可以使用 正規表示式 (regex) 或 模式 來決定使用者輸入的格式。 例如,電子郵件必須在其文字中包含(@)符號和句號(.)。
當您宣告一項權益時,自定義原則可讓您定義使用者輸入必須相符的正規表示式。 您可以選擇性地提供訊息,如果訊息的輸入不符合表達式,則會向用戶顯示。
找到
ClaimsSchema元素,並使用以下程式碼宣告電子郵件宣告。<ClaimType Id="email"> <DisplayName>Email Address</DisplayName> <DataType>string</DataType> <DefaultPartnerClaimTypes> <Protocol Name="OpenIdConnect" PartnerClaimType="email"/> </DefaultPartnerClaimTypes> <UserHelpText>Your email address. </UserHelpText> <UserInputType>TextBox</UserInputType> <Restriction> <Pattern RegularExpression="^[a-zA-Z0-9.!#$%&'^_`{}~-]+@[a-zA-Z0-9-]+(?:\.[a-zA-Z0-9-]+)*$" HelpText="Please enter a valid email address something like maurice@contoso.com"/> </Restriction> </ClaimType>使用以下代碼定位具有
Id="UserInformationCollector"的技術設定檔,將 電子郵件 宣告新增為顯示宣告:<DisplayClaim ClaimTypeReferenceId="email" Required="true"/>在 具有
Id="UserInformationCollector"的技術設定檔中,使用下列程式代碼,將 電子郵件 宣告新增為輸出宣告:<OutputClaim ClaimTypeReferenceId="email"/>請定位
RelyingParty元件,並使用下列程式碼將電子郵件新增為標記宣告:<OutputClaim ClaimTypeReferenceId="email" />
步驟 3 - 使用述詞驗證使用者輸入
您已使用 regex 來驗證使用者輸入。 不過,regex 有一個弱點,就是在您更正輸入之前,錯誤訊息會顯示,但不會指出您輸入缺少的具體要求。
述詞驗證可讓您藉由定義一組規則(述詞)和每個規則的獨立錯誤訊息,來解決此問題。 在自訂政策中,條件包含一個內建方法,用來定義您想要執行的檢查。 例如,您可以使用 IsLengthRange 述詞方法來檢查用戶 密碼 是否在指定之最小和最大參數(值)的範圍內。
當 述詞 定義驗證以針對宣告類型進行檢查時, PredicateValidations 會將一組述詞分組,以形成可套用至宣告類型的使用者輸入驗證。 例如,您可以建立驗證述詞群組,以驗證密碼的不同類型的允許字元。
Predicates 和 PredicateValidations 元素都是原則檔案的BuildingBlocks區段的子元素。
ClaimsSchema找出 元素,並使用下列程式代碼宣告密碼宣告:<ClaimType Id="password"> <DisplayName>Password</DisplayName> <DataType>string</DataType> <AdminHelpText>Enter password</AdminHelpText> <UserHelpText>Enter password</UserHelpText> <UserInputType>Password</UserInputType> </ClaimType>使用以下程式碼,將
Predicates元素新增為BuildingBlocks區段的子元素。 您將Predicates元素新增在ClaimsSchema元素的下方。<Predicates> </Predicates>在
Predicates元素內,使用下列程式代碼定義謂詞:<Predicate Id="IsLengthBetween8And64" Method="IsLengthRange" HelpText="The password must be between 8 and 64 characters."> <Parameters> <Parameter Id="Minimum">8</Parameter> <Parameter Id="Maximum">64</Parameter> </Parameters> </Predicate> <Predicate Id="Lowercase" Method="IncludesCharacters" HelpText="a lowercase letter"> <Parameters> <Parameter Id="CharacterSet">a-z</Parameter> </Parameters> </Predicate> <Predicate Id="Uppercase" Method="IncludesCharacters" HelpText="an uppercase letter"> <Parameters> <Parameter Id="CharacterSet">A-Z</Parameter> </Parameters> </Predicate> <Predicate Id="Number" Method="IncludesCharacters" HelpText="a digit"> <Parameters> <Parameter Id="CharacterSet">0-9</Parameter> </Parameters> </Predicate> <Predicate Id="Symbol" Method="IncludesCharacters" HelpText="a symbol"> <Parameters> <Parameter Id="CharacterSet">@#$%^&*\-_+=[]{}|\\:',.?/`~"();!</Parameter> </Parameters> </Predicate> <Predicate Id="PIN" Method="MatchesRegex" HelpText="The password must be numbers only."> <Parameters> <Parameter Id="RegularExpression">^[0-9]+$</Parameter> </Parameters> </Predicate> <Predicate Id="AllowedCharacters" Method="MatchesRegex" HelpText="An invalid character was provided."> <Parameters> <Parameter Id="RegularExpression">(^([0-9A-Za-z\d@#$%^&*\-_+=[\]{}|\\:',?/`~"();! ]|(\.(?!@)))+$)|(^$)</Parameter> </Parameters> </Predicate> <Predicate Id="DisallowedWhitespace" Method="MatchesRegex" HelpText="The password must not begin or end with a whitespace character."> <Parameters> <Parameter Id="RegularExpression">(^\S.*\S$)|(^\S+$)|(^$)</Parameter> </Parameters> </Predicate>我們定義了幾個規則,組合在一起後描述了一個可接受的密碼。 接下來,您可以將述詞分組,以形成一組可在政策中使用的密碼政策。
使用以下程式碼,將
PredicateValidations元素新增為BuildingBlocks區段的子元素。 您將PredicateValidations元素新增為BuildingBlocks區段的子系,但要放在Predicates元素的下方。<PredicateValidations> </PredicateValidations>在
PredicateValidations元素內,使用下列程式代碼定義 PredicateValidations:<PredicateValidation Id="SimplePassword"> <PredicateGroups> <PredicateGroup Id="DisallowedWhitespaceGroup"> <PredicateReferences> <PredicateReference Id="DisallowedWhitespace"/> </PredicateReferences> </PredicateGroup> <PredicateGroup Id="AllowedCharactersGroup"> <PredicateReferences> <PredicateReference Id="AllowedCharacters"/> </PredicateReferences> </PredicateGroup> <PredicateGroup Id="LengthGroup"> <PredicateReferences> <PredicateReference Id="IsLengthBetween8And64"/> </PredicateReferences> </PredicateGroup> </PredicateGroups> </PredicateValidation> <PredicateValidation Id="StrongPassword"> <PredicateGroups> <PredicateGroup Id="DisallowedWhitespaceGroup"> <PredicateReferences> <PredicateReference Id="DisallowedWhitespace"/> </PredicateReferences> </PredicateGroup> <PredicateGroup Id="AllowedCharactersGroup"> <PredicateReferences> <PredicateReference Id="AllowedCharacters"/> </PredicateReferences> </PredicateGroup> <PredicateGroup Id="LengthGroup"> <PredicateReferences> <PredicateReference Id="IsLengthBetween8And64"/> </PredicateReferences> </PredicateGroup> <PredicateGroup Id="CharacterClasses"> <UserHelpText>The password must have at least 3 of the following:</UserHelpText> <PredicateReferences MatchAtLeast="3"> <PredicateReference Id="Lowercase"/> <PredicateReference Id="Uppercase"/> <PredicateReference Id="Number"/> <PredicateReference Id="Symbol"/> </PredicateReferences> </PredicateGroup> </PredicateGroups> </PredicateValidation> <PredicateValidation Id="CustomPassword"> <PredicateGroups> <PredicateGroup Id="DisallowedWhitespaceGroup"> <PredicateReferences> <PredicateReference Id="DisallowedWhitespace"/> </PredicateReferences> </PredicateGroup> <PredicateGroup Id="AllowedCharactersGroup"> <PredicateReferences> <PredicateReference Id="AllowedCharacters"/> </PredicateReferences> </PredicateGroup> </PredicateGroups> </PredicateValidation>我們有三個定義的述詞驗證、StrongPassword、CustomPassword 和 SimplePassword。 視您希望使用者輸入密碼的特性而定,您可以使用任何述詞驗證方法。 在本文中,我們將使用強密碼。
找出 密碼 宣告形式,然後使用下列程式碼在它所包含的 UserInputType 元素宣告之後,新增 StrongPassword 述詞驗證:
<PredicateValidationReference Id="StrongPassword" />找出具有
Id="UserInformationCollector"的技術配置檔,使用下列程式代碼,將 密碼 宣告設為顯示宣告:<DisplayClaim ClaimTypeReferenceId="password" Required="true"/>在 具有
Id="UserInformationCollector"的技術設定檔中,使用下列程式代碼,將 密碼 宣告新增為輸出宣告:<OutputClaim ClaimTypeReferenceId="password"/>
備註
基於安全性考慮,我們不會將用戶的密碼新增為規則所產生令牌中的宣告。 因此,我們不會將密碼宣告新增至信賴方元素。
步驟 4 - 驗證密碼並確認密碼
您可以要求使用者輸入其密碼兩次,以確認使用者記住他們輸入的密碼。 在此情況下,您必須檢查兩個項目的值是否匹配。 自定義原則可讓您輕鬆達成此需求。 宣告類型 密碼 和 reenterPassword 會被視為特殊,因此當他們用來收集使用者輸入時,UI 會驗證使用者是否已正確重新輸入其密碼。
使用下列步驟來驗證自定義原則中的密碼重新輸入:
在您的
ClaimsSchema檔案區ContosoCustomPolicy.XML段中,使用下列程式碼在密碼宣告之後宣告reenterPassword:<ClaimType Id="reenterPassword"> <DisplayName>Confirm new password</DisplayName> <DataType>string</DataType> <AdminHelpText>Confirm new password</AdminHelpText> <UserHelpText>Reenter password</UserHelpText> <UserInputType>Password</UserInputType> </ClaimType>若要從使用者收集密碼確認輸入,請找出
UserInformationCollector自我聲明技術設定檔,使用下列程式代碼將 reenterPassword 宣告新增為顯示宣告:<DisplayClaim ClaimTypeReferenceId="reenterPassword" Required="true"/>在您的
ContosoCustomPolicy.XML檔案中,找出UserInformationCollector自我聲明的技術配置檔案,使用下列程式碼,將 reenterPassword 宣告新增為輸出宣告:<OutputClaim ClaimTypeReferenceId="reenterPassword"/>
步驟 5 - 上傳自定義原則檔案
此時,您已建置原則來解決使用者輸入驗證的前三種方法。
請遵循 上傳自定義原則檔案中的步驟。 如果您要上傳與入口網站中已有的檔案同名的檔案,請確認選取 [如果檔案已存在,則覆寫自訂策略]。
步驟 6 - 測試自定義原則
在 自訂政策 底下,選擇 B2C_1A_CONTOSOCUSTOMPOLICY。
在自定義政策的概觀頁面中,針對選取應用程式,請選擇您先前註冊的網頁應用程式,例如webapp1。 請確定 [ 選擇取回覆 URL ] 值已設定為
https://jwt.ms。選取 [ 立即執行] 按鈕。
輸入指定名稱和姓氏。
選取 [帳戶類型]。
針對 [電子郵件位址],輸入格式不正確的電子郵件值,例如 maurice@contoso。
針對 [密碼],輸入密碼值,該值不符合設定的強密碼的所有特性。
選取 [ 繼續] 按鈕。 您會看到類似如下所示的畫面:

您必須先更正輸入,才能繼續。
輸入錯誤訊息所建議的正確值,然後再次選取 [ 繼續] 按鈕。 原則完成執行之後,系統會將您重新導向至
https://jwt.ms,您會看到已譯碼的 JWT。 此令牌看起來類似下列 JWT 片段:
    {
      "typ": "JWT",
      "alg": "RS256",
      "kid": "pxLOMWFg...."
    }.{
      ...
      "sub": "c7ae4515-f7a7....",
      ...
      "acr": "b2c_1a_contosocustompolicy",
      "accountType": "work",
      ...
      "email": "maurice@contoso.com",
      "name": "Maurice Paulet",
      "message": "Hello Maurice Paulet"
    }.[Signature]
步驟 7 - 使用驗證技術配置文件驗證使用者輸入
我們在步驟 1、步驟 2 和步驟 3 中使用的驗證技術不適用於所有案例。 如果您的商務規則過於複雜,無法在宣告層級中定義,您可以設定驗證技術,然後從Self-Asserted 技術設定檔呼叫它。
備註
只有自我聲稱的技術配置檔可以使用驗證技術配置檔。 深入瞭解 驗證技術設定檔
案例概觀
我們需要,如果使用者的 帳戶類型 是 Contoso 員工帳戶,我們必須確定其電子郵件網域是以一組預先定義的網域為基礎。 這些網域是 contoso.com、fabrikam.com 和 woodgrove.com。 否則,我們會向用戶顯示錯誤,直到他們使用有效的 Contoso 員工帳戶 或切換至 個人帳戶為止。
使用下列步驟,瞭解如何使用驗證技術配置文件來驗證用戶輸入。 您可以使用宣告轉換類型驗證技術配置檔,但您也可以呼叫 REST API 服務來驗證數據,因為您稍後會在本系列中瞭解。
在您的
ClaimsSchema檔案區ContosoCustomPolicy.XML段中,使用下列程式代碼宣告 網域 和 domainStatus 宣告:<ClaimType Id="domain"> <DataType>string</DataType> </ClaimType> <ClaimType Id="domainStatus"> <DataType>string</DataType> </ClaimType>找出區段
ClaimsTransformations,並使用下列程式碼設定宣告轉換:<ClaimsTransformation Id="GetDomainFromEmail" TransformationMethod="ParseDomain"> <InputClaims> <InputClaim ClaimTypeReferenceId="email" TransformationClaimType="emailAddress"/> </InputClaims> <OutputClaims> <OutputClaim ClaimTypeReferenceId="domain" TransformationClaimType="domain"/> </OutputClaims> </ClaimsTransformation> <ClaimsTransformation Id="LookupDomain" TransformationMethod="LookupValue"> <InputClaims> <InputClaim ClaimTypeReferenceId="domain" TransformationClaimType="inputParameterId"/> </InputClaims> <InputParameters> <InputParameter Id="contoso.com" DataType="string" Value="valid"/> <InputParameter Id="fabrikam.com" DataType="string" Value="valid"/> <InputParameter Id="woodgrove.com" DataType="string" Value="valid"/> <InputParameter Id="errorOnFailedLookup" DataType="boolean" Value="true"/> </InputParameters> <OutputClaims> <OutputClaim ClaimTypeReferenceId="domainStatus" TransformationClaimType="outputClaim"/> </OutputClaims> </ClaimsTransformation>GetDomainFromEmail 宣告轉換會使用 ParseDomain 方法從電子郵件擷取網域,並將其儲存在網域宣告中。 LookupDomain 宣告轉換使用擷取的網域核對其在預先定義的網域列表中是否有效,然後將有效指派給domainStatus 宣告。
使用下列程式代碼,在與
Id=UserInformationCollector的技術配置檔相同的宣告提供者中新增技術配置檔。<TechnicalProfile Id="CheckCompanyDomain"> <DisplayName>Check Company validity </DisplayName> <Protocol Name="Proprietary" Handler="Web.TPEngine.Providers.ClaimsTransformationProtocolProvider, Web.TPEngine, Version=1.0.0.0, Culture=neutral, PublicKeyToken=null"/> <InputClaimsTransformations> <InputClaimsTransformation ReferenceId="GetDomainFromEmail"/> </InputClaimsTransformations> <OutputClaims> <OutputClaim ClaimTypeReferenceId="domain"/> </OutputClaims> <OutputClaimsTransformations> <OutputClaimsTransformation ReferenceId="LookupDomain"/> </OutputClaimsTransformations> </TechnicalProfile>我們已宣告聲明轉換技術配置檔,其會執行 GetDomainFromEmail 和 LookupDomain 聲明轉換。
使用下列程式碼來定位具有
Id=UserInformationCollector的技術設定檔,並確保ValidationTechnicalProfile緊接在OutputClaims元素之後:<ValidationTechnicalProfiles> <ValidationTechnicalProfile ReferenceId="CheckCompanyDomain"> <Preconditions> <Precondition Type="ClaimEquals" ExecuteActionsIf="false"> <Value>accountType</Value> <Value>work</Value> <Action>SkipThisValidationTechnicalProfile</Action> </Precondition> </Preconditions> </ValidationTechnicalProfile> </ValidationTechnicalProfiles>我們已將驗證技術配置檔新增至 UserInformationCollector 自我聲明技術配置檔。 只有在 accountType 值不等於 工作時,才會略過技術配置檔。 如果技術配置檔執行,且電子郵件網域無效,則會發生錯誤。
找到具有
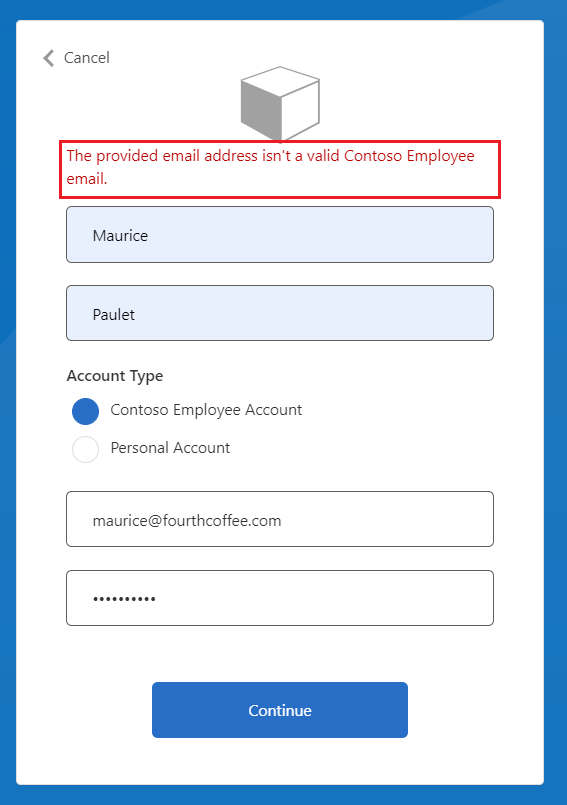
Id=UserInformationCollector的技術配置檔,並在metadata標記內新增以下程式碼。<Item Key="LookupNotFound">The provided email address isn't a valid Contoso Employee email.</Item>我們已設定自定義錯誤,以防使用者未使用有效的電子郵件。
請遵循 上傳自定義原則檔案 中的指示來上傳您的原則檔案。
請遵循 步驟 6 中的指示來測試您的自訂原則:
- 針對 [帳戶類型],選取 [Contoso 員工帳戶]
- 針對 [電子郵件位址],輸入無效的電子郵件位址,例如 maurice@fourthcoffee.com。
- 視需要輸入其餘詳細數據,然後選取 [ 繼續]
由於 maurice@fourthcoffee.com 不是有效的電子郵件,因此您會看到類似以下螢幕快照所示的錯誤。 您必須使用有效的電子郵件位址,才能成功執行自定義原則並接收 JWT。

相關內容
了解 驗證技術配置檔。