在通話期間管理視訊
了解如何使用 Azure 通訊服務 SDK 管理視訊通話。 我們將了解如何在通話內管理視訊的接收和傳送。
必要條件
- 具有有效訂用帳戶的 Azure 帳戶。 免費建立帳戶。
- 已部署通訊服務資源。 建立通訊服務資源。
- 用來啟用呼叫用戶端的使用者存取權杖。 如需詳細資訊,請參閱建立和管理存取權杖。
- 選擇性:完成快速入門以將語音通話新增至您的應用程式
安裝 SDK
使用 npm install 命令,安裝適用於 JavaScript 的 Azure 通訊服務通用和通話 SDK:
npm install @azure/communication-common --save
npm install @azure/communication-calling --save
初始化必要的物件
大部分通話作業都需要 CallClient 執行個體。 當您建立新的 CallClient 執行個體時,您可以使用自訂選項加以設定,如同 Logger 執行個體一樣。
使用 CallClient 執行個體,您可以藉由呼叫 createCallAgent 來建立 CallAgent 執行個體。 此方法會以非同步的方式傳回 CallAgent 執行個體物件。
createCallAgent 方法會使用 CommunicationTokenCredential 作為引數。 其接受使用者存取權杖。
您可以使用 CallClient 執行個體上的 getDeviceManager 方法來存取 deviceManager。
const { CallClient } = require('@azure/communication-calling');
const { AzureCommunicationTokenCredential} = require('@azure/communication-common');
const { AzureLogger, setLogLevel } = require("@azure/logger");

// Set the logger's log level
setLogLevel('verbose');

// Redirect log output to console, file, buffer, REST API, or whatever location you want
AzureLogger.log = (...args) => {
    console.log(...args); // Redirect log output to console
};

const userToken = '<USER_TOKEN>';
callClient = new CallClient(options);
const tokenCredential = new AzureCommunicationTokenCredential(userToken);
const callAgent = await callClient.createCallAgent(tokenCredential, {displayName: 'optional Azure Communication Services user name'});
const deviceManager = await callClient.getDeviceManager()
如何最好地管理與 Microsoft 基礎結構的 SDK 連線
Call Agent 執行個體可協助您管理通話 (加入或啟動通話)。 若要運作,您的通話 SDK 必須連線到 Microsoft 基礎結構以取得來電通知,並協調其他通話詳細資料。 您的 Call Agent 有兩種可能的狀態:
已連線 - Connected 的 Call Agent connectionStatue 值表示用戶端 SDK 已連線且能夠接收來自 Microsoft 基礎結構的通知。
已中斷連線 - Disconnected 狀態的 Call Agent connectionStatue 值指出有問題導致 SDK 無法正確連線。 Call Agent 應該重新建立。
invalidToken:如果權杖已過期或無效,Call Agent執行個體會中斷連線,並出現此錯誤。connectionIssue:如果用戶端連線到 Microsoft 基礎結構時發生問題,在多次重試之後,Call Agent會公開connectionIssue錯誤。
您可以藉由檢查 connectionState 屬性的目前值,檢查本機 Call Agent 是否已連線到 Microsoft 基礎結構。 在作用中通話期間,您可以接聽 connectionStateChanged 事件,以判斷 Call Agent 是否從已連線變更為已中斷連線狀態。
const connectionState = callAgentInstance.connectionState;
console.log(connectionState); // it may return either of 'Connected' | 'Disconnected'

const connectionStateCallback = (args) => {
    console.log(args); // it will return an object with oldState and newState, each of having a value of either of 'Connected' | 'Disconnected'
    // it will also return reason, either of 'invalidToken' | 'connectionIssue'
}
callAgentInstance.on('connectionStateChanged', connectionStateCallback);
裝置管理
若要開始搭配使用視訊與通話 SDK,您必須能夠管理裝置。 裝置可讓您控制要將音訊和視訊傳輸至通話的項目。
透過 deviceManager,您可以列舉可在通話中傳輸音訊和視訊串流的本機裝置。 您也可以使用 deviceManager 來要求權限,以存取本機裝置的麥克風和相機。
您可以呼叫 callClient.getDeviceManager() 方法來存取 deviceManager:
const deviceManager = await callClient.getDeviceManager();
取得本機裝置
若要存取本機裝置,可以使用 deviceManager 列舉方法 getCameras() 和 getMicrophones。 這些方法是非同步動作。
//  Get a list of available video devices for use.
const localCameras = await deviceManager.getCameras(); // [VideoDeviceInfo, VideoDeviceInfo...]

// Get a list of available microphone devices for use.
const localMicrophones = await deviceManager.getMicrophones(); // [AudioDeviceInfo, AudioDeviceInfo...]

// Get a list of available speaker devices for use.
const localSpeakers = await deviceManager.getSpeakers(); // [AudioDeviceInfo, AudioDeviceInfo...]
設定預設裝置
一旦您知道可以使用哪些裝置,則可以設定麥克風、喇叭和相機的預設裝置。 如果未設定用戶端的預設值,通訊服務 SDK 會使用作業系統的預設值。
麥克風
存取使用的裝置
// Get the microphone device that is being used.
const defaultMicrophone = deviceManager.selectedMicrophone;
設定要使用的裝置
// Set the microphone device to use.
await deviceManager.selectMicrophone(localMicrophones[0]);
演講者
存取使用的裝置
// Get the speaker device that is being used.
const defaultSpeaker = deviceManager.selectedSpeaker;
設定要使用的裝置
// Set the speaker device to use.
await deviceManager.selectSpeaker(localSpeakers[0]);
相機
存取使用的裝置
// Get the camera device that is being used.
const defaultSpeaker = deviceManager.selectedSpeaker;
設定要使用的裝置
// Set the speaker device to use.
await deviceManager.selectSpeaker(localCameras[0]);
每個 CallAgent 都可以在其相關聯的 DeviceManager 上選擇自己的麥克風和喇叭。 建議不同的 CallAgents 使用不同的麥克風和喇叭。 它們不應共用相同的麥克風和喇叭。 如果發生共享,則可能會觸發面相使用者的麥克風診斷,而導致麥克風停止運作 (具體視瀏覽器/作業系統而定)。
本機視訊串流
若要能夠在通話中傳送視訊,則必須建立 LocalVideoStream 物件。
const localVideoStream = new LocalVideoStream(camera);
作為參數傳遞的相機是 deviceManager.getCameras() 方法傳回的其中一個 VideoDeviceInfo 物件。
LocalVideoStream 具有下列屬性:
source:裝置資訊。
const source = localVideoStream.source;
mediaStreamType:可以是Video、ScreenSharing或RawMedia。
const type: MediaStreamType = localVideoStream.mediaStreamType;
本機相機預覽
您可以使用 deviceManager 和 VideoStreamRenderer 開始從本機相機轉譯串流。
建立 LocalVideoStream 之後,即可將其用來設定 VideoStreamRenderer。 建立 VideoStreamRenderer 之後,會呼叫其 createView() 方法,以取得可做為子系新增至頁面的檢視。
此串流不會傳送給其他參與者;其為本機預覽摘要。
// To start viewing local camera preview
const cameras = await deviceManager.getCameras();
const camera = cameras[0];
const localVideoStream = new LocalVideoStream(camera);
const videoStreamRenderer = new VideoStreamRenderer(localVideoStream);
const view = await videoStreamRenderer.createView();
htmlElement.appendChild(view.target);
停止本機預覽
若要停止本機預覽呼叫,請處置衍生自 VideoStreamRenderer 的檢視。
處置 VideoStreamRenderer 之後,請從包含預覽的 DOM 節點呼叫 removeChild() 方法,來從 HTML 樹狀結構移除檢視。
// To stop viewing local camera preview
view.dispose();
htmlElement.removeChild(view.target);
要求相機和麥克風的權限
應用程式無法在沒有權限的情況下使用相機或麥克風。 您可以使用 deviceManager 來提示使用者授與相機和/或麥克風權限:
const result = await deviceManager.askDevicePermission({audio: true, video: true});
一旦解決承諾之後,該方法會傳回一個 DeviceAccess 物件,來指出是否授與 audio 和 video 權限:
console.log(result.audio);
console.log(result.video);
備註
- 視訊裝置插入/拔除時會引發
videoDevicesUpdated事件。 - 音訊裝置插入時會引發
audioDevicesUpdated事件。 - 建立 DeviceManager 後,如果尚未授與權限,則一開始將無法辨識任何裝置,因此其裝置清單起初會是空白的,並且不包含詳細的裝置資訊。 如果我們後續呼叫 DeviceManager.askPermission() API,系統會提示使用者提供裝置存取權。 如果使用者按一下 [允許] 以授與裝置管理員了解系統上的裝置的存取權限時,請更新其裝置清單,然後發出 'audioDevicesUpdated' 和 'videoDevicesUpdated' 事件。 如果使用者重新整理頁面並建立裝置管理員,裝置管理員即能夠辨識裝置,因為使用者先前已授與存取權。 其一開始已填滿裝置清單,且不會發出 'audioDevicesUpdated' 或 'videoDevicesUpdated' 事件。
- Android Chrome、iOS Safari 和 macOS Safari 均不支援列舉/選取喇叭。
使用視訊相機撥打電話
重要
目前僅支援一個傳出本機視訊串流。
若要撥打視訊通話,您必須在 deviceManager 中使用 getCameras() 方法來列舉本機相機。
選取相機之後,請使用它來建構 LocalVideoStream 執行個體。
在 videoOptions 內將其作為 localVideoStream 陣列內的項目傳遞到 CallAgent startCall 方法。
const deviceManager = await callClient.getDeviceManager();
const cameras = await deviceManager.getCameras();
const camera = cameras[0]
const localVideoStream = new LocalVideoStream(camera);
const placeCallOptions = {videoOptions: {localVideoStreams:[localVideoStream]}};
const userCallee = { communicationUserId: '<ACS_USER_ID>' }
const call = callAgent.startCall([userCallee], placeCallOptions);
- 您也可以使用
CallAgent.join()API 加入視訊通話,並使用Call.Accept()API 接受和進行視訊通話。 - 通話連接成功時,便會自動開始從選取的相機傳送視訊串流給其他參與者。
在通話時開始和停止傳送本機視訊
啟動視訊
若要在通話時開始視訊,您必須在 deviceManager 物件上使用 getCameras 方法來列舉相機。
然後使用所需的相機建立新的 LocalVideoStream 執行個體,再將 LocalVideoStream 物件傳遞至現有通話物件的 startVideo 方法:
const deviceManager = await callClient.getDeviceManager();
const cameras = await deviceManager.getCameras();
const camera = cameras[0]
const localVideoStream = new LocalVideoStream(camera);
await call.startVideo(localVideoStream);
停止視訊
成功開始傳送視訊後,將會在通話執行個體上的 localVideoStreams 集合中新增 Video 類型的 LocalVideoStream 執行個體。
在 Call 物件中尋找視訊串流
const localVideoStream = call.localVideoStreams.find( (stream) => { return stream.mediaStreamType === 'Video'} );
停止本機視訊:若要在呼叫時停止本機視 訊,請將用於視訊的 localVideoStream 執行個體傳遞至 Call 的 stopVideo 方法:
await call.stopVideo(localVideoStream);
透過在該 LocalVideoStream 執行個體上叫用 switchSource,可以在具有活動 LocalVideoStream 的同時切換至不同的相機裝置:
const cameras = await callClient.getDeviceManager().getCameras();
const camera = cameras[1];
localVideoStream.switchSource(camera);
如果指定的視訊裝置無法使用:
- 在通話時,如果您關閉視訊,並使用
call.startVideo()啟動視訊,此方法將會擲回SourceUnavailableError,且cameraStartFailed使用者面向診斷會設定為 true。 - 呼叫
localVideoStream.switchSource()方法會導致cameraStartFailed設定為 True。 我們的通話診斷指南會提供其他有關如何診斷通話相關問題的資訊。
若要確認本機視訊是開啟或關閉狀態,可以使用 Call 方法 isLocalVideoStarted,該方法會傳回 True 或 False:
// Check if local video is on or off
call.isLocalVideoStarted;
若要接聽本機視訊的變更,您可以訂閱和取消訂閱 isLocalVideoStartedChanged 事件:
// Subscribe to local video event
call.on('isLocalVideoStartedChanged', () => {
    // Callback();
});
// Unsubscribe from local video event
call.off('isLocalVideoStartedChanged', () => {
    // Callback();
});
在通話時開始和停止螢幕共用
若要在通話期間開始螢幕畫面分享,可以在 Call 物件上使用非同步方法 startScreenSharing():
開始螢幕畫面分享
// Start screen sharing
await call.startScreenSharing();
注意:僅桌面瀏覽器支援傳送螢幕畫面分享。
在 LocalVideoStream 集合中尋找螢幕畫面分享
在成功啟動傳送螢幕共用之後,類型 ScreenSharing 的 LocalVideoStream 執行個體就會新增至通話執行個體上的 localVideoStreams 集合。
const localVideoStream = call.localVideoStreams.find( (stream) => { return stream.mediaStreamType === 'ScreenSharing'} );
停止螢幕畫面分享
若要在通話期間停止螢幕共用,您可以使用非同步 API stoptScreenSharing:
// Stop screen sharing
await call.stopScreenSharing();
檢查螢幕畫面分享狀態
若要確認螢幕共用是開啟還是關閉,您可以使用 isScreenSharingOn API,傳回 true 或 false:
// Check if screen sharing is on or off
call.isScreenSharingOn;
若要接聽螢幕共用的變更,您可以訂閱和取消訂閱 isScreenSharingOnChanged 事件:
// Subscribe to screen share event
call.on('isScreenSharingOnChanged', () => {
    // Callback();
});
// Unsubscribe from screen share event
call.off('isScreenSharingOnChanged', () => {
    // Callback();
});
重要
此 Azure 通訊服務功能目前處於預覽狀態。
提供的預覽 API 和 SDK 並無服務等級協定。 建議您不要將其用於生產工作負載。 部分功能可能不受支援,或是在功能上有所限制。
如需詳細資訊,請檢閱 Microsoft Azure 預覽版補充使用規定。
本機螢幕共用預覽處於公開預覽狀態,並且在 1.15.1-beta.1+ 版中提供。
本機螢幕共用預覽
您可以使用 VideoStreamRenderer 從本機螢幕畫面分享開始轉譯串流,以便查看以螢幕畫面分享串流的形式傳送的內容。
// To start viewing local screen share preview
await call.startScreenSharing();
const localScreenSharingStream = call.localVideoStreams.find( (stream) => { return stream.mediaStreamType === 'ScreenSharing' });
const videoStreamRenderer = new VideoStreamRenderer(localScreenSharingStream);
const view = await videoStreamRenderer.createView();
htmlElement.appendChild(view.target);

// To stop viewing local screen share preview.
await call.stopScreenSharing();
view.dispose();
htmlElement.removeChild(view.target);

// Screen sharing can also be stoped by clicking on the native browser's "Stop sharing" button.
// The isScreenSharingOnChanged event will be triggered where you can check the value of call.isScreenSharingOn.
// If the value is false, then that means screen sharing is turned off and so we can go ahead and dispose the screen share preview.
// This event is also triggered for the case when stopping screen sharing via Call.stopScreenSharing() API.
call.on('isScreenSharingOnChanged', () => {
    if (!call.isScreenSharingOn) {
        view.dispose();
        htmlElement.removeChild(view.target);
    }
});
轉譯遠程參與者視訊/螢幕共用串流
若要轉譯遠端參與者視訊或螢幕畫面分享,第一步是取得要轉譯的 RemoteVideoStream 的參考。
這可以透過 RemoteParticipant 的數位或視訊串流 (videoStreams) 來完成。 透過 Call 物件,可存取遠端參與者集合。
const remoteVideoStream = call.remoteParticipants[0].videoStreams[0];
const streamType = remoteVideoStream.mediaStreamType;
若要轉譯 RemoteVideoStream,您必須訂閱其 isAvailableChanged 事件。 如果 isAvailable 屬性變更為 true,則是遠端參與者在傳送視訊串流。
在發生此情況後,建立新的 VideoStreamRenderer 執行個體,然後使用非同步的 createView 方法建立新的 VideoStreamRendererView 執行個體。
接著,您可以將 view.target 連結至任何 UI 元素。
每當遠端串流的可用性變更時,可以終結整個 VideoStreamRenderer 或特定的 VideoStreamRendererView。
如果您決定加以保留,則檢視會顯示空白視訊畫面。
// Reference to the html's div where we would display a grid of all remote video stream from all participants.
let remoteVideosGallery = document.getElementById('remoteVideosGallery');

subscribeToRemoteVideoStream = async (remoteVideoStream) => {
    let renderer = new VideoStreamRenderer(remoteVideoStream);
    let view;
    let remoteVideoContainer = document.createElement('div');
    remoteVideoContainer.className = 'remote-video-container';

    let loadingSpinner = document.createElement('div');
    // See the css example below for styling the loading spinner.
    loadingSpinner.className = 'loading-spinner';
    remoteVideoStream.on('isReceivingChanged', () => {
        try {
            if (remoteVideoStream.isAvailable) {
                const isReceiving = remoteVideoStream.isReceiving;
                const isLoadingSpinnerActive = remoteVideoContainer.contains(loadingSpinner);
                if (!isReceiving && !isLoadingSpinnerActive) {
                    remoteVideoContainer.appendChild(loadingSpinner);
                } else if (isReceiving && isLoadingSpinnerActive) {
                    remoteVideoContainer.removeChild(loadingSpinner);
                }
            }
        } catch (e) {
            console.error(e);
        }
    });

    const createView = async () => {
        // Create a renderer view for the remote video stream.
        view = await renderer.createView();
        // Attach the renderer view to the UI.
        remoteVideoContainer.appendChild(view.target);
        remoteVideosGallery.appendChild(remoteVideoContainer);
    }

    // Remote participant has switched video on/off
    remoteVideoStream.on('isAvailableChanged', async () => {
        try {
            if (remoteVideoStream.isAvailable) {
                await createView();
            } else {
                view.dispose();
                remoteVideosGallery.removeChild(remoteVideoContainer);
            }
        } catch (e) {
            console.error(e);
        }
    });

    // Remote participant has video on initially.
    if (remoteVideoStream.isAvailable) {
        try {
            await createView();
        } catch (e) {
            console.error(e);
        }
    }

    console.log(`Initial stream size: height: ${remoteVideoStream.size.height}, width: ${remoteVideoStream.size.width}`);
    remoteVideoStream.on('sizeChanged', () => {
        console.log(`Remote video stream size changed: new height: ${remoteVideoStream.size.height}, new width: ${remoteVideoStream.size.width}`);
    });
}
用於設定遠端視訊串流上載入微調按鈕樣式的 CSS。
.remote-video-container {
   position: relative;
}
.loading-spinner {
   border: 12px solid #f3f3f3;
   border-radius: 50%;
   border-top: 12px solid #ca5010;
   width: 100px;
   height: 100px;
   -webkit-animation: spin 2s linear infinite; /* Safari */
   animation: spin 2s linear infinite;
   position: absolute;
   margin: auto;
   top: 0;
   bottom: 0;
   left: 0;
   right: 0;
   transform: translate(-50%, -50%);
}
@keyframes spin {
   0% { transform: rotate(0deg); }
   100% { transform: rotate(360deg); }
}
/* Safari */
@-webkit-keyframes spin {
   0% { -webkit-transform: rotate(0deg); }
   100% { -webkit-transform: rotate(360deg); }
}
遠端視訊品質
從 1.15.1 版開始,Azure 通訊服務 WebJS SDK 提供了名為最佳視訊計數 (OVC) 的功能。
這項功能可在執行階段用來通知應用程式,在群組通話 (2 個以上的參與者) 中的指定時間點可用最佳方式轉譯多少個來自不同參與者的傳入視訊。
這項功能會根據本機端點的網路和硬體功能,公開在通話期間動態變更的屬性 optimalVideoCount。 optimalVideoCount 的值詳盡指出了不同參與者應用程式中在指定的時間點應轉譯的視訊數量。 應用程式應根據建議處理這些變更,並更新轉譯的視訊數目。 每次更新之間都有一個防抖期間 (大約 10 秒)。
用法:optimalVideoCount 功能是一個通話功能。 您必須透過 feature 物件的 Call 方法參考功能 OptimalVideoCount。 接著,可以透過 OptimalVideoCountCallFeature 的 on 方法來設定接聽程式,以在 optimalVideoCount 發生變更時收到通知。 若要取消訂閱變更,可以呼叫 off 方法。 目前可轉譯的傳入視訊的數量上限為 16。 為了正確支援 16 個傳入的視訊,電腦應至少有 16GB RAM 和一個 4 核心且使用不超過 3 年的更大的 CPU。
const optimalVideoCountFeature = call.feature(Features.OptimalVideoCount);
optimalVideoCountFeature.on('optimalVideoCountChanged', () => {
    const localOptimalVideoCountVariable = optimalVideoCountFeature.optimalVideoCount;
})
範例使用方式:應用程式應訂閱群組通話中最佳視訊計數的變更。 可以透過建立新的轉譯器 (createView 方法),或者處置檢視 (dispose) 並據以更新應用程式配置來處理最佳視訊數量的變更。
遠端視訊串流屬性
遠端視訊串流具有下列屬性:
const id: number = remoteVideoStream.id;
id:遠端視訊串流的識別碼。
const type: MediaStreamType = remoteVideoStream.mediaStreamType;
mediaStreamType:可以是Video或ScreenSharing。
const isAvailable: boolean = remoteVideoStream.isAvailable;
isAvailable:定義遠端參與者端點是否正在主動傳送串流。
const isReceiving: boolean = remoteVideoStream.isReceiving;
isReceiving:向應用程式指出是否正在接收遠端視訊串流資料。
在下列情況下,旗標會變為
false:- 使用行動瀏覽器上的遠端參與者將行動瀏覽器應用程式帶入背景。
- 接收視訊的遠端參與者或使用者有影響視訊品質的網路問題。
- 使用 macOS/iOS Safari 的遠端參與者從網址列中選取 [暫停]。
- 遠端參與者的網路中斷連線。
- 使用行動裝置的遠端參與者會刪除或終止瀏覽器。
- 使用行動裝置或桌面裝置的遠端參與者會鎖定其裝置。 如果遠端參與者位於桌面電腦上且進入睡眠狀態,則此案例也適用於這種情況。
在下列情況下,旗標會變為
true:- 使用行動瀏覽器的遠端參與者,將其原來在背景執行的瀏覽器帶入前景。
- 使用 macOS/iOS Safari 的遠端參與者在暫停視訊後從網址列中選取 [繼續]。
- 遠端參與者在暫時中斷連線之後重新連線到網路。
- 使用行動裝置上的遠端參與者解除鎖定其裝置,並返回其行動瀏覽器上的通話。
此功能可改善用於轉譯遠端視訊串流的使用者體驗。
當 isReceiving 旗標變更為 false 時,您可以在遠端視訊串流上顯示載入微調按鈕。 您不一定需要實作載入進度環,但載入進度環是為了提升使用者體驗最常見的用法。
const size: StreamSize = remoteVideoStream.size;
size:資料流大小,其中包含視訊寬度和高度的相關資訊。
VideoStreamRenderer 方法和屬性
await videoStreamRenderer.createView();
建立可連結到應用程式 UI 的 VideoStreamRendererView 執行個體,以轉譯遠端視訊串流、使用非同步的 createView() 方法,其會在串流準備好轉譯時進行解析,並傳回具有 target 屬性的物件,以代表可在 DOM 樹狀結構中的任何位置插入的 video 元素。
videoStreamRenderer.dispose();
處置 videoStreamRenderer 和所有相關聯的 VideoStreamRendererView 執行個體。
VideoStreamRendererView 方法和屬性
在建立 VideoStreamRendererView 時可以指定 scalingMode 和 isMirrored 屬性。 scalingMode 可以是 Stretch、Crop 或 Fit。 如果指定了 isMirrored,則會垂直翻轉所轉譯的串流。
const videoStreamRendererView: VideoStreamRendererView = await videoStreamRenderer.createView({ scalingMode, isMirrored });
每個 VideoStreamRendererView 執行個體都有代表轉譯介面的 target 屬性。 在應用程式 UI 中連結此屬性:
htmlElement.appendChild(view.target);
您可以叫用 updateScalingMode 方法來更新 scalingMode:
view.updateScalingMode('Crop');
在相同桌面裝置的同一次通話中,從兩個不同的相機傳送視訊串流。
重要
此 Azure 通訊服務功能目前處於預覽狀態。
提供的預覽 API 和 SDK 並無服務等級協定。 建議您不要將其用於生產工作負載。 部分功能可能不受支援,或是在功能上有所限制。
如需詳細資訊,請參閱 Microsoft Azure 預覽版增補使用規定。
在桌面設備支援的瀏覽器上,1.17.1-beta.1+ 版支援在相同通話中傳送來自兩個不同相機的視訊串流。
- 您可以使用下列程式碼片段,在同一次通話中從單一桌面瀏覽器索引標籤/應用程式傳送來自兩個不同相機的視訊串流:
// Create your first CallAgent with identity A
const callClient1 = new CallClient();
const callAgent1 = await callClient1.createCallAgent(tokenCredentialA);
const deviceManager1 = await callClient1.getDeviceManager();

// Create your second CallAgent with identity B
const callClient2 = new CallClient();
const callAgent2 = await callClient2.createCallAgent(tokenCredentialB);
const deviceManager2 = await callClient2.getDeviceManager();

// Join the call with your first CallAgent
const camera1 = await deviceManager1.getCameras()[0];
const callObj1 = callAgent1.join({ groupId: ‘123’}, { videoOptions: { localVideoStreams: [new LocalVideoStream(camera1)] } });

// Join the same call with your second CallAgent and make it use a different camera
const camera2 = (await deviceManager2.getCameras()).filter((camera) => { return camera !== camera1 })[0];
const callObj2 = callAgent2.join({ groupId: '123' }, { videoOptions: { localVideoStreams: [new LocalVideoStream(camera2)] } });

//Mute the microphone and speakers of your second CallAgent’s Call, so that there is no echos/noises.
await callObj2.muteIncomingAudio();
await callObj2.mute();
限制:
- 這必須使用不同的身分識別透過兩個不同的
CallAgent執行個體來完成。 該程式碼片段會顯示正在使用的兩個呼叫代理程式,每個代理程式都有其自己的 Call 物件。 - 在此程式碼範例中,兩個 CallAgent 加入了相同的通話 (相同的通話識別碼)。 您也可以讓每個代理程式加入不同的通話,並在一個通話上傳送一個視訊,另一個通話上傳送不同的視訊。
- 不支援在兩個 CallAgent 中傳送相同的相機。 必須是兩個不同的相機。
- 目前不支援以一個 CallAgent 傳送兩個不同的相機。
- 在 macOS Safari 上,背景模糊視訊效果 (來自 @azure/communication-effects) 只能套用至一個相機,無法同時套用至兩個相機。
安裝 SDK
找出您的專案層級 build.gradle 檔案,並將 mavenCentral() 新增至 buildscript 和 allprojects 下的存放庫清單:
buildscript {
    repositories {
    ...
        mavenCentral()
    ...
    }
}
allprojects {
    repositories {
    ...
        mavenCentral()
    ...
    }
}
然後,在您的模組層級 build.gradle 檔案中,將以下幾行新增至 dependencies 區段:
dependencies {
    ...
    implementation 'com.azure.android:azure-communication-calling:1.0.0'
    ...
}
初始化必要的物件
若要建立 CallAgent 執行個體,您必須在 CallClient 執行個體上呼叫 createCallAgent 方法。 此呼叫會以非同步方式傳回 CallAgent 執行個體物件。
createCallAgent 方法會採用 CommunicationUserCredential 作為引數,用來封裝存取權杖。
若要存取 DeviceManager,您必須先建立 callAgent 執行個體。 然後,您可以使用 CallClient.getDeviceManager 方法取得 DeviceManager。
String userToken = '<user token>';
CallClient callClient = new CallClient();
CommunicationTokenCredential tokenCredential = new CommunicationTokenCredential(userToken);
android.content.Context appContext = this.getApplicationContext(); // From within an activity, for instance
CallAgent callAgent = callClient.createCallAgent(appContext, tokenCredential).get();
DeviceManager deviceManager = callClient.getDeviceManager(appContext).get();
若要設定來電者的顯示名稱,請使用下列替代方法:
String userToken = '<user token>';
CallClient callClient = new CallClient();
CommunicationTokenCredential tokenCredential = new CommunicationTokenCredential(userToken);
android.content.Context appContext = this.getApplicationContext(); // From within an activity, for instance
CallAgentOptions callAgentOptions = new CallAgentOptions();
callAgentOptions.setDisplayName("Alice Bob");
DeviceManager deviceManager = callClient.getDeviceManager(appContext).get();
CallAgent callAgent = callClient.createCallAgent(appContext, tokenCredential, callAgentOptions).get();
裝置管理
若要開始搭配使用視訊與通話,您必須知道如何管理裝置。 裝置可讓您控制要將音訊和視訊傳輸至通話的項目。
DeviceManager 可讓您列舉可於通話中用來傳輸音訊/視訊串流的本機裝置。 其也可讓您向使用者要求權限,以使用原生瀏覽器 API 存取其麥克風和相機。
您可以呼叫 callClient.getDeviceManager() 方法來存取 deviceManager。
Context appContext = this.getApplicationContext();
DeviceManager deviceManager = callClient.getDeviceManager(appContext).get();
列舉本機裝置
若要存取本機裝置,您可以在裝置管理員上使用列舉方法。 列舉是非同步動作。
//  Get a list of available video devices for use.
List<VideoDeviceInfo> localCameras = deviceManager.getCameras(); // [VideoDeviceInfo, VideoDeviceInfo...]
本機相機預覽
您可以使用 DeviceManager 和 Renderer 開始從本機相機轉譯串流。 此串流不會傳送給其他參與者;其為本機預覽摘要。 這是非同步的動作。
VideoDeviceInfo videoDevice = <get-video-device>; // See the `Enumerate local devices` topic above
Context appContext = this.getApplicationContext();

LocalVideoStream currentVideoStream = new LocalVideoStream(videoDevice, appContext);

LocalVideoStream[] localVideoStreams = new LocalVideoStream[1];
localVideoStreams[0] = currentVideoStream;

VideoOptions videoOptions = new VideoOptions(localVideoStreams);

RenderingOptions renderingOptions = new RenderingOptions(ScalingMode.Fit);
VideoStreamRenderer previewRenderer = new VideoStreamRenderer(currentVideoStream, appContext);

VideoStreamRendererView uiView = previewRenderer.createView(renderingOptions);

// Attach the uiView to a viewable location on the app at this point
layout.addView(uiView);
使用視訊相機撥打一對一通話
警告
目前僅支援一個傳出本機視訊串流,若要撥打視訊通話,您必須使用 deviceManagergetCameras API 來列舉本機相機。
選取想要的相機之後,請使用該相機來建構 LocalVideoStream 執行個體,並在 videoOptions 內將其作為 localVideoStream 陣列中的項目傳遞至 call 方法。
通話連接成功後,便會自動開始從選取的相機傳送視訊串流給其他參與者。
注意
由於有隱私權疑慮,如果不會在本機預覽視訊,便不會與通話共用視訊。 如需詳細資訊,請參閱本機相機預覽。
VideoDeviceInfo desiredCamera = <get-video-device>; // See the `Enumerate local devices` topic above
Context appContext = this.getApplicationContext();

LocalVideoStream currentVideoStream = new LocalVideoStream(desiredCamera, appContext);

LocalVideoStream[] localVideoStreams = new LocalVideoStream[1];
localVideoStreams[0] = currentVideoStream;

VideoOptions videoOptions = new VideoOptions(localVideoStreams);

// Render a local preview of video so the user knows that their video is being shared
Renderer previewRenderer = new VideoStreamRenderer(currentVideoStream, appContext);
View uiView = previewRenderer.createView(new CreateViewOptions(ScalingMode.FIT));

// Attach the uiView to a viewable location on the app at this point
layout.addView(uiView);

CommunicationUserIdentifier[] participants = new CommunicationUserIdentifier[]{ new CommunicationUserIdentifier("<acs user id>") };

StartCallOptions startCallOptions = new StartCallOptions();
startCallOptions.setVideoOptions(videoOptions);

Call call = callAgent.startCall(context, participants, startCallOptions);
開始和停止傳送本機視訊
若要開始視訊,您必須在 deviceManager 物件上使用 getCameraList API 列舉相機。 然後,建立新的 LocalVideoStream 執行個體以傳遞所需相機,並將其作為引數傳入 startVideo API:
VideoDeviceInfo desiredCamera = <get-video-device>; // See the `Enumerate local devices` topic above
Context appContext = this.getApplicationContext();

LocalVideoStream currentLocalVideoStream = new LocalVideoStream(desiredCamera, appContext);

VideoOptions videoOptions = new VideoOptions(currentLocalVideoStream);

Future startVideoFuture = call.startVideo(appContext, currentLocalVideoStream);
startVideoFuture.get();
成功開始傳送視訊後,便會在通話執行個體上的 localVideoStreams 集合中新增 LocalVideoStream 執行個體。
List<LocalVideoStream> videoStreams = call.getLocalVideoStreams();
LocalVideoStream currentLocalVideoStream = videoStreams.get(0); // Please make sure there are VideoStreams in the list before calling get(0).
若要停止本機視訊,請在 localVideoStreams 集合中傳遞可用的 LocalVideoStream 執行個體:
call.stopVideo(appContext, currentLocalVideoStream).get();
您可以藉由在 LocalVideoStream 執行個體上叫用 switchSource,於傳送視訊時切換至不同的相機裝置:
currentLocalVideoStream.switchSource(source).get();
轉譯遠端參與者視訊串流
若要列出遠端參與者的視訊串流和螢幕共用串流,請檢查 videoStreams 集合:
List<RemoteParticipant> remoteParticipants = call.getRemoteParticipants();
RemoteParticipant remoteParticipant = remoteParticipants.get(0); // Please make sure there are remote participants in the list before calling get(0).

List<RemoteVideoStream> remoteStreams = remoteParticipant.getVideoStreams();
RemoteVideoStream remoteParticipantStream = remoteStreams.get(0); // Please make sure there are video streams in the list before calling get(0).

MediaStreamType streamType = remoteParticipantStream.getType(); // of type MediaStreamType.Video or MediaStreamType.ScreenSharing
若要轉譯遠端參與者的 RemoteVideoStream,您必須訂閱 OnVideoStreamsUpdated 事件。
在該事件內,isAvailable 屬性變更為 true 表示遠端參與者目前正在傳送串流。 在發生此情況後,建立新的 Renderer 執行個體,然後使用非同步的 createView API 建立新的 RendererView,並在應用程式 UI 中的任何位置連結 view.target。
每當遠端串流的可用性變更時,您就可以選擇終結整個轉譯器、終結特定 RendererView 或予以保留,但這會導致顯示空白的視訊畫面。
VideoStreamRenderer remoteVideoRenderer = new VideoStreamRenderer(remoteParticipantStream, appContext);
VideoStreamRendererView uiView = remoteVideoRenderer.createView(new RenderingOptions(ScalingMode.FIT));
layout.addView(uiView);

remoteParticipant.addOnVideoStreamsUpdatedListener(e -> onRemoteParticipantVideoStreamsUpdated(p, e));

void onRemoteParticipantVideoStreamsUpdated(RemoteParticipant participant, RemoteVideoStreamsEvent args) {
    for(RemoteVideoStream stream : args.getAddedRemoteVideoStreams()) {
        if(stream.getIsAvailable()) {
            startRenderingVideo();
        } else {
            renderer.dispose();
        }
    }
}
遠端視訊串流屬性
遠端視訊串流有幾個屬性
Id- 遠端視訊串流的識別碼
int id = remoteVideoStream.getId();
MediaStreamType- 可以是「Video」或「ScreenSharing」
MediaStreamType type = remoteVideoStream.getMediaStreamType();
isAvailable- 指出遠端參與者端點是否正在主動傳送串流
boolean availability = remoteVideoStream.isAvailable();
轉譯器方法和屬性
API 之後的轉譯器物件
- 建立
VideoStreamRendererView執行個體,以便稍後可以連結到應用程式 UI 以轉譯遠端視訊串流。
// Create a view for a video stream
VideoStreamRendererView.createView()
- 處置轉譯器和與這個轉譯器相關聯的所有
VideoStreamRendererView。 要在已從 UI 中移除所有相關聯檢視時呼叫。
VideoStreamRenderer.dispose()
StreamSize- 遠端視訊串流的大小 (寬度/高度)
StreamSize renderStreamSize = VideoStreamRenderer.getSize();
int width = renderStreamSize.getWidth();
int height = renderStreamSize.getHeight();
RendererView 方法和屬性
在建立 VideoStreamRendererView 時,您可以指定將套用至此檢視的 ScalingMode 和 mirrored 屬性:縮放模式可以是「CROP」|「FIT」
VideoStreamRenderer remoteVideoRenderer = new VideoStreamRenderer(remoteVideoStream, appContext);
VideoStreamRendererView rendererView = remoteVideoRenderer.createView(new CreateViewOptions(ScalingMode.Fit));
接著,您可以使用下列程式碼片段,將所建立的 RendererView 連結至應用程式 UI:
layout.addView(rendererView);
您稍後可以使用 ScalingMode.CROP | ScalingMode.FIT 其中之一作為引數,在 RendererView 物件上叫用 updateScalingMode API 來更新縮放模式。
// Update the scale mode for this view.
rendererView.updateScalingMode(ScalingMode.CROP)
設定系統
建立 Xcode 專案
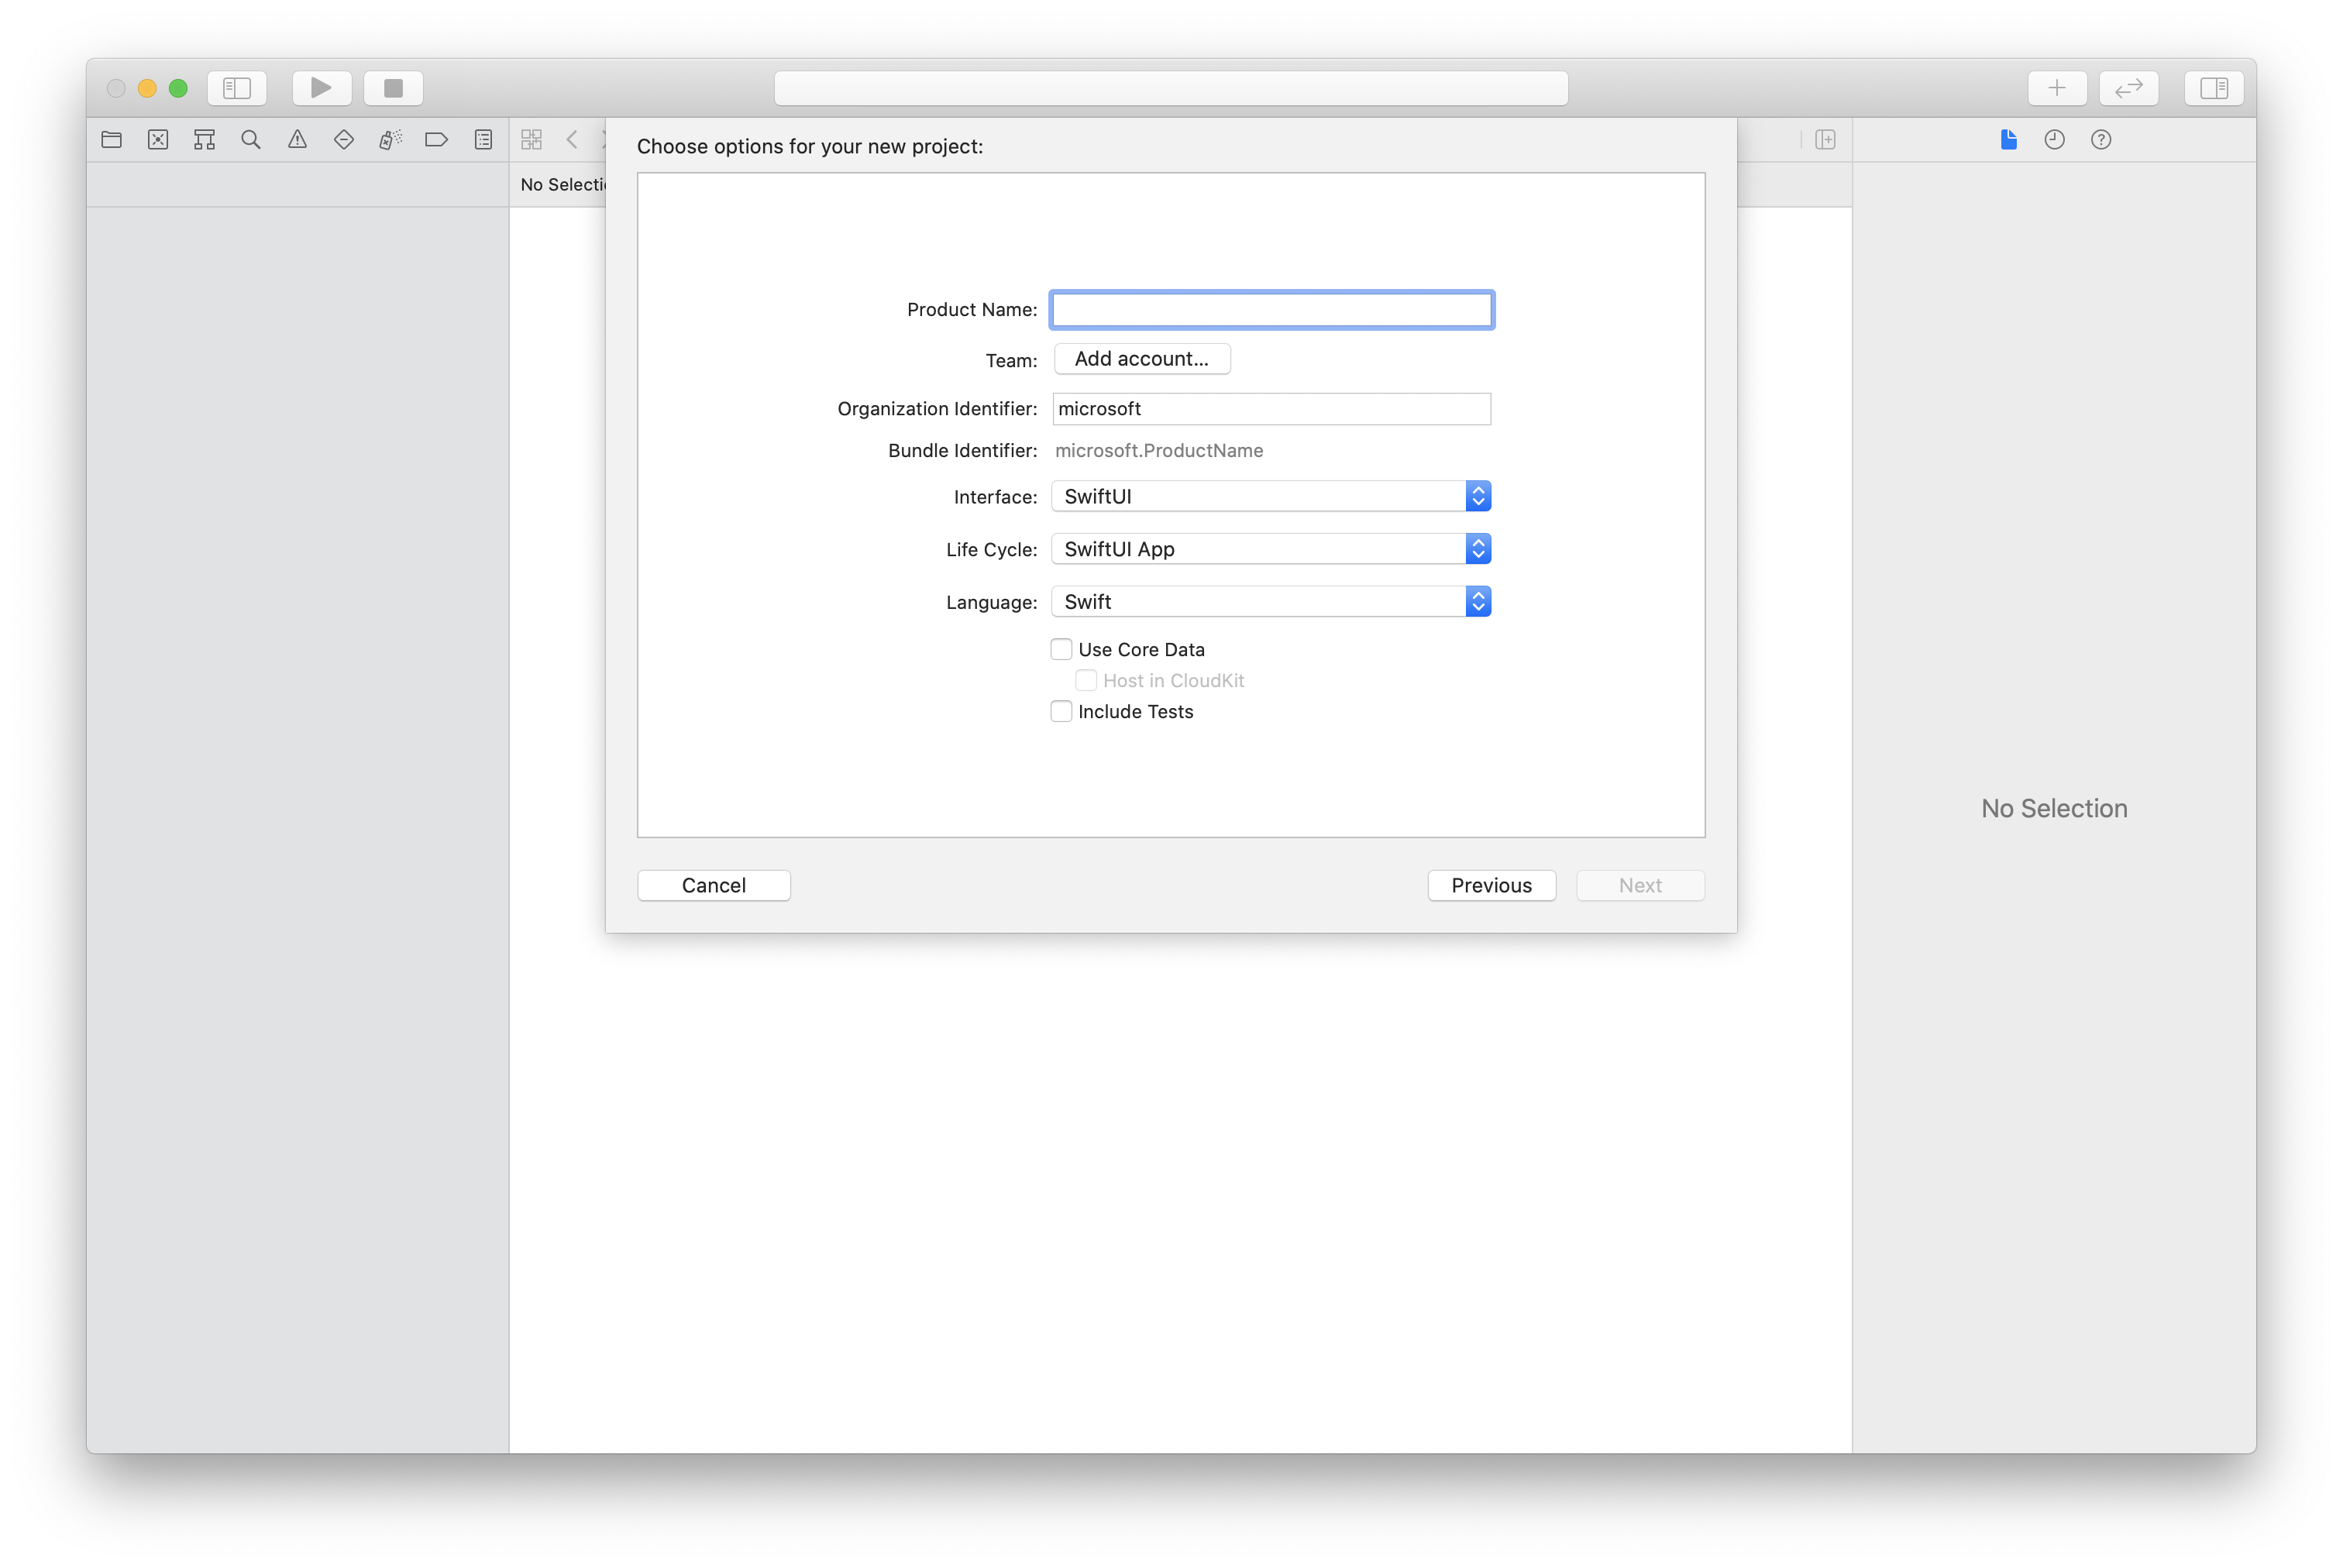
在 Xcode 中建立新的 iOS 專案,並選取 [單一檢視應用程式] 範本。 本快速入門使用 SwiftUI 架構,因此您應將 [語言] 設定為 [Swift],並將 [使用者介面] 設定為 [SwiftUI]。
進行本快速入門期間,您不會建立測試。 您可以隨意清除 [包含測試] 核取方塊。
使用 CocoaPods 安裝套件和相依性
為您的應用程式建立 Podfile,如以下範例所示:
platform :ios, '13.0'
use_frameworks!
target 'AzureCommunicationCallingSample' do
    pod 'AzureCommunicationCalling', '~> 1.0.0'
end
執行
pod install。使用 Xcode 開啟
.xcworkspace。
要求存取麥克風
若要存取裝置的麥克風,您必須使用 NSMicrophoneUsageDescription 更新應用程式的資訊屬性清單。 您可以將相關聯的值設定為字串,並使其包含在系統用來向使用者要求存取權的對話中。
以滑鼠右鍵按一下專案樹狀結構的 Info.plist 項目,接著選取 [開啟為]>[原始程式碼]。 將以下幾行新增至最上層 <dict> 區段中,然後儲存檔案。
<key>NSMicrophoneUsageDescription</key>
<string>Need microphone access for VOIP calling.</string>
設定應用程式架構
開啟專案的 ContentView.swift 檔案。 將 import 宣告新增至檔案頂端,以匯入 AzureCommunicationCalling 程式庫。 此外,匯入 AVFoundation。 您將需要程式庫,才能在程式碼中要求音訊權限。
import AzureCommunicationCalling
import AVFoundation
初始化 CallAgent
若要從 CallClient 建立 CallAgent 執行個體,您必須使用 callClient.createCallAgent 方法,在 CallAgent 物件初始化後以非同步方式傳回該物件。
若要建立通話用戶端,請傳遞 CommunicationTokenCredential 物件:
import AzureCommunication

let tokenString = "token_string"
var userCredential: CommunicationTokenCredential?
do {
    let options = CommunicationTokenRefreshOptions(initialToken: token, refreshProactively: true, tokenRefresher: self.fetchTokenSync)
    userCredential = try CommunicationTokenCredential(withOptions: options)
} catch {
    updates("Couldn't created Credential object", false)
    initializationDispatchGroup!.leave()
    return
}

// tokenProvider needs to be implemented by Contoso, which fetches a new token
public func fetchTokenSync(then onCompletion: TokenRefreshOnCompletion) {
    let newToken = self.tokenProvider!.fetchNewToken()
    onCompletion(newToken, nil)
}
將您建立的 CommunicationTokenCredential 物件傳遞至 CallClient,並設定顯示名稱:
self.callClient = CallClient()
let callAgentOptions = CallAgentOptions()
options.displayName = " iOS Azure Communication Services User"

self.callClient!.createCallAgent(userCredential: userCredential!,
    options: callAgentOptions) { (callAgent, error) in
        if error == nil {
            print("Create agent succeeded")
            self.callAgent = callAgent
        } else {
            print("Create agent failed")
        }
})
管理裝置
若要開始搭配使用視訊與通話,您必須知道如何管理裝置。 裝置可讓您控制要將音訊和視訊傳輸至通話的項目。
DeviceManager 可讓您列舉可於通話中用來傳輸音訊或視訊串流的本機裝置。 其也可讓您向使用者要求權限,以存取麥克風或相機。 您可以在 callClient 物件上存取 deviceManager。
self.callClient!.getDeviceManager { (deviceManager, error) in
        if (error == nil) {
            print("Got device manager instance")
            self.deviceManager = deviceManager
        } else {
            print("Failed to get device manager instance")
        }
    }
列舉本機裝置
若要存取本機裝置,您可以在裝置管理員上使用列舉方法。 列舉是非同步動作。
// enumerate local cameras
var localCameras = deviceManager.cameras // [VideoDeviceInfo, VideoDeviceInfo...]
取得本機相機預覽
您可以使用 Renderer 開始轉譯本機相機的串流。 此串流不會傳送給其他參與者;其為本機預覽摘要。 這是非同步的動作。
let camera: VideoDeviceInfo = self.deviceManager!.cameras.first!
let localVideoStream = LocalVideoStream(camera: camera)
let localRenderer = try! VideoStreamRenderer(localVideoStream: localVideoStream)
self.view = try! localRenderer.createView()
取得本機相機預覽屬性
轉譯器有一組屬性和方法可讓您控制轉譯。
// Constructor can take in LocalVideoStream or RemoteVideoStream
let localRenderer = VideoStreamRenderer(localVideoStream:localVideoStream)
let remoteRenderer = VideoStreamRenderer(remoteVideoStream:remoteVideoStream)

// [StreamSize] size of the rendering view
localRenderer.size

// [VideoStreamRendererDelegate] an object you provide to receive events from this Renderer instance
localRenderer.delegate

// [Synchronous] create view
try! localRenderer.createView()

// [Synchronous] create view with rendering options
try! localRenderer!.createView(withOptions: CreateViewOptions(scalingMode: ScalingMode.fit))

// [Synchronous] dispose rendering view
localRenderer.dispose()
撥打一對一視訊通話
若要取得裝置管理員執行個體,請參閱關於管理裝置的章節。
let firstCamera = self.deviceManager!.cameras.first
self.localVideoStreams = [LocalVideoStream]()
self.localVideoStreams!.append(LocalVideoStream(camera: firstCamera!))
let videoOptions = VideoOptions(localVideoStreams: self.localVideoStreams!)

let startCallOptions = StartCallOptions()
startCallOptions.videoOptions = videoOptions

let callee = CommunicationUserIdentifier('UserId')
self.callAgent?.startCall(participants: [callee], options: startCallOptions) { (call, error) in
    if error == nil {
        print("Successfully started outgoing video call")
        self.call = call
    } else {
        print("Failed to start outgoing video call")
    }
}
轉譯遠端參與者視訊串流
遠端參與者可以在通話期間起始視訊或螢幕共用。
處理遠端參與者的視訊共用或螢幕共用串流
若要列出遠端參與者的串流,請檢查 videoStreams 集合。
var remoteParticipantVideoStream = call.remoteParticipants[0].videoStreams[0]
取得遠端視訊串流屬性
var type: MediaStreamType = remoteParticipantVideoStream.type // 'MediaStreamTypeVideo'
var isAvailable: Bool = remoteParticipantVideoStream.isAvailable // indicates if remote stream is available
var id: Int = remoteParticipantVideoStream.id // id of remoteParticipantStream
轉譯遠端參與者串流
若要開始轉譯遠端參與者串流,請使用下列程式碼。
let renderer = VideoStreamRenderer(remoteVideoStream: remoteParticipantVideoStream)
let targetRemoteParticipantView = renderer?.createView(withOptions: CreateViewOptions(scalingMode: ScalingMode.crop))
// To update the scaling mode later
targetRemoteParticipantView.update(scalingMode: ScalingMode.fit)
取得遠端視訊轉譯器方法和屬性
// [Synchronous] dispose() - dispose renderer and all `RendererView` associated with this renderer. To be called when you have removed all associated views from the UI.
remoteVideoRenderer.dispose()
設定系統
建立 Visual Studio 專案
針對 UWP 應用程式,在 Visual Studio 2022 中建立新的空白應用程式 (通用 Windows) 專案。 在輸入專案名稱之後,隨意選擇高於 10.0.17763.0 的任何 Windows SDK。
針對 WinUI 3 應用程式,使用空白應用程式、封裝 (桌面中的 WinUI 3) 範本建立新專案,以設定單頁 WinUI 3 應用程式。 需要 Windows App SDK 1.3 版或更新版本。
使用 NuGet 套件管理員來安裝套件和相依性
通話 SDK API 和程式庫可透過 NuGet 套件公開取得。
下列步驟示範如何尋找、下載及安裝通話 SDK NuGet 套件:
- 藉由選取 [工具]>[NuGet 套件管理員]>[管理解決方案的 NuGet 套件],開啟 NuGet 套件管理員。
- 選取 [瀏覽],然後在搜尋方塊中輸入
Azure.Communication.Calling.WindowsClient。 - 確定已選取 [包含發行前版本] 核取方塊。
- 選取
Azure.Communication.Calling.WindowsClient套件,然後選取Azure.Communication.Calling.WindowsClient1.4.0-beta.1 或更新版本。 - 選取與右側索引標籤上的「通訊服務」專案相對應的核取方塊。
- 選取 [安裝] 按鈕。
要求存取麥克風
應用程式必須存取相機才能正常執行。 在 UWP 應用程式中,應於應用程式資訊清單檔案中宣告相機功能。
下列步驟示範如何達成此目的。
- 在
Solution Explorer面板中,按兩下副檔名為.appxmanifest的檔案。 - 按一下
Capabilities索引標籤。 - 從功能清單中選取
Camera核取方塊。
建立 UI 按鈕以撥打和掛斷通話
這個簡單的範例應用程式包含兩個按鈕。 一個用於撥打電話,另一個用於掛斷通話。 下列步驟示範如何將這兩個按鈕新增至應用程式。
- 在
Solution Explorer面板中,按兩下名為MainPage.xaml的檔案 (若為 UWP) 或名為MainWindows.xaml的檔案 (若為 WinUI 3)。 - 在中央面板中,尋找 UI 預覽下的 XAML 程式碼。
- 依照下列摘錄修改 XAML 程式碼:
<TextBox x:Name="CalleeTextBox" PlaceholderText="Who would you like to call?" />
<StackPanel>
    <Button x:Name="CallButton" Content="Start/Join call" Click="CallButton_Click" />
    <Button x:Name="HangupButton" Content="Hang up" Click="HangupButton_Click" />
</StackPanel>
使用通話 SDK API 設定應用程式
通話 SDK API 位於兩個不同的命名空間中。 下列步驟會向 C# 編譯器告知這兩個命名空間的資訊,讓 Visual Studio 的 Intellisense 能夠協助開發程式碼。
- 在
Solution Explorer面板中,按一下名為MainPage.xaml的檔案 (若為 UWP) 左側的箭號,或名為MainWindows.xaml的檔案 (若為 WinUI 3) 左側的箭號。 - 按兩下名為
MainPage.xaml.cs或MainWindows.xaml.cs的檔案。 - 在目前的
using陳述式底部新增下列命令。
using Azure.Communication.Calling.WindowsClient;
將 MainPage.xaml.cs 或 MainWindows.xaml.cs 保持開啟。 後續步驟會在其中新增更多程式碼。
允許應用程式互動
先前新增的 UI 按鈕需要在放置的 CommunicationCall 頂端運作。 這表示您應該將 CommunicationCall 資料成員新增至 MainPage 或 MainWindow 類別。
此外,為了讓建立 CallAgent 的非同步作業成功,也應該將 CallAgent 資料成員新增至相同的類別。
將下列資料成員新增至 MainPage 或 MainWindow 類別:
CallAgent callAgent;
CommunicationCall call;
建立按鈕處理常式
先前已將兩個 UI 按鈕新增至 XAML 程式碼。 下列程式碼會新增要在使用者選取按鈕時執行的處理常式。 請在上一節的資料成員後面新增下列程式碼。
private async void CallButton_Click(object sender, RoutedEventArgs e)
{
    // Start call
}

private async void HangupButton_Click(object sender, RoutedEventArgs e)
{
    // End the current call
}
物件模型
下列類別和介面會處理 Azure 通訊服務通話用戶端程式庫 (適用於 UWP) 的一些主要功能。
| 名稱 | 描述 |
|---|---|
CallClient |
CallClient 是通話用戶端程式庫的主要進入點。 |
CallAgent |
CallAgent 可用來開始和加入通話。 |
CommunicationCall |
CommunicationCall 可用來管理已撥打或已加入的通話。 |
CommunicationTokenCredential |
CommunicationTokenCredential 是用來具現化 CallAgent 的權杖認證。 |
CallAgentOptions |
CallAgentOptions 包含用來識別來電者的資訊。 |
HangupOptions |
HangupOptions 可讓您知道是否應向所有參與者終止通話。 |
註冊視訊結構描述處理常式
UI 元件 (例如 XAML 的 MediaElement 或 MediaPlayerElement),需要應用程式註冊用來轉譯本機和遠端視訊摘要的設定。
在 Package.appxmanifest 的 Package 標籤之間新增下列內容:
<Extensions>
    <Extension Category="windows.activatableClass.inProcessServer">
        <InProcessServer>
            <Path>RtmMvrUap.dll</Path>
            <ActivatableClass ActivatableClassId="VideoN.VideoSchemeHandler" ThreadingModel="both" />
        </InProcessServer>
    </Extension>
</Extensions>
初始化 CallAgent
若要從 CallClient 建立 CallAgent 執行個體,必須使用 CallClient.CreateCallAgentAsync 方法,在 CallAgent 物件初始化後以非同步方式傳回該物件。
若要建立 CallAgent,您必須傳遞 CallTokenCredential 物件和 CallAgentOptions 物件。 請記住,如果傳遞了格式錯誤的權杖,便會擲回 CallTokenCredential。
請在要於應用程式初始化時呼叫的協助程式函式內新增下列程式碼。
var callClient = new CallClient();
this.deviceManager = await callClient.GetDeviceManagerAsync();

var tokenCredential = new CallTokenCredential("<AUTHENTICATION_TOKEN>");
var callAgentOptions = new CallAgentOptions()
{
    DisplayName = "<DISPLAY_NAME>"
};

this.callAgent = await callClient.CreateCallAgentAsync(tokenCredential, callAgentOptions);
this.callAgent.CallsUpdated += Agent_OnCallsUpdatedAsync;
this.callAgent.IncomingCallReceived += Agent_OnIncomingCallAsync;
以資源的有效認證權杖變更 <AUTHENTICATION_TOKEN>。 若要取得認證權杖,請參閱使用者存取權杖文件。
使用視訊相機撥打一對一通話
建立 CallAgent 所需的物件現已準備就緒。 您現在可以透過非同步方式建立 CallAgent 並撥打視訊通話。
private async void CallButton_Click(object sender, RoutedEventArgs e)
{
    var callString = CalleeTextBox.Text.Trim();

    if (!string.IsNullOrEmpty(callString))
    {
        if (callString.StartsWith("8:")) // 1:1 Azure Communication Services call
        {
            this.call = await StartAcsCallAsync(callString);
        }
    }

    if (this.call != null)
    {
        this.call.RemoteParticipantsUpdated += OnRemoteParticipantsUpdatedAsync;
        this.call.StateChanged += OnStateChangedAsync;
    }
}

private async Task<CommunicationCall> StartAcsCallAsync(string acsCallee)
{
    var options = await GetStartCallOptionsAsynnc();
    var call = await this.callAgent.StartCallAsync( new [] { new UserCallIdentifier(acsCallee) }, options);
    return call;
}

var micStream = new LocalOutgoingAudioStream(); // Create a default local audio stream
var cameraStream = new LocalOutgoingVideoStreamde(this.viceManager.Cameras.FirstOrDefault() as VideoDeviceDetails); // Create a default video stream

private async Task<StartCallOptions> GetStartCallOptionsAsynnc()
{
    return new StartCallOptions() {
        OutgoingAudioOptions = new OutgoingAudioOptions() { IsMuted = true, Stream = micStream  },
        OutgoingVideoOptions = new OutgoingVideoOptions() { Streams = new OutgoingVideoStream[] { cameraStream } }
    };
}
本機相機預覽
我們可以選擇性地設定本機相機預覽。 視訊可透過 MediaPlayerElement 進行轉譯:
<Grid>
    <MediaPlayerElement x:Name="LocalVideo" AutoPlay="True" />
    <MediaPlayerElement x:Name="RemoteVideo" AutoPlay="True" />
</Grid>
若要初始化本機預覽 MediaPlayerElement:
private async void CameraList_SelectionChanged(object sender, SelectionChangedEventArgs e)
{
    if (cameraStream != null)
    {
        await cameraStream?.StopPreviewAsync();
        if (this.call != null)
        {
            await this.call?.StopVideoAsync(cameraStream);
        }
    }
    var selectedCamerea = CameraList.SelectedItem as VideoDeviceDetails;
    cameraStream = new LocalOutgoingVideoStream(selectedCamerea);

    var localUri = await cameraStream.StartPreviewAsync();
    LocalVideo.Source = MediaSource.CreateFromUri(localUri);

    if (this.call != null) {
        await this.call?.StartVideoAsync(cameraStream);
    }
}
轉譯遠端相機串流
設定事件處理常式以回應 OnCallsUpdated 事件:
private async void OnCallsUpdatedAsync(object sender, CallsUpdatedEventArgs args)
{
    var removedParticipants = new List<RemoteParticipant>();
    var addedParticipants = new List<RemoteParticipant>();

    foreach(var call in args.RemovedCalls)
    {
        removedParticipants.AddRange(call.RemoteParticipants.ToList<RemoteParticipant>());
    }

    foreach (var call in args.AddedCalls)
    {
        addedParticipants.AddRange(call.RemoteParticipants.ToList<RemoteParticipant>());
    }

    await OnParticipantChangedAsync(removedParticipants, addedParticipants);
}

private async void OnRemoteParticipantsUpdatedAsync(object sender, ParticipantsUpdatedEventArgs args)
{
    await OnParticipantChangedAsync(
        args.RemovedParticipants.ToList<RemoteParticipant>(),
        args.AddedParticipants.ToList<RemoteParticipant>());
}

private async Task OnParticipantChangedAsync(IEnumerable<RemoteParticipant> removedParticipants, IEnumerable<RemoteParticipant> addedParticipants)
{
    foreach (var participant in removedParticipants)
    {
        foreach(var incomingVideoStream in  participant.IncomingVideoStreams)
        {
            var remoteVideoStream = incomingVideoStream as RemoteIncomingVideoStream;
            if (remoteVideoStream != null)
            {
                await remoteVideoStream.StopPreviewAsync();
            }
        }
        participant.VideoStreamStateChanged -= OnVideoStreamStateChanged;
    }

    foreach (var participant in addedParticipants)
    {
        participant.VideoStreamStateChanged += OnVideoStreamStateChanged;
    }
}

private void OnVideoStreamStateChanged(object sender, VideoStreamStateChangedEventArgs e)
{
    CallVideoStream callVideoStream = e.CallVideoStream;

    switch (callVideoStream.StreamDirection)
    {
        case StreamDirection.Outgoing:
            OnOutgoingVideoStreamStateChanged(callVideoStream as OutgoingVideoStream);
            break;
        case StreamDirection.Incoming:
            OnIncomingVideoStreamStateChanged(callVideoStream as IncomingVideoStream);
            break;
    }
}
在 MediaPlayerElement 上開始轉譯遠端視訊串流:
private async void OnIncomingVideoStreamStateChanged(IncomingVideoStream incomingVideoStream)
{
    switch (incomingVideoStream.State)
    {
        case VideoStreamState.Available:
            {
                switch (incomingVideoStream.Kind)
                {
                    case VideoStreamKind.RemoteIncoming:
                        var remoteVideoStream = incomingVideoStream as RemoteIncomingVideoStream;
                        var uri = await remoteVideoStream.StartPreviewAsync();

                        await Dispatcher.RunAsync(Windows.UI.Core.CoreDispatcherPriority.Normal, () =>
                        {
                            RemoteVideo.Source = MediaSource.CreateFromUri(uri);
                        });

                        /* Or WinUI 3
                        this.DispatcherQueue.TryEnqueue(() => {
                            RemoteVideo.Source = MediaSource.CreateFromUri(uri);
                            RemoteVideo.MediaPlayer.Play();
                        });
                        */

                        break;

                    case VideoStreamKind.RawIncoming:
                        break;
                }

                break;
            }
        case VideoStreamState.Started:
            break;
        case VideoStreamState.Stopping:
            break;
        case VideoStreamState.Stopped:
            if (incomingVideoStream.Kind == VideoStreamKind.RemoteIncoming)
            {
                var remoteVideoStream = incomingVideoStream as RemoteIncomingVideoStream;
                await remoteVideoStream.StopPreviewAsync();
            }
            break;
        case VideoStreamState.NotAvailable:
            break;
    }
}
結束通話
撥打電話後,應使用 CommunicationCall 物件的 HangupAsync 方法來掛斷通話。
此外也應使用 HangupOptions 的執行個體,告知是否必須向所有參與者終止通話。
請在 HangupButton_Click 內新增下列程式碼。
var call = this.callAgent?.Calls?.FirstOrDefault();
if (call != null)
{
    var call = this.callAgent?.Calls?.FirstOrDefault();
    if (call != null)
    {
        foreach (var localVideoStream in call.OutgoingVideoStreams)
        {
            await call.StopVideoAsync(localVideoStream);
        }

        try
        {
            if (cameraStream != null)
            {
                await cameraStream.StopPreviewAsync();
            }

            await call.HangUpAsync(new HangUpOptions() { ForEveryone = false });
        }
        catch(Exception ex)
        {
            var errorCode = unchecked((int)(0x0000FFFFU & ex.HResult));
            if (errorCode != 98) // Sample error code, sam_status_failed_to_hangup_for_everyone (98)
            {
                throw;
            }
        }
    }
}
執行程式碼
請確定 Visual Studio 會針對 x64、x86 或 ARM64 建置應用程式,然後按 F5 開始執行應用程式。 然後,按一下 CommunicationCall 按鈕,向已定義的受話方撥打電話。
請記住,應用程式首次執行時,系統會提示使用者授與麥克風的存取權。