Azure 通訊服務的群組通話 Hero 範例會示範如何使用通訊服務的通話 Web SDK,來建立群組通話體驗。
在本範例快速入門中,我們會先了解範例的運作方式,再於本地機器上執行範例,然後使用您自己的 Azure 通訊服務資源將範例部署至 Azure。
下載程式碼
在 GitHub 上尋找此範例的專案。 您可以在個別的分支中找到目前處於公開預覽狀態的範例版本,例如 Teams Interop 和通話錄製。
概觀
此範例同時包含用戶端應用程式和伺服器端應用程式。 用戶端應用程式是使用 Microsoft Fluent UI 架構的 React/Redux Web 應用程式。 此應用程式會將要求傳送至 ASP.NET Core 的伺服器端應用程式,以協助用戶端應用程式連線至 Azure。
範例如下所示:
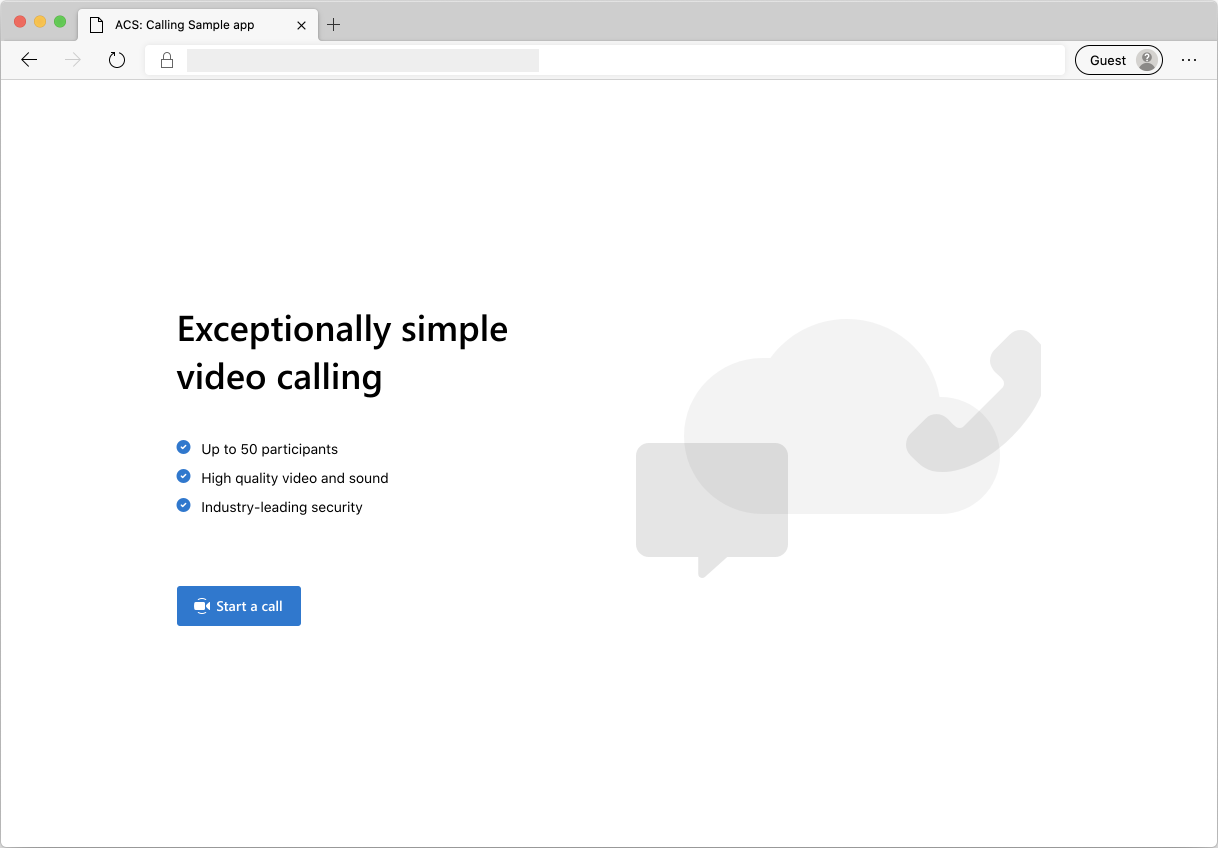
當您按下 [開始通話] 按鈕時,Web 應用程式就會從伺服器端應用程式提取使用者存取權杖。 然後,此權杖會用來將用戶端應用程式連線到 Azure 通訊服務。 一旦取得權杖之後,系統會提示您指定想要使用的相機和麥克風。 您能夠使用切換控制項來停用/啟用您的裝置:
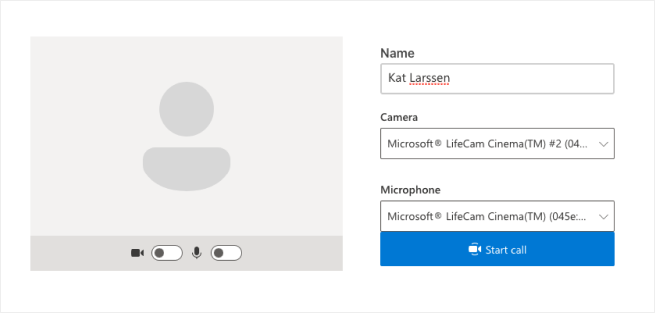
設定顯示名稱和裝置之後,您就可以加入通話的會話中。 您會看到核心通話體驗所在的主要通話畫布。
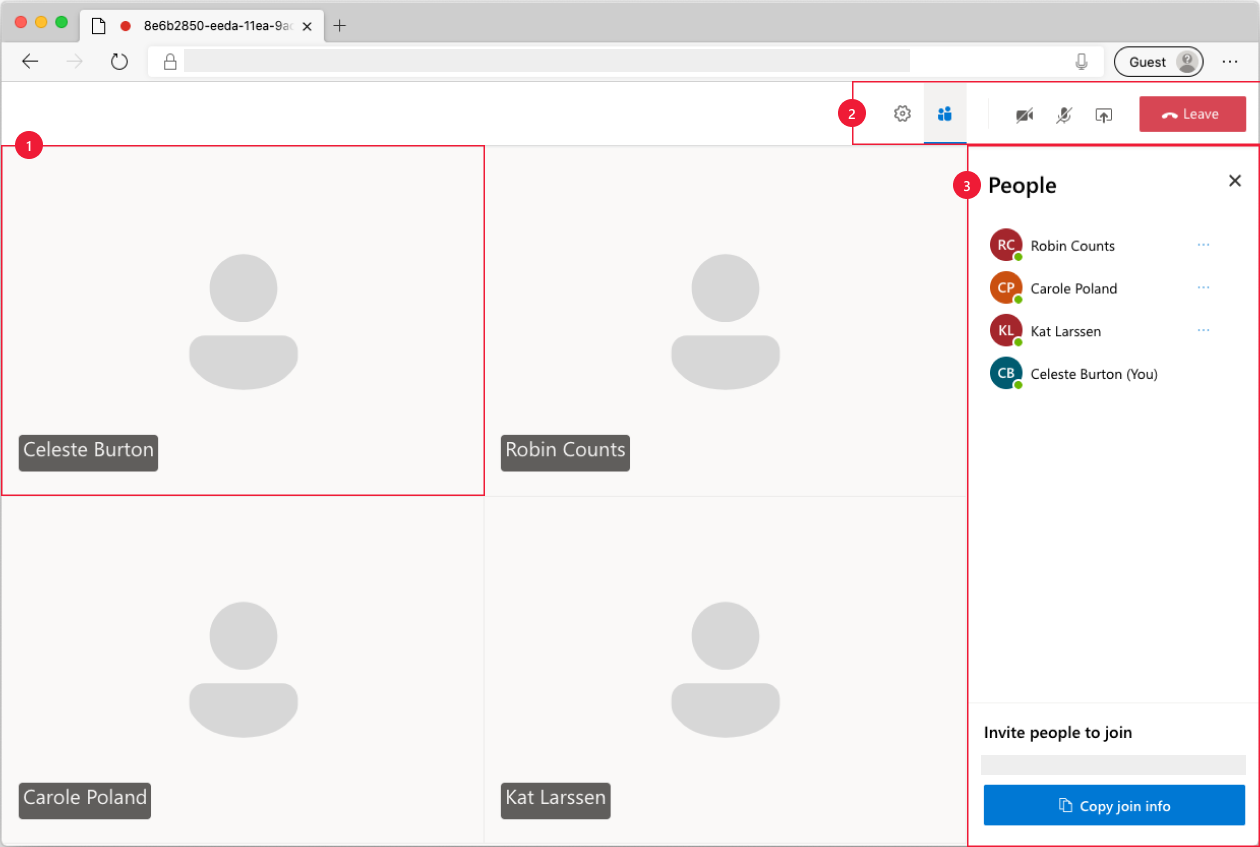
主要通話畫面的元件:
- 媒體資源庫:顯示參與者的主要階段。 如果參與者已啟用其相機,此處會顯示其影片摘要。 每個參與者都有個別圖格,其中顯示他們的顯示名稱和影片串流 (如果有的話)
- 標頭:這是主要通話控制項所在的位置,可切換設定和參與者側邊欄、開啟/關閉影片和混合功能、共用畫面及離開通話。
- 側邊列:使用標頭上的控制項進行切換時,此處會顯示參與者和設定資訊。 您可以使用右上角的 [X] 來關閉該元件。 參與者側邊欄會顯示參與者清單,以及邀請更多使用者加入聊天的連結。 [設定] 側邊欄可讓您設定麥克風和相機設定。
您能在下面找到有關設定範例的必要條件及步驟的詳細資訊。
必要條件
- 具有有效訂用帳戶的 Azure 帳戶。 如需詳細資訊,請參閱免費建立帳戶
- Node.js (12.18.4 及更新版本)
- Visual Studio Code (穩定組建)
- Azure 通訊服務資源。 如需詳細資訊,請參閱建立 Azure 通訊服務資源。 您需要在本快速入門中記錄您的資源連接字串。
第一次執行範例之前
開啟 [PowerShell]、[Windows 終端機]、[命令提示字元] 或 [對等] 的執行個體,然後瀏覽至您想要將範例複製到其中的目錄。
git clone https://github.com/Azure-Samples/communication-services-web-calling-hero.git從 Azure 入口網站或使用 Azure CLI 取得
Connection String。az communication list-key --name "<acsResourceName>" --resource-group "<resourceGroup>"如需連接字串的詳細資訊,請參閱建立 Azure 通訊資源
取得
Connection String之後,請將連接字串新增至 samples/Server/appsetting.json 檔案。 在變數中輸入您的連接字串:ResourceConnectionString。從 Azure 入口網站或使用 Azure CLI 取得
Endpoint string。az communication list-key --name "<acsResourceName>" --resource-group "<resourceGroup>"如需端點字串的詳細資訊,請參閱建立 Azure 通訊資源
取得
Endpoint String之後,請將端點字串新增至 samples/Server/appsetting.json 檔案。 在變數EndpointUrl中輸入您的端點字串
本機執行
安裝相依性
npm run setup啟動電話撥接應用程式
npm run start這會在提供網站檔案的連接埠 3000 上開啟客戶端伺服器,並在連接埠 8080 上開啟 API 伺服器,以執行呼叫參與者的權杖等功能。
疑難排解
應用程式會顯示「不支援的瀏覽器」畫面,但我處於支援的瀏覽器中。
如果您的應用程式是透過 localhost 以外的主機名提供服務,您必須透過 HTTPs 而非 HTTP 提供流量。
發佈至 Azure
npm run setupnpm run buildnpm run package- 使用 Azure 延伸模組並將 Calling/dist 目錄部署至您的應用程式服務
清除資源
如果您想要清除並移除通訊服務訂用帳戶,您可以刪除資源或資源群組。 刪除資源群組也會刪除與其相關聯的任何其他資源。 深入了解如何清除資源。
下一步
如需詳細資訊,請參閱下列文章:
延伸閱讀
- 範例 - 在我們的範例概觀頁面上尋找更多範例。
- Redux - 用戶端狀態管理
- FluentUI - Microsoft 支援的 UI 程式庫
- React - 組建使用者介面的程式庫
- ASP.NET Core - 用來建置 Web 應用程式的架構
Azure 通訊服務的 iOS 的群組通話 Hero 範例會示範如何使用通訊服務的通話 iOS SDK 程式庫,來建立群組通話體驗,其中包含音訊和視訊。 在本範例快速入門中,您將了解如何設定和執行範例。 提供內容範例的概觀。
下載程式碼
在 GitHub 上尋找此範例的專案。
概觀
樣本是一個原生 iOS 應用程式,會利用 Azure 通訊服務 iOS SDK 來建置通話體驗,其同時具有語音和視訊通話功能。 應用程式會使用伺服器端元件來布建存取權杖,然後用來初始化 Azure 通訊服務 SDK。 若要設定此伺服器端元件,請隨意遵循信任的服務與 Azure Functions 教學課程。
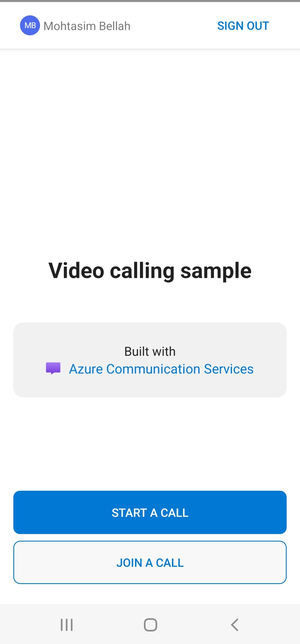
範例如下所示:
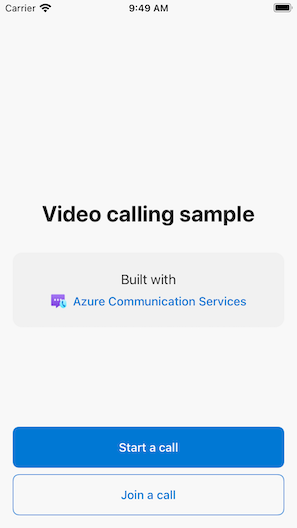
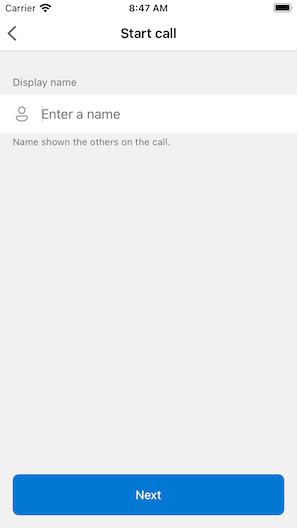
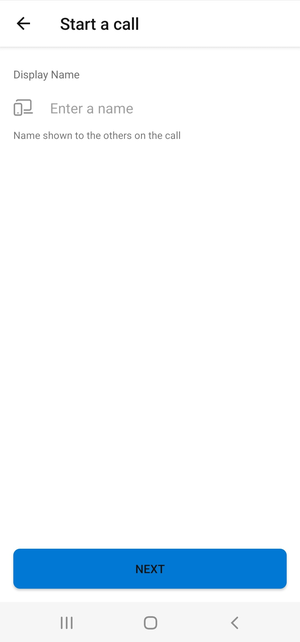
當您按下 [開始新呼叫] 按鈕時,iOS 應用程式會提示您輸入要用於呼叫的顯示名稱。
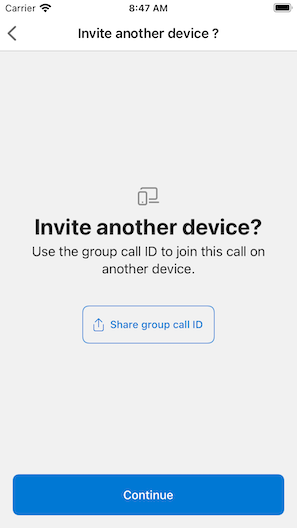
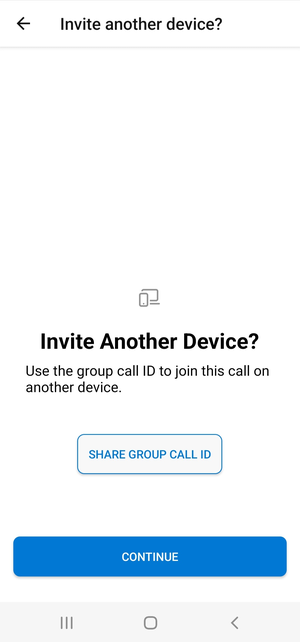
點選 [開始通話] 畫面上的 [下一步] 之後,您有機會透過 iOS 共用工作表共用通話的群組識別碼。
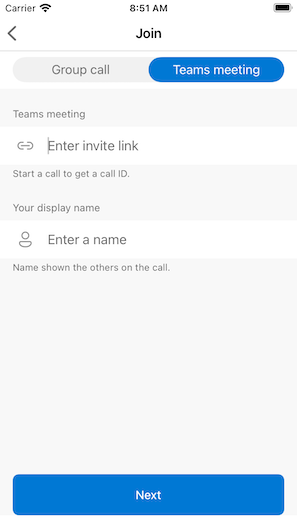
應用程式也可讓您藉由指定現有通話的識別碼或小組識別碼連結,加入現有的 Azure 通訊服務通話。
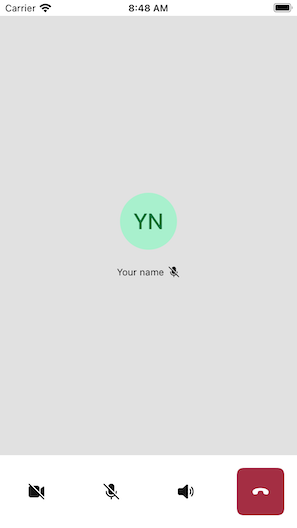
加入通話之後,系統會提示您授與應用程式存取相機和麥克風的權限,如果尚未獲得授權。 請記住,就像所有 AVFoundation 型應用程式一樣,真正的音訊和視訊功能只能在實際硬體上使用。
設定顯示名稱並加入通話後,您會看到核心通話體驗所在的主要通話畫布。
主要通話畫面的元件:
- 媒體資源庫:顯示參與者的主要階段。 如果參與者已啟用其相機,此處會顯示其影片摘要。 每個參與者都有個別圖格,其中顯示他們的顯示名稱和影片串流 (如果有的話)。 資源庫支援多個參與者,並在將參與者新增或移除至呼叫時更新。
- 動作列:這是主要呼叫控件所在的位置。 這些控制項可讓您開啟/關閉視訊和麥克風、共享螢幕,以及離開通話。
您可以在下面找到有關設定範例的必要條件及步驟的詳細資訊。
必要條件
- 具有有效訂用帳戶的 Azure 帳戶。 如需詳細資訊,請參閱免費建立帳戶。
- 執行 Xcode 的 Mac,以及安裝在您 Keychain 中的有效開發人員憑證。
- Azure 通訊服務資源。 如需詳細資訊,請參閱建立 Azure 通訊服務資源。
- 執行驗證端點的 Azure 函式來擷取存取權杖。
本機執行範例
群組呼叫範例可以使用 XCode 在本機執行。 開發人員可以使用其實體裝置或模擬器來測試應用程式。
第一次執行範例之前
- 執行
pod install安裝相依性。 - 在 XCode 中開啟
AzureCalling.xcworkspace。 - 在根目錄建立文本檔案,稱之為
AppSettings.xcconfig並設定值:communicationTokenFetchUrl = <your authentication endpoint, without the https:// component>
執行範例
在 XCode 中建置並執行範例,並在您選擇的模擬器或裝置上使用 AzureCalling 目標。
(選擇性)保障驗證端點
基於示範目的,此範例預設會使用可公開存取的端點來擷取 Azure 通訊服務存取權杖。 在生產案例中,我們建議使用您自己的安全端點來佈建您自己的權杖。
透過額外的設定,此範例支援連線到 Microsoft Entra ID (Microsoft Entra ID) 保護的端點,讓應用程式需要使用者記錄,才能擷取 Azure 通訊服務存取權杖。 請參閱下方步驟:
- 在您的應用程式上啟用 Microsoft Entra 驗證。
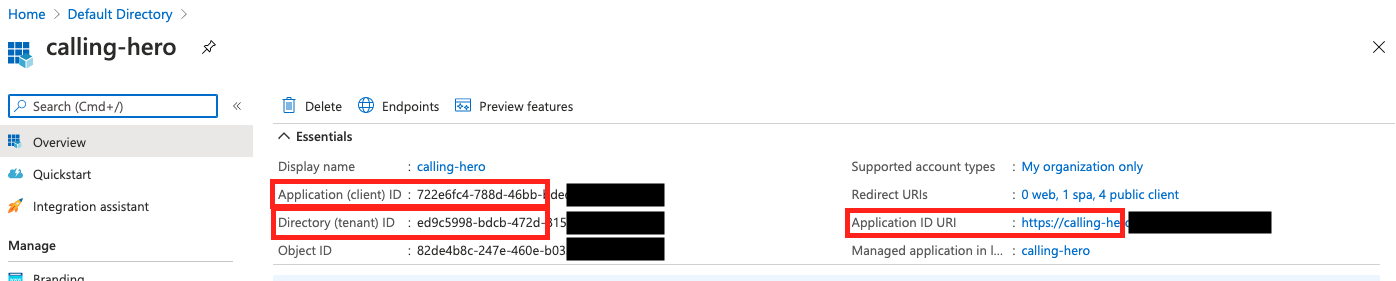
- 前往 Microsoft Entra 應用程式註冊底下的已註冊應用程式概觀頁面。 記下
Application (client) ID、Directory (tenant) ID、Application ID URI
- 如果尚未存在,請在根目錄建立
AppSettings.xcconfig檔案,並新增值:communicationTokenFetchUrl = <Application ID URI, without the https:// component> aadClientId = <Application (client) ID> aadTenantId = <Directory (tenant) ID>
清除資源
如果您想要清除並移除通訊服務訂用帳戶,您可以刪除資源或資源群組。 刪除資源群組也會刪除與其相關聯的任何其他資源。 深入了解如何清除資源。
下一步
如需詳細資訊,請參閱下列文章:
延伸閱讀
- Azure 通訊 GitHub - 在官方 GitHub 頁面上尋找更多範例和資訊
- 範例 - 在我們的範例概觀頁面上尋找更多範例。
- Azure 通訊通話功能 - 若要深入了解呼叫 iOS sdk -Azure 通訊 iOS 通話 SDK
Azure 通訊服務的 Android 的群組通話 Hero 範例會示範如何使用通訊服務的通話 Android SDK 程式庫,來建立群組通話體驗,其中包含音訊和視訊。 在本範例快速入門中,您將了解如何設定和執行範例。 提供內容範例的概觀。
下載程式碼
在 GitHub 上尋找此範例的專案。
概觀
樣本是一個原生 Android 應用程式,會利用 Azure 通訊服務 Android UI 用戶端程式庫來建置通話體驗,其同時具有語音和視訊通話功能。 應用程式會使用伺服器端元件來布建存取權杖,然後用來初始化 Azure 通訊服務 SDK。 若要設定此伺服器端元件,請隨意遵循信任的服務與 Azure Functions 教學課程。
範例如下所示:
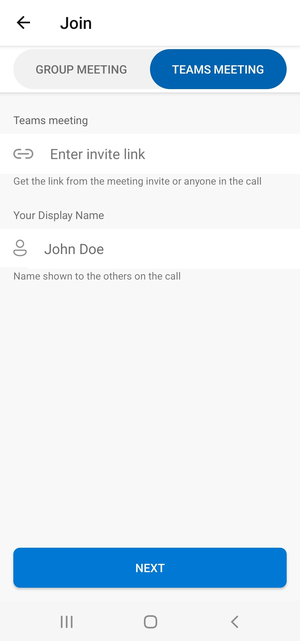
當您按下 [開始新呼叫] 按鈕時,Android 應用程式會提示您輸入要用於呼叫的顯示名稱。
點選 [開始通話] 頁面上的 [下一步] 之後,您有機會共用「群組通話識別碼」。
應用程式可讓您藉由指定現有通話的識別碼或小組會議識別碼連結並顯示名稱,加入現有的 Azure 通訊服務通話。
加入通話之後,系統會提示您授與應用程式存取相機和麥克風的權限,如果尚未獲得授權。 您會看到核心通話體驗所在的主要通話畫布。
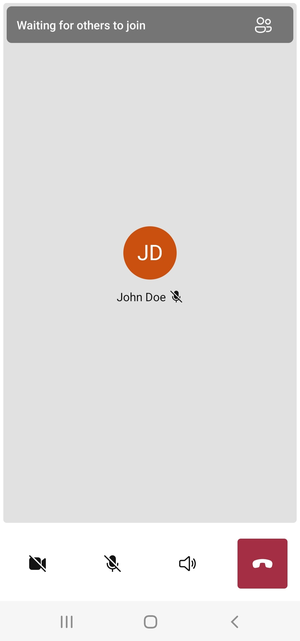
主要通話畫面的元件:
- 媒體資源庫:顯示參與者的主要階段。 如果參與者已啟用其相機,此處會顯示其影片摘要。 每個參與者都有個別圖格,其中顯示他們的顯示名稱和影片串流 (如果有的話)。 資源庫支援多個參與者,並在將參與者新增或移除至呼叫時更新。
- 動作列:這是主要呼叫控件所在的位置。 這些控制項可讓您開啟/關閉視訊和麥克風、共享螢幕,以及離開通話。
您可以在下面找到有關設定範例的必要條件及步驟的詳細資訊。
必要條件
- 具有有效訂用帳戶的 Azure 帳戶。 如需詳細資訊,請參閱免費建立帳戶。
- 電腦上執行的 Android Studio
- Azure 通訊服務資源。 如需詳細資訊,請參閱建立 Azure 通訊服務資源。
- 執行驗證端點的 Azure 函式來擷取存取權杖。
本機執行範例
群組呼叫範例可以使用 Android Studio 在本機執行。 開發人員可以使用其實體裝置或模擬器來測試應用程式。
第一次執行範例之前
- 開啟 Android Studio,然後選取
Open an Existing Project - 開啟範例下載版本內的
AzureCalling資料夾。 - 展開應用程式/資產以更新
appSettings.properties。 將金鑰的值communicationTokenFetchUrl設定為必要條件的驗證端點 URL。
執行範例
在 Android Studio 中建立並執行範例。
(選擇性)保障驗證端點
基於示範目的,此範例預設會使用可公開存取的端點來擷取 Azure 通訊服務權杖。 在生產案例中,我們建議使用您自己的安全端點來佈建您自己的權杖。
透過額外的設定,此範例支援連線到 Microsoft Entra ID (Microsoft Entra ID) 保護的端點,讓應用程式需要使用者記錄,才能擷取 Azure 通訊服務權杖。 請參閱下方步驟:
在您的應用程式上啟用 Microsoft Entra 驗證。
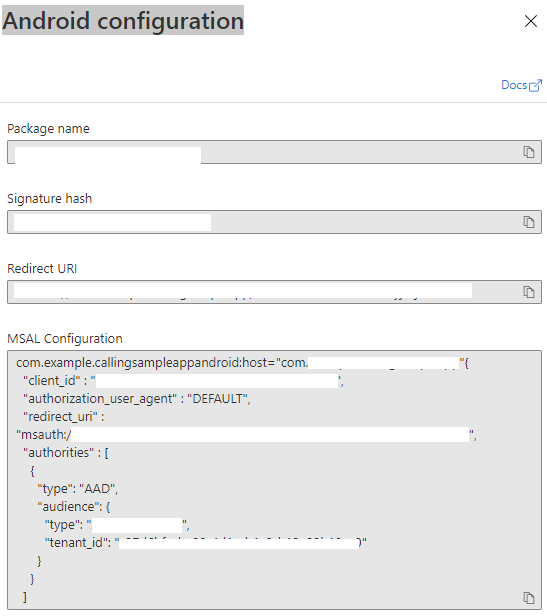
前往 Microsoft Entra 應用程式註冊底下的已註冊應用程式概觀頁面。 記下
Package name、Signature hash、MSAL Configuration。
編輯
AzureCalling/app/src/main/res/raw/auth_config_single_account.json並將isAADAuthEnabled設定為啟用 Microsoft Entra ID。編輯
AndroidManifest.xml,並將android:path設定為金鑰儲存區簽章雜湊。 (選擇性。目前的值會使用來自配套 debug.keystore 的雜湊。如果使用不同的金鑰儲存區,則必須更新此值。)<activity android:name="com.microsoft.identity.client.BrowserTabActivity"> <intent-filter> <action android:name="android.intent.action.VIEW" /> <category android:name="android.intent.category.DEFAULT" /> <category android:name="android.intent.category.BROWSABLE" /> <data android:host="com.azure.samples.communication.calling" android:path="/Signature hash" <!-- do not remove /. The current hash in AndroidManifest.xml is for debug.keystore. --> android:scheme="msauth" /> </intent-filter> </activity>從 Azure 入口網站複製 MSAL Android 設定,並貼到
AzureCalling/app/src/main/res/raw/auth_config_single_account.json。 包含 "account_mode": "SINGLE"{ "client_id": "", "authorization_user_agent": "DEFAULT", "redirect_uri": "", "account_mode" : "SINGLE", "authorities": [ { "type": "AAD", "audience": { "type": "AzureADMyOrg", "tenant_id": "" } } ] }編輯
AzureCalling/app/src/main/res/raw/auth_config_single_account.json將金鑰的值communicationTokenFetchUrl設定為安全性驗證端點 URL。編輯
AzureCalling/app/src/main/res/raw/auth_config_single_account.json,並從aadScopesAzure Active Directory範圍設定金鑰的值Expose an API將
graphURL中AzureCalling/app/assets/appSettings.properties的值設定為圖形 API 端點,以擷取使用者資訊。編輯
AzureCalling/app/src/main/assets/appSettings.properties並設定金鑰的值tenant,以啟用無訊息登入,讓使用者不需要在重新啟動應用程式時再次驗證。
清除資源
如果您想要清除並移除通訊服務訂用帳戶,您可以刪除資源或資源群組。 刪除資源群組也會刪除與其相關聯的任何其他資源。 深入了解如何清除資源。
下一步
如需詳細資訊,請參閱下列文章:
延伸閱讀
- Azure 通訊 GitHub - 在官方 GitHub 頁面上尋找更多範例和資訊
- 範例 - 在我們的範例概觀頁面上尋找更多範例。
- Azure 通訊通話功能 - 若要深入了解呼叫 Android sdk -Azure 通訊 Android 通話 SDK
Azure 通訊服務的 Windows 的群組通話 Hero 範例會示範如何使用通訊服務的通話 Windows SDK 程式庫,來建立群組通話體驗,其中包含音訊和視訊。 在本範例,您將了解如何設定和執行範例。 提供內容範例的概觀。
在此快速入門中,您將了解如何使用適用於 Windows 的 Azure 通訊服務通話 SDK,開始進行 1 對1 視訊通話。
UWP 範例程式碼
必要條件
若要完成本教學課程,您需要下列必要條件:
具有有效訂用帳戶的 Azure 帳戶。 免費建立帳戶。
安裝包含通用 Windows 平台開發工作負載的 Visual Studio 2022。
已部署通訊服務資源。 建立通訊服務資源。 您必須針對此快速入門記錄您的連接字串。
針對您的 Azure 通訊服務的使用者存取權杖。 您也可以使用 Azure CLI,並搭配您的連接字串執行命令,以建立使用者和存取權杖。
az communication identity token issue --scope voip --connection-string "yourConnectionString"如需詳細資訊,請參閱使用 Azure CLI 建立和管理存取權杖。
設定
建立專案
在 Visual Studio 中,使用 [空白應用程式 (通用 Windows)] 範本建立新專案,以設定單頁通用 Windows 平台 (UWP) 應用程式。
![螢幕擷取畫面:顯示 Visual Studio 內的 [新 UWP 專案] 視窗。](../quickstarts/voice-video-calling/media/windows/create-a-new-project.png)
安裝套件
以滑鼠右鍵按一下您的專案,然後移至 Manage Nuget Packages,以安裝 Azure.Communication.Calling.WindowsClient1.2.0-beta.1 \(英文\) 或更高版本。 請確定已選取 [包含發行前版本]。
要求存取
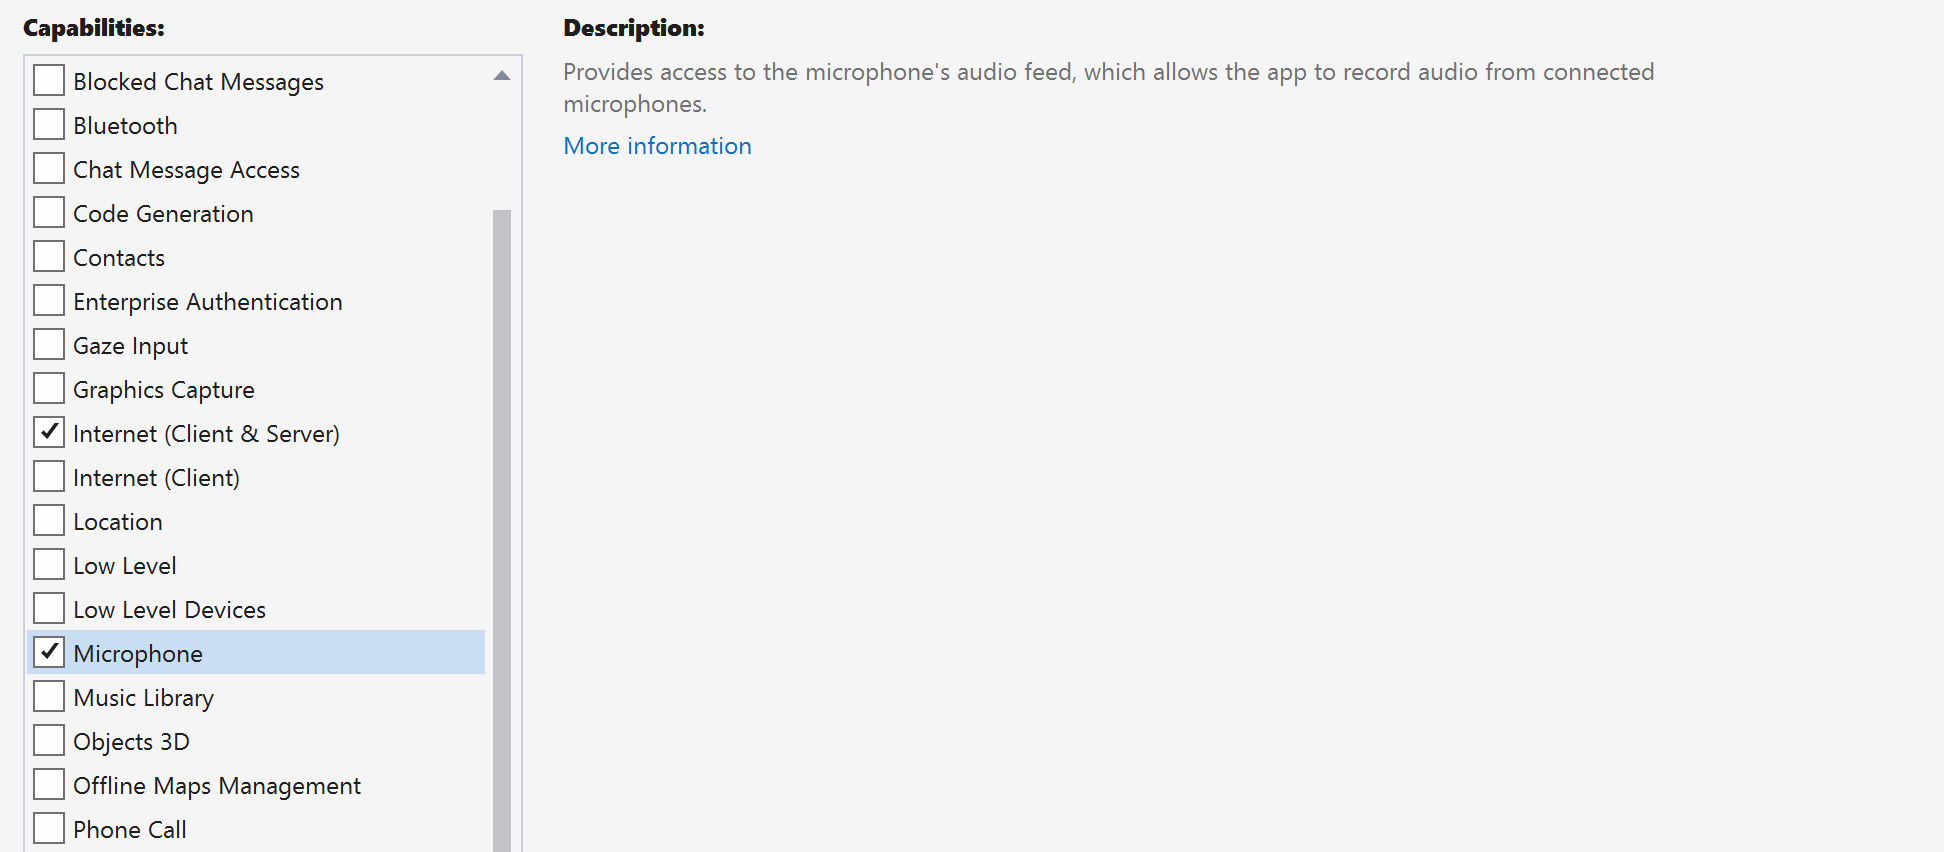
移至 [Package.appxmanifest],然後按一下 [Capabilities]。
檢查 Internet (Client & Server),以取得存取網際網路的輸入和輸出權限。
檢查 Microphone,以存取麥克風的音訊摘要。
檢查 WebCam,以存取裝置的相機。
以滑鼠右鍵按一下並選擇 [檢視程式碼],藉以將下列程式碼新增至您的 Package.appxmanifest。
<Extensions>
<Extension Category="windows.activatableClass.inProcessServer">
<InProcessServer>
<Path>RtmMvrUap.dll</Path>
<ActivatableClass ActivatableClassId="VideoN.VideoSchemeHandler" ThreadingModel="both" />
</InProcessServer>
</Extension>
</Extensions>
設定應用程式架構
我們必須設定基本配置來附加邏輯。 為了撥打外撥電話,我們需要 TextBox 來提供被通話者的使用者識別碼。 我們也需要 [Start Call] 按鈕和 [Hang Up] 按鈕。
同時還需要預覽本機視訊,並轉譯另一位參與者的遠端視訊。 因此,我們需要兩個元素來顯示視訊串流。
開啟專案的 MainPage.xaml,並使用下列實作取代內容。
<Page
    x:Class="CallingQuickstart.MainPage"
    xmlns="http://schemas.microsoft.com/winfx/2006/xaml/presentation"
    xmlns:x="http://schemas.microsoft.com/winfx/2006/xaml"
    xmlns:local="using:CallingQuickstart"
    xmlns:d="http://schemas.microsoft.com/expression/blend/2008"
    xmlns:mc="http://schemas.openxmlformats.org/markup-compatibility/2006"
    mc:Ignorable="d"
    Background="{ThemeResource ApplicationPageBackgroundThemeBrush}">

    <Grid x:Name="MainGrid" HorizontalAlignment="Stretch">
        <Grid.RowDefinitions>
            <RowDefinition Height="*"/>
            <RowDefinition Height="Auto"/>
            <RowDefinition Height="200*"/>
            <RowDefinition Height="60*"/>
            <RowDefinition Height="Auto"/>
        </Grid.RowDefinitions>

        <Grid Grid.Row="0" x:Name="AppTitleBar" Background="LightSeaGreen">
            <!-- Width of the padding columns is set in LayoutMetricsChanged handler. -->
            <!-- Using padding columns instead of Margin ensures that the background paints the area under the caption control buttons (for transparent buttons). -->
            <TextBlock x:Name="QuickstartTitle" Text="Calling Quickstart sample title bar" Style="{StaticResource CaptionTextBlockStyle}" Padding="4,4,0,0"/>
        </Grid>

        <TextBox Grid.Row="1" x:Name="CalleeTextBox" PlaceholderText="Who would you like to call?" TextWrapping="Wrap" VerticalAlignment="Center" />

        <Grid Grid.Row="2" Background="LightGray">
            <Grid.RowDefinitions>
                <RowDefinition/>
            </Grid.RowDefinitions>
            <Grid.ColumnDefinitions>
                <ColumnDefinition Width="*"/>
                <ColumnDefinition Width="*"/>
            </Grid.ColumnDefinitions>
            <MediaPlayerElement x:Name="LocalVideo" HorizontalAlignment="Center" Stretch="UniformToFill" Grid.Column="0" VerticalAlignment="Center" AutoPlay="True" />
            <MediaPlayerElement x:Name="RemoteVideo" HorizontalAlignment="Center" Stretch="UniformToFill" Grid.Column="1" VerticalAlignment="Center" AutoPlay="True" />
        </Grid>
        <StackPanel Grid.Row="3" Orientation="Vertical" Grid.RowSpan="2">
            <StackPanel Orientation="Horizontal" Margin="10">
                <TextBlock VerticalAlignment="Center">Cameras:</TextBlock>
                <ComboBox x:Name="CameraList" HorizontalAlignment="Left" Grid.Column="0" DisplayMemberPath="Name" SelectionChanged="CameraList_SelectionChanged" Margin="10"/>
            </StackPanel>
            <StackPanel Orientation="Horizontal">
                <Button x:Name="CallButton" Content="Start/Join call" Click="CallButton_Click" VerticalAlignment="Center" Margin="10,0,0,0" Height="40" Width="123"/>
                <Button x:Name="HangupButton" Content="Hang up" Click="HangupButton_Click" VerticalAlignment="Center" Margin="10,0,0,0" Height="40" Width="123"/>
                <CheckBox x:Name="MuteLocal" Content="Mute" Margin="10,0,0,0" Click="MuteLocal_Click" Width="74"/>
                <CheckBox x:Name="BackgroundBlur" Content="Background blur" Width="142" Margin="10,0,0,0" Click="BackgroundBlur_Click"/>
            </StackPanel>
        </StackPanel>
        <TextBox Grid.Row="4" x:Name="Stats" Text="" TextWrapping="Wrap" VerticalAlignment="Center" Height="30" Margin="0,2,0,0" BorderThickness="2" IsReadOnly="True" Foreground="LightSlateGray" />
    </Grid>
</Page>
開啟 App.xaml.cs (以滑鼠右鍵按一下並選擇 [檢視程式碼]),並將這一行新增至頂端:
using CallingQuickstart;
開啟 MainPage.xaml.cs (按一下滑鼠右鍵並選擇 [檢視程式碼]),然後使用下列實作取代內容:
using Azure.Communication.Calling.WindowsClient;
using System;
using System.Collections.Generic;
using System.Linq;
using System.Threading.Tasks;
using Windows.ApplicationModel;
using Windows.ApplicationModel.Core;
using Windows.Media.Core;
using Windows.Networking.PushNotifications;
using Windows.UI;
using Windows.UI.ViewManagement;
using Windows.UI.Xaml;
using Windows.UI.Xaml.Controls;
using Windows.UI.Xaml.Media;
using Windows.UI.Xaml.Navigation;

namespace CallingQuickstart
{
    public sealed partial class MainPage : Page
    {
        private const string authToken = "<Azure Communication Services auth token>";

        private CallClient callClient;
        private CallTokenRefreshOptions callTokenRefreshOptions;
        private CallAgent callAgent;
        private CommunicationCall call = null;

        private LocalOutgoingAudioStream micStream;
        private LocalOutgoingVideoStream cameraStream;

        #region Page initialization
        public MainPage()
        {
            this.InitializeComponent();

            // Hide default title bar.
            var coreTitleBar = CoreApplication.GetCurrentView().TitleBar;
            coreTitleBar.ExtendViewIntoTitleBar = true;

            QuickstartTitle.Text = $"{Package.Current.DisplayName} - Ready";
            Window.Current.SetTitleBar(AppTitleBar);

            CallButton.IsEnabled = true;
            HangupButton.IsEnabled = !CallButton.IsEnabled;
            MuteLocal.IsChecked = MuteLocal.IsEnabled = !CallButton.IsEnabled;

            ApplicationView.PreferredLaunchViewSize = new Windows.Foundation.Size(800, 600);
            ApplicationView.PreferredLaunchWindowingMode = ApplicationViewWindowingMode.PreferredLaunchViewSize;
        }

        protected override async void OnNavigatedTo(NavigationEventArgs e)
        {
            await InitCallAgentAndDeviceManagerAsync();

            base.OnNavigatedTo(e);
        }
#endregion

        private async Task InitCallAgentAndDeviceManagerAsync()
        {
            // Initialize call agent and Device Manager
        }

        private async void Agent_OnIncomingCallAsync(object sender, IncomingCall incomingCall)
        {
            // Accept an incoming call
        }

        private async void CallButton_Click(object sender, RoutedEventArgs e)
        {
            // Start a call with video
        }

        private async void HangupButton_Click(object sender, RoutedEventArgs e)
        {
            // End the current call
        }

        private async void Call_OnStateChangedAsync(object sender, PropertyChangedEventArgs args)
        {
            var call = sender as CommunicationCall;

            if (call != null)
            {
                var state = call.State;

                await Dispatcher.RunAsync(Windows.UI.Core.CoreDispatcherPriority.Normal, () =>
                {
                    QuickstartTitle.Text = $"{Package.Current.DisplayName} - {state.ToString()}";
                    Window.Current.SetTitleBar(AppTitleBar);

                    HangupButton.IsEnabled = state == CallState.Connected || state == CallState.Ringing;
                    CallButton.IsEnabled = !HangupButton.IsEnabled;
                    MuteLocal.IsEnabled = !CallButton.IsEnabled;
                });

                switch (state)
                {
                    case CallState.Connected:
                        {
                            break;
                        }
                    case CallState.Disconnected:
                        {
                            break;
                        }
                    default: break;
                }
            }
        }

        private async void CameraList_SelectionChanged(object sender, SelectionChangedEventArgs e)
        {
            // Handle camera selection
        }
    }
}
物件模型
下列類別和介面會處理 Azure 通訊服務通話 SDK 的一些重大功能:
| 名稱 | 描述 |
|---|---|
CallClient |
CallClient 是通話用戶端程式庫的主要進入點。 |
CallAgent |
CallAgent 可用來開始和加入通話。 |
CommunicationCall |
CommunicationCall 可用來管理已撥打或已加入的通話。 |
CallTokenCredential |
CallTokenCredential 可用來作為權杖認證以將 CallAgent 具現化。 |
CommunicationUserIdentifier |
CommunicationUserIdentifier 可用來代表使用者的身分識別,其可以是下列其中一個選項:CommunicationUserIdentifier、PhoneNumberIdentifier 或 CallingApplication。 |
驗證用戶端
若要將 CallAgent 初始化,您需要使用者存取權杖。 一般來說,此權杖會從具有應用程式特定驗證的服務產生。 如需使用者存取權杖的詳細資訊,請參閱使用者存取權杖指南。
在快速入門中,將 <AUTHENTICATION_TOKEN> 取代為針對您的 Azure 通訊服務資源所產生的使用者存取權杖。
當您具有權杖之後,請使用它來將 CallAgent 執行個體初始化,讓我們能夠撥打和接收通話。 為了存取裝置上的相機,我們也需要取得裝置管理員執行個體。
將下列程式碼新增至 InitCallAgentAndDeviceManagerAsync 函式。
this.callClient = new CallClient(new CallClientOptions() {
    Diagnostics = new CallDiagnosticsOptions() {
        AppName = "CallingQuickstart",
        AppVersion="1.0",
        Tags = new[] { "Calling", "ACS", "Windows" }
        }
    });

// Set up local video stream using the first camera enumerated
var deviceManager = await this.callClient.GetDeviceManagerAsync();
var camera = deviceManager?.Cameras?.FirstOrDefault();
var mic = deviceManager?.Microphones?.FirstOrDefault();
micStream = new LocalOutgoingAudioStream();

CameraList.ItemsSource = deviceManager.Cameras.ToList();

if (camera != null)
{
    CameraList.SelectedIndex = 0;
}

callTokenRefreshOptions = new CallTokenRefreshOptions(false);
callTokenRefreshOptions.TokenRefreshRequested += OnTokenRefreshRequestedAsync;

var tokenCredential = new CallTokenCredential(authToken, callTokenRefreshOptions);

var callAgentOptions = new CallAgentOptions()
{
    DisplayName = "Contoso",
    //https://github.com/lukes/ISO-3166-Countries-with-Regional-Codes/blob/master/all/all.csv
    EmergencyCallOptions = new EmergencyCallOptions() { CountryCode = "840" }
};


try
{
    this.callAgent = await this.callClient.CreateCallAgentAsync(tokenCredential, callAgentOptions);
    //await this.callAgent.RegisterForPushNotificationAsync(await this.RegisterWNS());
    this.callAgent.CallsUpdated += OnCallsUpdatedAsync;
    this.callAgent.IncomingCallReceived += OnIncomingCallAsync;

}
catch(Exception ex)
{
    if (ex.HResult == -2147024809)
    {
        // E_INVALIDARG
        // Handle possible invalid token
    }
}
開始視訊通話
將實作新增至 CallButton_Click,以開始視訊通話。 我們需要使用裝置管理員執行個體來列舉相機,並建構 LocalOutgoingVideoStream。 我們需要使用 VideoOptions 設定 LocalVideoStream,並使用 startCallOptions 傳遞它,以設定通話的初始選項。 透過將 LocalOutgoingVideoStream 附加至 MediaElement,我們就能看到本機視訊的預覽。
var callString = CalleeTextBox.Text.Trim();

if (!string.IsNullOrEmpty(callString))
{
    if (callString.StartsWith("8:")) // 1:1 Azure Communication Services call
    {
        call = await StartAcsCallAsync(callString);
    }
    else if (callString.StartsWith("+")) // 1:1 phone call
    {
        call = await StartPhoneCallAsync(callString, "+12133947338");
    }
    else if (Guid.TryParse(callString, out Guid groupId))// Join group call by group guid
    {
        call = await JoinGroupCallByIdAsync(groupId);
    }
    else if (Uri.TryCreate(callString, UriKind.Absolute, out Uri teamsMeetinglink)) //Teams meeting link
    {
        call = await JoinTeamsMeetingByLinkAsync(teamsMeetinglink);
    }
}

if (call != null)
{
    call.RemoteParticipantsUpdated += OnRemoteParticipantsUpdatedAsync;
    call.StateChanged += OnStateChangedAsync;
}
新增方法來開始或加入不同類型的通話 (1 對 1 Azure 通訊服務通話、1:1 通話、Azure 通訊服務群組通話、Teams 會議加入等)。
private async Task<CommunicationCall> StartAcsCallAsync(string acsCallee)
{
    var options = await GetStartCallOptionsAsync();
    var call = await this.callAgent.StartCallAsync( new [] { new UserCallIdentifier(acsCallee) }, options);
    return call;
}

private async Task<CommunicationCall> StartPhoneCallAsync(string acsCallee, string alternateCallerId)
{
    var options = await GetStartCallOptionsAsync();
    options.AlternateCallerId = new PhoneNumberCallIdentifier(alternateCallerId);

    var call = await this.callAgent.StartCallAsync( new [] { new PhoneNumberCallIdentifier(acsCallee) }, options);
    return call;
}

private async Task<CommunicationCall> JoinGroupCallByIdAsync(Guid groupId)
{
    var joinCallOptions = await GetJoinCallOptionsAsync();

    var groupCallLocator = new GroupCallLocator(groupId);
    var call = await this.callAgent.JoinAsync(groupCallLocator, joinCallOptions);
    return call;
}

private async Task<CommunicationCall> JoinTeamsMeetingByLinkAsync(Uri teamsCallLink)
{
    var joinCallOptions = await GetJoinCallOptionsAsync();

    var teamsMeetingLinkLocator = new TeamsMeetingLinkLocator(teamsCallLink.AbsoluteUri);
    var call = await callAgent.JoinAsync(teamsMeetingLinkLocator, joinCallOptions);
    return call;
}

private async Task<StartCallOptions> GetStartCallOptionsAsync()
{
    return new StartCallOptions() {
        OutgoingAudioOptions = new OutgoingAudioOptions() { IsOutgoingAudioMuted = true, OutgoingAudioStream = micStream  },
        OutgoingVideoOptions = new OutgoingVideoOptions() { OutgoingVideoStreams = new OutgoingVideoStream[] { cameraStream } }
    };
}

private async Task<JoinCallOptions> GetJoinCallOptionsAsync()
{
    return new JoinCallOptions() {
        OutgoingAudioOptions = new OutgoingAudioOptions() { IsOutgoingAudioMuted = true },
        OutgoingVideoOptions = new OutgoingVideoOptions() { OutgoingVideoStreams = new OutgoingVideoStream[] { cameraStream } }
    };
}
根據 CameraList_SelectionChanged 方法上選取的相機,新增程式碼來建立 LocalVideoStream。
var selectedCamera = CameraList.SelectedItem as VideoDeviceDetails;
cameraStream = new LocalOutgoingVideoStream(selectedCamera);

 var localUri = await cameraStream.StartPreviewAsync();
await Dispatcher.RunAsync(Windows.UI.Core.CoreDispatcherPriority.Normal, () =>
{
    LocalVideo.Source = MediaSource.CreateFromUri(localUri);
});

if (call != null)
{
    await call?.StartVideoAsync(cameraStream);
}
接聽來電
將實作新增至 OnIncomingCallAsync,以透過視訊接聽來電,將 LocalVideoStream 傳遞至 acceptCallOptions。
var incomingCall = args.IncomingCall;

var acceptCallOptions = new AcceptCallOptions() {
    IncomingVideoOptions = new IncomingVideoOptions()
    {
        IncomingVideoStreamKind = VideoStreamKind.RemoteIncoming
    }
};

_ = await incomingCall.AcceptAsync(acceptCallOptions);
遠端參與者和遠端視訊串流
在通話執行個體上,所有遠端參與者均可透過 RemoteParticipants 集合取得。 通話連線後 (CallState.Connected),我們就能存取通話的遠端參與者,並處理遠端視訊串流。
注意
當使用者加入通話時,他們可以透過 RemoteParticipants 集合存取目前的遠程參與者。 這些現有參與者不會觸發 RemoteParticipantsUpdated 事件。 只有在遠端參與者在使用者已經在通話中時加入或離開通話時,才會觸發此事件。
private async void Call_OnVideoStreamsUpdatedAsync(object sender, RemoteVideoStreamsEventArgs args)
{
    foreach (var remoteVideoStream in args.AddedRemoteVideoStreams)
    {
        await Dispatcher.RunAsync(Windows.UI.Core.CoreDispatcherPriority.Normal, async () =>
        {
            RemoteVideo.Source = await remoteVideoStream.Start();
        });
    }

    foreach (var remoteVideoStream in args.RemovedRemoteVideoStreams)
    {
        remoteVideoStream.Stop();
    }
}

private async void Agent_OnCallsUpdatedAsync(object sender, CallsUpdatedEventArgs args)
{
    var removedParticipants = new List<RemoteParticipant>();
    var addedParticipants = new List<RemoteParticipant>();

    foreach(var call in args.RemovedCalls)
    {
        removedParticipants.AddRange(call.RemoteParticipants.ToList<RemoteParticipant>());
    }

    foreach (var call in args.AddedCalls)
    {
        addedParticipants.AddRange(call.RemoteParticipants.ToList<RemoteParticipant>());
    }

    await OnParticipantChangedAsync(removedParticipants, addedParticipants);
}

private async Task OnParticipantChangedAsync(IEnumerable<RemoteParticipant> removedParticipants, IEnumerable<RemoteParticipant> addedParticipants)
{
    foreach (var participant in removedParticipants)
    {
        foreach(var incomingVideoStream in  participant.IncomingVideoStreams)
        {
            var remoteVideoStream = incomingVideoStream as RemoteIncomingVideoStream;
            if (remoteVideoStream != null)
            {
                await remoteVideoStream.StopPreviewAsync();
            }
        }
        participant.VideoStreamStateChanged -= OnVideoStreamStateChanged;
    }

    foreach (var participant in addedParticipants)
    {
        participant.VideoStreamStateChanged += OnVideoStreamStateChanged;
    }
}

private void OnVideoStreamStateChanged(object sender, VideoStreamStateChangedEventArgs e)
{
    CallVideoStream callVideoStream = e.CallVideoStream;

    switch (callVideoStream.StreamDirection)
    {
        case StreamDirection.Outgoing:
            OnOutgoingVideoStreamStateChanged(callVideoStream as OutgoingVideoStream);
            break;
        case StreamDirection.Incoming:
            OnIncomingVideoStreamStateChanged(callVideoStream as IncomingVideoStream);
            break;
    }
}

private async void OnIncomingVideoStreamStateChanged(IncomingVideoStream incomingVideoStream)
{
    switch (incomingVideoStream.State)
    {
        case VideoStreamState.Available:
        {
            switch (incomingVideoStream.Kind)
            {
                case VideoStreamKind.RemoteIncoming:
                    var remoteVideoStream = incomingVideoStream as RemoteIncomingVideoStream;
                    var uri = await remoteVideoStream.StartPreviewAsync();

                    await Dispatcher.RunAsync(Windows.UI.Core.CoreDispatcherPriority.Normal, () =>
                    {
                        RemoteVideo.Source = MediaSource.CreateFromUri(uri);
                    });
                    break;

                case VideoStreamKind.RawIncoming:
                    break;
            }
            break;
        }
        case VideoStreamState.Started:
            break;
        case VideoStreamState.Stopping:
            break;
        case VideoStreamState.Stopped:
            if (incomingVideoStream.Kind == VideoStreamKind.RemoteIncoming)
            {
                var remoteVideoStream = incomingVideoStream as RemoteIncomingVideoStream;
                await remoteVideoStream.StopPreviewAsync();
            }
            break;
        case VideoStreamState.NotAvailable:
            break;
    }

}
轉譯遠端視訊
針對每個遠端視訊串流,將其附加至 MediaElement。
private async Task AddVideoStreamsAsync(IReadOnlyList<RemoteVideoStream> remoteVideoStreams)
{
    foreach (var remoteVideoStream in remoteVideoStreams)
    {
        var remoteUri = await remoteVideoStream.Start();

        await Dispatcher.RunAsync(Windows.UI.Core.CoreDispatcherPriority.Normal, () =>
        {
            RemoteVideo.Source = remoteUri;
            RemoteVideo.Play();
        });
    }
}
通話狀態更新
當通話中斷連線之後,我們需要清除視訊轉譯器,並在遠端參與者一開始加入通話時處理這種情況。
private async void Call_OnStateChanged(object sender, PropertyChangedEventArgs args)
{
    switch (((Call)sender).State)
    {
        case CallState.Disconnected:
            await Dispatcher.RunAsync(Windows.UI.Core.CoreDispatcherPriority.Normal, () =>
            {
                LocalVideo.Source = null;
                RemoteVideo.Source = null;
            });
            break;

        case CallState.Connected:
            foreach (var remoteParticipant in call.RemoteParticipants)
            {
                String remoteParticipantMRI = remoteParticipant.Identifier.ToString();
                remoteParticipantDictionary.TryAdd(remoteParticipantMRI, remoteParticipant);
                await AddVideoStreams(remoteParticipant.VideoStreams);
                remoteParticipant.OnVideoStreamsUpdated += Call_OnVideoStreamsUpdated;
            }
            break;

        default:
            break;
    }
}
結束通話
按一下 [Hang Up] 按鈕時,結束目前的通話。 將實作新增至 HangupButton_Click,以使用我們建立的 callAgent 結束通話,然後終止參與者更新和通話狀態事件處理常式。
var call = this.callAgent?.Calls?.FirstOrDefault();
if (call != null)
{
    try
    {
        await call.HangUpAsync(new HangUpOptions() { ForEveryone = true });
    }
    catch(Exception ex)
    {
    }
}
執行程式碼
在 Visual Studio 中,您可以建置並執行程式碼。 針對解決方案平台,我們支援 ARM64、x64 和 x86。
您可以在文字欄位中提供使用者識別碼並按一下 [Start Call] 按鈕,以進行外撥視訊通話。
注意:呼叫 8:echo123 會停止視訊串流,因為回應聊天機器人不支持視訊串流。
如需使用者識別碼 (身分識別) 的詳細資訊,請參閱使用者存取權杖指南。
WinUI 3 範例程式碼
必要條件
若要完成本教學課程,您需要下列必要條件:
具有有效訂用帳戶的 Azure 帳戶。 免費建立帳戶。
如何建立 WinUI 3 應用程式的基礎知識。 建立您的第一個 WinUI 3 (Windows App SDK) 專案是一個很好的入門資源。
已部署通訊服務資源。 建立通訊服務資源。 您必須針對此快速入門記錄您的連接字串。
針對您的 Azure 通訊服務的使用者存取權杖。 您也可以使用 Azure CLI,並搭配您的連接字串執行命令,以建立使用者和存取權杖。
az communication identity token issue --scope voip --connection-string "yourConnectionString"如需詳細資訊,請參閱使用 Azure CLI 建立和管理存取權杖。
設定
建立專案
在 Visual Studio 中,使用 [已封裝的空白應用程式 (WinUI 3 in Desktop)] 範本建立新專案,以設定單頁 WinUI 3 應用程式。
![螢幕擷取畫面:顯示 Visual Studio 內的 [新 WinUI 專案] 視窗。](../quickstarts/voice-video-calling/media/windows/create-a-new-winui-project.png)
安裝套件
以滑鼠右鍵按一下您的專案,然後移至 Manage Nuget Packages,以安裝 Azure.Communication.Calling.WindowsClient1.0.0 \(英文\) 或更高版本。 請確定已選取 [包含發行前版本]。
要求存取
將下列程式碼新增至 app.manifest:
<file name="RtmMvrMf.dll">
    <activatableClass name="VideoN.VideoSchemeHandler" threadingModel="both" xmlns="urn:schemas-microsoft-com:winrt.v1" />
</file>
設定應用程式架構
我們必須設定基本配置來附加邏輯。 為了撥打外撥電話,我們需要 TextBox 來提供被通話者的使用者識別碼。 我們也需要 [Start Call] 按鈕和 [Hang Up] 按鈕。
同時還需要預覽本機視訊,並轉譯另一位參與者的遠端視訊。 因此,我們需要兩個元素來顯示視訊串流。
開啟專案的 MainWindow.xaml,並使用下列實作取代內容。
<Page
    x:Class="CallingQuickstart.MainPage"
    xmlns="http://schemas.microsoft.com/winfx/2006/xaml/presentation"
    xmlns:x="http://schemas.microsoft.com/winfx/2006/xaml"
    xmlns:local="using:CallingQuickstart"
    xmlns:d="http://schemas.microsoft.com/expression/blend/2008"
    xmlns:mc="http://schemas.openxmlformats.org/markup-compatibility/2006"
    mc:Ignorable="d">

    <Grid x:Name="MainGrid">
        <Grid.RowDefinitions>
            <RowDefinition Height="32"/>
            <RowDefinition Height="Auto"/>
            <RowDefinition Height="200*"/>
            <RowDefinition Height="60*"/>
            <RowDefinition Height="Auto"/>
        </Grid.RowDefinitions>

        <Grid Grid.Row="0" x:Name="AppTitleBar" Background="LightSeaGreen">
            <!-- Width of the padding columns is set in LayoutMetricsChanged handler. -->
            <!-- Using padding columns instead of Margin ensures that the background paints the area under the caption control buttons (for transparent buttons). -->
            <TextBlock x:Name="QuickstartTitle" Text="Calling Quickstart sample title bar" Style="{StaticResource CaptionTextBlockStyle}" Padding="4,4,0,0"/>
        </Grid>

        <TextBox Grid.Row="1" x:Name="CalleeTextBox" PlaceholderText="Who would you like to call?" TextWrapping="Wrap" VerticalAlignment="Center" />

        <Grid Grid.Row="2" Background="LightGray">
            <Grid.RowDefinitions>
                <RowDefinition/>
            </Grid.RowDefinitions>
            <Grid.ColumnDefinitions>
                <ColumnDefinition Width="*"/>
                <ColumnDefinition Width="*"/>
            </Grid.ColumnDefinitions>
            <MediaPlayerElement x:Name="LocalVideo" HorizontalAlignment="Center" Stretch="UniformToFill" Grid.Column="0" VerticalAlignment="Center" AutoPlay="True" />
            <MediaPlayerElement x:Name="RemoteVideo" HorizontalAlignment="Center" Stretch="UniformToFill" Grid.Column="1" VerticalAlignment="Center" AutoPlay="True" />
        </Grid>
        <StackPanel Grid.Row="3" Orientation="Vertical" Grid.RowSpan="2">
            <StackPanel Orientation="Horizontal" Margin="10">
                <TextBlock VerticalAlignment="Center">Cameras:</TextBlock>
                <ComboBox x:Name="CameraList" HorizontalAlignment="Left" Grid.Column="0" DisplayMemberPath="Name" SelectionChanged="CameraList_SelectionChanged" Margin="10"/>
            </StackPanel>
            <StackPanel Orientation="Horizontal">
                <Button x:Name="CallButton" Content="Start/Join call" Click="CallButton_Click" VerticalAlignment="Center" Margin="10,0,0,0" Height="40" Width="123"/>
                <Button x:Name="HangupButton" Content="Hang up" Click="HangupButton_Click" VerticalAlignment="Center" Margin="10,0,0,0" Height="40" Width="123"/>
                <CheckBox x:Name="MuteLocal" Content="Mute" Margin="10,0,0,0" Click="MuteLocal_Click" Width="74"/>
                <CheckBox x:Name="BackgroundBlur" Content="Background blur" Width="142" Margin="10,0,0,0" Click="BackgroundBlur_Click"/>
            </StackPanel>
        </StackPanel>
        <TextBox Grid.Row="4" x:Name="Stats" Text="" TextWrapping="Wrap" VerticalAlignment="Center" Height="30" Margin="0,2,0,0" BorderThickness="2" IsReadOnly="True" Foreground="LightSlateGray" />
    </Grid>
</Page>
開啟 App.xaml.cs (以滑鼠右鍵按一下並選擇 [檢視程式碼]),並將這一行新增至頂端:
using CallingQuickstart;
開啟 MainWindow.xaml.cs (按一下滑鼠右鍵並選擇 [檢視程式碼]),然後使用下列實作取代內容:
using Azure.Communication.Calling.WindowsClient;
using Azure.WinRT.Communication;
using Microsoft.UI.Xaml;
using System;
using System.Collections.Generic;
using System.Linq;
using System.Threading.Tasks;
using Windows.Media.Core;

namespace CallingQuickstart
{
    public sealed partial class MainWindow : Window
    {
        CallAgent callAgent;
        Call call;
        DeviceManager deviceManager;
        Dictionary<string, RemoteParticipant> remoteParticipantDictionary = new Dictionary<string, RemoteParticipant>();

        public MainWindow()
        {
            this.InitializeComponent();
            Task.Run(() => this.InitCallAgentAndDeviceManagerAsync()).Wait();
        }

        private async Task InitCallAgentAndDeviceManagerAsync()
        {
            // Initialize call agent and Device Manager
        }

        private async void Agent_OnIncomingCallAsync(object sender, IncomingCall incomingCall)
        {
            // Accept an incoming call
        }

        private async void CallButton_Click(object sender, RoutedEventArgs e)
        {
            // Start a call with video
        }

        private async void HangupButton_Click(object sender, RoutedEventArgs e)
        {
            // End the current call
        }

        private async void Call_OnStateChangedAsync(object sender, PropertyChangedEventArgs args)
        {
            var state = (sender as Call)?.State;
            this.DispatcherQueue.TryEnqueue(() => {
                State.Text = state.ToString();
            });
        }
    }
}
物件模型
下列類別和介面會處理 Azure 通訊服務通話 SDK 的一些重大功能:
| 名稱 | 描述 |
|---|---|
CallClient |
CallClient 是通話用戶端程式庫的主要進入點。 |
CallAgent |
CallAgent 可用來開始和加入通話。 |
CommunicationCall |
CommunicationCall 可用來管理已撥打或已加入的通話。 |
CallTokenCredential |
CallTokenCredential 可用來作為權杖認證以將 CallAgent 具現化。 |
CommunicationUserIdentifier |
CommunicationUserIdentifier 可用來代表使用者的身分識別,其可以是下列其中一個選項:CommunicationUserIdentifier、PhoneNumberIdentifier 或 CallingApplication。 |
驗證用戶端
若要將 CallAgent 初始化,您需要使用者存取權杖。 一般來說,此權杖會從具有應用程式特定驗證的服務產生。 如需使用者存取權杖的詳細資訊,請參閱使用者存取權杖指南。
在快速入門中,將 <AUTHENTICATION_TOKEN> 取代為針對您的 Azure 通訊服務資源所產生的使用者存取權杖。
當您具有權杖之後,請使用它來將 CallAgent 執行個體初始化,讓我們能夠撥打和接收通話。 為了存取裝置上的相機,我們也需要取得裝置管理員執行個體。
將下列程式碼新增至 InitCallAgentAndDeviceManagerAsync 函式。
var callClient = new CallClient();
this.deviceManager = await callClient.GetDeviceManagerAsync();

var tokenCredential = new CallTokenCredential("<AUTHENTICATION_TOKEN>");
var callAgentOptions = new CallAgentOptions()
{
    DisplayName = "<DISPLAY_NAME>"
};

this.callAgent = await callClient.CreateCallAgentAsync(tokenCredential, callAgentOptions);
this.callAgent.OnCallsUpdated += Agent_OnCallsUpdatedAsync;
this.callAgent.OnIncomingCall += Agent_OnIncomingCallAsync;
開始視訊通話
將實作新增至 CallButton_Click,以開始視訊通話。 我們需要使用裝置管理員執行個體來列舉相機,並建構 LocalVideoStream。 我們需要使用 VideoOptions 設定 LocalVideoStream,並使用 startCallOptions 傳遞它,以設定通話的初始選項。 透過將 LocalVideoStream 附加至 MediaPlayerElement,我們就能看到本機視訊的預覽。
var startCallOptions = new StartCallOptions();

if (this.deviceManager.Cameras?.Count > 0)
{
    var videoDeviceInfo = this.deviceManager.Cameras?.FirstOrDefault();
    if (videoDeviceInfo != null)
    {
        var selectedCamera = CameraList.SelectedItem as VideoDeviceDetails;
        cameraStream = new LocalOutgoingVideoStream(selectedCamera);

        var localUri = await cameraStream.StartPreviewAsync();
        await Dispatcher.RunAsync(Windows.UI.Core.CoreDispatcherPriority.Normal, () =>
        {
            LocalVideo.Source = MediaSource.CreateFromUri(localUri);
        });

        startCallOptions.VideoOptions = new OutgoingVideoOptions(new[] { cameraStream });
    }
}

var callees = new ICommunicationIdentifier[1]
{
    new CommunicationUserIdentifier(CalleeTextBox.Text.Trim())
};

this.call = await this.callAgent.StartCallAsync(callees, startCallOptions);
this.call.OnRemoteParticipantsUpdated += Call_OnRemoteParticipantsUpdatedAsync;
this.call.OnStateChanged += Call_OnStateChangedAsync;
接聽來電
將實作新增至 Agent_OnIncomingCallAsync,以透過視訊接聽來電,將 LocalVideoStream 傳遞至 acceptCallOptions。
var acceptCallOptions = new AcceptCallOptions();

if (this.deviceManager.Cameras?.Count > 0)
{
    var videoDeviceInfo = this.deviceManager.Cameras?.FirstOrDefault();
    if (videoDeviceInfo != null)
    {
        var selectedCamera = CameraList.SelectedItem as VideoDeviceDetails;
        cameraStream = new LocalOutgoingVideoStream(selectedCamera);

        var localUri = await cameraStream.StartPreviewAsync();
        await Dispatcher.RunAsync(Windows.UI.Core.CoreDispatcherPriority.Normal, () =>
        {
            LocalVideo.Source = MediaSource.CreateFromUri(localUri);
        });

        acceptCallOptions.VideoOptions = new OutgoingVideoOptions(new[] { localVideoStream });
    }
}

call = await incomingCall.AcceptAsync(acceptCallOptions);
遠端參與者和遠端視訊串流
在通話執行個體上,所有遠端參與者均可透過 RemoteParticipants 集合取得。 當通話連線之後,我們就能存取通話的遠端參與者,並處理遠端視訊串流。
注意
當使用者加入通話時,他們可以透過 RemoteParticipants 集合存取目前的遠程參與者。 這些現有參與者不會觸發 OnRemoteParticipantsUpdated 事件。 只有在遠端參與者在使用者已經在通話中時加入或離開通話時,才會觸發此事件。
private async void Call_OnVideoStreamsUpdatedAsync(object sender, RemoteVideoStreamsEventArgs args)
{
    foreach (var remoteVideoStream in args.AddedRemoteVideoStreams)
    {
        this.DispatcherQueue.TryEnqueue(async () => {
            RemoteVideo.Source = MediaSource.CreateFromUri(await remoteVideoStream.Start());
            RemoteVideo.MediaPlayer.Play();
        });
    }

    foreach (var remoteVideoStream in args.RemovedRemoteVideoStreams)
    {
        remoteVideoStream.Stop();
    }
}

private async void Agent_OnCallsUpdatedAsync(object sender, CallsUpdatedEventArgs args)
{
    foreach (var call in args.AddedCalls)
    {
        foreach (var remoteParticipant in call.RemoteParticipants)
        {
            var remoteParticipantMRI = remoteParticipant.Identifier.ToString();
            this.remoteParticipantDictionary.TryAdd(remoteParticipantMRI, remoteParticipant);
            await AddVideoStreamsAsync(remoteParticipant.VideoStreams);
            remoteParticipant.OnVideoStreamsUpdated += Call_OnVideoStreamsUpdatedAsync;
        }
    }
}

private async void Call_OnRemoteParticipantsUpdatedAsync(object sender, ParticipantsUpdatedEventArgs args)
{
    foreach (var remoteParticipant in args.AddedParticipants)
    {
        String remoteParticipantMRI = remoteParticipant.Identifier.ToString();
        this.remoteParticipantDictionary.TryAdd(remoteParticipantMRI, remoteParticipant);
        await AddVideoStreamsAsync(remoteParticipant.VideoStreams);
        remoteParticipant.OnVideoStreamsUpdated += Call_OnVideoStreamsUpdatedAsync;
    }

    foreach (var remoteParticipant in args.RemovedParticipants)
    {
        String remoteParticipantMRI = remoteParticipant.Identifier.ToString();
        this.remoteParticipantDictionary.Remove(remoteParticipantMRI);
    }
}
轉譯遠端視訊
針對每個遠端視訊串流,將其附加至 MediaPlayerElement。
private async Task AddVideoStreamsAsync(IReadOnlyList<RemoteVideoStream> remoteVideoStreams)
{
    foreach (var remoteVideoStream in remoteVideoStreams)
    {
        var remoteUri = await remoteVideoStream.Start();

        this.DispatcherQueue.TryEnqueue(() => {
            RemoteVideo.Source = MediaSource.CreateFromUri(remoteUri);
            RemoteVideo.MediaPlayer.Play();
        });
    }
}
通話狀態更新
當通話中斷連線之後,我們需要清除視訊轉譯器,並在遠端參與者一開始加入通話時處理這種情況。
private async void Call_OnStateChanged(object sender, PropertyChangedEventArgs args)
{
    switch (((Call)sender).State)
    {
        case CallState.Disconnected:
            this.DispatcherQueue.TryEnqueue(() => { =>
            {
                LocalVideo.Source = null;
                RemoteVideo.Source = null;
            });
            break;

        case CallState.Connected:
            foreach (var remoteParticipant in call.RemoteParticipants)
            {
                String remoteParticipantMRI = remoteParticipant.Identifier.ToString();
                remoteParticipantDictionary.TryAdd(remoteParticipantMRI, remoteParticipant);
                await AddVideoStreams(remoteParticipant.VideoStreams);
                remoteParticipant.OnVideoStreamsUpdated += Call_OnVideoStreamsUpdated;
            }
            break;

        default:
            break;
    }
}
結束通話
按一下 [Hang Up] 按鈕時,結束目前的通話。 將實作新增至 HangupButton_Click,以使用我們建立的 callAgent 結束通話,然後終止參與者更新和通話狀態事件處理常式。
this.call.OnRemoteParticipantsUpdated -= Call_OnRemoteParticipantsUpdatedAsync;
this.call.OnStateChanged -= Call_OnStateChangedAsync;
await this.call.HangUpAsync(new HangUpOptions());
執行程式碼
在 Visual Studio 中,您可以建置並執行程式碼。 針對解決方案平台,我們支援 ARM64、x64 和 x86。
您可以在文字欄位中提供使用者識別碼並按一下 [Start Call] 按鈕,以進行外撥視訊通話。
注意:呼叫 8:echo123 會停止視訊串流,因為回應聊天機器人不支持視訊串流。
如需使用者識別碼 (身分識別) 的詳細資訊,請參閱使用者存取權杖指南。