教學課程:透過後端服務使用 Azure 通知中樞將推播通知傳送至 Xamarin.Forms 應用程式
 下載範例
下載範例在本教學課程中,您會使用 Azure 通知中樞將通知推送至以 Android 和 iOS 為目標的 Xamarin.Forms 應用程式。
ASP.NET Core Web API 後端是用來使用最新且最佳的安裝方法來處理客戶端的裝置註冊。 服務也會以跨平臺方式傳送推播通知。
這些作業是使用 通知中樞 SDK 來處理後端作業。 如需整體方法的進一步詳細數據,請參閱 從您的應用程式後端註冊 檔。
本教學課程會引導您完成下列步驟:
Prerequisites
若要跟著做,您需要:
- 您可以在其中建立和管理資源的 Azure 訂 用帳戶。
- 已安裝 Visual Studio for Mac的 Mac 或執行 Visual Studio 2019 的電腦。
- Visual Studio 2019 用戶也必須使用 .NET 進行行動裝置開發 ,並 安裝 ASP.NET 和 Web 開發 工作負載。
- 在 Android (實體或模擬器裝置上執行應用程式的能力,) 或 iOS (實體裝置僅) 。
針對 Android,您必須具備:
- 開發人員已解除鎖定實體裝置或模擬器 , (執行 API 26 和更新版本,並安裝 google Play Services) 。
針對 iOS,您必須具有:
- 作用中的 Apple開發人員帳戶。
- 向開發人員帳戶註冊的實體 iOS 裝置, (執行 iOS 13.0 和更新版本) 。
- 在您的金鑰鏈中安裝的 .p12開發憑證,可讓您在實體裝置上執行應用程式。
注意
iOS 模擬器不支援遠端通知,因此在 iOS 上探索此範例時需要實體裝置。 不過,您不需要在 Android 和 iOS 上執行應用程式,即可完成本教學課程。
您可以遵循此第一個原則範例中的步驟,且沒有先前的經驗。 不過,您將受益於熟悉下列層面。
- Apple 開發人員入口網站
- ASP.NET Core和 Web API
- Google Firebase 控制台
- Microsoft Azure 和使用 Azure 通知中樞將推播通知傳送至 iOS 應用程式。
- Xamarin 和 Xamarin.Forms。
重要
提供的步驟專屬於 Visual Studio for Mac。 您可以使用 Visual Studio 2019 進行追蹤,但可能會有一些差異可協調。 例如,使用者介面和工作流程、範本名稱、環境組態等的描述。
設定推播通知服務和 Azure 通知中樞
在本節中,您會設定 Firebase 雲端通訊 (FCM) 和 Apple 推播通知服務, (APNS) 。 接著,您會建立並設定通知中樞來使用這些服務。
建立 Firebase 專案並啟用適用於 Android 的 Firebase 雲端通訊
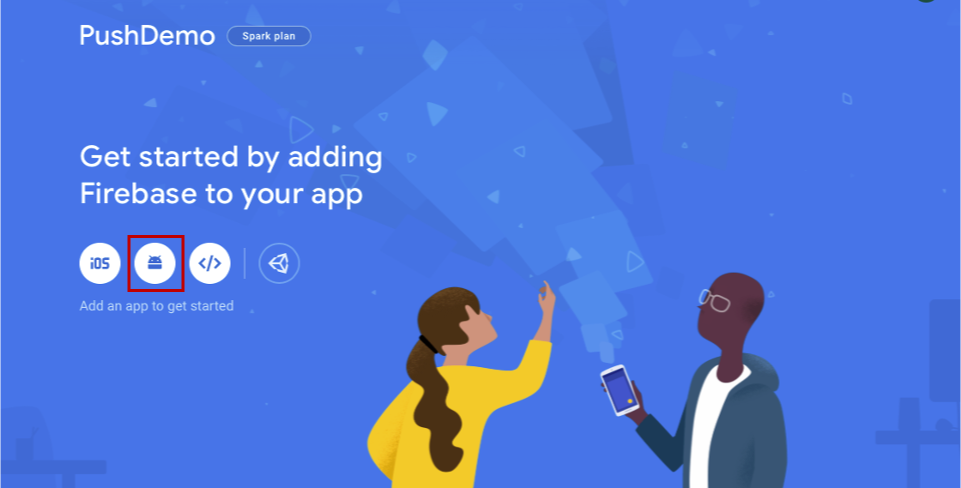
登入 Firebase 控制台。 建立新的 Firebase 專案,輸入 PushDemo 作為 項目名稱。
注意
系統會為您產生唯一的名稱。 根據預設,這是由您所提供名稱的小寫變體所組成,加上以虛線分隔的產生數位。 如果您想要將其設為全域唯一,您可以加以變更。
建立項目之後,請選取 [ 將 Firebase 新增至 Android 應用程式]。
在 [ 將 Firebase 新增至 Android 應用程式 ] 頁面上,採取下列步驟。
針對 Android套件名稱,輸入套件的名稱。 例如:
com.<organization_identifier>.<package_name>。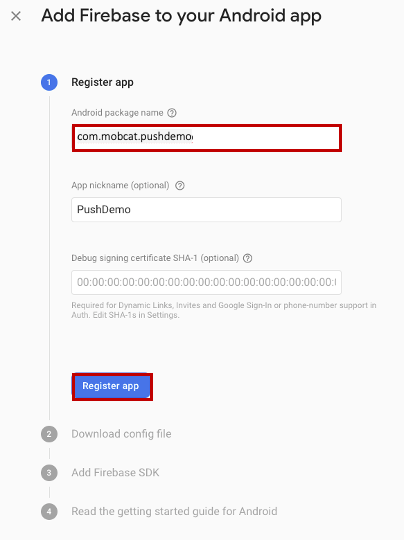
選取 [註冊應用程式]。
選取 [下載google-services.json]。 然後將檔案儲存到本機資料夾,以供稍後使用,然後選取 [ 下一步]。
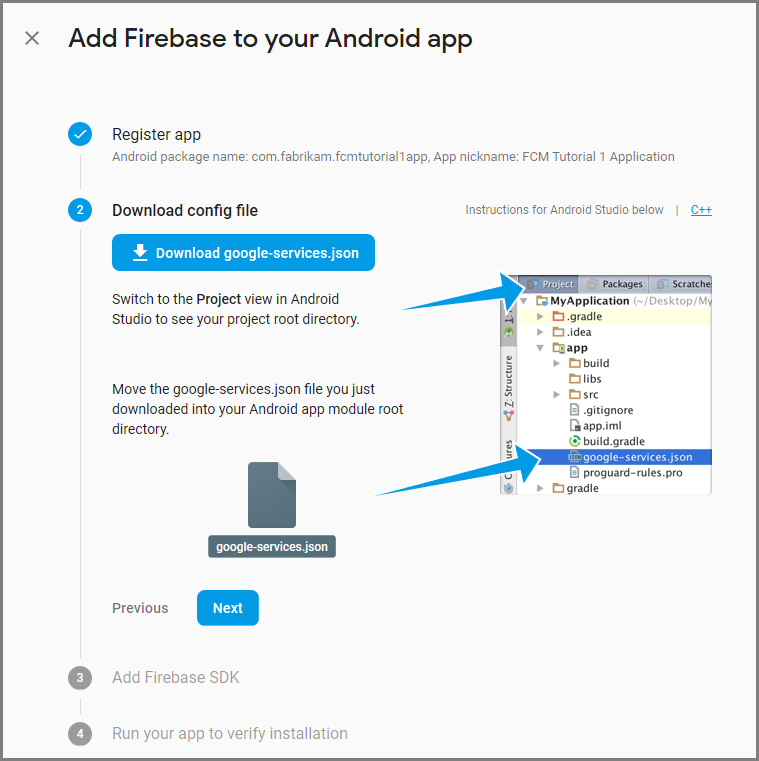
選取 [下一步]。
選取 [繼續至主控台]
注意
如果 [ 繼續控制台 ] 按鈕未啟用,因為 確認安裝 檢查,請選擇 [ 略過此步驟]。
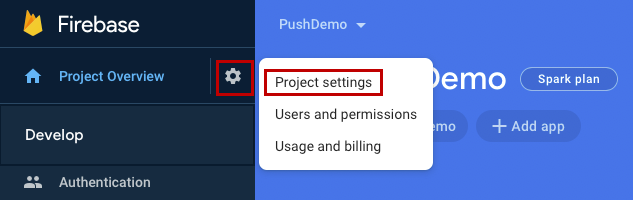
在 Firebase 控制台中,選取項目的齒輪。 然後選取 [項目設定]。
注意
如果您尚未下載 google-services.json 檔案,您可以在此頁面下載。
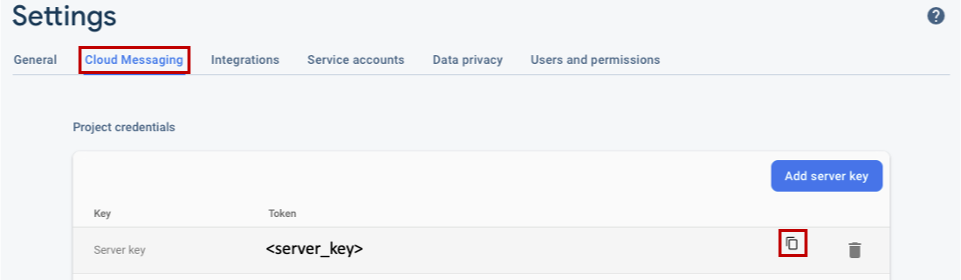
切換至頂端的 [雲端通訊] 索引 標籤。 複製並儲存 伺服器金鑰 以供稍後使用。 您可以使用此值來設定通知中樞。
註冊 iOS 應用程式以取得推播通知
若要將推播通知傳送至 iOS 應用程式,請向 Apple 註冊您的應用程式,同時註冊推播通知。
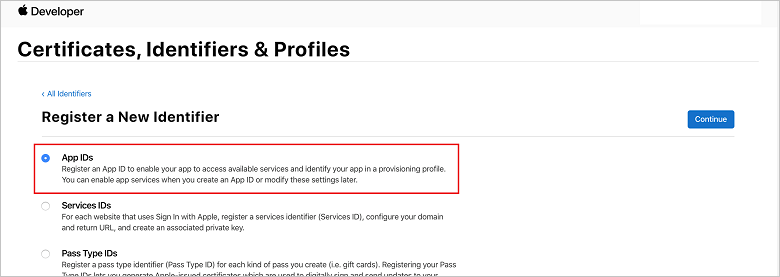
如果您尚未註冊您的應用程式,請流覽至 Apple 開發人員中心的 iOS 佈建入口網站 。 使用 Apple ID 登入入口網站,流覽至 [ 憑證]、[標識子 & 配置檔],然後選取 [ 標識符]。 按兩下 + 以註冊新的應用程式。

在 [ 註冊新標識符 ] 畫面上,選取 [ 應用程式 標識符] 單選按鈕。 然後選取 [繼續]。
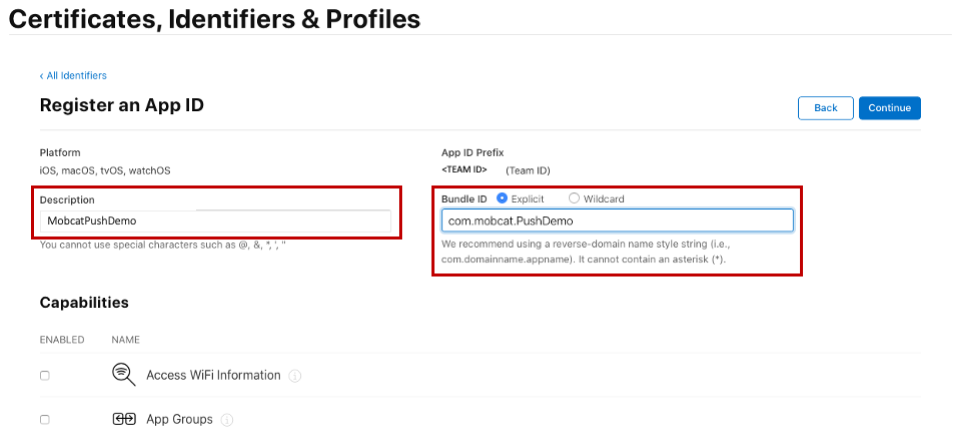
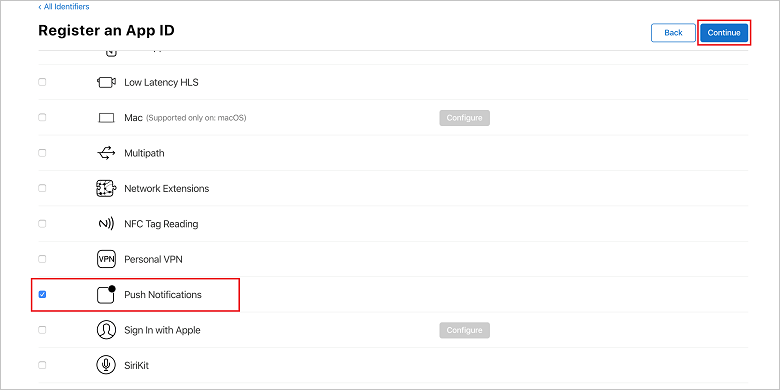
更新新應用程式的下列三個值,然後選取 [ 繼續]:
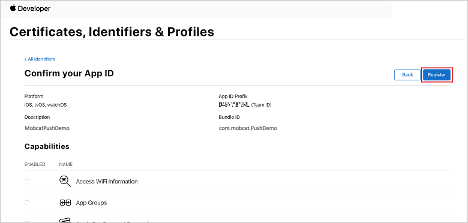
在 [ 憑證] 的 [標識符] & [配置檔 ] 頁面的 [ 標識符] 底下,找出您建立的應用程式標識符行專案。 然後,選取其數據列以顯示 [ 編輯您的應用程式識別符 設定] 畫面。
建立通知中樞的憑證
需要憑證,才能讓通知中樞使用 Apple推播通知服務 (APNS) ,而且可以使用下列兩種方式之一提供:
建立可直接上傳至通知中樞的 p12 推播憑證 , (原始方法)
建立 p8 憑證,以用於令牌型驗證 , (較新且建議的方法)
較新的方法有一些優點,如 令牌型 (HTTP/2) APNS 驗證中所述。 需要較少的步驟,但也適用於特定案例。 不過,已針對這兩種方法提供步驟,因為任一方法都適用於本教學課程的目的。
選項 1:建立可直接上傳至通知中樞的 p12 推播憑證
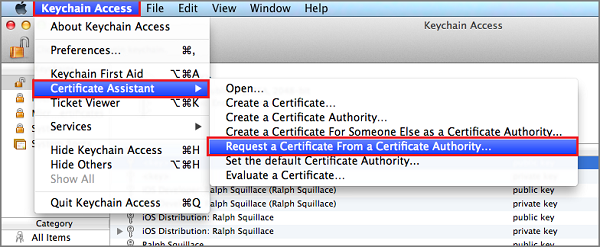
在您的 Mac 上,執行 Keychain 存取工具。 它可以從 [公用程式 ] 資料夾或啟動列上的 [其他 ] 資料夾開啟。
選取 [金鑰鏈存取],展開 [ 憑證小幫手],然後 選取 [向證書頒發機構單位要求憑證]。
注意
根據預設,Keychain Access 會選取清單中的第一個專案。 如果您位於 [憑證 ] 類別,而 Apple 全球開發人員關係證書頒發機構單位 不是清單中的第一個專案,則這可能會是問題。 產生 CSR (憑證簽署要求) 之前,請確定您已選取非密鑰專案或 Apple 全球開發人員關係證書頒發機構單位 密鑰。
選取 [使用者 Email 位址],輸入您的 [一般名稱] 值,確定您指定 [已儲存到磁碟],然後選取 [繼續]。 將 CA Email 位址保留空白,因為不需要。

在 [另存新檔] 中輸入憑證簽署要求 (CSR) 檔案的名稱,選取[位置] 中的位置,然後選取 [儲存]。
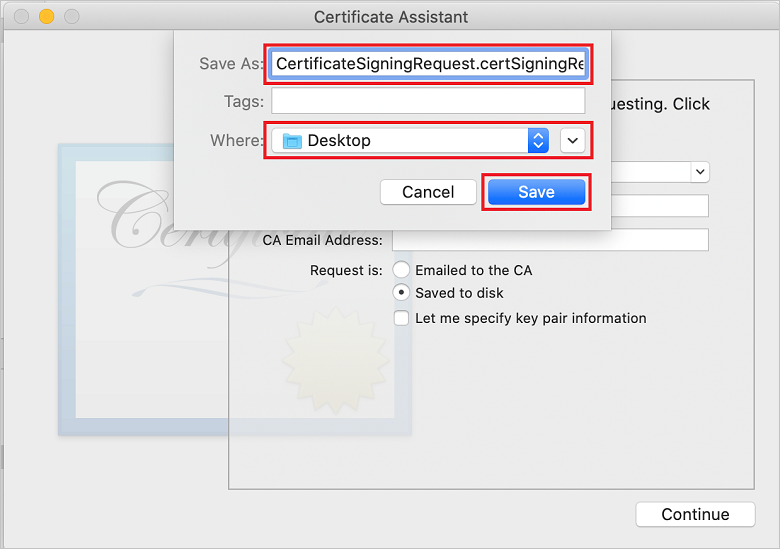
此動作會將 CSR 檔案 儲存在選取的位置。 默認位置為 Desktop。 請記住為檔案選擇的位置。
回到iOS布建入口網站中的 [憑證]、[標識符 & 配置檔] 頁面,向下卷動至核取的 [推播通知] 選項,然後選取 [設定] 以建立憑證。
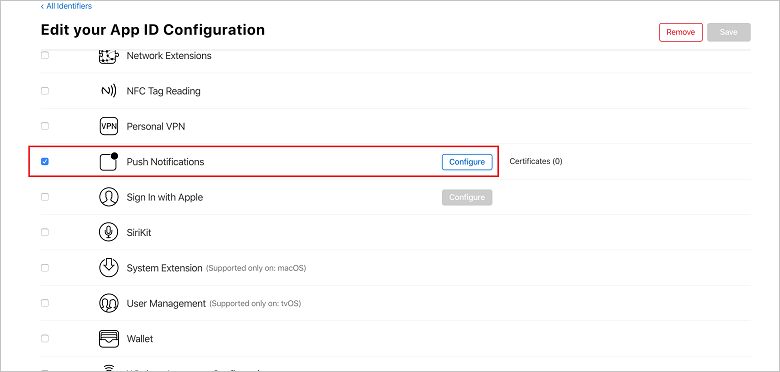
[Apple 推播通知服務 TLS/SSL 憑證] 視窗隨即出現。 選取 [開發 TLS/SSL 憑證] 區段底下的 [建立憑證] 按鈕。
![[建立應用程式識別碼] 按鈕的憑證](media/notification-hubs-appid-create-certificate.png)
隨即顯示 [建立新的憑證 ] 畫面。
注意
本教學課程使用開發憑證。 註冊生產憑證時會使用相同的程式。 只要確定您在傳送通知時使用相同的憑證類型。
選取 [選擇檔案],流覽至您儲存 CSR 檔案的位置,然後按兩下憑證名稱以載入它。 然後選取 [繼續]。
在入口網站建立憑證之後,選取 [ 下載 ] 按鈕。 儲存憑證,並記住其儲存位置。
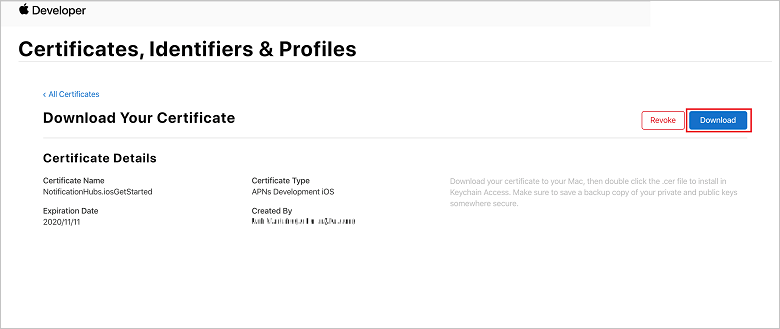
憑證會下載並儲存到 [ 下載 ] 資料夾中的電腦。
![在 [下載] 資料夾中找出憑證檔案](media/notification-hubs-certificate-downloaded.png)
注意
根據預設,下載的開發憑證會命名 為 aps_development.cer。
按兩下下載的推播憑證 aps_development.cer。 此動作會在 Keychain 中安裝新的憑證,如下圖所示:
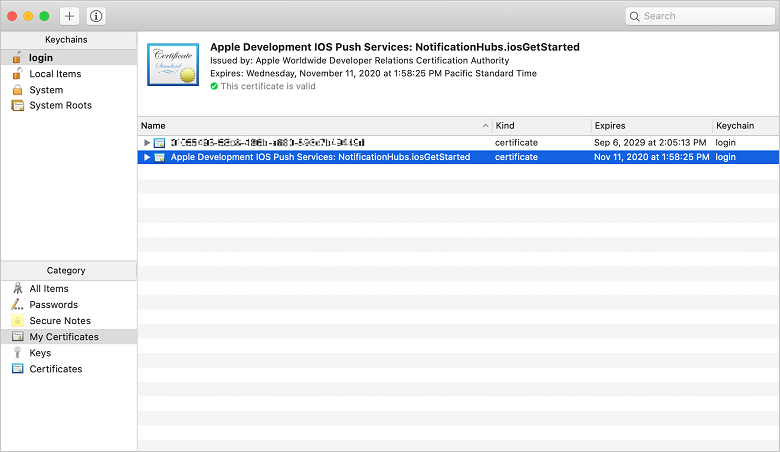
注意
雖然憑證中的名稱可能不同,但名稱前面會加上 Apple Development iOS Push Services ,並具有與其相關聯的適當套件組合標識碼。
在 [金鑰鏈存取] 中,按下 + 您在 [憑證] 類別中建立的新推播憑證。 選取 [匯出],將檔案命名為 p12 格式,然後選取 [ 儲存]。
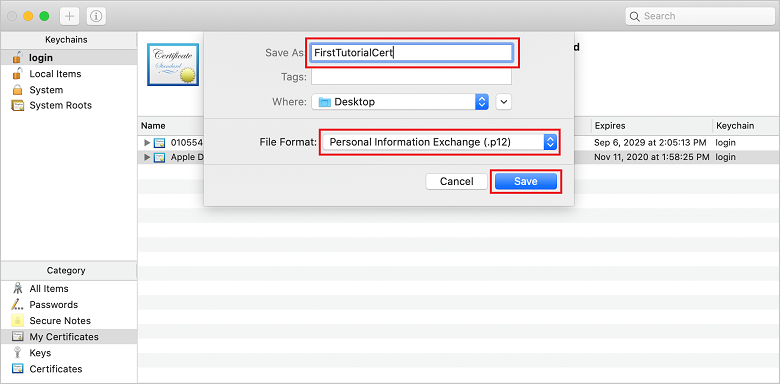
您可以選擇使用密碼來保護憑證,但密碼是選擇性的。 如果您想要略過密碼建立,請按兩下 [ 確定 ]。 記下匯出 p12 憑證的檔名和位置。 它們用來啟用APN的驗證。
注意
您的 p12 檔名和位置可能與本教學課程中所說明的內容不同。
選項 2:建立可用於令牌型驗證的 p8 憑證
記下下列詳細資料:
- 應用程式標識碼前置詞 (小組標識碼)
- 套件組合標識碼
回到 [憑證],[標識符] & [配置檔],按兩下 [ 金鑰]。
注意
如果您已經為 APNS 設定金鑰,您可以重複使用您在建立 APNS 後立即下載的 p8 憑證。 如果是,您可以忽略步驟 3 到 5。
+按鍵 (或 [建立金鑰] 按鈕) 來建立新的金鑰。
提供適當的 [金鑰名稱] 值,然後核取 [Apple Push Notifications 服務] ([APNS) ] 選項,然後按兩下 [ 繼續],然後在下一個畫面上按兩下 [ 註冊 ]。
按兩下 [下載],然後將前面加上 AuthKey_) 的 p8 (檔案移至安全本機目錄,然後按兩下 [完成]。
注意
請務必將 p8 檔案保留在安全的位置 (,並儲存備份) 。 下載金鑰之後,就無法在移除伺服器複本時重新下載。
在 [金鑰] 上,如果您選擇改用) ,請按下您建立 (或現有金鑰的金鑰。
記下 金鑰識別碼 值。
在您選擇的適當應用程式中開啟 p8 憑證,例如 Visual Studio Code。 記下 -----BEGIN 私鑰----- 與 -----END 私鑰 之間的金鑰 (值-----) 。
-----BEGIN 私鑰-----
<key_value>
-----END 私鑰-----注意
這是稍後將用來設定通知中樞的令牌值。
在這些步驟結束時,您應該會有下列資訊,以供稍後 使用APNS資訊設定通知中樞:
- 小組標識子 (請參閱步驟 1)
- 套件組合標識碼 (請參閱步驟 1)
- 密鑰標識碼 (請參閱步驟 7)
- 在步驟 8) 中取得的令牌值 (p8 索引鍵值
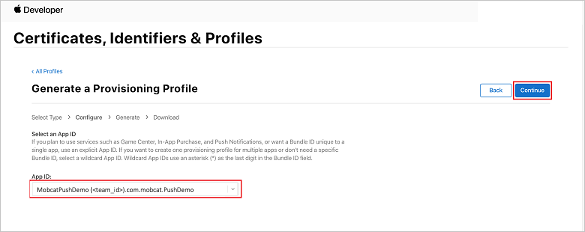
建立應用程式的布建配置檔
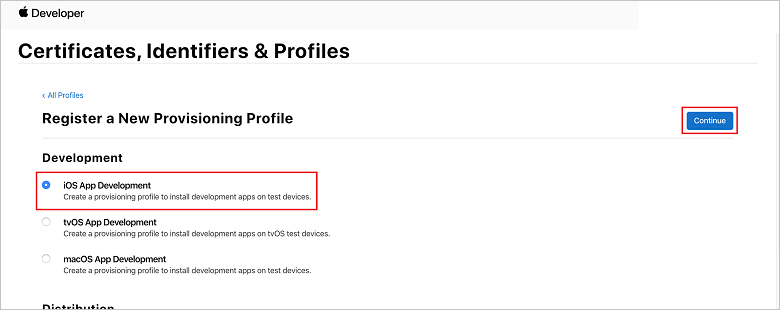
返回 iOS 布建入口網站,選取 [ 憑證]、[標識符 & 配置檔]、從左側功能表中選取 [ 配置檔 ],然後選取 + 以建立新的配置檔。 [ 註冊新的布建配置檔 ] 畫面隨即出現。
選取 [開發] 下的 [iOS 應用程式開發] 作為布建配置檔類型,然後選取 [繼續]。
接下來,從 [ 應用程式 標識符] 下拉式清單中選取您建立的應用程式識別碼,然後選取 [ 繼續]。
在 [ 選取憑證 ] 視窗中,選取您用於程式代碼簽署的開發憑證,然後選取 [ 繼續]。
注意
此憑證不是您在 上一個步驟中建立的推送憑證。 這是您的開發憑證。 如果不存在,您必須建立它,因為這是本教學課程 的必要條件 。 開發人員憑證可以透過 Xcode 或 Visual Studio,在 Apple Developer Portal 中建立。
返回 [ 憑證]、[標識符 & 配置檔 ] 頁面,從左側功能表中選取 [ 配置檔 ],然後選取 + 以建立新的配置檔。 [ 註冊新的布建配置檔 ] 畫面隨即出現。
在 [ 選取憑證] 視窗中,選取您建立的開發憑證。 然後選取 [繼續]。
接下來,選取要用於測試的裝置,然後選取 [ 繼續]。
最後,在 [ 布建配置檔名稱] 中選擇設定檔的名稱,然後選取 [ 產生]。
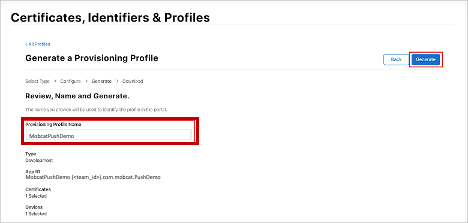
建立新的布建配置檔時,請選取 [ 下載]。 請記住儲存的位置。
流覽至布建配置檔的位置,然後按兩下它,將它安裝在您的開發電腦上。
建立通知中樞
在本節中,您會建立通知中樞,並使用 APNS設定驗證。 您可以使用 p12 推播憑證或令牌型驗證。 如果您想要使用已建立的通知中樞,您可以跳至步驟 5。
登入 Azure。
按兩下 [建立資源],然後搜尋並選擇 [通知中樞],然後按兩下 [ 建立]。
更新下列欄位,然後按兩下列欄位[ 建立]:
基本詳細數據
訂閱: 從下拉式清單中選擇目標 訂 用帳戶
資源群組: 建立新的 資源群組 (或挑選現有的資源群組)命名空間詳細數據
通知中樞命名空間: 輸入 通知中樞 命名空間的全域唯一名稱
注意
請確定已為此欄位選取 [ 建立新 ] 選項。
通知中樞詳細數據
通知中樞:輸入通知中樞的名稱
位置: 從下拉式清單中選擇適當的位置
定價層: 保留預設 的 [免費] 選項注意
除非您已達到免費層上的中樞數目上限。
布建 通知中樞 之後,請流覽至該資源。
流覽至新的 通知中樞。
從 [管理) ] 底下的清單中 (選取 [存取原則]。
記下原則 名稱 值及其對應的 連接字串 值。
使用APNS資訊設定通知中樞
在 [通知服務] 底下,選取 [Apple ],然後根據您先前在 [ 建立通知中樞憑證 ] 區段中選擇的方法,遵循適當的步驟。
注意
只有在您想要將推播通知傳送給從市集購買應用程式的使用者時,才使用 應用程式 生產 模式 。
選項 1:使用 .p12 推播憑證
選取 [ 憑證]。
選取檔案圖示。
選取您稍早導出的 .p12 檔案,然後選取 [ 開啟]。
如有必要,請指定正確的密碼。
選取 [沙盒 模式]。
選取 [ 儲存]。
選項 2:使用令牌型驗證
選取 [令牌]。
輸入您稍早取得的下列值:
- 金鑰識別碼
- 套件組合標識碼
- 小組標識碼
- 令牌
選擇 [沙盒]。
選取 [ 儲存]。
使用 FCM 資訊設定通知中樞
- 在左側功能表中的 [設定] 區段中,選取 [Google (GCM/FCM) 。
- 輸入您從Google Firebase 控制台中記錄的伺服器金鑰。
- 選取工具列上的 [ 儲存 ]。
建立 ASP.NET Core Web API 後端應用程式
在本節中,您會建立 ASP.NET Core Web API 後端來處理裝置註冊,以及將通知傳送至 Xamarin.Forms 行動應用程式。
建立 Web 專案
在 Visual Studio 中,選取 [ 檔案>新方案]。
選取 [.NET Core>應用程式>ASP.NET Core>API>下一步]。
在 [設定新的 ASP.NET Core Web API] 對話框中,選取 [.NET Core 3.1的目標架構]。
針對 [項目名稱] 輸入 PushDemoApi,然後選取 [建立]。
開始偵錯 (命令 + 輸入) 以測試樣板化應用程式。
注意
範本化應用程式已設定為使用 WeatherForecastController 作為 launchUrl。 這會在 [屬性>] launchSettings.json中設定。
如果系統提示您 找到無效的開發憑證 訊息:
按兩下 [是 ] 同意執行 'dotnet dev-certs https' 工具來修正此問題。 'dotnet dev-certs https' 工具會提示您輸入憑證的密碼和密鑰鏈的密碼。
當系統提示您安裝並信任新憑證時,請按兩下 [是],然後輸入密鑰鏈的密碼。
展開 Controllers 資料夾,然後刪除 WeatherForecastController.cs。
刪除 WeatherForecast.cs。
使用 秘密管理員工具設定本機組態值。 將秘密與解決方案分離可確保它們最終不會出現在原始檔控制中。 開啟 [終端機 ],然後移至項目檔的目錄,然後執行下列命令:
dotnet user-secrets init
dotnet user-secrets set "NotificationHub:Name" <value>
dotnet user-secrets set "NotificationHub:ConnectionString" <value>
以您自己的通知中樞名稱和 連接字串 值取代佔位元值。 您已在建立 通知中樞一 節中記下它們。 否則,您可以在 Azure 中查閱它們。
NotificationHub:Name:
請參閱概觀頂端的 [基本資訊] 摘要中的 [名稱]。NotificationHub:ConnectionString:
請參閱存取原則中的 DefaultFullSharedAccessSignature注意
針對生產案例,您可以查看 Azure KeyVault 之類的選項,以安全地儲存 連接字串。 為了簡單起見,秘密會新增至 Azure App 服務 應用程式設定。
使用 API 金鑰驗證用戶端 (選擇性)
API 金鑰不如令牌安全,但本教學課程的目的就已足夠。 您可以透過 ASP.NET 中間件輕鬆地設定 API 金鑰。
將 API 金鑰 新增至本機組態值。
dotnet user-secrets set "Authentication:ApiKey" <value>注意
您應該以您自己的佔位元值取代佔位元值,並記下它。
控制 + 單擊PushDemoApi 專案,從 [新增] 選單中選擇 [新增資料夾],然後按兩下 [使用驗證新增] 作為 [資料夾名稱]。
控制 + 單擊[驗證] 資料夾,然後從 [新增] 功能表中選擇 [新增檔案...]。
選取 [一般>空白類別],輸入名稱ApiKeyAuthOptions.cs,然後按兩下列實作。
using Microsoft.AspNetCore.Authentication; namespace PushDemoApi.Authentication { public class ApiKeyAuthOptions : AuthenticationSchemeOptions { public const string DefaultScheme = "ApiKey"; public string Scheme => DefaultScheme; public string ApiKey { get; set; } } }將另一個空白類別新增至名為 ApiKeyAuthHandler.cs 的 Authentication 資料夾,然後新增下列實作。
using System;
using System.Collections.Generic;
using System.Linq;
using System.Security.Claims;
using System.Text.Encodings.Web;
using System.Threading.Tasks;
using Microsoft.AspNetCore.Authentication;
using Microsoft.Extensions.Logging;
using Microsoft.Extensions.Options;

namespace PushDemoApi.Authentication
{
    public class ApiKeyAuthHandler : AuthenticationHandler<ApiKeyAuthOptions>
    {
        const string ApiKeyIdentifier = "apikey";

        public ApiKeyAuthHandler(
            IOptionsMonitor<ApiKeyAuthOptions> options,
            ILoggerFactory logger,
            UrlEncoder encoder,
            ISystemClock clock)
            : base(options, logger, encoder, clock) {}

        protected override Task<AuthenticateResult> HandleAuthenticateAsync()
        {
            string key = string.Empty;

            if (Request.Headers[ApiKeyIdentifier].Any())
            {
                key = Request.Headers[ApiKeyIdentifier].FirstOrDefault();
            }
            else if (Request.Query.ContainsKey(ApiKeyIdentifier))
            {
                if (Request.Query.TryGetValue(ApiKeyIdentifier, out var queryKey))
                    key = queryKey;
            }

            if (string.IsNullOrWhiteSpace(key))
                return Task.FromResult(AuthenticateResult.Fail("No api key provided"));

            if (!string.Equals(key, Options.ApiKey, StringComparison.Ordinal))
                return Task.FromResult(AuthenticateResult.Fail("Invalid api key."));

            var identities = new List<ClaimsIdentity> {
                new ClaimsIdentity("ApiKeyIdentity")
            };

            var ticket = new AuthenticationTicket(
                new ClaimsPrincipal(identities), Options.Scheme);

            return Task.FromResult(AuthenticateResult.Success(ticket));
        }
    }
}
注意
驗證處理程式是實作配置行為的類型,在此案例中為自定義 API 金鑰配置。
將另一個空白類別新增至名為 ApiKeyAuthenticationBuilderExtensions.cs的 Authentication 資料夾,然後新增下列實作。
using System;
using Microsoft.AspNetCore.Authentication;

namespace PushDemoApi.Authentication
{
    public static class AuthenticationBuilderExtensions
    {
        public static AuthenticationBuilder AddApiKeyAuth(
            this AuthenticationBuilder builder,
            Action<ApiKeyAuthOptions> configureOptions)
        {
            return builder
                .AddScheme<ApiKeyAuthOptions, ApiKeyAuthHandler>(
                    ApiKeyAuthOptions.DefaultScheme,
                    configureOptions);
        }
    }
}
注意
此擴充方法可簡化 Startup.cs 中的中間件組態程序代碼,使其更容易閱讀且通常更容易遵循。
在 Startup.cs中,更新 ConfigureServices 方法,以在服務呼叫下方設定 API 金鑰驗證 。AddControllers 方法。
using PushDemoApi.Authentication; using PushDemoApi.Models; using PushDemoApi.Services; public void ConfigureServices(IServiceCollection services) { services.AddControllers(); services.AddAuthentication(options => { options.DefaultAuthenticateScheme = ApiKeyAuthOptions.DefaultScheme; options.DefaultChallengeScheme = ApiKeyAuthOptions.DefaultScheme; }).AddApiKeyAuth(Configuration.GetSection("Authentication").Bind); }仍在Startup.cs中,更新 Configure 方法,在應用程式的 IApplicationBuilder 上呼叫 UseAuthentication 和 UseAuthorization 擴充方法。 請確定 在 UseRouting 和 app 之前呼叫這些方法 。UseEndpoints。
public void Configure(IApplicationBuilder app, IWebHostEnvironment env)
{
    if (env.IsDevelopment())
    {
        app.UseDeveloperExceptionPage();
    }

    app.UseHttpsRedirection();

    app.UseRouting();

    app.UseAuthentication();

    app.UseAuthorization();

    app.UseEndpoints(endpoints =>
    {
        endpoints.MapControllers();
    });
}
注意
呼叫 UseAuthentication 會註冊中間件,此中間件會使用先前從 ConfigureServices) 註冊的驗證配置 (。 這必須先呼叫,才能呼叫任何相依於要驗證之用戶的中間件。
新增相依性並設定服務
ASP.NET Core 支援相依性插入 (DI) 軟體設計模式,這是在類別與其相依性之間達成控制 (IoC) 反轉的技術。
使用通知中 樞和後端作業的通知中樞 SDK 會封裝在服務內。 服務會註冊並透過適當的抽象概念提供。
控制 + 按兩下 [ 相依性 ] 資料夾,然後選擇 [管理 NuGet 套件...]。
搜尋 Microsoft.Azure.NotificationHubs 並確定已核取。
按兩下 [新增套件],然後在系統提示您接受授權條款時按兩下 [ 接受 ]。
控制 + 單擊PushDemoApi 專案,從 [新增] 選單中選擇 [新增資料夾],然後按兩下 [使用模型新增] 作為 [資料夾名稱]。
控制 + 單擊[模型] 資料夾,然後從 [新增] 功能表中選擇 [新增檔案...]。
選取 [一般>空白類別],針對 [名稱] 輸入PushTemplates.cs,然後按兩下列實作]。
namespace PushDemoApi.Models { public class PushTemplates { public class Generic { public const string Android = "{ \"notification\": { \"title\" : \"PushDemo\", \"body\" : \"$(alertMessage)\"}, \"data\" : { \"action\" : \"$(alertAction)\" } }"; public const string iOS = "{ \"aps\" : {\"alert\" : \"$(alertMessage)\"}, \"action\" : \"$(alertAction)\" }"; } public class Silent { public const string Android = "{ \"data\" : {\"message\" : \"$(alertMessage)\", \"action\" : \"$(alertAction)\"} }"; public const string iOS = "{ \"aps\" : {\"content-available\" : 1, \"apns-priority\": 5, \"sound\" : \"\", \"badge\" : 0}, \"message\" : \"$(alertMessage)\", \"action\" : \"$(alertAction)\" }"; } } }將另一個空白類別新增至名為 DeviceInstallation.cs 的Models 資料夾,然後新增下列實作。
using System.Collections.Generic; using System.ComponentModel.DataAnnotations; namespace PushDemoApi.Models { public class DeviceInstallation { [Required] public string InstallationId { get; set; } [Required] public string Platform { get; set; } [Required] public string PushChannel { get; set; } public IList<string> Tags { get; set; } = Array.Empty<string>(); } }將另一個空白類別新增至名為 NotificationRequest.cs 的Models 資料夾,然後新增下列實作。
using System; namespace PushDemoApi.Models { public class NotificationRequest { public string Text { get; set; } public string Action { get; set; } public string[] Tags { get; set; } = Array.Empty<string>(); public bool Silent { get; set; } } }將另一個空白類別新增至名為 NotificationHubOptions.cs 的Models 資料夾,然後新增下列實作。
using System.ComponentModel.DataAnnotations;

namespace PushDemoApi.Models
{
    public class NotificationHubOptions
    {
        [Required]
        public string Name { get; set; }

        [Required]
        public string ConnectionString { get; set; }
    }
}
將新的資料夾新增至名為 Services 的 PushDemoApi 專案。
將空白介面新增至名為 INotificationService.cs的服務資料夾,然後新增下列實作。
using System.Threading; using System.Threading.Tasks; using PushDemoApi.Models; namespace PushDemoApi.Services { public interface INotificationService { Task<bool> CreateOrUpdateInstallationAsync(DeviceInstallation deviceInstallation, CancellationToken token); Task<bool> DeleteInstallationByIdAsync(string installationId, CancellationToken token); Task<bool> RequestNotificationAsync(NotificationRequest notificationRequest, CancellationToken token); } }將空白類別新增至名為 NotificationHubsService.cs的 Services 資料夾,然後新增下列程式代碼以實作 INotificationService 介面:
using System;
using System.Collections.Generic;
using System.Linq;
using System.Threading;
using System.Threading.Tasks;
using Microsoft.Azure.NotificationHubs;
using Microsoft.Extensions.Logging;
using Microsoft.Extensions.Options;
using PushDemoApi.Models;

namespace PushDemoApi.Services
{
    public class NotificationHubService : INotificationService
    {
        readonly NotificationHubClient _hub;
        readonly Dictionary<string, NotificationPlatform> _installationPlatform;
        readonly ILogger<NotificationHubService> _logger;

        public NotificationHubService(IOptions<NotificationHubOptions> options, ILogger<NotificationHubService> logger)
        {
            _logger = logger;
            _hub = NotificationHubClient.CreateClientFromConnectionString(
                options.Value.ConnectionString,
                options.Value.Name);

            _installationPlatform = new Dictionary<string, NotificationPlatform>
            {
                { nameof(NotificationPlatform.Apns).ToLower(), NotificationPlatform.Apns },
                { nameof(NotificationPlatform.Fcm).ToLower(), NotificationPlatform.Fcm }
            };
        }

        public async Task<bool> CreateOrUpdateInstallationAsync(DeviceInstallation deviceInstallation, CancellationToken token)
        {
            if (string.IsNullOrWhiteSpace(deviceInstallation?.InstallationId) ||
                string.IsNullOrWhiteSpace(deviceInstallation?.Platform) ||
                string.IsNullOrWhiteSpace(deviceInstallation?.PushChannel))
                return false;

            var installation = new Installation()
            {
                InstallationId = deviceInstallation.InstallationId,
                PushChannel = deviceInstallation.PushChannel,
                Tags = deviceInstallation.Tags
            };

            if (_installationPlatform.TryGetValue(deviceInstallation.Platform, out var platform))
                installation.Platform = platform;
            else
                return false;

            try
            {
                await _hub.CreateOrUpdateInstallationAsync(installation, token);
            }
            catch
            {
                return false;
            }

            return true;
        }

        public async Task<bool> DeleteInstallationByIdAsync(string installationId, CancellationToken token)
        {
            if (string.IsNullOrWhiteSpace(installationId))
                return false;

            try
            {
                await _hub.DeleteInstallationAsync(installationId, token);
            }
            catch
            {
                return false;
            }

            return true;
        }

        public async Task<bool> RequestNotificationAsync(NotificationRequest notificationRequest, CancellationToken token)
        {
            if ((notificationRequest.Silent &&
                string.IsNullOrWhiteSpace(notificationRequest?.Action)) ||
                (!notificationRequest.Silent &&
                (string.IsNullOrWhiteSpace(notificationRequest?.Text)) ||
                string.IsNullOrWhiteSpace(notificationRequest?.Action)))
                return false;

            var androidPushTemplate = notificationRequest.Silent ?
                PushTemplates.Silent.Android :
                PushTemplates.Generic.Android;

            var iOSPushTemplate = notificationRequest.Silent ?
                PushTemplates.Silent.iOS :
                PushTemplates.Generic.iOS;

            var androidPayload = PrepareNotificationPayload(
                androidPushTemplate,
                notificationRequest.Text,
                notificationRequest.Action);

            var iOSPayload = PrepareNotificationPayload(
                iOSPushTemplate,
                notificationRequest.Text,
                notificationRequest.Action);

            try
            {
                if (notificationRequest.Tags.Length == 0)
                {
                    // This will broadcast to all users registered in the notification hub
                    await SendPlatformNotificationsAsync(androidPayload, iOSPayload, token);
                }
                else if (notificationRequest.Tags.Length <= 20)
                {
                    await SendPlatformNotificationsAsync(androidPayload, iOSPayload, notificationRequest.Tags, token);
                }
                else
                {
                    var notificationTasks = notificationRequest.Tags
                        .Select((value, index) => (value, index))
                        .GroupBy(g => g.index / 20, i => i.value)
                        .Select(tags => SendPlatformNotificationsAsync(androidPayload, iOSPayload, tags, token));

                    await Task.WhenAll(notificationTasks);
                }

                return true;
            }
            catch (Exception e)
            {
                _logger.LogError(e, "Unexpected error sending notification");
                return false;
            }
        }

        string PrepareNotificationPayload(string template, string text, string action) => template
            .Replace("$(alertMessage)", text, StringComparison.InvariantCulture)
            .Replace("$(alertAction)", action, StringComparison.InvariantCulture);

        Task SendPlatformNotificationsAsync(string androidPayload, string iOSPayload, CancellationToken token)
        {
            var sendTasks = new Task[]
            {
                _hub.SendFcmNativeNotificationAsync(androidPayload, token),
                _hub.SendAppleNativeNotificationAsync(iOSPayload, token)
            };

            return Task.WhenAll(sendTasks);
        }

        Task SendPlatformNotificationsAsync(string androidPayload, string iOSPayload, IEnumerable<string> tags, CancellationToken token)
        {
            var sendTasks = new Task[]
            {
                _hub.SendFcmNativeNotificationAsync(androidPayload, tags, token),
                _hub.SendAppleNativeNotificationAsync(iOSPayload, tags, token)
            };

            return Task.WhenAll(sendTasks);
        }
    }
}
注意
提供給 SendTemplateNotificationAsync 的標籤示表達式限製為 20 個標記。 對大部分運算元而言,其限制為 6,但表示式只包含 (|| 的 OU在此情況下) 。 如果要求中有20個以上的標記,則必須將其分割成多個要求。 如需詳細資訊,請參閱 路由和標記表達式 檔。
在 Startup.cs中,更新 ConfigureServices 方法,將 NotificationHubsService 新增為 INotificationService 的單一實作。
using PushDemoApi.Models;
using PushDemoApi.Services;

public void ConfigureServices(IServiceCollection services)
{
    ...

    services.AddSingleton<INotificationService, NotificationHubService>();

    services.AddOptions<NotificationHubOptions>()
        .Configure(Configuration.GetSection("NotificationHub").Bind)
        .ValidateDataAnnotations();
}
建立通知 API
控制 + 按兩下[控制器] 資料夾,然後從 [新增] 選單中選擇 [新增檔案...]。
選取 [>ASP.NET Core Web API 控制器類別],針對 [名稱] 輸入 NotificationsController,然後按兩下 [新增]。
注意
如果您遵循 Visual Studio 2019,請選擇 具有讀取/寫入動作範本的 API 控制器 。
將下列命名空間新增至檔案頂端。
using System.ComponentModel.DataAnnotations;
using System.Net;
using System.Threading;
using System.Threading.Tasks;
using Microsoft.AspNetCore.Authorization;
using Microsoft.AspNetCore.Mvc;
using PushDemoApi.Models;
using PushDemoApi.Services;
更新樣板化控制器,使其衍生自 ControllerBase ,並使用 ApiController 屬性裝飾。
[ApiController]
[Route("api/[controller]")]
public class NotificationsController : ControllerBase
{
    // Templated methods here
}
注意
Controller 基類提供檢視的支援,但在此案例中不需要這麼做,因此可以改用 ControllerBase。 如果您遵循 Visual Studio 2019,您可以略過此步驟。
如果您選擇完成 [使用 API 金鑰驗證用戶端] 區段,也應該使用 Authorize 屬性裝飾 NotificationsController。
[Authorize]更新建構函式以接受 已註冊的 INotificationService 實例做為自變數,並將它指派給只讀成員。
readonly INotificationService _notificationService;

public NotificationsController(INotificationService notificationService)
{
    _notificationService = notificationService;
}
在 [屬性] 資料夾) 內的launchSettings.json (中,將 launchUrl 從
weatherforecast變更為 api/notifications,以符合 RegistrationsControllerRoute 屬性中指定的 URL。開始偵錯 (命令 + 輸入) 驗證應用程式正在使用新的 NotificationsController ,並傳回 401 未經授權的 狀態。
注意
Visual Studio 可能不會在瀏覽器中自動啟動應用程式。 您將使用 Postman 從這個點開始測試 API。
在新的 Postman 索引標籤上,將要求設定為 GET。 輸入下列位址,以屬性>launchSettings.json中找到的 HTTPs applicationUrl 取代佔位元 <applicationUrl>。
<applicationUrl>/api/notifications注意
applicationUrl 應該是預設配置檔的 『https://localhost:5001』。 如果您在 Windows) 上使用 Visual Studio 2019 中的 IIS (預設值,您應該改用 iisSettings 專案中指定的 applicationUrl。 如果位址不正確,您會收到 404 回應。
如果您選擇完成 [使用 API 金鑰驗證用戶端 ] 區段,請務必設定要求標頭以包含 apikey 值。
關鍵 價值 apikey <your_api_key> 按兩下 [ 傳送] 按鈕。
以下列程式代碼取代 NotificationsController.cs 中的樣板化類別方法。
[HttpPut]
[Route("installations")]
[ProducesResponseType((int)HttpStatusCode.OK)]
[ProducesResponseType((int)HttpStatusCode.BadRequest)]
[ProducesResponseType((int)HttpStatusCode.UnprocessableEntity)]
public async Task<IActionResult> UpdateInstallation(
    [Required]DeviceInstallation deviceInstallation)
{
    var success = await _notificationService
        .CreateOrUpdateInstallationAsync(deviceInstallation, HttpContext.RequestAborted);

    if (!success)
        return new UnprocessableEntityResult();

    return new OkResult();
}

[HttpDelete()]
[Route("installations/{installationId}")]
[ProducesResponseType((int)HttpStatusCode.OK)]
[ProducesResponseType((int)HttpStatusCode.BadRequest)]
[ProducesResponseType((int)HttpStatusCode.UnprocessableEntity)]
public async Task<ActionResult> DeleteInstallation(
    [Required][FromRoute]string installationId)
{
    var success = await _notificationService
        .DeleteInstallationByIdAsync(installationId, CancellationToken.None);

    if (!success)
        return new UnprocessableEntityResult();

    return new OkResult();
}

[HttpPost]
[Route("requests")]
[ProducesResponseType((int)HttpStatusCode.OK)]
[ProducesResponseType((int)HttpStatusCode.BadRequest)]
[ProducesResponseType((int)HttpStatusCode.UnprocessableEntity)]
public async Task<IActionResult> RequestPush(
    [Required]NotificationRequest notificationRequest)
{
    if ((notificationRequest.Silent &&
        string.IsNullOrWhiteSpace(notificationRequest?.Action)) ||
        (!notificationRequest.Silent &&
        string.IsNullOrWhiteSpace(notificationRequest?.Text)))
        return new BadRequestResult();

    var success = await _notificationService
        .RequestNotificationAsync(notificationRequest, HttpContext.RequestAborted);

    if (!success)
        return new UnprocessableEntityResult();

    return new OkResult();
}
建立 API 應用程式
您現在會在 Azure App 服務 中建立 API 應用程式,以裝載後端服務。
登入 Azure 入口網站。
按兩下 [建立資源],然後搜尋並選擇 [API 應用程式],然後按兩下 [ 建立]。
更新下列欄位,然後按兩 下列欄位,然後按兩下列欄位。。
應用程式名稱:
輸入 API 應用程式的全域唯一名稱訂閱:
選擇您在中建立通知中樞的相同目標 訂 用帳戶。資源群組:
選擇您在中建立通知中樞的相同 資源群組 。App Service 方案/位置:
建立新的 App Service方案注意
從預設選項變更為包含 SSL 支援的方案。 否則,在使用行動應用程式時,您必須採取適當的步驟,以防止 HTTP 要求遭到封鎖。
Application Insights:
請保留建議的選項, (使用該名稱建立新的資源,) 或挑選現有的資源。布建 API 應用程式 之後,請瀏覽至該資源。
記下 [概觀] 頂端 [基本資訊] 摘要中的 URL 屬性。 此 URL 是您稍後在本教學課程中使用的 後端端點 。
注意
URL 會使用您稍早指定的 API 應用程式名稱,格式
https://<app_name>.azurewebsites.net為 。從 [設定) ] 底下的清單中 (選取 [組態]。
針對下列每個設定,按兩下列每個設定,按兩下列每個設定,按兩下列每個設定,按兩下 [新增應用程式設定] 以輸入 [名稱] 和 [值
名字 價值 Authentication:ApiKey<api_key_value> NotificationHub:Name<hub_name_value> NotificationHub:ConnectionString<hub_connection_string_value> 注意
這些是您先前在用戶設定中定義的相同設定。 您應該能夠複製這些專案。 只有在您選擇完成使用 API 金鑰驗證用戶端一節時,才需要 Authentication:ApiKey 設定。 針對生產案例,您可以查看 Azure KeyVault 之類的選項。 為了簡單起見,這些設定已新增為應用程式設定。
新增所有應用程式設定之後,按兩下 [ 儲存],然後按兩下 [ 繼續]。
發佈後端服務
接下來,您會將應用程式部署至 API 應用程式,使其可從所有裝置存取。
注意
下列步驟專屬於 Visual Studio for Mac。 如果您在 Windows 上使用 Visual Studio 2019 進行追蹤,發佈流程將會不同。 請參閱在 Windows 上發行至 Azure App 服務。
如果您尚未這麼做,請將組態從 [偵 錯] 變更為 [發行 ]。
控制 + 單擊PushDemoApi 項目,然後從 [發佈] 功能表中選擇 [發佈至 Azure...]。
如果系統提示您這麼做,請遵循驗證流程。 使用您在上一個 建立 API 應用程式 一節中使用的帳戶。
選取您先前從清單中建立的 Azure App 服務 API 應用程式作為發佈目標,然後按兩下 [發佈]。
完成精靈之後,它會將應用程式發佈至 Azure,然後開啟應用程式。 如果您尚未這麼做,請記下 URL 。 此 URL 是您稍後在本教學課程中使用的 後端端點 。
驗證已發佈的 API
在 Postman 中開啟新的索引標籤,將要求設定為 PUT ,然後輸入下列位址。 將佔位元取代為您在上一個 發佈後端服務 區段中記下的基位址。
https://<app_name>.azurewebsites.net/api/notifications/installations注意
基位址的格式應為
https://<app_name>.azurewebsites.net/如果您選擇完成 [使用 API 金鑰驗證用戶端 ] 區段,請務必設定要求標頭以包含 您的 apikey 值。
關鍵 價值 apikey <your_api_key> 選擇本文的原始選項,然後從格式選項清單中選擇 JSON,然後包含一些佔位元 JSON 內容:
{}按兩下 [傳送]。
注意
您應該會收到來自服務的 422 UnprocessableEntity 狀態。
再次執行步驟 1-4,但這次指定要求端點來驗證您收到 400 不正確的要求 回應。
https://<app_name>.azurewebsites.net/api/notifications/requests
注意
目前無法使用有效的要求數據來測試 API,因為這需要來自用戶端應用程式的平臺特定資訊。
建立跨平臺 Xamarin.Forms 應用程式
在本節中,您會建置以跨平臺方式實作推播通知的 Xamarin.Forms 行動應用程式。
它可讓您透過您所建立的後端服務,從通知中樞註冊和取消註冊。
當指定動作且應用程式位於前景時,就會顯示警示。 否則,通知會出現在通知中心。
注意
您通常會在應用程式生命週期的適當時間點執行註冊 (和取消註冊) 動作 (,或作為初次執行) 體驗的一部分,而不需要明確的用戶註冊/取消註冊輸入。 不過,此範例需要明確的使用者輸入,才能更輕鬆地探索及測試這項功能。
建立 Xamarin.Forms 方案
在 Visual Studio 中,使用空白表單應用程式作為範本,並輸入 PushDemo 作為項目名稱,建立新的 Xamarin.Forms 方案。
注意
在 [ 設定空白表單應用程式 ] 對話框中,確定 [組織標識符 ] 符合您先前使用的值,並檢查 Android 和 iOS 目標。
控制 + 按兩下PushDemo 解決方案,然後選擇 [更新 NuGet 套件]。
控制 + 按兩下PushDemo 解決方案,然後選擇 [管理 NuGet 套件]。
搜尋 Newtonsoft.Json ,並確定已核取。
按兩下 [新增套件],然後在系統提示您接受授權條款時,按兩下 [ 接受 ]。
(命令 + 輸入) 在每個目標平臺上建置並執行應用程式,以測試範本化應用程式在裝置上執行 () 。
實作跨平臺元件
控制 + 單擊PushDemo 專案,從 [新增] 功能表中選擇 [新增資料夾],然後按兩下 [使用模型新增] 作為 [資料夾名稱]。
控制 + 單擊[模型] 資料夾,然後從 [新增] 功能表中選擇 [新增檔案...]。
選取 [一般>空白類別],輸入 DeviceInstallation.cs,然後新增下列實作。
using System.Collections.Generic; using Newtonsoft.Json; namespace PushDemo.Models { public class DeviceInstallation { [JsonProperty("installationId")] public string InstallationId { get; set; } [JsonProperty("platform")] public string Platform { get; set; } [JsonProperty("pushChannel")] public string PushChannel { get; set; } [JsonProperty("tags")] public List<string> Tags { get; set; } = new List<string>(); } }使用下列實作,將空列舉新增至名為 PushDemoAction.cs 的 Models 資料夾。
namespace PushDemo.Models
{
    public enum PushDemoAction
    {
        ActionA,
        ActionB
    }
}
將新的資料夾新增至名為 Services 的 PushDemo 專案,然後使用下列實作,將名為 ServiceContainer.cs的空白類別新增至該資料夾。
using System;
using System.Collections.Generic;

namespace PushDemo.Services
{
   public static class ServiceContainer
   {
       static readonly Dictionary<Type, Lazy<object>> services
           = new Dictionary<Type, Lazy<object>>();

       public static void Register<T>(Func<T> function)
           => services[typeof(T)] = new Lazy<object>(() => function());

       public static T Resolve<T>()
           => (T)Resolve(typeof(T));

       public static object Resolve(Type type)
       {
           {
               if (services.TryGetValue(type, out var service))
                   return service.Value;

               throw new KeyNotFoundException($"Service not found for type '{type}'");
           }
       }
   }
}
注意
這是從 XamCAT 存放庫修剪的 ServiceContainer 類別版本。 它會作為輕量 IoC (控制) 容器的反轉。
將空白介面新增至稱為 IDeviceInstallationService.cs的 Services 資料夾,然後新增下列程式代碼。
using PushDemo.Models;

namespace PushDemo.Services
{
    public interface IDeviceInstallationService
    {
        string Token { get; set; }
        bool NotificationsSupported { get; }
        string GetDeviceId();
        DeviceInstallation GetDeviceInstallation(params string[] tags);
    }
}
注意
此介面稍後會由每個目標實作並啟動,以提供後端服務所需的平臺特定功能和 DeviceInstallation 資訊。
將另一個名為 INotificationRegistrationService.cs的空白介面新增至 Services 資料夾,然後新增下列程式代碼。
using System.Threading.Tasks;

namespace PushDemo.Services
{
    public interface INotificationRegistrationService
    {
        Task DeregisterDeviceAsync();
        Task RegisterDeviceAsync(params string[] tags);
        Task RefreshRegistrationAsync();
    }
}
注意
這會處理用戶端與後端服務之間的互動。
將另一個名為 INotificationActionService.cs的空白介面新增至 Services 資料夾,然後新增下列程式代碼。
namespace PushDemo.Services
{
    public interface INotificationActionService
    {
        void TriggerAction(string action);
    }
}
注意
這是用來集中處理通知動作的簡單機制。
使用下列實作,將名為 IPushDemoNotificationActionService.cs的空白介面新增至衍生自 INotificationActionService 的 Services 資料夾。
using System;
using PushDemo.Models;

namespace PushDemo.Services
{
    public interface IPushDemoNotificationActionService : INotificationActionService
    {
        event EventHandler<PushDemoAction> ActionTriggered;
    }
}
注意
此類型專屬於 PushDemo 應用程式,並使用 PushDemoAction 列舉來識別以強型別方式觸發的動作。
使用下列程序代碼,將空類別新增至名為 NotificationRegistrationService.cs實作 INotificationRegistrationService 的 Services 資料夾。
using System;
using System.Net.Http;
using System.Text;
using System.Threading.Tasks;
using Newtonsoft.Json;
using PushDemo.Models;
using Xamarin.Essentials;

namespace PushDemo.Services
{
    public class NotificationRegistrationService : INotificationRegistrationService
    {
        const string RequestUrl = "api/notifications/installations";
        const string CachedDeviceTokenKey = "cached_device_token";
        const string CachedTagsKey = "cached_tags";

        string _baseApiUrl;
        HttpClient _client;
        IDeviceInstallationService _deviceInstallationService;

        public NotificationRegistrationService(string baseApiUri, string apiKey)
        {
            _client = new HttpClient();
            _client.DefaultRequestHeaders.Add("Accept", "application/json");
            _client.DefaultRequestHeaders.Add("apikey", apiKey);

            _baseApiUrl = baseApiUri;
        }

        IDeviceInstallationService DeviceInstallationService
            => _deviceInstallationService ??
                (_deviceInstallationService = ServiceContainer.Resolve<IDeviceInstallationService>());

        public async Task DeregisterDeviceAsync()
        {
            var cachedToken = await SecureStorage.GetAsync(CachedDeviceTokenKey)
                .ConfigureAwait(false);

            if (cachedToken == null)
                return;

            var deviceId = DeviceInstallationService?.GetDeviceId();

            if (string.IsNullOrWhiteSpace(deviceId))
                throw new Exception("Unable to resolve an ID for the device.");

            await SendAsync(HttpMethod.Delete, $"{RequestUrl}/{deviceId}")
                .ConfigureAwait(false);

            SecureStorage.Remove(CachedDeviceTokenKey);
            SecureStorage.Remove(CachedTagsKey);
        }

        public async Task RegisterDeviceAsync(params string[] tags)
        {
            var deviceInstallation = DeviceInstallationService?.GetDeviceInstallation(tags);

            await SendAsync<DeviceInstallation>(HttpMethod.Put, RequestUrl, deviceInstallation)
                .ConfigureAwait(false);

            await SecureStorage.SetAsync(CachedDeviceTokenKey, deviceInstallation.PushChannel)
                .ConfigureAwait(false);

            await SecureStorage.SetAsync(CachedTagsKey, JsonConvert.SerializeObject(tags));
        }

        public async Task RefreshRegistrationAsync()
        {
            var cachedToken = await SecureStorage.GetAsync(CachedDeviceTokenKey)
                .ConfigureAwait(false);

            var serializedTags = await SecureStorage.GetAsync(CachedTagsKey)
                .ConfigureAwait(false);

            if (string.IsNullOrWhiteSpace(cachedToken) ||
                string.IsNullOrWhiteSpace(serializedTags) ||
                string.IsNullOrWhiteSpace(DeviceInstallationService.Token) ||
                cachedToken == DeviceInstallationService.Token)
                return;

            var tags = JsonConvert.DeserializeObject<string[]>(serializedTags);

            await RegisterDeviceAsync(tags);
        }

        async Task SendAsync<T>(HttpMethod requestType, string requestUri, T obj)
        {
            string serializedContent = null;

            await Task.Run(() => serializedContent = JsonConvert.SerializeObject(obj))
                .ConfigureAwait(false);

            await SendAsync(requestType, requestUri, serializedContent);
        }

        async Task SendAsync(
            HttpMethod requestType,
            string requestUri,
            string jsonRequest = null)
        {
            var request = new HttpRequestMessage(requestType, new Uri($"{_baseApiUrl}{requestUri}"));

            if (jsonRequest != null)
                request.Content = new StringContent(jsonRequest, Encoding.UTF8, "application/json");

            var response = await _client.SendAsync(request).ConfigureAwait(false);

            response.EnsureSuccessStatusCode();
        }
    }
}
注意
只有在您選擇使用 API 金鑰驗證用戶端一節時,才需要 apiKey 自變數。
使用下列程序代碼,將空類別新增至名為 PushDemoNotificationActionService.cs實作 IPushDemoNotificationActionService 的 Services 資料夾。
using System; using System.Collections.Generic; using System.Linq; using PushDemo.Models; namespace PushDemo.Services { public class PushDemoNotificationActionService : IPushDemoNotificationActionService { readonly Dictionary<string, PushDemoAction> _actionMappings = new Dictionary<string, PushDemoAction> { { "action_a", PushDemoAction.ActionA }, { "action_b", PushDemoAction.ActionB } }; public event EventHandler<PushDemoAction> ActionTriggered = delegate { }; public void TriggerAction(string action) { if (!_actionMappings.TryGetValue(action, out var pushDemoAction)) return; List<Exception> exceptions = new List<Exception>(); foreach (var handler in ActionTriggered?.GetInvocationList()) { try { handler.DynamicInvoke(this, pushDemoAction); } catch (Exception ex) { exceptions.Add(ex); } } if (exceptions.Any()) throw new AggregateException(exceptions); } } }使用下列實作,將空類別新增至名為 Config.cs的 PushDemo 專案。
namespace PushDemo
{
    public static partial class Config
    {
        public static string ApiKey = "API_KEY";
        public static string BackendServiceEndpoint = "BACKEND_SERVICE_ENDPOINT";
    }
}
注意
這是用來將秘密保留在原始檔控制外簡單的方式。 您可以將這些值取代為自動化組建的一部分,或使用本機部分類別加以覆寫。 您將在下一個步驟中執行此動作。
只有在您選擇使用 API 金鑰驗證客戶端一節時,才需要 [ApiKey] 欄位。
這次將另一個 空白類別 新增至 PushDemo 專案 ,稱為 Config.local_secrets.cs 下列實作。
namespace PushDemo
{
    public static partial class Config
    {
        static Config()
        {
            ApiKey = "<your_api_key>";
            BackendServiceEndpoint = "<your_api_app_url>";
        }
    }
}
注意
將佔位元值取代為您自己的值。 當您建置後端服務時,應該已記下這些專案。 API 應用程式 URL 應該是
https://<api_app_name>.azurewebsites.net/。 請記得將 新增*.local_secrets.*至您的 gitignore 檔案,以避免認可此檔案。只有在您選擇使用 API 金鑰驗證客戶端一節時,才需要 [ApiKey] 欄位。
使用下列實作,將空類別新增至名為 Bootstrap.cs的 PushDemo 專案。
using System;
using PushDemo.Services;

namespace PushDemo
{
    public static class Bootstrap
    {
        public static void Begin(Func<IDeviceInstallationService> deviceInstallationService)
        {
            ServiceContainer.Register(deviceInstallationService);

            ServiceContainer.Register<IPushDemoNotificationActionService>(()
                => new PushDemoNotificationActionService());

            ServiceContainer.Register<INotificationRegistrationService>(()
                => new NotificationRegistrationService(
                    Config.BackendServiceEndpoint,
                    Config.ApiKey));
        }
    }
}
注意
當應用程式啟動傳入 IDeviceInstallationService 的平臺特定實作時,每個平台都會呼叫 Begin 方法。
只有在您選擇完成使用 API 金鑰驗證用戶端一節時,才需要 NotificationRegistrationServiceapiKey 建構函式自變數。
實作跨平臺UI
在 PushDemo 專案中,開啟 MainPage.xaml ,並以下列內容取代 StackLayout 控制件。
<StackLayout VerticalOptions="EndAndExpand"
             HorizontalOptions="FillAndExpand"
             Padding="20,40">
    <Button x:Name="RegisterButton"
            Text="Register"
            Clicked="RegisterButtonClicked" />
    <Button x:Name="DeregisterButton"
            Text="Deregister"
            Clicked="DeregisterButtonClicked" />
</StackLayout>
現在,在 MainPage.xaml.cs 中,新增 唯讀 備份欄位來儲存 INotificationRegistrationService 實作的參考。
readonly INotificationRegistrationService _notificationRegistrationService;在 MainPage 建構函式中,使用 ServiceContainer 解析 INotificationRegistrationService 實作,並將它指派給 notificationRegistrationService 支援字段。
public MainPage()
{
    InitializeComponent();

    _notificationRegistrationService =
        ServiceContainer.Resolve<INotificationRegistrationService>();
}
實作 RegisterButton 和 DeregisterButton 按鈕的事件處理程式 Clicked 事件,呼叫對應的 Register/Deregister 方法。
void RegisterButtonClicked(object sender, EventArgs e)
    => _notificationRegistrationService.RegisterDeviceAsync().ContinueWith((task)
        => { ShowAlert(task.IsFaulted ?
                task.Exception.Message :
                $"Device registered"); });

void DeregisterButtonClicked(object sender, EventArgs e)
    => _notificationRegistrationService.DeregisterDeviceAsync().ContinueWith((task)
        => { ShowAlert(task.IsFaulted ?
                task.Exception.Message :
                $"Device deregistered"); });

void ShowAlert(string message)
    => MainThread.BeginInvokeOnMainThread(()
        => DisplayAlert("PushDemo", message, "OK").ContinueWith((task)
            => { if (task.IsFaulted) throw task.Exception; }));
現在,在 App.xaml.cs中,請確定已參考下列命名空間。
using PushDemo.Models;
using PushDemo.Services;
using Xamarin.Essentials;
using Xamarin.Forms;
實作 IPushDemoNotificationActionServiceActionTriggered 事件的事件處理程式。
void NotificationActionTriggered(object sender, PushDemoAction e) => ShowActionAlert(e); void ShowActionAlert(PushDemoAction action) => MainThread.BeginInvokeOnMainThread(() => MainPage?.DisplayAlert("PushDemo", $"{action} action received", "OK") .ContinueWith((task) => { if (task.IsFaulted) throw task.Exception; }));在應用程式建構函式中,使用 ServiceContainer 解析 IPushNotificationActionService 實作,並訂閱 IPushDemoNotificationActionServiceActionTriggered 事件。
public App()
{
    InitializeComponent();

    ServiceContainer.Resolve<IPushDemoNotificationActionService>()
        .ActionTriggered += NotificationActionTriggered;

    MainPage = new MainPage();
}
注意
這隻是為了示範推播通知動作的接收和傳播。 一般而言,這些會以無訊息方式處理,例如流覽至特定檢視或重新整理某些數據,而不是在此案例中透過根 頁面MainPage 顯示警示。
設定推播通知的原生 Android 專案
驗證套件名稱和許可權
在 PushDemo.Android 中,開啟 [項目選項],然後從 [建置] 區段開啟 [Android 應用程式]。
檢查 套件名稱 是否符合您在 Firebase 控制台PushDemo 專案中所使用的值。 套件名稱的格式
com.<organization>.pushdemo為 。將 [最低 Android 版本 ] 設定為 [Android 8.0] (API 層級 26) ,並將 [目標 Android 版本 ] 設定為最新的 API 層級。
注意
本教學課程的目的僅支持執行 API 層級 26 和更新 版本的裝置,不過您可以擴充它以支援執行舊版的裝置。
請確定已在 [必要許可權] 下啟用因特網和READ_PHONE_STATE許可權。
按兩下 [確定]
新增 Xamarin Google Play Services 基底和 Xamarin.Firebase.Messaging 套件
在 PushDemo.Android 中, 控制 + 按兩下[套件 ] 資料夾,然後選擇 [ 管理 NuGet 套件...]。
搜尋 Xamarin.GooglePlayServices.Base (而非 「) 」,並確定已核取。
搜尋 Xamarin.Firebase.Messaging 並確定 已核取。
按兩下 [新增套件],然後在系統提示您接受授權條款時,按兩下 [接受]。
新增Google Services JSON 檔案
控制 +
PushDemo.Android單擊專案,然後從 [新增] 功能表中選擇 [現有檔案...]。在 Firebase 控制台中設定 PushDemo 專案時,請選擇您稍早下載的google-services.json檔案,然後按兩下 [開啟]。
出現提示時,選擇 [ 將檔案複製到目錄]。
控制 + 從專案內
PushDemo.Android按兩下google-services.json檔案,然後確定GoogleServicesJson已設定為 [建置動作]。
處理Android的推播通知
控制 +
PushDemo.Android單擊專案,從 [新增] 功能表中選擇 [新增資料夾],然後按兩下 [使用服務新增] 作為 [資料夾名稱]。控制 + 單擊 [服務] 資料夾,然後從 [新增] 功能表中選擇 [新增檔案...]。
選取 [一般>空白類別],針對 [名稱] 輸入DeviceInstallationService.cs,然後按兩下 [新增] 新增下列實作。
using System;
using Android.App;
using Android.Gms.Common;
using PushDemo.Models;
using PushDemo.Services;
using static Android.Provider.Settings;

namespace PushDemo.Droid.Services
{
    public class DeviceInstallationService : IDeviceInstallationService
    {
        public string Token { get; set; }

        public bool NotificationsSupported
            => GoogleApiAvailability.Instance
                .IsGooglePlayServicesAvailable(Application.Context) == ConnectionResult.Success;

        public string GetDeviceId()
            => Secure.GetString(Application.Context.ContentResolver, Secure.AndroidId);

        public DeviceInstallation GetDeviceInstallation(params string[] tags)
        {
            if (!NotificationsSupported)
                throw new Exception(GetPlayServicesError());

            if (string.IsNullOrWhiteSpace(Token))
                throw new Exception("Unable to resolve token for FCM");

            var installation = new DeviceInstallation
            {
                InstallationId = GetDeviceId(),
                Platform = "fcm",
                PushChannel = Token
            };

            installation.Tags.AddRange(tags);

            return installation;
        }

        string GetPlayServicesError()
        {
            int resultCode = GoogleApiAvailability.Instance.IsGooglePlayServicesAvailable(Application.Context);

            if (resultCode != ConnectionResult.Success)
                return GoogleApiAvailability.Instance.IsUserResolvableError(resultCode) ?
                           GoogleApiAvailability.Instance.GetErrorString(resultCode) :
                           "This device is not supported";

            return "An error occurred preventing the use of push notifications";
        }
    }
}
注意
這個類別提供唯一標識碼 (,使用 Secure.AndroidId) 作為通知中樞註冊承載的一部分。
將另一個名為 PushNotificationFirebaseMessagingService.cs的空白類別新增至 Services 資料夾,然後新增下列實作。
using Android.App;
using Android.Content;
using Firebase.Messaging;
using PushDemo.Services;

namespace PushDemo.Droid.Services
{
    [Service]
    [IntentFilter(new[] { "com.google.firebase.MESSAGING_EVENT" })]
    public class PushNotificationFirebaseMessagingService : FirebaseMessagingService
    {
        IPushDemoNotificationActionService _notificationActionService;
        INotificationRegistrationService _notificationRegistrationService;
        IDeviceInstallationService _deviceInstallationService;

        IPushDemoNotificationActionService NotificationActionService
            => _notificationActionService ??
                (_notificationActionService =
                ServiceContainer.Resolve<IPushDemoNotificationActionService>());

        INotificationRegistrationService NotificationRegistrationService
            => _notificationRegistrationService ??
                (_notificationRegistrationService =
                ServiceContainer.Resolve<INotificationRegistrationService>());

        IDeviceInstallationService DeviceInstallationService
            => _deviceInstallationService ??
                (_deviceInstallationService =
                ServiceContainer.Resolve<IDeviceInstallationService>());

        public override void OnNewToken(string token)
        {
            DeviceInstallationService.Token = token;

            NotificationRegistrationService.RefreshRegistrationAsync()
                .ContinueWith((task) => { if (task.IsFaulted) throw task.Exception; });
        }

        public override void OnMessageReceived(RemoteMessage message)
        {
            if(message.Data.TryGetValue("action", out var messageAction))
                NotificationActionService.TriggerAction(messageAction);
        }
    }
}
在 MainActivity.cs中,確定已將下列命名空間新增至檔案頂端。
using System;
using Android.App;
using Android.Content;
using Android.Content.PM;
using Android.OS;
using Android.Runtime;
using Firebase.Iid;
using PushDemo.Droid.Services;
using PushDemo.Services;
在 MainActivity.cs中,將 LaunchMode 設定為 SingleTop ,讓 MainActivity 在開啟時不會再次建立。
[Activity(
    Label = "PushDemo",
    LaunchMode = LaunchMode.SingleTop,
    Icon = "@mipmap/icon",
    Theme = "@style/MainTheme",
    MainLauncher = true,
    ConfigurationChanges = ConfigChanges.ScreenSize | ConfigChanges.Orientation)]
新增私人屬性和對應的備份字段,以儲存 IPushNotificationActionService 和 IDeviceInstallationService 實作 的參考。
IPushDemoNotificationActionService _notificationActionService;
IDeviceInstallationService _deviceInstallationService;

IPushDemoNotificationActionService NotificationActionService
    => _notificationActionService ??
        (_notificationActionService =
        ServiceContainer.Resolve<IPushDemoNotificationActionService>());

IDeviceInstallationService DeviceInstallationService
    => _deviceInstallationService ??
        (_deviceInstallationService =
        ServiceContainer.Resolve<IDeviceInstallationService>());
實作 IOnSuccessListener 介面,以擷取及儲存 Firebase 令牌。
public class MainActivity : global::Xamarin.Forms.Platform.Android.FormsAppCompatActivity, Android.Gms.Tasks.IOnSuccessListener
{
    ...

    public void OnSuccess(Java.Lang.Object result)
        => DeviceInstallationService.Token =
            result.Class.GetMethod("getToken").Invoke(result).ToString();
}
新增名為 ProcessNotificationActions 的新方法,以檢查指定的 意圖 是否有額外的具名 動作值。 使用 IPushDemoNotificationActionService 實作有條件地觸發該動作。
void ProcessNotificationActions(Intent intent)
{
    try
    {
        if (intent?.HasExtra("action") == true)
        {
            var action = intent.GetStringExtra("action");

            if (!string.IsNullOrEmpty(action))
                NotificationActionService.TriggerAction(action);
        }
    }
    catch (Exception ex)
    {
        System.Diagnostics.Debug.WriteLine(ex.Message);
    }
}
覆寫 OnNewIntent 方法以呼叫 ProcessNotificationActions 方法。
protected override void OnNewIntent(Intent intent)
{
    base.OnNewIntent(intent);
    ProcessNotificationActions(intent);
}
注意
由於 Activity 的 LaunchMode 設定為 SingleTop,因此意圖會透過 OnNewIntent 方法傳送至現有的 Activity 實例,而不是 OnCreate 方法,因此您必須在 OnCreate 和 OnNewIntent 方法中處理傳入意圖。
更新 OnCreate 方法,以在呼叫之後立即呼叫
Bootstrap.Begin,以base.OnCreate傳入 IDeviceInstallationService 的平臺特定實作。Bootstrap.Begin(() => new DeviceInstallationService());在相同的方法中,在 FirebaseApp 實例上有條件地呼叫 GetInstanceId,緊接在 呼叫
Bootstrap.Begin之後,將 MainActivity 新增為 IOnSuccessListener。if (DeviceInstallationService.NotificationsSupported) { FirebaseInstanceId.GetInstance(Firebase.FirebaseApp.Instance) .GetInstanceId() .AddOnSuccessListener(this); }仍在 OnCreate 中,在呼叫傳入目前意圖之後立即呼叫
LoadApplicationProcessNotificationActions。... LoadApplication(new App()); ProcessNotificationActions(Intent);
注意
每次執行應用程式時,都必須重新註冊應用程式,並從偵錯會話停止應用程式,才能繼續接收推播通知。
設定推播通知的原生 iOS 專案
設定 Info.plist 和 Entitlements.plist
確定您已在 Visual Studio> 喜好設定中登入 Apple 開發人員帳戶...>出版>已下載Apple開發人員帳戶和適當的憑證和布建配置檔。 您應該已在先前的步驟中建立這些資產。
在 PushDemo.iOS 中,開啟 Info.plist ,並確定 BundleIdentifier 符合 Apple 開發人員入口網站中個別布建配置檔所使用的值。 BundleIdentifier 的格式為
com.<organization>.PushDemo。在相同的檔案中,將 [最低系統版本 ] 設定為 13.0。
注意
本教學課程的目的僅支持執行 iOS 13.0 和更新 版本的裝置,不過您可以擴充它以支援執行舊版的裝置。
開啟 PushDemo.iOS的項目選項 (按兩下專案) 。
在 [項目選項] 的 [ 建置 > iOS 套件組合簽署] 底下,確定您已在 [小組] 底下選取您的開發人員帳戶。 然後,確定已選取 [自動管理簽署],並自動選取您的簽署憑證和布建配置檔。
注意
如果尚未自動選取您的 簽署憑證 和 布建配置檔 ,請選擇 [手動布建],然後按兩下 [套件組合簽署選項]。 確定已針對 [簽署身分識別] 選取您的小組,並已針對 [偵錯] 和 [發行] 組態選取您的 PushDemo 特定佈建配置檔,以確保在這兩種情況下都已針對平臺選取 iPhone。
在 PushDemo.iOS 中,開啟 Entitlements.plist,並確定在 [權利] 索引卷標中檢視時會檢查 [啟用推播通知]。然後,確定 APS 環境設定在 [來源] 索引標籤中檢視時設定為開發。
處理 iOS 的推播通知
控制 + 單擊PushDemo.iOS 專案,從 [新增] 選單中選擇 [新增資料夾],然後按兩下 [使用服務新增] 作為 [資料夾名稱]。
控制 + 單擊 [服務] 資料夾,然後從 [新增] 功能表中選擇 [新增檔案...]。
選取 [一般>空白類別],針對 [名稱] 輸入DeviceInstallationService.cs,然後按兩下 [新增] 新增下列實作。
using System;
using PushDemo.Models;
using PushDemo.Services;
using UIKit;

namespace PushDemo.iOS.Services
{
    public class DeviceInstallationService : IDeviceInstallationService
    {
        const int SupportedVersionMajor = 13;
        const int SupportedVersionMinor = 0;

        public string Token { get; set; }

        public bool NotificationsSupported
            => UIDevice.CurrentDevice.CheckSystemVersion(SupportedVersionMajor, SupportedVersionMinor);

        public string GetDeviceId()
            => UIDevice.CurrentDevice.IdentifierForVendor.ToString();

        public DeviceInstallation GetDeviceInstallation(params string[] tags)
        {
            if (!NotificationsSupported)
                throw new Exception(GetNotificationsSupportError());

            if (string.IsNullOrWhiteSpace(Token))
                throw new Exception("Unable to resolve token for APNS");

            var installation = new DeviceInstallation
            {
                InstallationId = GetDeviceId(),
                Platform = "apns",
                PushChannel = Token
            };

            installation.Tags.AddRange(tags);

            return installation;
        }

        string GetNotificationsSupportError()
        {
            if (!NotificationsSupported)
                return $"This app only supports notifications on iOS {SupportedVersionMajor}.{SupportedVersionMinor} and above. You are running {UIDevice.CurrentDevice.SystemVersion}.";

            if (Token == null)
                return $"This app can support notifications but you must enable this in your settings.";


            return "An error occurred preventing the use of push notifications";
        }
    }
}
注意
這個類別會使用 UIDevice.IdentifierForVendor 值) 和通知中樞註冊承載,提供唯一標識碼 (。
將新的資料夾新增至名為 Extensions 的 PushDemo.iOS 專案,然後使用下列實作,將該資料夾新增至名為 NSDataExtensions.cs 的空白類別。
using System.Text;
using Foundation;

namespace PushDemo.iOS.Extensions
{
    internal static class NSDataExtensions
    {
        internal static string ToHexString(this NSData data)
        {
            var bytes = data.ToArray();

            if (bytes == null)
                return null;

            StringBuilder sb = new StringBuilder(bytes.Length * 2);

            foreach (byte b in bytes)
                sb.AppendFormat("{0:x2}", b);

            return sb.ToString().ToUpperInvariant();
        }
    }
}
在 AppDelegate.cs中,請確定已將下列命名空間新增至檔案頂端。
using System;
using System.Diagnostics;
using System.Threading.Tasks;
using Foundation;
using PushDemo.iOS.Extensions;
using PushDemo.iOS.Services;
using PushDemo.Services;
using UIKit;
using UserNotifications;
using Xamarin.Essentials;
新增私用屬性及其各自的備份字段,以儲存 IPushDemoNotificationActionService、 INotificationRegistrationService 和 IDeviceInstallationService 實作 的參考。
IPushDemoNotificationActionService _notificationActionService;
INotificationRegistrationService _notificationRegistrationService;
IDeviceInstallationService _deviceInstallationService;

IPushDemoNotificationActionService NotificationActionService
    => _notificationActionService ??
        (_notificationActionService =
        ServiceContainer.Resolve<IPushDemoNotificationActionService>());

INotificationRegistrationService NotificationRegistrationService
    => _notificationRegistrationService ??
        (_notificationRegistrationService =
        ServiceContainer.Resolve<INotificationRegistrationService>());

IDeviceInstallationService DeviceInstallationService
    => _deviceInstallationService ??
        (_deviceInstallationService =
        ServiceContainer.Resolve<IDeviceInstallationService>());
新增 RegisterForRemoteNotifications 方法來註冊使用者通知設定,然後使用 APNS 註冊遠端通知。
void RegisterForRemoteNotifications()
{
    MainThread.BeginInvokeOnMainThread(() =>
    {
        var pushSettings = UIUserNotificationSettings.GetSettingsForTypes(
            UIUserNotificationType.Alert |
            UIUserNotificationType.Badge |
            UIUserNotificationType.Sound,
            new NSSet());

        UIApplication.SharedApplication.RegisterUserNotificationSettings(pushSettings);
        UIApplication.SharedApplication.RegisterForRemoteNotifications();
    });
}
新增 CompleteRegistrationAsync 方法來設定
IDeviceInstallationService.Token屬性值。 重新整理註冊,並在上次儲存后已更新裝置令牌時快取該令牌。Task CompleteRegistrationAsync(NSData deviceToken) { DeviceInstallationService.Token = deviceToken.ToHexString(); return NotificationRegistrationService.RefreshRegistrationAsync(); }新增 ProcessNotificationActions 方法來處理 NSDictionary 通知數據,並有條件地呼叫 NotificationActionService.TriggerAction。
void ProcessNotificationActions(NSDictionary userInfo)
{
    if (userInfo == null)
        return;

    try
    {
        var actionValue = userInfo.ObjectForKey(new NSString("action")) as NSString;

        if (!string.IsNullOrWhiteSpace(actionValue?.Description))
            NotificationActionService.TriggerAction(actionValue.Description);
    }
    catch (Exception ex)
    {
        Debug.WriteLine(ex.Message);
    }
}
覆寫 RegisteredForRemoteNotifications 方法,將 deviceToken 自變數傳遞至 CompleteRegistrationAsync 方法。
public override void RegisteredForRemoteNotifications(
    UIApplication application,
    NSData deviceToken)
    => CompleteRegistrationAsync(deviceToken).ContinueWith((task)
        => { if (task.IsFaulted) throw task.Exception; });
覆寫 ReceivedRemoteNotification 方法,將 userInfo 自變數傳遞至 ProcessNotificationActions 方法。
public override void ReceivedRemoteNotification(
    UIApplication application,
    NSDictionary userInfo)
    => ProcessNotificationActions(userInfo);
覆寫 FailedToRegisterForRemoteNotifications 方法來記錄錯誤。
public override void FailedToRegisterForRemoteNotifications(
    UIApplication application,
    NSError error)
    => Debug.WriteLine(error.Description);
注意
這是佔位元。 您要針對生產案例實作適當的記錄和錯誤處理。
更新 FinishedLaunching 方法,以在呼叫之後立即呼叫
Bootstrap.Begin,以Forms.Init傳入 IDeviceInstallationService 的平臺特定實作。Bootstrap.Begin(() => new DeviceInstallationService());在相同的方法中,有條件地要求授權,並在 之後
Bootstrap.Begin立即註冊遠端通知。if (DeviceInstallationService.NotificationsSupported) { UNUserNotificationCenter.Current.RequestAuthorization( UNAuthorizationOptions.Alert | UNAuthorizationOptions.Badge | UNAuthorizationOptions.Sound, (approvalGranted, error) => { if (approvalGranted && error == null) RegisterForRemoteNotifications(); }); }仍在 FinishedLaunching 中,如果 options 自變數包含 UIApplication.LaunchOptionsRemoteNotificationKey,則呼叫 ProcessNotificationActions,並在產生的 userInfo 物件中傳入時立即呼叫
LoadApplicationProcessNotificationActions。using (var userInfo = options?.ObjectForKey( UIApplication.LaunchOptionsRemoteNotificationKey) as NSDictionary) ProcessNotificationActions(userInfo);
測試解決方案
您現在可以測試透過後端服務傳送通知。
傳送測試通知
在 Postman 中開啟新的索引標籤。
將要求設定為 POST,然後輸入下列位址:
https://<app_name>.azurewebsites.net/api/notifications/requests如果您選擇完成 [使用 API 金鑰驗證用戶端 ] 區段,請務必設定要求標頭以包含 您的 apikey 值。
關鍵 價值 apikey <your_api_key> 選擇本文的原始選項,然後從格式選項清單中選擇 JSON,然後包含一些佔位元 JSON 內容:
{
    "text": "Message from Postman!",
    "action": "action_a"
}
選取 [ 程序代碼 ] 按鈕,其位於視窗右上方的 [ 儲存 ] 按鈕底下。 根據您是否包含 apikey 標頭) 而定,針對 HTML (顯示時,要求看起來應該類似下列範例:
POST /api/notifications/requests HTTP/1.1
Host: https://<app_name>.azurewebsites.net
apikey: <your_api_key>
Content-Type: application/json

{
    "text": "Message from backend service",
    "action": "action_a"
}
在 Android 和 iOS () 的其中一個或兩個目標平台上執行 PushDemo 應用程式。
注意
如果您要在 Android 上進行測試,請確定您未在 [ 偵錯] 中執行,或執行應用程式以部署應用程式,然後強制關閉應用程式並從啟動器重新啟動。
在 PushDemo 應用程式中,點選 [ 註冊] 按鈕。
回到 Postman,如果您尚未) 按兩下 [傳送] 按鈕,請關閉 [產生代碼段] 視窗 (。
驗證您在 Postman 中收到 200 OK 回應,且警示會出現在應用程式中,其中顯示已收到的 ActionA 動作。
關閉 PushDemo 應用程式,然後在 Postman 中再次按兩下 [傳送] 按鈕。
再次驗證您在Postman中收到200 OK回應。 使用正確的訊息,驗證 PushDemo 應用程式的通知出現在通知區域中。
點選通知以確認它已開啟應用程式並顯示 ActionA 動作已收到 警示。
回到Postman,修改先前的要求本文以傳送無訊息通知,以指定動作值action_b而不是action_a。
{ "action": "action_b", "silent": true }在應用程式仍然開啟時,按兩下Postman中的 [傳送] 按鈕。
驗證您在 Postman 中收到 200 OK 回應,且警示出現在應用程式中,其中顯示已收到的 ActionB 動作,而不是收到 ActionA 動作。
關閉 PushDemo 應用程式,然後在 Postman 中再次按兩下 [傳送] 按鈕。
驗證您在 Postman 中收到 200 OK 回應,且無訊息通知不會出現在通知區域中。
故障排除
後端服務沒有回應
在本機測試時,請確定後端服務正在執行,並使用正確的埠。
如果針對 Azure API 應用程式進行測試,請檢查服務是否正在執行,且已部署且已啟動,且未發生錯誤。
請務必在 Postman 或透過客戶端測試時,在行動裝置應用程式組態中正確指定基位址。 基地址應該表示在本機測試時為 https://<api_name>.azurewebsites.net/ 或 https://localhost:5001/ 。
啟動或停止偵錯會話之後,未在Android上收到通知
請確定您在啟動或停止偵錯會話之後再次註冊。 調試程式會導致產生新的 Firebase 令牌。 通知中樞安裝也必須更新。
從後端服務接收 401 狀態代碼
驗證您正在設定 apikey 要求標頭,且此值符合您為後端服務設定的值。
如果您在本機測試時收到此錯誤,請確定您在用戶端設定中定義的密鑰值符合 API 所使用的 Authentication:ApiKey 用戶設定值。
如果您要使用 API 應用程式進行測試,請確定用戶端組態檔中的密鑰值符合您在 API 應用程式中使用的 Authentication:ApiKey 應用程式設定。
注意
如果您在部署後端服務之後已建立或變更此設定,則必須重新啟動服務,才能生效。
如果您選擇不完成 [使用 API 金鑰驗證用戶端 ] 區段,請確定您未將 Authorize 屬性套用至 NotificationsController 類別。
從後端服務接收 404 狀態代碼
驗證端點和 HTTP 要求方法是否正確。 例如,端點應指出為:
- [PUT]
https://<api_name>.azurewebsites.net/api/notifications/installations - [DELETE]
https://<api_name>.azurewebsites.net/api/notifications/installations/<installation_id> - [POST]
https://<api_name>.azurewebsites.net/api/notifications/requests
或在本機測試時:
- [PUT]
https://localhost:5001/api/notifications/installations - [DELETE]
https://localhost:5001/api/notifications/installations/<installation_id> - [POST]
https://localhost:5001/api/notifications/requests
在用戶端應用程式中指定基位址時,請確定其結尾為 /。 基地址應該表示在本機測試時為 https://<api_name>.azurewebsites.net/ 或 https://localhost:5001/ 。
無法註冊並顯示通知中樞錯誤訊息
確認測試裝置具有網路連線能力。 然後,藉由設定斷點來檢查 HttpResponse 中的 StatusCode 屬性值,以判斷 Http 回應狀態代碼。
根據狀態代碼檢閱先前的疑難解答建議。
在傳回個別 API 之這些特定狀態代碼的行上設定斷點。 然後在本機偵錯時嘗試呼叫後端服務。
使用適當的承載,驗證後端服務是否如預期般運作。 針對有問題的平臺,使用用戶端程式代碼所建立的實際承載。
檢閱平臺特定的組態區段,以確保未遺漏任何步驟。 檢查是否要針對 installation id 適當的平臺解析適當的值和 token 變數。
無法解析裝置錯誤訊息的識別碼
檢閱平臺特定的組態區段,以確保未遺漏任何步驟。
相關連結
- Azure 通知中樞概觀
- 安裝 Visual Studio for Mac
- 在 Windows 上安裝 Xamarin
- 後端作業的通知中樞 SDK
- GitHub 上的通知中樞 SDK
- 向應用程式後端註冊
- 註冊管理
- 使用標籤
- 使用自訂範本
後續步驟
您現在應該已透過後端服務連線到通知中樞的基本 Xamarin.Forms 應用程式,而且可以傳送和接收通知。
您可能需要調整本教學課程中使用的範例,以符合您自己的案例。 也建議您實作更強固的錯誤處理、重試邏輯和記錄。
Visual Studio App Center 可以快速併入行動裝置應用程式中,提供分析和診斷,以協助進行疑難解答。