在本文中,您將瞭解如何使用適用於 Python 的 Azure 管理連結庫來建立資源群組,以及 Azure 記憶體帳戶和 Blob 記憶體容器。
布建這些資源之後,請參閱 範例:使用 Azure 記憶體 來瞭解如何使用 Python 中的 Azure 用戶端連結庫,將檔案上傳至 Blob 容器。
本文稍後會列出 bash 和 PowerShell 的 對等 Azure CLI 命令 。 如果您想要使用 Azure 入口網站,請參閱 建立 Azure 記憶體帳戶 和 建立 Blob 容器。
1:設定本機開發環境
如果您尚未設定,請設定可在其中執行程式碼的環境。 以下是一些選項:
使用
venv或您選擇的工具設定 Python 虛擬環境。 若要開始使用虛擬環境,請務必加以啟用。 若要安裝 Python,請參閱 安裝 Python。#!/bin/bash # Create a virtual environment python -m venv .venv # Activate the virtual environment source .venv/Scripts/activate # only required for Windows (Git Bash)使用 conda 環境。 若要安裝 Conda,請參閱 安裝 Miniconda。
在 Visual Studio Code 或 GitHub Codespaces中使用 開發容器。
2:安裝所需的 Azure 連結庫套件
在您的控制台中,建立 requirements.txt 檔案,其中列出此範例中使用的管理連結庫:
azure-mgmt-resource
azure-mgmt-storage
azure-identity
在已啟用虛擬環境的控制台中,安裝需求:
pip install -r requirements.txt
3.設定環境變數
在此步驟中,您會設定環境變數以用於本文中的程序代碼。 程序代碼會使用os.environ方法來擷取值。
#!/bin/bash
export AZURE_RESOURCE_GROUP_NAME="<ResourceGroupName>" # Change to your preferred resource group name
export LOCATION="<Location>" # Change to your preferred region
export AZURE_SUBSCRIPTION_ID=$(az account show --query id --output tsv)
export STORAGE_ACCOUNT_NAME="<StorageAccountName>" # Change to your preferred storage account name
export CONTAINER_NAME="<ContainerName>" # Change to your preferred container name
4:撰寫程式代碼以建立記憶體帳戶和 Blob 容器
在此步驟中,您會使用下列程式代碼建立名為 provision_blob.py 的 Python 檔案。 這個 Python 腳本使用 Azure SDK for Python 管理函式庫來建立資源群組、Azure 儲存體 帳號和 Blob 容器。
import os

# Import the needed credential and management objects from the libraries.
from azure.identity import DefaultAzureCredential
from azure.mgmt.resource import ResourceManagementClient
from azure.mgmt.storage import StorageManagementClient
from azure.mgmt.storage.models import BlobContainer

# Acquire a credential object.
credential = DefaultAzureCredential()

# Retrieve subscription ID from environment variable.
subscription_id = os.environ["AZURE_SUBSCRIPTION_ID"]

# Retrieve resource group name and location from environment variables
RESOURCE_GROUP_NAME = os.environ["AZURE_RESOURCE_GROUP_NAME"]
LOCATION = os.environ["LOCATION"]

# Step 1: Provision the resource group.
resource_client = ResourceManagementClient(credential, subscription_id)

rg_result = resource_client.resource_groups.create_or_update(RESOURCE_GROUP_NAME,
    { "location": LOCATION })

print(f"Provisioned resource group {rg_result.name}")

# For details on the previous code, see Example: Create a resource group:
# https://learn.microsoft.com/azure/developer/python/sdk/examples/azure-sdk-example-resource-group


# Step 2: Provision the storage account, starting with a management object.

storage_client = StorageManagementClient(credential, subscription_id)

STORAGE_ACCOUNT_NAME = os.environ["STORAGE_ACCOUNT_NAME"]

# Check if the account name is available. Storage account names must be unique across
# Azure because they're used in URLs.
availability_result = storage_client.storage_accounts.check_name_availability(
    { "name": STORAGE_ACCOUNT_NAME, "type": "Microsoft.Storage/storageAccounts" }
)

if not availability_result.name_available:
    print(f"Storage name {STORAGE_ACCOUNT_NAME} is already in use. Try another name.")
    exit()

# The name is available, so provision the account
poller = storage_client.storage_accounts.begin_create(RESOURCE_GROUP_NAME, STORAGE_ACCOUNT_NAME,
    {
        "location" : LOCATION,
        "kind": "StorageV2",
        "sku": {"name": "Standard_LRS"}
    }
)

# Long-running operations return a poller object; calling poller.result()
# waits for completion.
account_result = poller.result()
print(f"Provisioned storage account {account_result.name}")


# Step 3: Retrieve the account's primary access key and generate a connection string.
keys = storage_client.storage_accounts.list_keys(RESOURCE_GROUP_NAME, STORAGE_ACCOUNT_NAME)

print("Retrieved the primary key for the storage account")

conn_string = f"DefaultEndpointsProtocol=https;EndpointSuffix=core.windows.net;AccountName={STORAGE_ACCOUNT_NAME};AccountKey={keys['keys'][0].value}"

# print(f"Connection string: {conn_string}")

# Step 4: Provision the blob container in the account (this call is synchronous)
CONTAINER_NAME = os.environ["CONTAINER_NAME"]
container = storage_client.blob_containers.create(RESOURCE_GROUP_NAME, STORAGE_ACCOUNT_NAME, CONTAINER_NAME, BlobContainer())

print(f"Provisioned blob container {container.name}")
程式代碼中的驗證
本文後面,你要使用 Azure CLI 來執行範例程式碼來登入 Azure。 如果你的帳號有足夠權限在 Azure 訂閱中建立資源群組和儲存資源,腳本就能在不需額外設定的情況下順利執行。
若要在生產環境中使用此程式碼,請使用服務主體進行驗證並設定環境變數。 此方法能安全且自動化地存取,無需依賴互動式登入。 如需詳細指引,請參閱 如何使用 Azure 服務驗證 Python 應用程式。
請確定服務主體已獲指派具有足夠許可權的角色,以建立資源群組和記憶體帳戶。 例如,在訂用帳戶層級指派參與者角色可提供必要的存取權。 若要深入瞭解角色指派,請參閱 Azure 中的角色型訪問控制 (RBAC)。
程式代碼中使用的類別參考連結
- DefaultAzureCredential (azure.identity)
- ResourceManagementClient (azure.mgmt.resource)
- StorageManagementClient (azure.mgmt.storage)
5.執行腳本
如果你還沒登入,請使用以下Azure CLI登入Azure:
az login
執行指令碼:
python provision_blob.py腳本需要一兩分鐘才能完成。
6:驗證資源
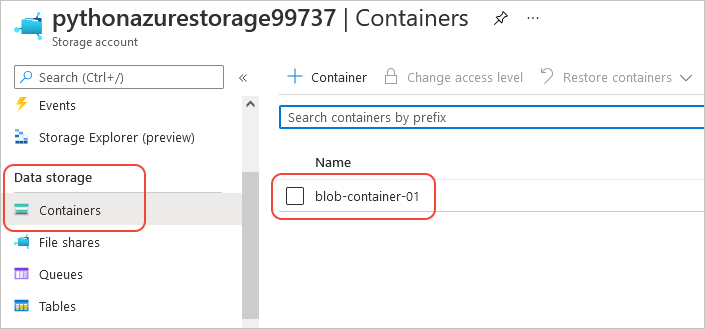
開啟 Azure 入口網站 ,確認資源群組和記憶體帳戶已如預期般建立。 你可能需要等一分鐘,然後重新整理資源群組檢視。
選擇儲存帳號,然後在左側選單選擇 資料儲存>容器 ,以確認你建立的容器是否出現:
如果您想要嘗試從應用程式程式碼使用這些資源,請繼續進行 範例:使用 Azure 記憶體。
如需使用 Azure 記憶體管理連結庫的另一個範例,請參閱 管理 Python 記憶體範例。
7:清除資源
如果你想在應用程式程式碼中使用這些資源,請參考文章 Example: Use Azure 儲存體。 否則,如果你不需要保留這個範例中建立的資源群組和儲存資源,就執行 az 群組刪除 指令。
資源群組不會在您的訂用帳戶中產生任何持續費用,但資源群組中的資源,例如記憶體帳戶,可能會產生費用。 清理任何目前未主動使用的資源群組,是一個好習慣。
--no-wait 自變數可讓命令立即傳回,而不是等待作業完成。
#!/bin/bash
az group delete -n $AZURE_RESOURCE_GROUP_NAME --no-wait
如需參考:對等的 Azure CLI 命令
下列 Azure CLI 命令會完成與 Python 腳本相同的建立步驟:
#!/bin/bash

# Set variables
export LOCATION="<Location>" # Change to your preferred region
export AZURE_RESOURCE_GROUP_NAME="<ResourceGroupName>" # Change to your preferred resource group name
export STORAGE_ACCOUNT_NAME="<StorageAccountName>" # Change to your preferred storage account name
export CONTAINER_NAME="<ContainerName>" # Change to your preferred container name

# Provision the resource group
echo "Creating resource group: $AZURE_RESOURCE_GROUP_NAME"
az group create \
    --location "$LOCATION" \
    --name "$AZURE_RESOURCE_GROUP_NAME"

# Provision the storage account
az storage account create \
    --resource-group "$AZURE_RESOURCE_GROUP_NAME" \
    --location "$LOCATION" \
    --name "$STORAGE_ACCOUNT_NAME" \
    --kind StorageV2 \
    --sku Standard_LRS

echo "Storage account name is $STORAGE_ACCOUNT_NAME"

# Retrieve the connection string
CONNECTION_STRING=$(az storage account show-connection-string \
    --resource-group "$AZURE_RESOURCE_GROUP_NAME" \
    --name "$STORAGE_ACCOUNT_NAME" \
    --query connectionString \
    --output tsv)

# Provision the blob container
az storage container create \
    --name "$CONTAINER_NAME" \
    --account-name "$STORAGE_ACCOUNT_NAME" \
    --connection-string "$CONNECTION_STRING"