Azure 通知中心安全推播
概觀
Microsoft Azure 中的推播通知支援可讓您存取易於使用、多重平台的大規模推播基礎結構,因而可大幅簡化消費者和企業應用程式在行動平台上的推播通知實作。
基於法規或安全性限制,應用程式有時會想要在通知中加入無法透過標準推播通知基礎結構傳送的內容。 本教學課程說明如何透過用戶端裝置和應用程式後端之間的安全、已驗證連線來傳送敏感資訊,以達到相同體驗。
概括而言,流程如下所示:
- 應用程式後端:
- 在後端資料庫中儲存安全裝載。
- 將此通知的識別碼傳送至裝置 (不會傳送安全資訊)。
- 收到通知時,裝置上的應用程式會執行下列動作:
- 裝置會連絡後端並要求安全裝載。
- 應用程式會以通知的形式在裝置上顯示裝載。
請務必注意在上述流程 (與本教學課程) 中,我們假設使用者登入後,裝置會將驗證權杖儲存在本機儲存體中。 由於裝置可使用此權杖擷取通知的安全裝載,因此可保證順暢的體驗。 如果您的應用程式沒有將驗證權杖儲存在裝置上,或如果這些權杖可能會過期,裝置應用程式應在收到通知時顯示一般通知,以提示使用者啟動應用程式。 應用程式會接著驗證使用者,並顯示通知裝載。
本安全推播教學課程說明如何以安全的方式傳送推播通知。 本教學課程會以 通知使用者 教學課程為基礎,因此您應先完成該教學課程中的步驟。
注意
本教學課程假設您已建立並設定通知中樞,如使用 Azure 通知中樞將推播通知傳送至 iOS 應用程式中所述。
WebAPI 專案
在 Visual Studio 中,開啟您在 [通知使用者] 教學課程中所建立的 AppBackend 專案。
在 Notifications.cs 中,使用下列程式碼來取代整個 Notifications 類別。 請確定使用通知中樞的連接字串 (包含完整存取權) 和中樞名稱來取代預留位置。 您可以從 Azure 入口網站取得這些值。 此模組現會顯示即將傳送的不同安全通知。 在完整的實作中,通知會儲存在資料庫中。為了本案例的方便起見,我們會將通知儲存在記憶體中。
 public class Notification
 {
     public int Id { get; set; }
     public string Payload { get; set; }
     public bool Read { get; set; }
 }

 public class Notifications
 {
     public static Notifications Instance = new Notifications();

     private List<Notification> notifications = new List<Notification>();

     public NotificationHubClient Hub { get; set; }

     private Notifications() {
         Hub = NotificationHubClient.CreateClientFromConnectionString("{conn string with full access}",     "{hub name}");
     }

     public Notification CreateNotification(string payload)
     {
         var notification = new Notification() {
         Id = notifications.Count,
         Payload = payload,
         Read = false
         };

         notifications.Add(notification);

         return notification;
     }

     public Notification ReadNotification(int id)
     {
         return notifications.ElementAt(id);
     }
 }
在 NotificationsController.cs 中,使用下列程式碼來取代 NotificationsController 類別定義內的程式碼。 此元件會實作一個可供裝置以安全的方式擷取通知的方法,它還提供一個可觸發安全推送至裝置的方法 (依照本教學課程的目的)。 請注意,將通知傳送至通知中樞時,我們只會傳送包含通知 ID 的原始通知 (而非實際訊息)。
 public NotificationsController()
 {
     Notifications.Instance.CreateNotification("This is a secure notification!");
 }

 // GET api/notifications/id
 public Notification Get(int id)
 {
     return Notifications.Instance.ReadNotification(id);
 }

 public async Task<HttpResponseMessage> Post()
 {
     var secureNotificationInTheBackend = Notifications.Instance.CreateNotification("Secure confirmation.");
     var usernameTag = "username:" + HttpContext.Current.User.Identity.Name;

     // windows
     var rawNotificationToBeSent = new Microsoft.Azure.NotificationHubs.WindowsNotification(secureNotificationInTheBackend.Id.ToString(),
                     new Dictionary<string, string> {
                         {"X-WNS-Type", "wns/raw"}
                     });
     await Notifications.Instance.Hub.SendNotificationAsync(rawNotificationToBeSent, usernameTag);

     // apns
     await Notifications.Instance.Hub.SendAppleNativeNotificationAsync("{\"aps\": {\"content-available\": 1}, \"secureId\": \"" + secureNotificationInTheBackend.Id.ToString() + "\"}", usernameTag);

     // gcm
     await Notifications.Instance.Hub.SendGcmNativeNotificationAsync("{\"data\": {\"secureId\": \"" + secureNotificationInTheBackend.Id.ToString() + "\"}}", usernameTag);

     return Request.CreateResponse(HttpStatusCode.OK);
 }
請注意 Post 方法目前不會傳送快顯通知。 它會傳送只包含通知 ID 且非任何敏感內容的原始通知。 另外,針對您未在通知中樞上設定其認證的平台,請務必為傳送作業加上註解,因為他們將會導致錯誤。
- 為了可以從所有裝置存取此應用程式,我們現在可以將它重新部署到 Azure 網站。 以滑鼠右鍵按一下 AppBackend 專案,然後選取 [發佈]。
- 選取 Azure 網站作為您的發行目標。 使用您的 Azure 帳戶登入,並選取現有或新的網站,然後記下 [連線] 索引標籤中的 [目的地 URL] 屬性。我們後續將在本教學課程中參考此 URL 作為您的 後端端點 。 按一下發行。
修改 iOS 專案
現在,您已修改應用程式後端將只傳送通知的識別碼,接著必須變更 iOS 應用程式來處理該通知,並回呼後端以擷取要顯示的安全訊息。
若要達到此目標,我們必須撰寫可從應用程式後端擷取安全內容的邏輯。
在
AppDelegate.m中,請確定應用程式已註冊無訊息通知,以便處理從後端傳送出來的通知識別碼。 在 didFinishLaunchingWithOptions 中新增UIRemoteNotificationTypeNewsstandContentAvailability選項:[[UIApplication sharedApplication] registerForRemoteNotificationTypes: UIRemoteNotificationTypeAlert | UIRemoteNotificationTypeBadge | UIRemoteNotificationTypeSound | UIRemoteNotificationTypeNewsstandContentAvailability];在
AppDelegate.m的開頭處,新增包含下列宣告的實作區段:@interface AppDelegate () - (void) retrieveSecurePayloadWithId:(int)payloadId completion: (void(^)(NSString*, NSError*)) completion; @end然後在實作區段中新增下列程式碼,並以先前為後端取得的端點取代預留位置
{back-end endpoint}:NSString *const GetNotificationEndpoint = @"{back-end endpoint}/api/notifications"; - (void) retrieveSecurePayloadWithId:(int)payloadId completion: (void(^)(NSString*, NSError*)) completion; { // check if authenticated ANHViewController* rvc = (ANHViewController*) self.window.rootViewController; NSString* authenticationHeader = rvc.registerClient.authenticationHeader; if (!authenticationHeader) return; NSURLSession* session = [NSURLSession sessionWithConfiguration:[NSURLSessionConfiguration defaultSessionConfiguration] delegate:nil delegateQueue:nil]; NSURL* requestURL = [NSURL URLWithString:[NSString stringWithFormat:@"%@/%d", GetNotificationEndpoint, payloadId]]; NSMutableURLRequest* request = [NSMutableURLRequest requestWithURL:requestURL]; [request setHTTPMethod:@"GET"]; NSString* authorizationHeaderValue = [NSString stringWithFormat:@"Basic %@", authenticationHeader]; [request setValue:authorizationHeaderValue forHTTPHeaderField:@"Authorization"]; NSURLSessionDataTask* dataTask = [session dataTaskWithRequest:request completionHandler:^(NSData *data, NSURLResponse *response, NSError *error) { NSHTTPURLResponse* httpResponse = (NSHTTPURLResponse*) response; if (!error && httpResponse.statusCode == 200) { NSLog(@"Received secure payload: %@", [[NSString alloc] initWithData:data encoding:NSUTF8StringEncoding]); NSMutableDictionary *json = [NSJSONSerialization JSONObjectWithData:data options: NSJSONReadingMutableContainers error: &error]; completion([json objectForKey:@"Payload"], nil); } else { NSLog(@"Error status: %ld, request: %@", (long)httpResponse.statusCode, error); if (error) completion(nil, error); else { completion(nil, [NSError errorWithDomain:@"APICall" code:httpResponse.statusCode userInfo:nil]); } } }]; [dataTask resume]; }本方法會呼叫應用程式後端,使用儲存在共用喜好設定中的認證來擷取通知內容。
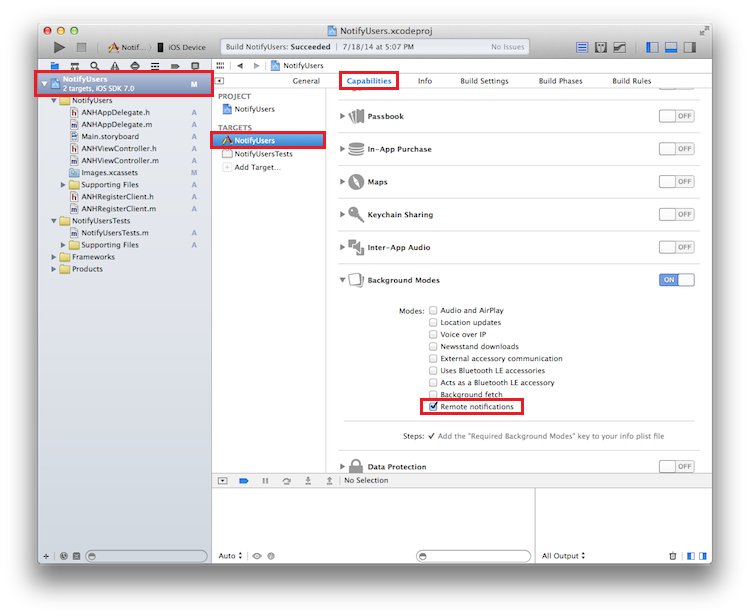
現在處理內送通知,並使用上述方法擷取要顯示的內容。 首先要讓 iOS 應用程式能在接收推播通知時於背景中執行。 在 XCode 中,在左側面板中選取您的應用程式專案,然後在中央窗格的 [目標] 區段中,按一下您的主要應用程式目標。
接著按一下中央窗格頂端的 [功能] 索引標籤,並核取 [遠端通知] 方塊。
在
AppDelegate.m中,新增下列可處理推播通知的方法:-(void)application:(UIApplication *)application didReceiveRemoteNotification:(NSDictionary *)userInfo fetchCompletionHandler:(void (^)(UIBackgroundFetchResult))completionHandler { NSLog(@"%@", userInfo); [self retrieveSecurePayloadWithId:[[userInfo objectForKey:@"secureId"] intValue] completion:^(NSString * payload, NSError *error) { if (!error) { // show local notification UILocalNotification* localNotification = [[UILocalNotification alloc] init]; localNotification.fireDate = [NSDate dateWithTimeIntervalSinceNow:0]; localNotification.alertBody = payload; localNotification.timeZone = [NSTimeZone defaultTimeZone]; [[UIApplication sharedApplication] scheduleLocalNotification:localNotification]; completionHandler(UIBackgroundFetchResultNewData); } else { completionHandler(UIBackgroundFetchResultFailed); } }]; }請注意,比較理想的案例是處理遺失驗證標頭屬性或遭到後端拒絕的情況。 這些案例的特定處理絕大部分會依您的目標使用者經驗而定。 其中一個選項就是透過一般提示顯示通知,方便使用者進行驗證並擷取實際通知。
執行應用程式
若要執行應用程式,請執行下列動作:
- 在 XCode 中,在實體 iOS 裝置上執行應用程式 (推播通知無法在模擬器中運作)。
- 在 iOS 應用程式 UI 中,輸入使用者名稱和密碼。 這些可以是任何字串,但必須是相同值。
- 在 iOS 應用程式 UI 中,按一下 [登入] 。 然後按一下 [傳送推播] 。 您應該會在您的通知中心內看見安全通知。