從 Azure 通知中樞傳送安全推播通知
概觀
Microsoft Azure 中的推播通知支援可讓您存取易於使用、多重平台的大規模推播基礎結構,因而可大幅簡化消費者和企業應用程式在行動平台上的推播通知實作。
基於法規或安全性限制,應用程式有時會想要在通知中加入無法透過標準推播通知基礎結構傳送的內容。 本教學課程說明如何透過用戶端裝置和應用程式後端之間的安全、已驗證連線來傳送敏感資訊,以達到相同體驗。
概括而言,流程如下所示:
- 應用程式後端:
- 在後端資料庫中儲存安全裝載。
- 將此通知的識別碼傳送至裝置 (不會傳送安全資訊)。
- 收到通知時,裝置上的應用程式會執行下列動作:
- 裝置會連絡後端並要求安全裝載。
- 應用程式會以通知的形式在裝置上顯示裝載。
請務必注意在上述流程 (與本教學課程) 中,我們假設使用者登入後,裝置會將驗證權杖儲存在本機儲存體中。 由於裝置可使用此權杖擷取通知的安全裝載,因此可保證完全順暢的體驗。 如果您的應用程式沒有將驗證權杖儲存在裝置上,或如果這些權杖可能會過期,裝置應用程式應在收到通知時顯示一般通知,以提示使用者啟動應用程式。 應用程式會接著驗證使用者,並顯示通知裝載。
本教學課程說明如何以安全的方式傳送推播通知。 本教學課程會以通知使用者教學課程為基礎,因此您應先完成該教學課程中的步驟。
注意
本教學課程假設您已建立並設定通知中樞,如傳送通知給通用 Windows 平台應用程式中所述。 另請注意,Windows Phone 8.1 需要 Windows (不是 Windows Phone) 認證,且無法在 Windows Phone 8.0 或 Silverlight 8.1 上使用背景工作。 若是 Windows 市集應用程式,只有當應用程式已啟用鎖定畫面 (按一下 Appmanifest 中的核取方塊) 時,您才可以透過背景工作接收通知。
WebAPI 專案
在 Visual Studio 中,開啟您在 [通知使用者] 教學課程中所建立的 AppBackend 專案。
在 Notifications.cs 中,使用下列程式碼來取代整個 Notifications 類別。 請確定使用通知中樞的連接字串 (包含完整存取權) 和中樞名稱來取代預留位置。 您可以從 Azure 入口網站取得這些值。 此模組現會顯示即將傳送的不同安全通知。 在完整的實作中,通知會儲存在資料庫中。為了本案例的方便起見,我們會將通知儲存在記憶體中。
 public class Notification
 {
     public int Id { get; set; }
     public string Payload { get; set; }
     public bool Read { get; set; }
 }

 public class Notifications
 {
     public static Notifications Instance = new Notifications();

     private List<Notification> notifications = new List<Notification>();

     public NotificationHubClient Hub { get; set; }

     private Notifications() {
         Hub = NotificationHubClient.CreateClientFromConnectionString("{conn string with full access}",     "{hub name}");
     }

     public Notification CreateNotification(string payload)
     {
         var notification = new Notification() {
         Id = notifications.Count,
         Payload = payload,
         Read = false
         };

         notifications.Add(notification);

         return notification;
     }

     public Notification ReadNotification(int id)
     {
         return notifications.ElementAt(id);
     }
 }
在 NotificationsController.cs 中,使用下列程式碼來取代 NotificationsController 類別定義內的程式碼。 此元件會實作一個可供裝置以安全的方式擷取通知的方法,它還提供一個可觸發安全推送至裝置的方法 (依照本教學課程的目的)。 請注意,將通知傳送至通知中樞時,我們只會傳送包含通知 ID 的原始通知 (而非實際訊息)。
 public NotificationsController()
 {
     Notifications.Instance.CreateNotification("This is a secure notification!");
 }

 // GET api/notifications/id
 public Notification Get(int id)
 {
     return Notifications.Instance.ReadNotification(id);
 }

 public async Task<HttpResponseMessage> Post()
 {
     var secureNotificationInTheBackend = Notifications.Instance.CreateNotification("Secure confirmation.");
     var usernameTag = "username:" + HttpContext.Current.User.Identity.Name;

     // windows
     var rawNotificationToBeSent = new Microsoft.Azure.NotificationHubs.WindowsNotification(secureNotificationInTheBackend.Id.ToString(),
                     new Dictionary<string, string> {
                         {"X-WNS-Type", "wns/raw"}
                     });
     await Notifications.Instance.Hub.SendNotificationAsync(rawNotificationToBeSent, usernameTag);

     // apns
     await Notifications.Instance.Hub.SendAppleNativeNotificationAsync("{\"aps\": {\"content-available\": 1}, \"secureId\": \"" + secureNotificationInTheBackend.Id.ToString() + "\"}", usernameTag);

     // gcm
     await Notifications.Instance.Hub.SendGcmNativeNotificationAsync("{\"data\": {\"secureId\": \"" + secureNotificationInTheBackend.Id.ToString() + "\"}}", usernameTag);

     return Request.CreateResponse(HttpStatusCode.OK);
 }
請注意 Post 方法目前不會傳送快顯通知。 它會傳送只包含通知 ID 且非任何敏感內容的原始通知。 另外,針對您未在通知中樞上設定其認證的平台,請務必為傳送作業加上註解,因為他們將會導致錯誤。
- 為了可以從所有裝置存取此應用程式,我們現在可以將它重新部署到 Azure 網站。 以滑鼠右鍵按一下 AppBackend 專案,然後選取 [發佈]。
- 選取 Azure 網站作為您的發行目標。 使用您的 Azure 帳戶登入,並選取現有或新的網站,然後記下 [連線] 索引標籤中的 [目的地 URL] 屬性。我們後續將在本教學課程中參考此 URL 作為您的 後端端點 。 按一下發行。
修改 Windows Phone 專案
在 NotifyUserWindowsPhone 專案中,新增下列程式碼至 App.xaml.cs 以註冊推播背景工作。 在
OnLaunched()方法的結尾新增下列程式碼行:RegisterBackgroundTask();仍在 App.xaml.cs 中,在
OnLaunched()方法後面立即新增下列程式碼:private async void RegisterBackgroundTask() { if (!Windows.ApplicationModel.Background.BackgroundTaskRegistration.AllTasks.Any(i => i.Value.Name == "PushBackgroundTask")) { var result = await BackgroundExecutionManager.RequestAccessAsync(); var builder = new BackgroundTaskBuilder(); builder.Name = "PushBackgroundTask"; builder.TaskEntryPoint = typeof(PushBackgroundComponent.PushBackgroundTask).FullName; builder.SetTrigger(new Windows.ApplicationModel.Background.PushNotificationTrigger()); BackgroundTaskRegistration task = builder.Register(); } }在 App.xaml.cs 檔案開頭處新增下列
using陳述式:using Windows.Networking.PushNotifications; using Windows.ApplicationModel.Background;從 Visual Studio 的 [檔案] 功能表中,按一下 [全部儲存]。
建立推播背景元件
下一個步驟說明如何建立推播背景元件。
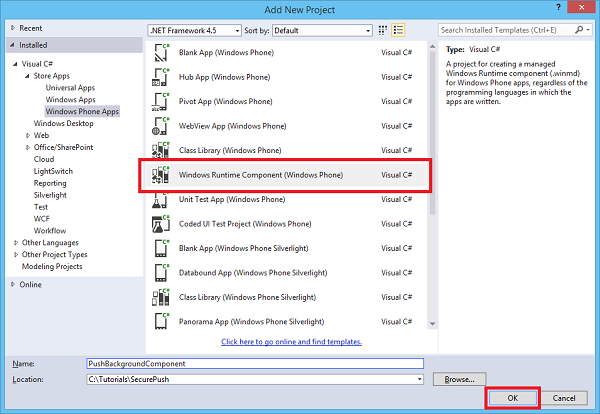
在 [方案總管] 中,以滑鼠右鍵按一下解決方案的最上層節點 (在此案例中為 Solution SecurePush),並按一下 [新增],然後按一下 [新增專案]。
展開 [市集應用程式],並按一下 [Windows Phone 應用程式],然後按一下 [Windows 執行階段元件 (Windows Phone)]。 將專案命名為 PushBackgroundComponent,然後按一下 [確定] 以建立專案。
在 [方案總管] 中,以滑鼠右鍵按一下 PushBackgroundComponent (Windows Phone 8.1) 專案,並按一下 [新增],然後按一下 [類別]。 將新類別命名為
PushBackgroundTask.cs。 按一下 [新增] 以產生類別。使用下列程式碼來取代
PushBackgroundComponent命名空間定義的整個內容,並將預留位置{back-end endpoint}替換成部署後端時所取得的後端端點:public sealed class Notification { public int Id { get; set; } public string Payload { get; set; } public bool Read { get; set; } } public sealed class PushBackgroundTask : IBackgroundTask { private string GET_URL = "{back-end endpoint}/api/notifications/"; async void IBackgroundTask.Run(IBackgroundTaskInstance taskInstance) { // Store the content received from the notification so it can be retrieved from the UI. RawNotification raw = (RawNotification)taskInstance.TriggerDetails; var notificationId = raw.Content; // retrieve content BackgroundTaskDeferral deferral = taskInstance.GetDeferral(); var httpClient = new HttpClient(); var settings = ApplicationData.Current.LocalSettings.Values; httpClient.DefaultRequestHeaders.Authorization = new AuthenticationHeaderValue("Basic", (string)settings["AuthenticationToken"]); var notificationString = await httpClient.GetStringAsync(GET_URL + notificationId); var notification = JsonConvert.DeserializeObject<Notification>(notificationString); ShowToast(notification); deferral.Complete(); } private void ShowToast(Notification notification) { ToastTemplateType toastTemplate = ToastTemplateType.ToastText01; XmlDocument toastXml = ToastNotificationManager.GetTemplateContent(toastTemplate); XmlNodeList toastTextElements = toastXml.GetElementsByTagName("text"); toastTextElements[0].AppendChild(toastXml.CreateTextNode(notification.Payload)); ToastNotification toast = new ToastNotification(toastXml); ToastNotificationManager.CreateToastNotifier().Show(toast); } }在 [方案總管] 中,以滑鼠右鍵按一下 PushBackgroundComponent (Windows Phone 8.1) 專案,然後按一下 [管理 NuGet 套件]。
在左側,按一下 [線上] 。
在 [搜尋] 方塊中,輸入 Http Client。
按一下結果清單中的 Microsoft HTTP Client Libraries,然後按一下 [安裝]。 完成安裝。
回到 NuGet [搜尋] 方塊,輸入 Json.net。 安裝 Json.NET 套件,然後關閉 [NuGet Package Manager] 視窗。
在
PushBackgroundTask.cs檔案頂端新增下列using陳述式:using Windows.ApplicationModel.Background; using Windows.Networking.PushNotifications; using System.Net.Http; using Windows.Storage; using System.Net.Http.Headers; using Newtonsoft.Json; using Windows.UI.Notifications; using Windows.Data.Xml.Dom;在 [方案總管] 的 NotifyUserWindowsPhone (Windows Phone 8.1) 專案中,以滑鼠右鍵按一下 [參考],然後按一下 [新增參考...]。在 [參考管理員] 對話方塊中,核取 PushBackgroundComponent 旁邊的方塊,然後按一下 [確定]。
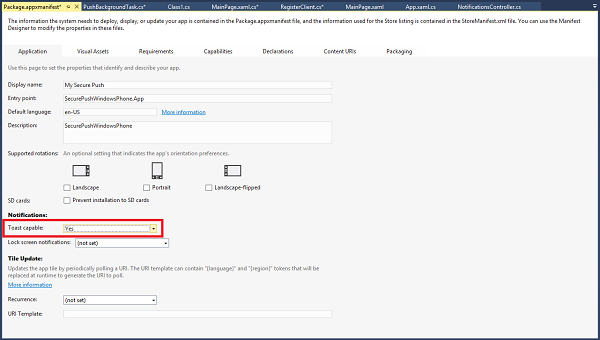
在 [方案總管] 中,連按兩下 NotifyUserWindowsPhone (Windows Phone 8.1) 專案中的 Package.appxmanifest。 在 [通知] 下,將 [支援快顯通知] 設定為 [是]。
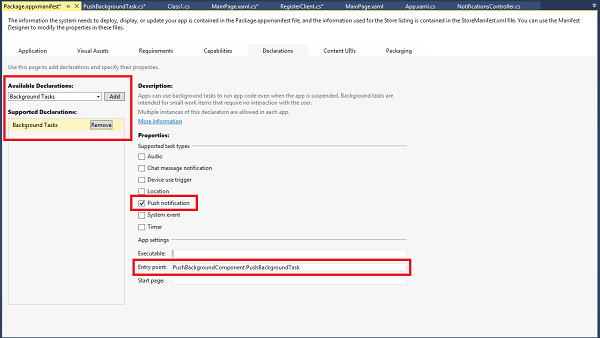
仍在 Package.appxmanifest 中,按一下頂端附近的 [宣告] 功能表。 在 [可用宣告] 下拉式清單中,按一下 [背景工作],然後按一下 [新增]。
在 Package.appxmanifest 中,核取 [屬性] 下的 [推播通知]。
在 Package.appxmanifest 中,於 [應用程式設定] 的 [輸入點] 欄位中輸入 PushBackgroundComponent.PushBackgroundTask。
從 [檔案] 功能表中,按一下 [全部儲存]。
執行應用程式
若要執行應用程式,請執行下列動作:
- 在 Visual Studio 中,執行 AppBackend Web API 應用程式。 [ASP.NET Web] 頁面便會隨即顯示。
- 在 Visual Studio 中,執行 NotifyUserWindowsPhone (Windows Phone 8.1) Windows Phone 應用程式。 Windows Phone 模擬器便會執行,並自動載入此應用程式。
- 在 NotifyUserWindowsPhone 應用程式 UI 中,輸入使用者名稱和密碼。 這些可以是任何字串,但必須是相同值。
- 在 NotifyUserWindowsPhone 應用程式 UI 中,按一下 [登入並註冊]。 然後按一下 [傳送推播] 。
意見反應
即將登場:在 2024 年,我們將逐步淘汰 GitHub 問題作為內容的意見反應機制,並將它取代為新的意見反應系統。 如需詳細資訊,請參閱:https://aka.ms/ContentUserFeedback。
提交並檢視相關的意見反應