將推播通知加入至 Windows 應用程式
概觀
在本教學課程中,您會將推播通知新增至 Windows 快速入門專案,以便在每次插入一筆記錄時傳送推播通知至裝置。
如果您不要使用下載的快速入門伺服器專案,將需要推播通知擴充套件。 如需詳細資訊,請參閱使用 Azure Mobile Apps 的 .NET 後端伺服器 SDK。
設定通知中樞
Azure App Service 的 Mobile Apps 使用 Azure 通知中樞來傳送推送,因此您將為行動應用程式設定通知中樞。
在 Azure 入口網站中,移至 [應用程式服務],然後選取應用程式後端。 在 [設定] 底下,選取 [推播]。
將通知中樞資源新增至應用程式,選取 [連線]。 您可以建立中樞或連線到現有的中樞。
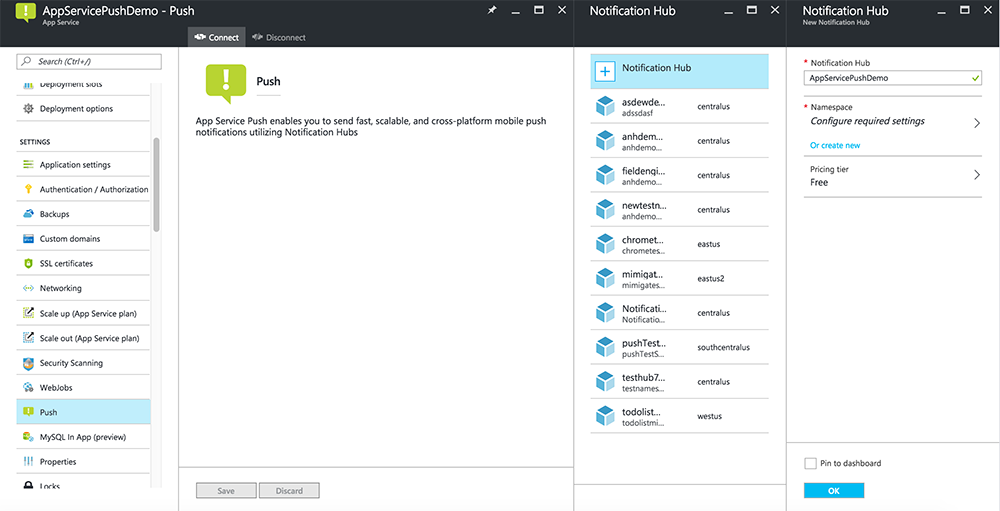
現在您已將通知中樞連接到 Mobile Apps 後端專案。 稍後您要設定此通知中樞,使其連線到平台通知系統 (PNS) 以推播至裝置。
針對推播通知註冊應用程式
您必須將應用程式提交至 Microsoft Store,然後設定伺服器專案以與 Windows 推播通知服務整合, (WNS) 以傳送推播。
在 Visual Studio 方案總管中,以滑鼠右鍵按一下 UWP 應用程式專案,然後按一下 [市> 集關聯應用程式與市集]。
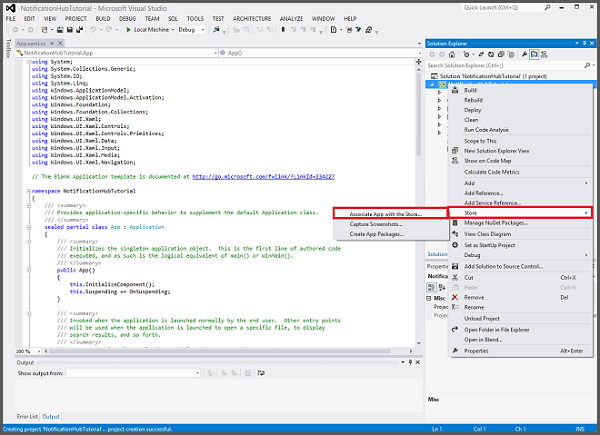
在精靈中按 [下一步],使用 Microsoft 帳戶登入,在 [保留新的應用程式名稱] 中輸入您應用程式的名稱,然後按一下 [保留]。
成功建立應用程式註冊之後,選取新的應用程式名稱,按 [下一步],然後按一下 [關聯]。 這會將所需的 Microsoft Store 註冊資訊新增至應用程式資訊清單。
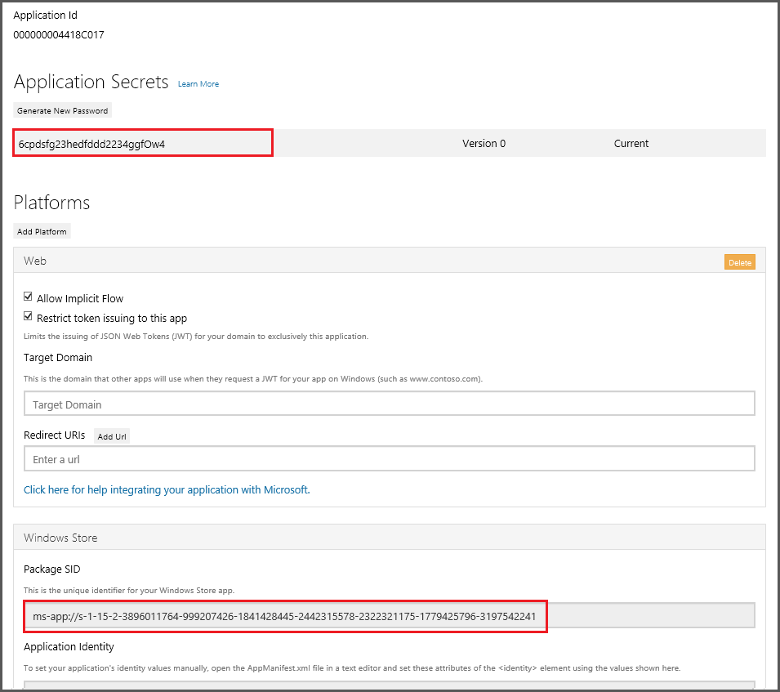
瀏覽至 應用程式註冊入口網站,並使用您的 Microsoft 帳戶登入。 按一下您在上一個步驟中關聯的 Windows 市集應用程式。
在註冊頁面中,記下 [應用程式祕密] 和 [套件 SID] 底下的值,以在接下來用來設定您的行動應用程式後端。
重要
用戶端密碼和封裝 SID 是重要的安全性認證。 請勿與任何人共用這些值,或與您的應用程式一起散發密碼。 應用程式識別碼 會與密碼搭配用來設定 Microsoft 帳戶驗證。
App Center 也有設定 UWP 應用程式以推播通知的指示。
設定後端來傳送推播通知
在 Azure 入口網站中,選取 [瀏覽全部]>[應用程式服務]。 然後選取您的 Mobile Apps 後端。 在 [設定] 下,選取 [App Service 推播]。 然後選取您的通知中樞名稱。
移至 Windows (WNS)。 然後輸入您從線上服務網站取得的 [安全性金鑰] \(用戶端秘密) 和 [封裝 SID]。 接下來,選取 [儲存]。
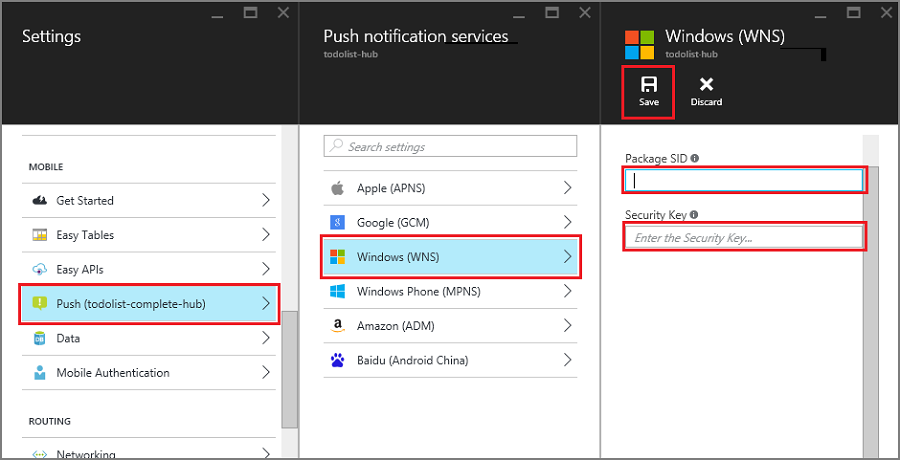
您的後端現在已設定成使用 WNS 傳送來傳送推播通知。
更新伺服器以傳送推播通知
請使用下列符合後端專案類型的程式,也就是 .NET 後端 或 Node.js後端。
.NET 後端專案
在 Visual Studio 中,以滑鼠右鍵按一下伺服器專案並按一下 [管理 NuGet 套件],搜尋 Microsoft.Azure.NotificationHubs,然後按一下 [安裝]。 這會安裝通知中樞用戶端程式庫。
展開 [Controllers] ,開啟 [TodoItemController.cs],然後新增下列 using 陳述式:
using System.Collections.Generic;
using Microsoft.Azure.NotificationHubs;
using Microsoft.Azure.Mobile.Server.Config;
在 PostTodoItem 方法中,於呼叫 InsertAsync 之後新增下列程式碼:
// Get the settings for the server project.
HttpConfiguration config = this.Configuration;
MobileAppSettingsDictionary settings =
    this.Configuration.GetMobileAppSettingsProvider().GetMobileAppSettings();

// Get the Notification Hubs credentials for the Mobile App.
string notificationHubName = settings.NotificationHubName;
string notificationHubConnection = settings
    .Connections[MobileAppSettingsKeys.NotificationHubConnectionString].ConnectionString;

// Create the notification hub client.
NotificationHubClient hub = NotificationHubClient
    .CreateClientFromConnectionString(notificationHubConnection, notificationHubName);

// Define a WNS payload
var windowsToastPayload = @"<toast><visual><binding template=""ToastText01""><text id=""1"">"
                        + item.Text + @"</text></binding></visual></toast>";
try
{
    // Send the push notification.
    var result = await hub.SendWindowsNativeNotificationAsync(windowsToastPayload);

    // Write the success result to the logs.
    config.Services.GetTraceWriter().Info(result.State.ToString());
}
catch (System.Exception ex)
{
    // Write the failure result to the logs.
    config.Services.GetTraceWriter()
        .Error(ex.Message, null, "Push.SendAsync Error");
}
此程式碼會告訴通知中樞在插入新項目之後傳送推播通知。
發佈伺服器專案。
Node.js 後端專案
設定後端專案。
在 todoitem.js 檔案中,以下列程式碼取代現有的程式碼:
var azureMobileApps = require('azure-mobile-apps'),
promises = require('azure-mobile-apps/src/utilities/promises'),
logger = require('azure-mobile-apps/src/logger');

var table = azureMobileApps.table();

table.insert(function (context) {
// For more information about the Notification Hubs JavaScript SDK,
// see https://aka.ms/nodejshubs
logger.info('Running TodoItem.insert');

// Define the WNS payload that contains the new item Text.
var payload = "<toast><visual><binding template=\ToastText01\><text id=\"1\">"
                            + context.item.text + "</text></binding></visual></toast>";

// Execute the insert.  The insert returns the results as a Promise,
// Do the push as a post-execute action within the promise flow.
return context.execute()
    .then(function (results) {
        // Only do the push if configured
        if (context.push) {
            // Send a WNS native toast notification.
            context.push.wns.sendToast(null, payload, function (error) {
                if (error) {
                    logger.error('Error while sending push notification: ', error);
                } else {
                    logger.info('Push notification sent successfully!');
                }
            });
        }
        // Don't forget to return the results from the context.execute()
        return results;
    })
    .catch(function (error) {
        logger.error('Error while running context.execute: ', error);
    });
});

module.exports = table;
插入新的 todo 項目時,這會傳送包含 item.text 的 WNS 快顯通知。
當您在本機電腦上編輯檔案時,請重新發佈伺服器專案。
將推播通知新增至應用程式
接下來,您的應用程式必須在啟動時註冊推播通知。 當您已啟用驗證時,請確定使用者在嘗試註冊推播通知之前已登入。
開啟 App.xaml.cs 專案檔,並新增下列
using語句:using System.Threading.Tasks; using Windows.Networking.PushNotifications;在相同檔案中,將下列 InitNotificationsAsync 方法定義新增至 [應用程式] 類別:
private async Task InitNotificationsAsync()
{
    // Get a channel URI from WNS.
    var channel = await PushNotificationChannelManager
        .CreatePushNotificationChannelForApplicationAsync();

    // Register the channel URI with Notification Hubs.
    await App.MobileService.GetPush().RegisterAsync(channel.Uri);
}
此程式碼會從 WNS 中擷取應用程式的 ChannelURI,然後向您的應用程式服務行動應用程式註冊該 ChannelURI。
在 App.xaml.cs 中 OnLaunched 事件處理常式的頂端,將 async 修飾詞新增到方法定義中,並將下列呼叫新增到新的 InitNotificationsAsync 方法中,如下列範例所示:
protected async override void OnLaunched(LaunchActivatedEventArgs e)
{
    await InitNotificationsAsync();

    // ...
}
這樣可保證在每次啟動應用程式時都會註冊存留期較短的 ChannelURI。
重建 UWP 應用程式專案。 您的應用程式現在已能夠接收快顯通知。
在應用程式中測試推播通知
以滑鼠右鍵按一下 Windows 市集專案、按一下 [設定為啟始專案] ,然後按 F5 鍵以執行 Windows 市集應用程式。
應用程式啟動後,系統便會替裝置註冊推播通知。
停止 Windows 市集應用程式,接著對 Windows Phone 市集應用程式重複上一個步驟。
此時,系統會註冊這兩個裝置以接收推播通知。
再執行 Windows 市集應用程式一次,接著在 [插入 TodoItem] 中輸入文字,然後按一下 [儲存]。
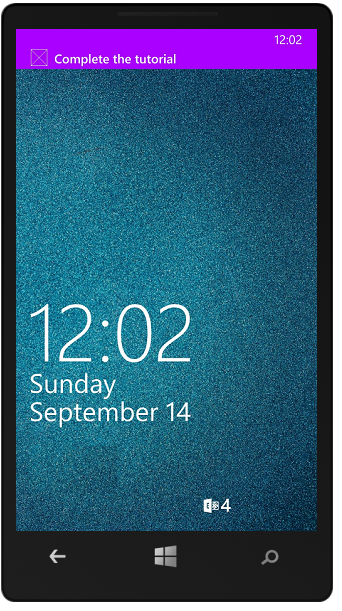
請注意,插入作業完成後,Windows 市集應用程式和 Windows Phone 應用程式都會收到來自 WNS 的推播通知。 即使應用程式未處於執行狀態,Windows Phone 上依然會顯示通知。
後續步驟
進一步了解推播通知︰
- 如何針對 Azure Mobile Apps 使用受控用戶端:範本可讓您彈性地傳送跨平台推播和當地語系化推播。 了解如何註冊範本。
- 診斷推播通知問題:通知遭到捨棄或未抵達裝置有各種原因。 本主題說明如何分析及找出推播通知失敗的根本原因。
請考慮繼續進行下列其中一個教學課程:
- 將驗證新增至您的應用程式:了解如何利用身分識別提供者來驗證您應用程式的使用者。
- 啟用應用程式的離線同步處理:了解如何使用行動應用程式後端,將離線支援新增至應用程式。 離線同步可讓使用者與行動應用程式互動—檢視、新增或修改資料,即使沒有網路連線也一般。