使用 Microsoft Entra ID (舊版) 建立和設定 Azure 磁碟加密的金鑰保存庫
適用於:✔️ Windows VM
新版的 Azure 磁碟加密不需要提供 Microsoft Entra 應用程式參數,即可啟用 VM 磁碟加密。 若使用新版本,您就無須在啟用加密步驟期間提供 Microsoft Entra 認證。 若使用新版本,所有新的 VM 必須經過加密,而不需要 Microsoft Entra 應用程式參數。 若要檢視使用新版本來啟用 VM 磁碟加密的指示,請參閱 Azure 磁碟加密。 已經使用 Microsoft Entra 應用程式參數進行加密的 VM 仍然受支援,且應該繼續使用 Microsoft Entra 語法進行維護。
Azure 磁碟加密會使用 Azure Key Vault 來控制及管理磁碟加密金鑰和祕密。 如需金鑰保存庫的詳細資訊,請參閱開始使用 Azure Key Vault 和保護金鑰保存庫。
如需使用 Microsoft Entra ID (預覽版) 建立和設定 Azure 磁碟加密的金鑰保存庫,需進行下列三個步驟:
- 建立金鑰保存庫。
- 設定 Microsoft Entra 應用程式和服務主體。
- 設定 Microsoft Entra 應用程式的金鑰保存庫存取原則。
- 設定金鑰保存庫進階存取原則。
如果想要的話,您也可以產生或匯入金鑰加密金鑰 (KEK)。
請參閱主要使用 Azure AD (舊版) 建立和設定 Azure 磁碟加密的金鑰保存庫,以取得如何安裝工具和連線至 Azure 的步驟。
注意
本文中的步驟會在 Azure 磁碟加密的必要 CLI 指令碼中和 Azure 磁碟加密的必要 PowerShell 指令碼中自動化。
建立金鑰保存庫
Azure 磁碟加密會與 Azure Key Vault 整合,協助您控制及管理金鑰保存庫訂用帳戶中的磁碟加密金鑰與祕密。 針對 Azure 磁碟加密,您可以建立金鑰保存庫,也可以使用現有保存庫。 如需金鑰保存庫的詳細資訊,請參閱開始使用 Azure Key Vault 和保護金鑰保存庫。 您可以使用 Resource Manager 範本、Azure PowerShell 或 Azure CLI 來建立金鑰保存庫。
警告
為了確保加密祕密不會跨出區域界限,Azure 磁碟加密需要讓 Key Vault 和 VM 共置於相同區域中。 請在和所要加密 VM 相同的區域中建立並使用 Key Vault。
使用 PowerShell 建立金鑰保存庫
您可以搭配使用 Azure PowerShell 與 New-AzKeyVault Cmdlet 來建立金鑰保存庫。 如需 Key Vault 的另一個 Cmdlet,請參閱 Az.KeyVault。
如有需要,請使用 New-AzResourceGroup 建立新的資源群組。 若要列出資料中心位置,請使用 Get-AzLocation。
# Get-AzLocation
New-AzResourceGroup –Name 'MyKeyVaultResourceGroup' –Location 'East US'
使用 New-AzKeyVault 建立新的金鑰保存庫
New-AzKeyVault -VaultName 'MySecureVault' -ResourceGroupName 'MyKeyVaultResourceGroup' -Location 'East US'記下傳回的保存庫名稱、資源群組名稱、資源識別碼、保存庫 URI 和物件識別碼,以供稍後在加密磁碟時使用。
使用 Azure CLI 建立金鑰保存庫
您可以搭配使用 Azure CLI 與 az keyvault 命令來管理金鑰保存庫。 若要建立金鑰保存庫,請使用 az keyvault create。
如有需要,請使用 az group create 建立新的資源群組。 若要列出位置,請使用 az account list-locations
# To list locations: az account list-locations --output table
az group create -n "MyKeyVaultResourceGroup" -l "East US"
使用 az keyvault create 建立新的金鑰保存庫。
az keyvault create --name "MySecureVault" --resource-group "MyKeyVaultResourceGroup" --location "East US"記下傳回的保存庫名稱 (名稱)、資源群組名稱、資源識別碼 (識別碼)、保存庫 URI 和物件識別碼,以供稍後使用。
使用 Resource Manager 範本建立金鑰保存庫
您可以使用 Resource Manager 範本來建立金鑰保存庫。
- 在 Azure 快速入門範本上,選取 [部署至 Azure]。
- 選取訂用帳戶、資源群組、資源群組位置、金鑰保存庫名稱、物件識別碼、法律條款和協議,然後選取 [購買]。
設定 Microsoft Entra 應用程式和服務主體
當您需要在 Azure 中執行中的 VM 上啟用加密時,Azure 磁碟加密會產生並將加密金鑰寫入金鑰保存庫。 在金鑰保存庫中管理加密金鑰需要 Microsoft Entra 驗證。 為此目的建立 Microsoft Entra 應用程式。 就驗證目的而言,您可以使用用戶端密碼式驗證,或用戶端憑證式 Microsoft Entra 驗證。
使用 Azure PowerShell 設定 Microsoft Entra 應用程式和服務主體
若要執行下列命令,請取得並使用 Azure PowerShell 模組。
使用 New-AzADApplication PowerShell Cmdlet 建立 Microsoft Entra 應用程式。 MyApplicationHomePage 和 MyApplicationUri 可以是任何您想要的值。
$aadClientSecret = "My AAD client secret"
$aadClientSecretSec = ConvertTo-SecureString -String $aadClientSecret -AsPlainText -Force
$azureAdApplication = New-AzADApplication -DisplayName "My Application Display Name" -HomePage "https://MyApplicationHomePage" -IdentifierUris "https://MyApplicationUri" -Password $aadClientSecretSec
$servicePrincipal = New-AzADServicePrincipal –ApplicationId $azureAdApplication.ApplicationId -Role Contributor
$azureAdApplication.ApplicationId 是 Microsoft Entra ClientID,而 $aadClientSecret 是用戶端密碼,您稍後會用此資訊來啟用 Azure 磁碟加密。 妥善保護 Microsoft Entra 用戶端密碼。 執行
$azureAdApplication.ApplicationId會顯示 ApplicationID。
使用 Azure CLI 設定 Microsoft Entra 應用程式和服務主體
您可以搭配使用 Azure CLI 和 az ad sp 命令來管理服務主體。 如需詳細資訊,請參閱建立 Azure 服務主體。
建立新的服務主體。
az ad sp create-for-rbac --name "ServicePrincipalName" --password "My-AAD-client-secret" --role Contributor --scopes /subscriptions/<subscription_id>所傳回 appId 是其他命令中所用的 Microsoft Entra ClientID。 它也是您會用於 az keyvault set-policy 的 SPN。 此密碼是您稍後應該會用來啟用 Azure 磁碟加密的用戶端密碼。 妥善保護 Microsoft Entra 用戶端密碼。
透過 Azure 入口網站設定 Microsoft Entra 應用程式和服務主體
請參閱使用入口網站來建立可存取資源的 Microsoft Entra 應用程式和服務主體,使用文章中的步驟來建立 Microsoft Entra 應用程式。 以下每個步驟各會帶您直接前往要完成的文章章節。
- 確認所需權限
- 建立 Microsoft Entra 應用程式
- 在建立應用程式時,您可以使用任何您想要的名稱和登入 URL。
- 取得應用程式識別碼和驗證金鑰。
- 驗證金鑰就是用戶端密碼,可作為 Set-AzVMDiskEncryptionExtension 的 AadClientSecret。
- 應用程式會使用驗證金鑰作為認證,藉此登入 Microsoft Entra ID。 在 Azure 入口網站中,此密碼稱為金鑰,但實際上與金鑰保存庫並無任何關聯。 請適當地保護這個祕密。
- 稍後,我們會使用應用程式識別碼作為 Set-AzVMDiskEncryptionExtension 的 AadClientId 和 Set-AzKeyVaultAccessPolicy 的 ServicePrincipalName。
- 驗證金鑰就是用戶端密碼,可作為 Set-AzVMDiskEncryptionExtension 的 AadClientSecret。
設定 Microsoft Entra 應用程式的金鑰保存庫存取原則
為了將加密祕密寫入指定的金鑰保存庫,Azure 磁碟加密需要 Microsoft Entra 應用程式的用戶端識別碼和用戶端密碼,該識別碼和密碼需有權將祕密寫入金鑰保存庫。
注意
若要使用 Azure 磁碟加密,您必須對 Microsoft Entra 用戶端應用程式設定下列存取原則:WrapKey 和 Set 權限。
使用 Azure PowerShell 設定 Microsoft Entra 應用程式的金鑰保存庫存取原則
您的 Microsoft Entra 應用程式需要權限,才能存取保存庫中的金鑰或祕密。 使用 Set-AzKeyVaultAccessPolicy Cmdlet 可授與應用程式權限,使用用戶端識別碼 (登錄應用程式時所產生) 作為 -ServicePrincipalName 參數值。 若要深入了解,請參閱部落格文章 Azure Key Vault - 逐步解說。
使用 PowerShell 設定 AD 應用程式的金鑰保存庫存取原則。
$keyVaultName = 'MySecureVault'
$aadClientID = 'MyAadAppClientID'
$KVRGname = 'MyKeyVaultResourceGroup'
Set-AzKeyVaultAccessPolicy -VaultName $keyVaultName -ServicePrincipalName $aadClientID -PermissionsToKeys 'WrapKey' -PermissionsToSecrets 'Set' -ResourceGroupName $KVRGname
使用 Azure CLI 設定 Microsoft Entra 應用程式的金鑰保存庫存取原則
使用 az keyvault set-policy 來設定存取原則。 如需詳細資訊,請參閱使用 CLI 2.0 管理 Key Vault。
使用下列命令,提供您透過 Azure CLI 存取權所建立的服務主體,來取得祕密並包裝金鑰:
az keyvault set-policy --name "MySecureVault" --spn "<spn created with CLI/the Azure AD ClientID>" --key-permissions wrapKey --secret-permissions set
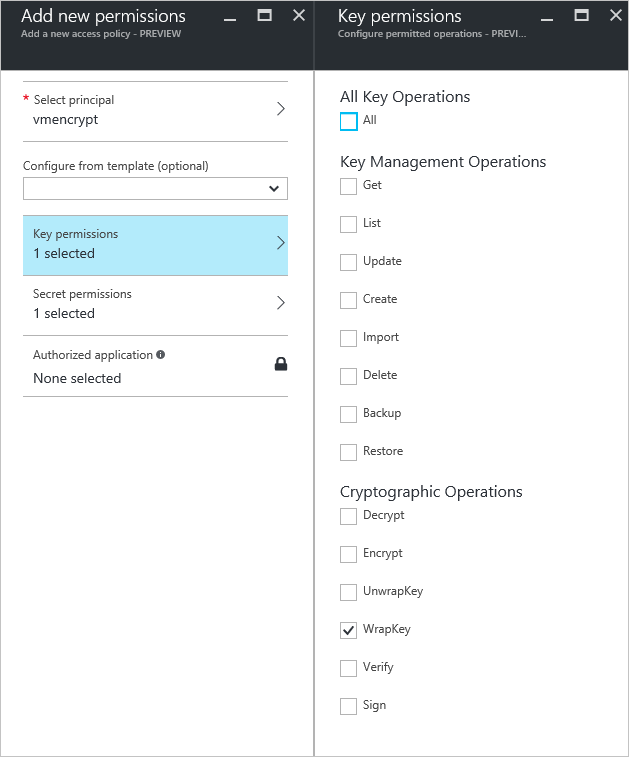
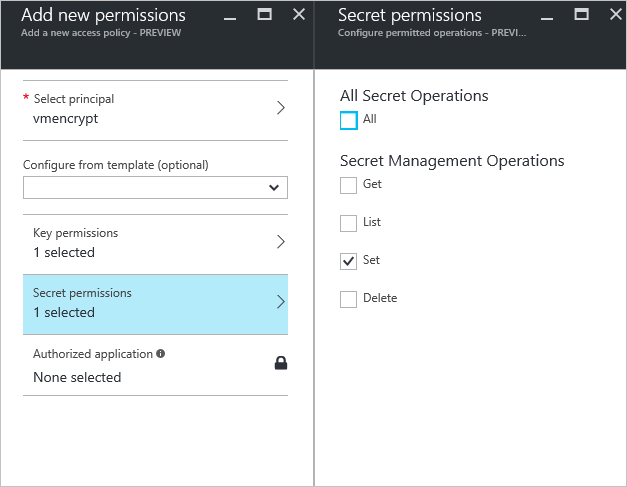
使用入口網站設定 Microsoft Entra 應用程式的金鑰保存庫存取原則
- 使用金鑰保存庫開啟資源群組。
- 選取金鑰保存庫,移至 [存取原則],然後選取 [新增]。
- 在 [選取主體] 底下,搜尋您所建立的 Microsoft Entra 應用程式,並加以選取。
- 針對 [金鑰權限],勾選 [密碼編譯作業] 底下的 [包裝金鑰]。
- 針對 [祕密權限],勾選 [祕密管理作業] 底下的 [設定]。
- 選取 [確定] 以儲存存取原則。
設定金鑰保存庫進階存取原則
Azure 平台需要存取您金鑰保存庫中的加密金鑰或密碼,讓該資訊可供 VM 用來開機和解密磁碟區。 在金鑰保存庫或部署上啟用磁碟加密將會失敗。
使用 Azure PowerShell 設定金鑰保存庫進階存取原則
使用金鑰保存庫 PowerShell Cmdlet Set-AzKeyVaultAccessPolicy 以啟用金鑰保存庫的磁碟加密。
針對磁碟加密啟用 Key Vault:Azure 磁碟加密需要 EnabledForDiskEncryption。
Set-AzKeyVaultAccessPolicy -VaultName 'MySecureVault' -ResourceGroupName 'MyKeyVaultResourceGroup' -EnabledForDiskEncryption視需要針對部署啟用金鑰保存庫:讓 Microsoft. Compute 資源提供者能在建立資源期間參考此金鑰保存庫的情況下 (例如建立虛擬機器時),從此金鑰保存庫擷取祕密。
Set-AzKeyVaultAccessPolicy -VaultName 'MySecureVault' -ResourceGroupName 'MyKeyVaultResourceGroup' -EnabledForDeployment視需要針對範本部署啟用 Key Vault:可讓 Azure Resource Manager 在範本部署參考了這個金鑰保存庫的情況下,從這個金鑰保存庫取得祕密。
Set-AzKeyVaultAccessPolicy -VaultName 'MySecureVault' -ResourceGroupName 'MyKeyVaultResourceGroup' -EnabledForTemplateDeployment
使用 Azure CLI 設定金鑰保存庫進階存取原則
使用 az keyvault update 啟用金鑰保存庫的磁碟加密。
針對磁碟加密啟用 Key Vault:需要 Enabled-for-disk-encryption。
az keyvault update --name "MySecureVault" --resource-group "MyKeyVaultResourceGroup" --enabled-for-disk-encryption "true"視需要針對部署啟用 Key Vault:允許虛擬機器從保存庫擷取儲存為祕密的憑證。
az keyvault update --name "MySecureVault" --resource-group "MyKeyVaultResourceGroup" --enabled-for-deployment "true"視需要針對範本部署啟用 Key Vault:允許 Resource Manager 從保存庫擷取祕密。
az keyvault update --name "MySecureVault" --resource-group "MyKeyVaultResourceGroup" --enabled-for-template-deployment "true"
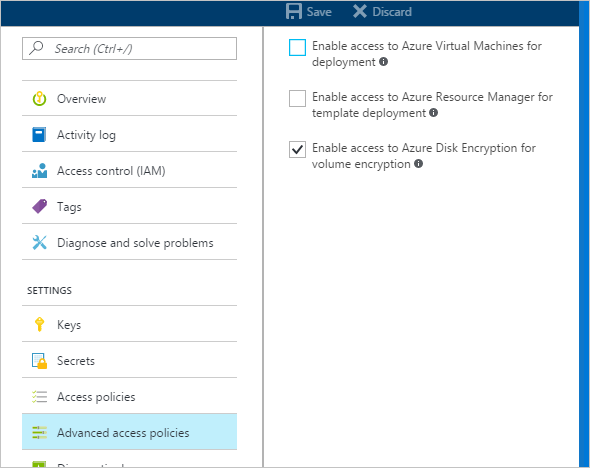
透過 Azure 入口網站設定金鑰保存庫進階存取原則
- 選取金鑰保存庫,移至 [存取原則],然後按一下以顯示進階存取原則。
- 選取標示為為磁碟區加密啟用對 Azure 磁碟加密的存取的方塊。
- 視需要選取 [為部署啟用對 Azure 虛擬機器的存取] 及/或 [為範本部署啟用對 Azure Resource Manager 的存取]。
- 選取 [儲存]。
設定金鑰加密金鑰 (選擇性)
如果您想使用金鑰加密金鑰 (KEK) 來為加密金鑰額外添加一層安全性,請將 KEK 新增至金鑰保存庫。 使用 Add-AzKeyVaultKey Cmdlet 在金鑰保存庫中建立金鑰加密金鑰。 您也可以從內部部署金鑰管理 HSM 匯入 KEK。 如需詳細資訊,請參閱 Key Vault 文件。 若指定了金鑰加密金鑰,Azure 磁碟加密會先使用該金鑰包裝加密祕密,再寫入 Key Vault。
產生金鑰時,請使用 RSA 金鑰類型。 Azure 磁碟加密尚未支援使用橢圓曲線金鑰。
您的金鑰保存庫密碼和 KEK URL 必須已設定版本。 Azure 會強制執行設定版本的這項限制。 針對有效的密碼和 KEK URL,請參閱下列範例︰
Azure 磁碟加密不支援將連接埠號碼指定為金鑰保存庫密碼和 KEK URL 的一部分。 如需不支援和支援的金鑰保存庫 URL 範例,請參閱下列範例:
使用 Azure PowerShell 設定金鑰加密金鑰
在使用 PowerShell 指令碼之前,請先熟悉 Azure 磁碟加密的先決條件,以了解指令碼中的步驟。 範例指令碼可能需要隨環境加以變更。 此指令碼會建立所有 Azure 磁碟加密先決條件,並加密現有 IaaS VM 以使用金鑰加密金鑰包裝磁碟加密金鑰。
# Step 1: Create a new resource group and key vault in the same location.
	 # Fill in 'MyLocation', 'MyKeyVaultResourceGroup', and 'MySecureVault' with your values.
	 # Use Get-AzLocation to get available locations and use the DisplayName.
	 # To use an existing resource group, comment out the line for New-AzResourceGroup

    $Loc = 'MyLocation';
    $KVRGname = 'MyKeyVaultResourceGroup';
    $KeyVaultName = 'MySecureVault';
    New-AzResourceGroup –Name  $KVRGname –Location $Loc;
    New-AzKeyVault -VaultName $KeyVaultName -ResourceGroupName $KVRGname -Location $Loc;
    $KeyVault = Get-AzKeyVault -VaultName $KeyVaultName -ResourceGroupName  $KVRGname;
    $KeyVaultResourceId = (Get-AzKeyVault -VaultName $KeyVaultName -ResourceGroupName  $KVRGname).ResourceId;
    $diskEncryptionKeyVaultUrl = (Get-AzKeyVault -VaultName $KeyVaultName -ResourceGroupName  $KVRGname).VaultUri;

# Step 2: Create the AD application and service principal.
	 # Fill in 'MyAADClientSecret', "<My Application Display Name>", "<https://MyApplicationHomePage>", and "<https://MyApplicationUri>" with your values.
	 # MyApplicationHomePage and the MyApplicationUri can be any values you wish.

	 $aadClientSecret =  'MyAADClientSecret';
    $aadClientSecretSec = ConvertTo-SecureString -String $aadClientSecret -AsPlainText -Force;
    $azureAdApplication = New-AzADApplication -DisplayName "<My Application Display Name>" -HomePage "<https://MyApplicationHomePage>" -IdentifierUris "<https://MyApplicationUri>" -Password $aadClientSecretSec
    $servicePrincipal = New-AzADServicePrincipal –ApplicationId $azureAdApplication.ApplicationId -Role Contributor;
    $aadClientID = $azureAdApplication.ApplicationId;

#Step 3: Enable the vault for disk encryption and set the access policy for the Microsoft Entra application.

	 Set-AzKeyVaultAccessPolicy -VaultName $KeyVaultName -ResourceGroupName $KVRGname -EnabledForDiskEncryption;
    Set-AzKeyVaultAccessPolicy -VaultName $keyVaultName -ServicePrincipalName $aadClientID -PermissionsToKeys 'WrapKey' -PermissionsToSecrets 'Set' -ResourceGroupName  $KVRGname;

#Step 4: Create a new key in the key vault with the Add-AzKeyVaultKey cmdlet.
	 # Fill in 'MyKeyEncryptionKey' with your value.

	 $keyEncryptionKeyName = 'MyKeyEncryptionKey';
    Add-AzKeyVaultKey -VaultName $KeyVaultName -Name $keyEncryptionKeyName -Destination 'Software';
    $keyEncryptionKeyUrl = (Get-AzKeyVaultKey -VaultName $KeyVaultName -Name $keyEncryptionKeyName).Key.kid;

#Step 5: Encrypt the disks of an existing IaaS VM
	 # Fill in 'MySecureVM' and 'MyVirtualMachineResourceGroup' with your values.

	 $VMName = 'MySecureVM';
     $VMRGName = 'MyVirtualMachineResourceGroup';
    Set-AzVMDiskEncryptionExtension -ResourceGroupName $VMRGName -VMName $vmName -AadClientID $aadClientID -AadClientSecret $aadClientSecret -DiskEncryptionKeyVaultUrl $diskEncryptionKeyVaultUrl -DiskEncryptionKeyVaultId $KeyVaultResourceId -KeyEncryptionKeyUrl $keyEncryptionKeyUrl -KeyEncryptionKeyVaultId $KeyVaultResourceId;
憑證式驗證 (選擇性)
如果您想要使用憑證驗證,您可以在金鑰保存庫上傳一個憑證驗證,並將它部署到用戶端。 在使用 PowerShell 指令碼之前,請先熟悉 Azure 磁碟加密的先決條件,以了解指令碼中的步驟。 範例指令碼可能需要隨環境加以變更。
# Fill in "MyKeyVaultResourceGroup", "MySecureVault", and 'MyLocation' ('My location' only if needed)

  $KVRGname = 'MyKeyVaultResourceGroup'
  $KeyVaultName= 'MySecureVault'

  # Create a key vault and set enabledForDiskEncryption property on it.
  # Comment out the next three lines if you already have an existing key vault enabled for encryption. No need to set 'My location' in this case.

  $Loc = 'MyLocation'
  New-AzKeyVault -VaultName $KeyVaultName -ResourceGroupName $KVRGname -Location $Loc
  Set-AzKeyVaultAccessPolicy -VaultName $KeyVaultName -ResourceGroupName $KVRGname -EnabledForDiskEncryption

  #Setting some variables with the key vault information
  $KeyVault = Get-AzKeyVault -VaultName $KeyVaultName -ResourceGroupName $KVRGname
  $DiskEncryptionKeyVaultUrl = $KeyVault.VaultUri
  $KeyVaultResourceId = $KeyVault.ResourceId

  # Create the Microsoft Entra application and associate the certificate with it.
  # Fill in "C:\certificates\mycert.pfx", "Password", "<My Application Display Name>", "<https://MyApplicationHomePage>", and "<https://MyApplicationUri>" with your values.
  # MyApplicationHomePage and the MyApplicationUri can be any values you wish

  $CertPath = "C:\certificates\mycert.pfx"
  $CertPassword = "Password"
  $Cert = New-Object System.Security.Cryptography.X509Certificates.X509Certificate2($CertPath, $CertPassword)
  $CertValue = [System.Convert]::ToBase64String($cert.GetRawCertData())

  $AzureAdApplication = New-AzADApplication -DisplayName "<My Application Display Name>" -HomePage "<https://MyApplicationHomePage>" -IdentifierUris "<https://MyApplicationUri>" -CertValue $CertValue
  $ServicePrincipal = New-AzADServicePrincipal -ApplicationId $AzureAdApplication.ApplicationId -Role Contributor

  $AADClientID = $AzureAdApplication.ApplicationId
  $aadClientCertThumbprint= $cert.Thumbprint

  Set-AzKeyVaultAccessPolicy -VaultName $keyVaultName -ServicePrincipalName $aadClientID -PermissionsToKeys 'WrapKey' -PermissionsToSecrets 'Set' -ResourceGroupName $KVRGname

  # Upload the pfx file to the key vault.
  # Fill in "MyAADCert".

  $KeyVaultSecretName = "MyAADCert"
  $FileContentBytes = get-content $CertPath -Encoding Byte
  $FileContentEncoded = [System.Convert]::ToBase64String($fileContentBytes)
          $JSONObject = @"
          {
              "data" : "$filecontentencoded",
              "dataType" : "pfx",
              "password" : "$CertPassword"
          }
"@

  $JSONObjectBytes = [System.Text.Encoding]::UTF8.GetBytes($jsonObject)
  $JSONEncoded = [System.Convert]::ToBase64String($jsonObjectBytes)

  #Set the secret and set the key vault policy for -EnabledForDeployment

  $Secret = ConvertTo-SecureString -String $JSONEncoded -AsPlainText -Force
  Set-AzKeyVaultSecret -VaultName $KeyVaultName -Name $KeyVaultSecretName -SecretValue $Secret
  Set-AzKeyVaultAccessPolicy -VaultName $KeyVaultName -ResourceGroupName $KVRGname -EnabledForDeployment

  # Deploy the certificate to the VM
  # Fill in 'MySecureVM' and 'MyVirtualMachineResourceGroup' with your values.

  $VMName = 'MySecureVM'
  $VMRGName = 'MyVirtualMachineResourceGroup'
  $CertUrl = (Get-AzKeyVaultSecret -VaultName $KeyVaultName -Name $KeyVaultSecretName).Id
  $SourceVaultId = (Get-AzKeyVault -VaultName $KeyVaultName -ResourceGroupName $KVRGName).ResourceId
  $VM = Get-AzVM -ResourceGroupName $VMRGName -Name $VMName
  $VM = Add-AzVMSecret -VM $VM -SourceVaultId $SourceVaultId -CertificateStore "My" -CertificateUrl $CertUrl
  Update-AzVM -VM $VM -ResourceGroupName $VMRGName

  #Enable encryption on the VM using Microsoft Entra client ID and the client certificate thumbprint

  Set-AzVMDiskEncryptionExtension -ResourceGroupName $VMRGName -VMName $VMName -AadClientID $AADClientID -AadClientCertThumbprint $AADClientCertThumbprint -DiskEncryptionKeyVaultUrl $DiskEncryptionKeyVaultUrl -DiskEncryptionKeyVaultId $KeyVaultResourceId
憑證式驗證和 KEK (選擇性)
如果您想要使用憑證驗證,並以 KEK 包裝加密金鑰,您可以使用下列指令碼作為範例。 在使用 PowerShell 指令碼之前,請先熟悉所有先前的 Azure 磁碟加密先決條件,以了解指令碼中的步驟。 範例指令碼可能需要隨環境加以變更。
# Fill in 'MyKeyVaultResourceGroup', 'MySecureVault', and 'MyLocation' (if needed)

   $KVRGname = 'MyKeyVaultResourceGroup'
   $KeyVaultName= 'MySecureVault'

   # Create a key vault and set enabledForDiskEncryption property on it.
   # Comment out the next three lines if you already have an existing key vault enabled for encryption.

   $Loc = 'MyLocation'
   New-AzKeyVault -VaultName $KeyVaultName -ResourceGroupName $KVRGname -Location $Loc
   Set-AzKeyVaultAccessPolicy -VaultName $KeyVaultName -ResourceGroupName $KVRGname -EnabledForDiskEncryption

   # Create the Azure AD application and associate the certificate with it.
   # Fill in "C:\certificates\mycert.pfx", "Password", "<My Application Display Name>", "<https://MyApplicationHomePage>", and "<https://MyApplicationUri>" with your values.
   # MyApplicationHomePage and the MyApplicationUri can be any values you wish

   $CertPath = "C:\certificates\mycert.pfx"
   $CertPassword = "Password"
   $Cert = New-Object System.Security.Cryptography.X509Certificates.X509Certificate2($CertPath, $CertPassword)
   $CertValue = [System.Convert]::ToBase64String($cert.GetRawCertData())

   $AzureAdApplication = New-AzADApplication -DisplayName "<My Application Display Name>" -HomePage "<https://MyApplicationHomePage>" -IdentifierUris "<https://MyApplicationUri>" -CertValue $CertValue
   $ServicePrincipal = New-AzADServicePrincipal -ApplicationId $AzureAdApplication.ApplicationId -Role Contributor

   $AADClientID = $AzureAdApplication.ApplicationId
   $aadClientCertThumbprint= $cert.Thumbprint

   ## Give access for setting secrets and wraping keys
   Set-AzKeyVaultAccessPolicy -VaultName $keyVaultName -ServicePrincipalName $aadClientID -PermissionsToKeys 'WrapKey' -PermissionsToSecrets 'Set' -ResourceGroupName $KVRGname

   # Upload the pfx file to the key vault.
   # Fill in "MyAADCert".

   $KeyVaultSecretName = "MyAADCert"
   $FileContentBytes = get-content $CertPath -Encoding Byte
   $FileContentEncoded = [System.Convert]::ToBase64String($fileContentBytes)
           $JSONObject = @"
           {
               "data" : "$filecontentencoded",
               "dataType" : "pfx",
               "password" : "$CertPassword"
           }
"@

   $JSONObjectBytes = [System.Text.Encoding]::UTF8.GetBytes($jsonObject)
   $JSONEncoded = [System.Convert]::ToBase64String($jsonObjectBytes)

   #Set the secret and set the key vault policy for deployment

   $Secret = ConvertTo-SecureString -String $JSONEncoded -AsPlainText -Force
   Set-AzKeyVaultSecret -VaultName $KeyVaultName -Name $KeyVaultSecretName -SecretValue $Secret
   Set-AzKeyVaultAccessPolicy -VaultName $KeyVaultName -ResourceGroupName $KVRGname -EnabledForDeployment

   #Setting some variables with the key vault information and generating a KEK
   # FIll in 'KEKName'

   $KEKName ='KEKName'
   $KeyVault = Get-AzKeyVault -VaultName $KeyVaultName -ResourceGroupName $KVRGname
   $DiskEncryptionKeyVaultUrl = $KeyVault.VaultUri
   $KeyVaultResourceId = $KeyVault.ResourceId
   $KEK = Add-AzKeyVaultKey -VaultName $KeyVaultName -Name $KEKName -Destination "Software"
   $KeyEncryptionKeyUrl = $KEK.Key.kid


   # Deploy the certificate to the VM
   # Fill in 'MySecureVM' and 'MyVirtualMachineResourceGroup' with your values.

   $VMName = 'MySecureVM';
   $VMRGName = 'MyVirtualMachineResourceGroup';
   $CertUrl = (Get-AzKeyVaultSecret -VaultName $KeyVaultName -Name $KeyVaultSecretName).Id
   $SourceVaultId = (Get-AzKeyVault -VaultName $KeyVaultName -ResourceGroupName $KVRGName).ResourceId
   $VM = Get-AzVM -ResourceGroupName $VMRGName -Name $VMName
   $VM = Add-AzVMSecret -VM $VM -SourceVaultId $SourceVaultId -CertificateStore "My" -CertificateUrl $CertUrl
   Update-AzVM -VM $VM -ResourceGroupName $VMRGName

   #Enable encryption on the VM using Azure AD client ID and the client certificate thumbprint

   Set-AzVMDiskEncryptionExtension -ResourceGroupName $VMRGName -VMName $VMName -AadClientID $AADClientID -AadClientCertThumbprint $AADClientCertThumbprint -DiskEncryptionKeyVaultUrl $DiskEncryptionKeyVaultUrl -DiskEncryptionKeyVaultId $KeyVaultResourceId -KeyEncryptionKeyUrl $keyEncryptionKeyUrl -KeyEncryptionKeyVaultId $KeyVaultResourceId