重要事項
部分資訊涉及預售產品,可能在正式上市前經過大幅修改。 Microsoft 對此處提供的資訊,不提供任何明確或隱含的瑕疵擔保。
本頁說明如何建立應用程式,在沒有特定使用者的情況下,取得 Microsoft Defender 全面偵測回應的程式存取權——例如,如果您正在建立守護程序或背景服務。
如果您需要代表一位或多位使用者程式化存取 Microsoft Defender 全面偵測回應,請參閱「建立應用程式以代表使用者存取 Microsoft Defender 全面偵測回應 API」及「建立一個與合作夥伴存取 Microsoft Defender 全面偵測回應 API 的應用程式」。 如果你不確定需要哪種存取方式,請參閱 「開始使用」。
Microsoft Defender 全面偵測回應透過一組程式化 API 公開其大部分資料與操作。 這些 API 幫助你自動化工作流程,並善用 Microsoft Defender 全面偵測回應的功能。 此 API 存取需要 OAuth2.0 認證。 欲了解更多資訊,請參閱 OAuth 2.0 授權碼流程。
一般來說,使用這些 API 需要採取以下步驟:
- 建立一個 Microsoft Entra 應用程式。
- 使用這個應用程式取得存取權杖。
- 使用令牌來存取 Microsoft Defender 全面偵測回應 API。
本文說明如何:
- 建立 Microsoft Entra 應用程式
- 取得 Microsoft Defender 全面偵測回應的存取權杖
- 驗證該憑證。
建立應用程式
登入 Azure。
導航至 Microsoft Entra ID>應用程式註冊>新註冊。

在表單中,選擇申請名稱,然後選擇 註冊。
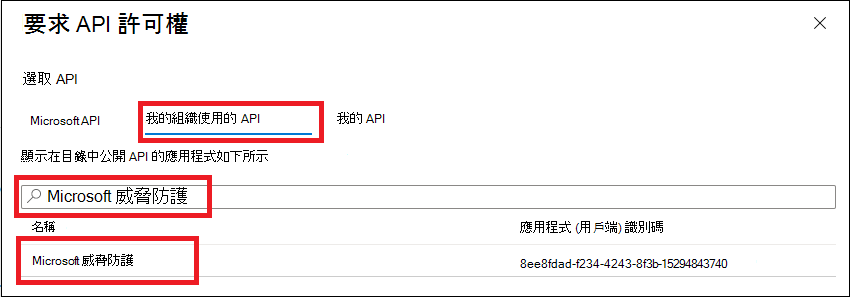
在你的應用程式頁面,選擇 API 權限> 新增我組織使用的>權限> API,輸入 Microsoft Threat Protection,然後選擇 Microsoft Threat Protection。 您的應用程式現在可以存取 Microsoft Defender 全面偵測回應。
提示
Microsoft Threat Protection 是 Microsoft Defender 全面偵測回應的舊稱,並未出現在原始清單中。 你需要先在文字框裡寫下它的名字,這樣它才會出現。
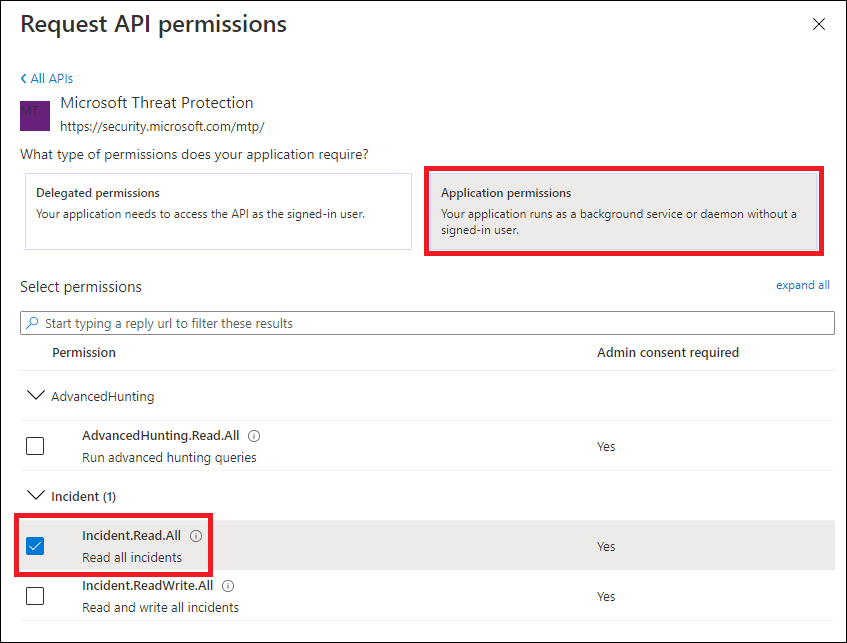
選取 應用程式權限。 選擇與你情境相關的權限,例如 (Incident.Read.All) ,然後選擇 新增權限。
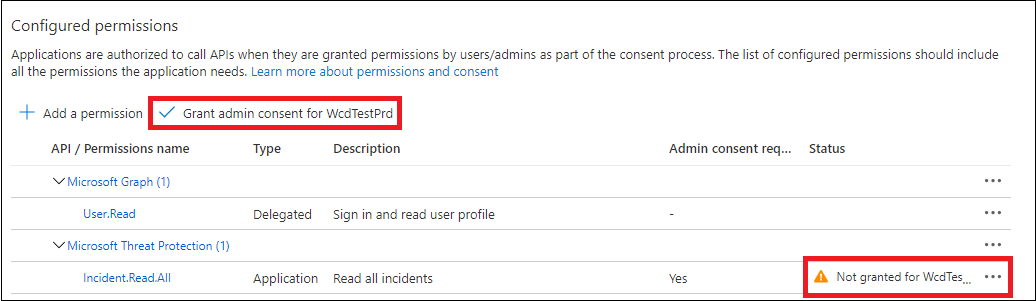
選擇 授予管理員同意。 每次新增權限時,必須選擇 「授予管理員同意 」才能生效。
要為應用程式新增祕密,選擇 「憑證 & 祕密」,為祕密加上描述,然後選擇 「新增」。
提示
選擇 新增後,選擇 複製產生的秘密值。 離開後你將無法取得秘密值。

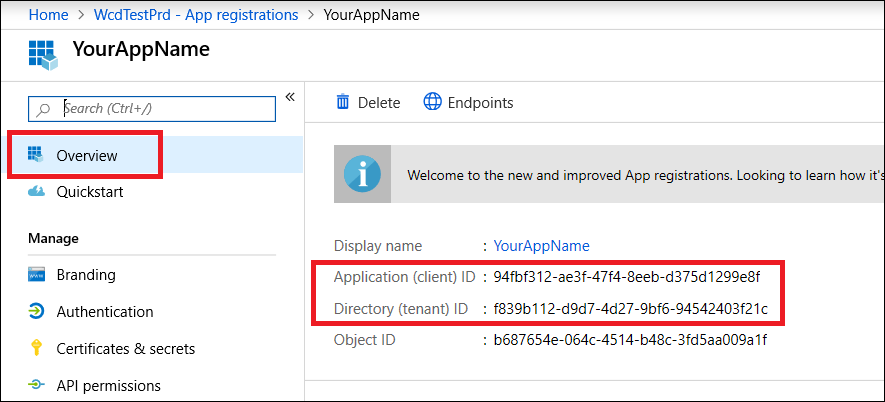
請將你的申請ID和租戶ID記錄在安全的地方。 他們會在你申請頁面的 「概覽 」裡列出。
僅限 Microsoft Defender 全面偵測回應合作夥伴:請依照以下指示透過 Microsoft Defender 全面偵測回應 API 存取合作夥伴,並將應用程式設為多租戶,這樣一旦取得管理員同意,應用程式即可在所有租戶中使用。 第三方應用程式 需要 合作夥伴存取權限——例如,如果你建立一個應用程式,打算在多個客戶的租戶中執行。 如果你建立的服務只想在租戶中執行,例如只與你自己的資料互動的應用程式,則 不需要 使用。 要將你的應用程式設定為多租戶:
進入認證,並新增https://portal.azure.com為重定向 URI。
在頁面底部的支援 帳號類型中,選擇多租戶應用程式的「帳號」,選擇 任何組織目錄應用程式中的帳號 同意。
由於你的應用程式代表使用者與 Microsoft Defender 全面偵測回應,因此你打算使用的每個租戶都需要獲得批准。
每個租戶的 Active Directory 管理員需要選擇同意連結並批准你的應用程式。
同意連結的結構如下:
https://login.microsoftonline.com/common/oauth2/authorize?prompt=consent&client_id=<00000000-0000-0000-0000-000000000000>&response_type=code&sso_reload=true這些數字
00000000-0000-0000-0000-000000000000應該被你的申請編號取代。


完成! 您已成功註冊申請! 請參考以下範例來取得與驗證代幣。
取得存取權杖
欲了解更多關於 Microsoft Entra 令牌的資訊,請參閱 Microsoft Entra 教學。
重要事項
雖然本節範例鼓勵你在測試時貼入秘密值,但 你絕對不 應該硬編碼秘密到執行於生產環境的應用程式中。 第三方可能會利用你的秘密來取得資源。 你可以透過使用 Azure 金鑰保存庫 來保護應用程式的機密。 想了解如何保護你的應用程式,請參考「用 Azure 金鑰保存庫 管理伺服器應用程式中的秘密」。
使用 PowerShell 取得存取權杖
# This code gets the application context token and saves it to a file named "Latest-token.txt" under the current directory.

$tenantId = '' # Paste your directory (tenant) ID here
$clientId = '' # Paste your application (client) ID here
$appSecret = '' # Paste your own app secret here to test, then store it in a safe place, such as the Azure Key Vault!

$resourceAppIdUri = 'https://api.security.microsoft.com'
$oAuthUri = "https://login.windows.net/$tenantId/oauth2/token"

$authBody = [Ordered] @{
    resource = $resourceAppIdUri
    client_id = $clientId
    client_secret = $appSecret
    grant_type = 'client_credentials'
}

$authResponse = Invoke-RestMethod -Method Post -Uri $oAuthUri -Body $authBody -ErrorAction Stop
$token = $authResponse.access_token

Out-File -FilePath "./Latest-token.txt" -InputObject $token

return $token
用 C 語言取得存取權杖#
注意事項
以下程式碼是使用 Nuget Microsoft.Identity.Client 3.19.8 測試的。
重要事項
Microsoft.IdentityModel.Clients.ActiveDirectory NuGet 套件及 Azure AD 驗證 函式庫 (ADAL) 已被棄用。 自 2020 年 6 月 30 日起未新增任何新功能。 我們強烈建議你升級,詳情請參閱 遷移指南 。
建立一個新的主控台應用程式。
安裝 NuGet Microsoft.Identity.Client.
加上以下這行:
using Microsoft.Identity.Client;將以下程式碼複製貼上到你的應用程式中 (別忘了更新三個變數:
tenantId、、clientIdappSecret) :csharp string tenantId = "00000000-0000-0000-0000-000000000000"; // Paste your own tenant ID here string appId = "11111111-1111-1111-1111-111111111111"; // Paste your own app ID here string appSecret = "22222222-2222-2222-2222-222222222222"; // Paste your own app secret here for a test, and then store it in a safe place! const string authority = https://login.microsoftonline.com; const string audience = https://api.securitycenter.microsoft.com; IConfidentialClientApplication myApp = ConfidentialClientApplicationBuilder.Create(appId).WithClientSecret(appSecret).WithAuthority($"{authority}/{tenantId}").Build(); List<string> scopes = new List<string>() { $"{audience}/.default" }; AuthenticationResult authResult = myApp.AcquireTokenForClient(scopes).ExecuteAsync().GetAwaiter().GetResult(); string token = authResult.AccessToken;
使用 Python 取得存取權杖
import json
import urllib.request
import urllib.parse

tenantId = '' # Paste your directory (tenant) ID here
clientId = '' # Paste your application (client) ID here
appSecret = '' # Paste your own app secret here to test, then store it in a safe place, such as the Azure Key Vault!

url = "https://login.windows.net/%s/oauth2/token" % (tenantId)

resourceAppIdUri = 'https://api.security.microsoft.com'

body = {
    'resource' : resourceAppIdUri,
    'client_id' : clientId,
    'client_secret' : appSecret,
    'grant_type' : 'client_credentials'
}

data = urllib.parse.urlencode(body).encode("utf-8")

req = urllib.request.Request(url, data)
response = urllib.request.urlopen(req)
jsonResponse = json.loads(response.read())
aadToken = jsonResponse["access_token"]
使用 Curl 取得存取權杖
注意事項
Curl 已預先安裝於 Windows 10 版本 1803 及以上版本。 其他版本的 Windows 請直接從 官方 curl 網站下載並安裝此工具。
打開命令提示字元,將CLIENT_ID設為你的Azure應用程式 ID。
將CLIENT_SECRET設為你的Azure應用程式秘密。
TENANT_ID設定為想用你應用程式存取Microsoft Defender 全面偵測回應的客戶的Azure租戶ID。
執行下列命令:
curl -i -X POST -H "Content-Type:application/x-www-form-urlencoded" -d "grant_type=client_credentials" -d "client_id=%CLIENT_ID%" -d "scope=https://api.security.microsoft.com/.default" -d "client_secret=%CLIENT_SECRET%" "https://login.microsoftonline.com/%TENANT_ID%/oauth2/v2.0/token" -k成功的回應方式如下:
{"token_type":"Bearer","expires_in":3599,"ext_expires_in":0,"access_token":"eyJ0eXAiOiJKV1QiLCJhbGciOiJSUzI1NiIsIn <truncated> aWReH7P0s0tjTBX8wGWqJUdDA"}
驗證代幣
將令牌複製並貼上到 JSON 網頁令牌驗證網站 JWT 中解 碼。
確保解碼後的權杖中 的角色主張包含 所需的權限。
在下圖中,你可以看到一個從應用程式取得的解碼令牌,權限為
Incidents.Read.All、Incidents.ReadWrite.AllAdvancedHunting.Read.All、 和 :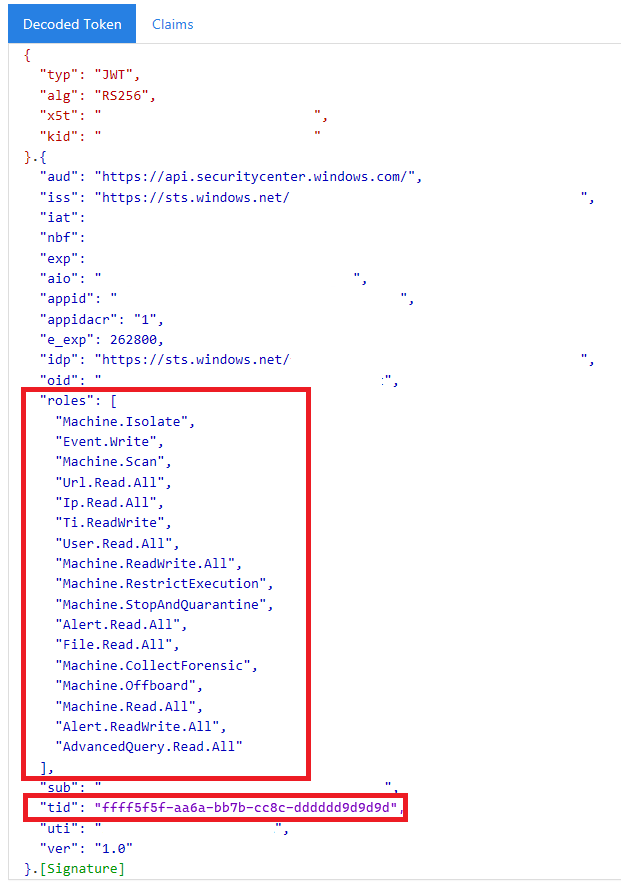

使用該令牌存取 Microsoft Defender 全面偵測回應 API
選擇你想在事件 (或進階狩獵) 使用的 API。 欲了解更多資訊,請參閱支援的 Microsoft Defender 全面偵測回應 API。
在你即將發送的基於 HTTP 的請求中,將授權標頭設為
"Bearer" <token>,持有人是授權方案,令牌是你已驗證的令牌。該代幣在一小時內到期。 你可以在同一段時間內用同一令牌發送多個請求。
以下範例說明如何使用 C# 發送請求以取得事件清單。
    var httpClient = new HttpClient();
    var request = new HttpRequestMessage(HttpMethod.Get, "https://api.security.microsoft.com/api/incidents");

    request.Headers.Authorization = new AuthenticationHeaderValue("Bearer", token);

    var response = httpClient.SendAsync(request).GetAwaiter().GetResult();
相關文章
- Microsoft Defender 全面偵測回應 API 概覽
- 存取 Microsoft Defender 全面偵測回應 API
- 建立一個「Hello world」應用程式
- 建立應用程式以代表使用者存取 Microsoft Defender 全面偵測回應 API
- 建立一個擁有多租戶合作夥伴存取 Microsoft Defender 全面偵測回應 API 的應用程式
- 了解 API 限制與授權
- 了解錯誤代碼
- 用 Azure 金鑰保存庫 管理伺服器應用程式中的秘密
- OAuth 2.0 授權用戶登入與 API 存取
提示
想要深入了解? 請到我們的技術社群中與 Microsoft 安全性社群互動: Microsoft Defender 全面偵測回應技術社群。