適用於:✅ Fabric 資料工程與資料科學
學習如何使用 Livy API 提交 Spark 會話工作以支援 Fabric 資料工程。
必要條件
遠端用戶端如 Visual Studio Code,搭配 Jupyter Notebooks、PySpark,以及用於 Python 的 Microsoft Authentication Library (MSAL)
也可以是 Microsoft Entra 應用程式的令牌。 在 Microsoft identity 平台上註冊應用程式
或者用 Microsoft Entra SPN 令牌。
在 Microsoft Entra 湖屋的一些數據,此範例使用 NYC計程車和豪華轎車委員會 green_tripdata_2022_08載入湖屋的 parquet 檔案
Livy API 會定義作業的統一端點。 當您遵循本文中的範例時,請將佔位符 {Entra_TenantID}、{Entra_ClientID}、{Fabric_WorkspaceID}、{Fabric_LakehouseID} 取代為適當的值。
將 Visual Studio Code 配置為你的 Livy API 會話使用環境
在你的Fabric Lakehouse 中選擇 Lakehouse Settings。

導航至 Livy 端點 區段。
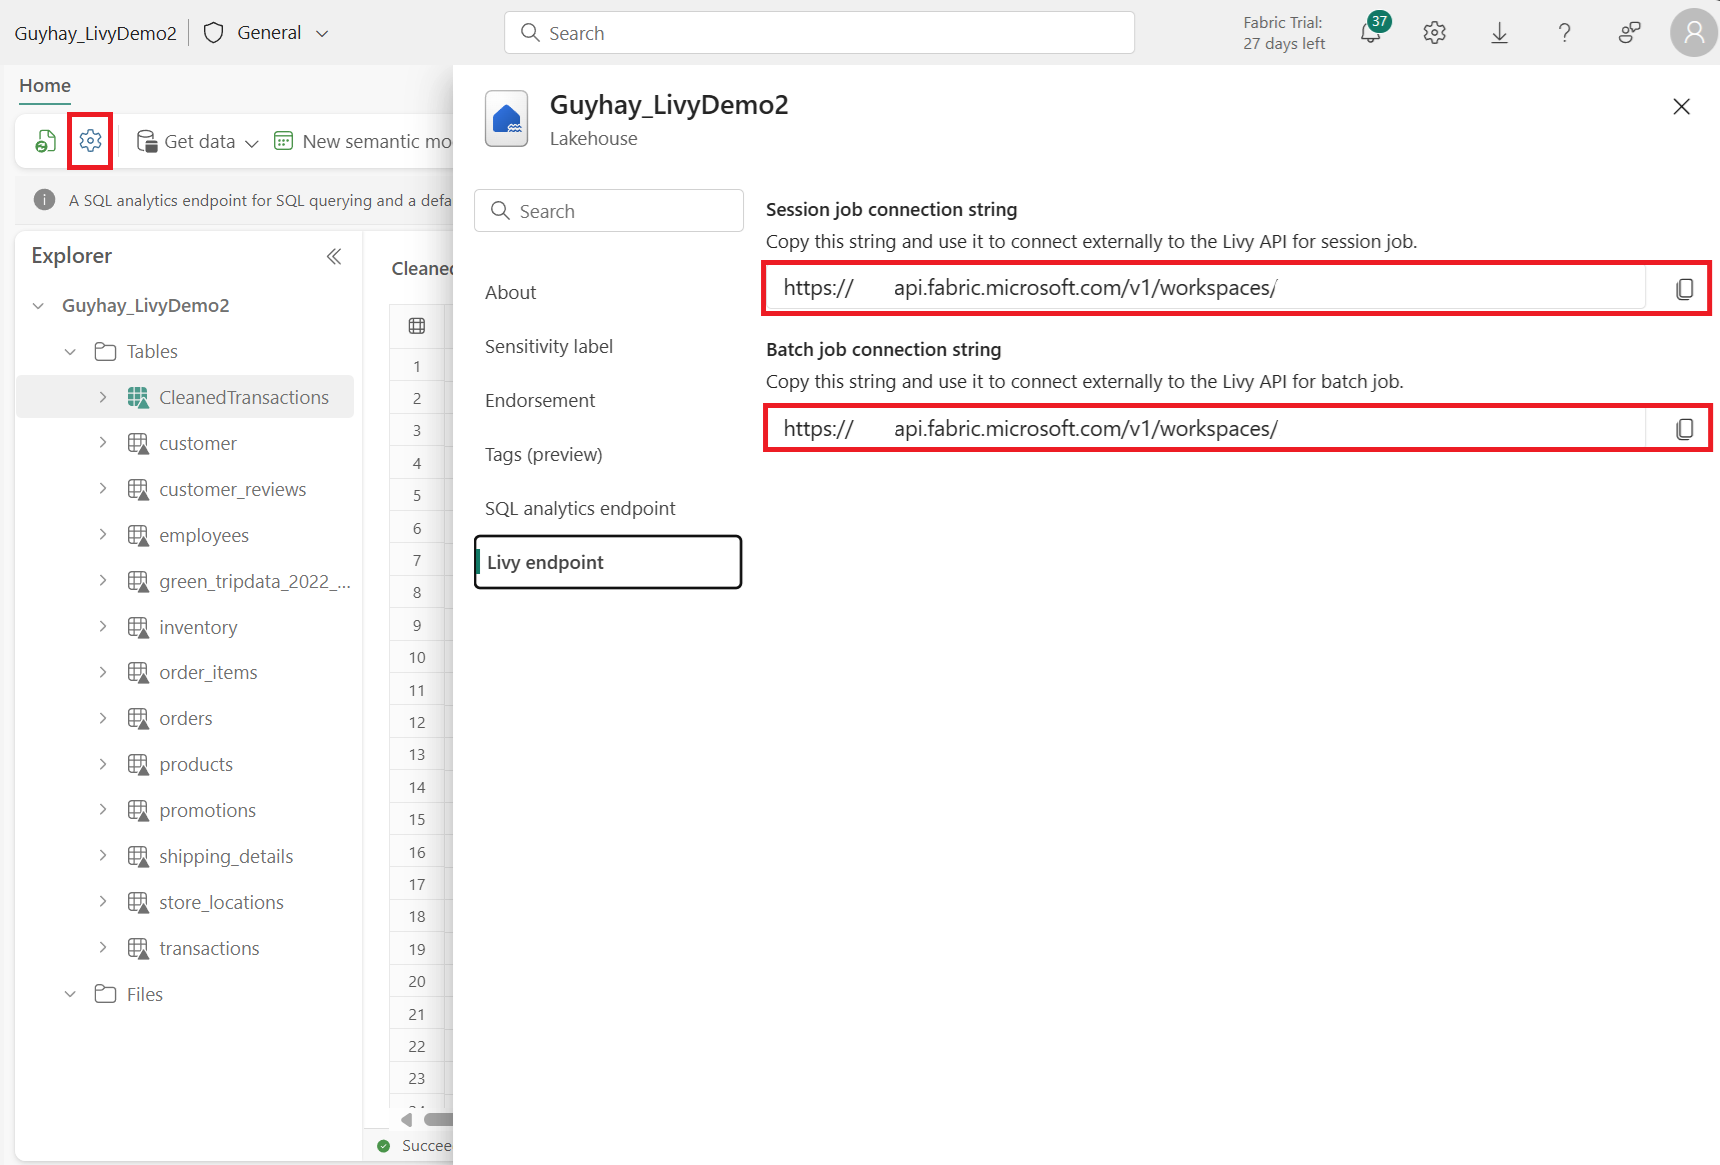
將 Session 作業的連接字串(圖片中第一個紅框)複製到你的程式碼中。
請前往 Microsoft Entra admin center,並將應用程式(客戶端)ID 和目錄(租戶)ID 複製到你的程式碼中。


使用 Microsoft Entra 使用者憑證或 Microsoft Entra SPN 憑證來認證 Livy API Spark 會話
使用 Microsoft Entra SPN 令牌認證 Livy API Spark 會話
在 Visual Studio Code 建立一個
.ipynb筆記本,並插入以下程式碼。import sys from msal import ConfidentialClientApplication # Configuration - Replace with your actual values tenant_id = "Entra_TenantID" # Microsoft Entra tenant ID client_id = "Entra_ClientID" # Service Principal Application ID # Certificate paths - Update these paths to your certificate files certificate_path = "PATH_TO_YOUR_CERTIFICATE.pem" # Public certificate file private_key_path = "PATH_TO_YOUR_PRIVATE_KEY.pem" # Private key file certificate_thumbprint = "YOUR_CERTIFICATE_THUMBPRINT" # Certificate thumbprint # OAuth settings audience = "https://analysis.windows.net/powerbi/api/.default" authority = f"https://login.windows.net/{tenant_id}" def get_access_token(client_id, audience, authority, certificate_path, private_key_path, certificate_thumbprint=None): """ Get an app-only access token for a Service Principal using OAuth 2.0 client credentials flow. This function uses certificate-based authentication which is more secure than client secrets. Args: client_id (str): The Service Principal's client ID audience (str): The audience for the token (resource scope) authority (str): The OAuth authority URL certificate_path (str): Path to the certificate file (.pem format) private_key_path (str): Path to the private key file (.pem format) certificate_thumbprint (str): Certificate thumbprint (optional but recommended) Returns: str: The access token for API authentication Raises: Exception: If token acquisition fails """ try: # Read the certificate from PEM file with open(certificate_path, "r", encoding="utf-8") as f: certificate_pem = f.read() # Read the private key from PEM file with open(private_key_path, "r", encoding="utf-8") as f: private_key_pem = f.read() # Create the confidential client application app = ConfidentialClientApplication( client_id=client_id, authority=authority, client_credential={ "private_key": private_key_pem, "thumbprint": certificate_thumbprint, "certificate": certificate_pem } ) # Acquire token using client credentials flow token_response = app.acquire_token_for_client(scopes=[audience]) if "access_token" in token_response: print("Successfully acquired access token") return token_response["access_token"] else: raise Exception(f"Failed to retrieve token: {token_response.get('error_description', 'Unknown error')}") except FileNotFoundError as e: print(f"Certificate file not found: {e}") sys.exit(1) except Exception as e: print(f"Error retrieving token: {e}", file=sys.stderr) sys.exit(1) # Get the access token token = get_access_token(client_id, audience, authority, certificate_path, private_key_path, certificate_thumbprint)執行筆記本儲存格。 你應該會看到 Microsoft Entra 的 token 被回傳。


使用 Microsoft Entra 使用者憑證驗證 Livy API Spark 會話
在 Visual Studio Code 建立一個
.ipynb筆記本,並插入以下程式碼。from msal import PublicClientApplication import requests import time # Configuration - Replace with your actual values tenant_id = "Entra_TenantID" # Microsoft Entra tenant ID client_id = "Entra_ClientID" # Application ID (can be the same as above or different) # Required scopes for Livy API access scopes = [ "https://api.fabric.microsoft.com/Lakehouse.Execute.All", # Required — execute operations in lakehouses "https://api.fabric.microsoft.com/Lakehouse.Read.All", # Required — read lakehouse metadata "https://api.fabric.microsoft.com/Code.AccessFabric.All", # Required — general Fabric API access from Spark Runtime "https://api.fabric.microsoft.com/Code.AccessStorage.All", # Required — access OneLake and Azure storage from Spark Runtime ] # Optional scopes — add these only if your Spark jobs need access to the corresponding services: # "https://api.fabric.microsoft.com/Code.AccessAzureKeyvault.All" # Optional — access Azure Key Vault from Spark Runtime # "https://api.fabric.microsoft.com/Code.AccessAzureDataLake.All" # Optional — access Azure Data Lake Storage Gen1 from Spark Runtime # "https://api.fabric.microsoft.com/Code.AccessAzureDataExplorer.All" # Optional — access Azure Data Explorer from Spark Runtime # "https://api.fabric.microsoft.com/Code.AccessSQL.All" # Optional — access Azure SQL audience tokens from Spark Runtime def get_access_token(tenant_id, client_id, scopes): """ Get an access token using interactive authentication. This method will open a browser window for user authentication. Args: tenant_id (str): The Microsoft Entra tenant ID client_id (str): The application client ID scopes (list): List of required permission scopes Returns: str: The access token, or None if authentication fails """ app = PublicClientApplication( client_id, authority=f"https://login.microsoftonline.com/{tenant_id}" ) print("Opening browser for interactive authentication...") token_response = app.acquire_token_interactive(scopes=scopes) if "access_token" in token_response: print("Successfully authenticated") return token_response["access_token"] else: print(f"Authentication failed: {token_response.get('error_description', 'Unknown error')}") return None # Uncomment the lines below to use interactive authentication token = get_access_token(tenant_id, client_id, scopes) print("Access token acquired via interactive login")執行筆記本儲存格。 你應該會看到 Microsoft Entra 的 token 被回傳。
顯示執行單元後返回的 Microsoft Entra 使用者憑證的截圖。
理解 Livy API 的程式碼*範圍
當你的 Spark 工作透過 Livy API 執行時,Code.* 範圍控制已認證使用者代表 Spark 執行環境能存取哪些外部服務。 需要兩個,其餘根據你的工作量自行選擇。
必要代碼。* 範圍
| Scope | 說明 |
|---|---|
Code.AccessFabric.All |
允許取得 Microsoft Fabric 的存取權杖。 所有 Livy API 操作皆需。 |
Code.AccessStorage.All |
允許取得 OneLake 和 Azure 儲存的存取權杖。 用於在湖倉中讀寫數據所需的。 |
可選代碼*範圍
只有當你的 Spark 工作需要在執行時存取對應的 Azure 服務時,才加入這些範圍。
| Scope | 說明 | 使用時機 |
|---|---|---|
Code.AccessAzureKeyvault.All |
允許取得 Azure Key Vault 的存取權杖。 | 您的 Spark 程式碼會從 Azure Key Vault 取得秘密、金鑰或憑證。 |
Code.AccessAzureDataLake.All |
允許取得 Azure Data Lake Storage Gen1 的存取權杖。 | 你的 Spark 程式碼會從 Azure Data Lake Storage Gen1 帳號讀取或寫入。 |
Code.AccessAzureDataExplorer.All |
允許取得 Azure Data Explorer(Kusto)的存取令牌。 | 你的 Spark 程式碼查詢或從 Azure Data Explorer 叢集匯入資料。 |
Code.AccessSQL.All |
允許獲取 Azure SQL 的存取權杖。 | 你的 Spark 程式碼需要連接到 Azure SQL 資料庫。 |
備註
Lakehouse.Execute.All和Lakehouse.Read.All範疇也是必需的,但不屬於Code.*家族。 它們分別授權在 Fabric 數據湖屋中執行操作與讀取元資料。
建立 Livy API Spark 會話
小提示
如果你的工作負載需要同時執行多個 Spark 語句,建議改用 高並發會話 。 HC 會話提供獨立的執行上下文,可以同時運行,而系統負責管理底層 Livy 會話的重複使用。
新增另一個筆記本數據格,並插入此程序代碼。
import json
import requests

api_base_url = "https://api.fabric.microsoft.com/"  # Base URL for Fabric APIs

# Fabric Resource IDs - Replace with your workspace and lakehouse IDs
workspace_id = "Fabric_WorkspaceID"
lakehouse_id = "Fabric_LakehouseID"

# Construct the Livy API session URL
# URL pattern: {base_url}/v1/workspaces/{workspace_id}/lakehouses/{lakehouse_id}/livyapi/versions/{api_version}/sessions
livy_api_session_url = (f"{api_base_url}v1/workspaces/{workspace_id}/lakehouses/{lakehouse_id}/"
                       f"livyapi/versions/2023-12-01/sessions")

# Set up authentication headers
headers = {"Authorization": f"Bearer {token}"}

print(f"Livy API URL: {livy_api_session_url}")
print("Creating Livy session...")

try:
    # Create a new Livy session with default configuration
    create_livy_session = requests.post(livy_api_session_url, headers=headers, json={})

    # Check if the request was successful
    if create_livy_session.status_code == 202:
        session_info = create_livy_session.json()
        print('Livy session creation request submitted successfully')
        print(f'Session Info: {json.dumps(session_info, indent=2)}')

        # Extract session ID for future operations
        livy_session_id = session_info['id']
        livy_session_url = f"{livy_api_session_url}/{livy_session_id}"

        print(f"Session ID: {livy_session_id}")
        print(f"Session URL: {livy_session_url}")

    else:
        print(f"Failed to create session. Status code: {create_livy_session.status_code}")
        print(f"Response: {create_livy_session.text}")

except requests.exceptions.RequestException as e:
    print(f"Network error occurred: {e}")
except json.JSONDecodeError as e:
    print(f"JSON decode error: {e}")
    print(f"Response text: {create_livy_session.text}")
except Exception as e:
    print(f"Unexpected error: {e}")
執行筆記本的儲存格,您應該會在建立 Livy 工作階段時看到一行被列印出來。

您可以透過 [在監視中樞查看您在監視中樞的工作](#View your jobs in the Monitoring hub),確認 Livy 會話是否已建立。

與 Fabric 環境的整合
根據預設,此 Livy API 會話會針對工作區的預設起始池執行。 另外,您可以使用 Fabric Environments Create、Configure,並在 Microsoft Fabric 中使用環境,以自訂 Livy API 會話所使用的 Spark 工作的 Spark 池配置。 要使用 Fabric 環境,請使用這個 JSON 載荷更新先前的筆記本儲存格。
create_livy_session = requests.post(livy_base_url, headers = headers, json = {
    "conf" : {
        "spark.fabric.environmentDetails" : "{\"id\" : \""EnvironmentID""}"}
        }
)
使用 Livy API 的 Spark 工作階段提交 spark.sql 語句
新增另一個筆記本數據格,並插入此程序代碼。
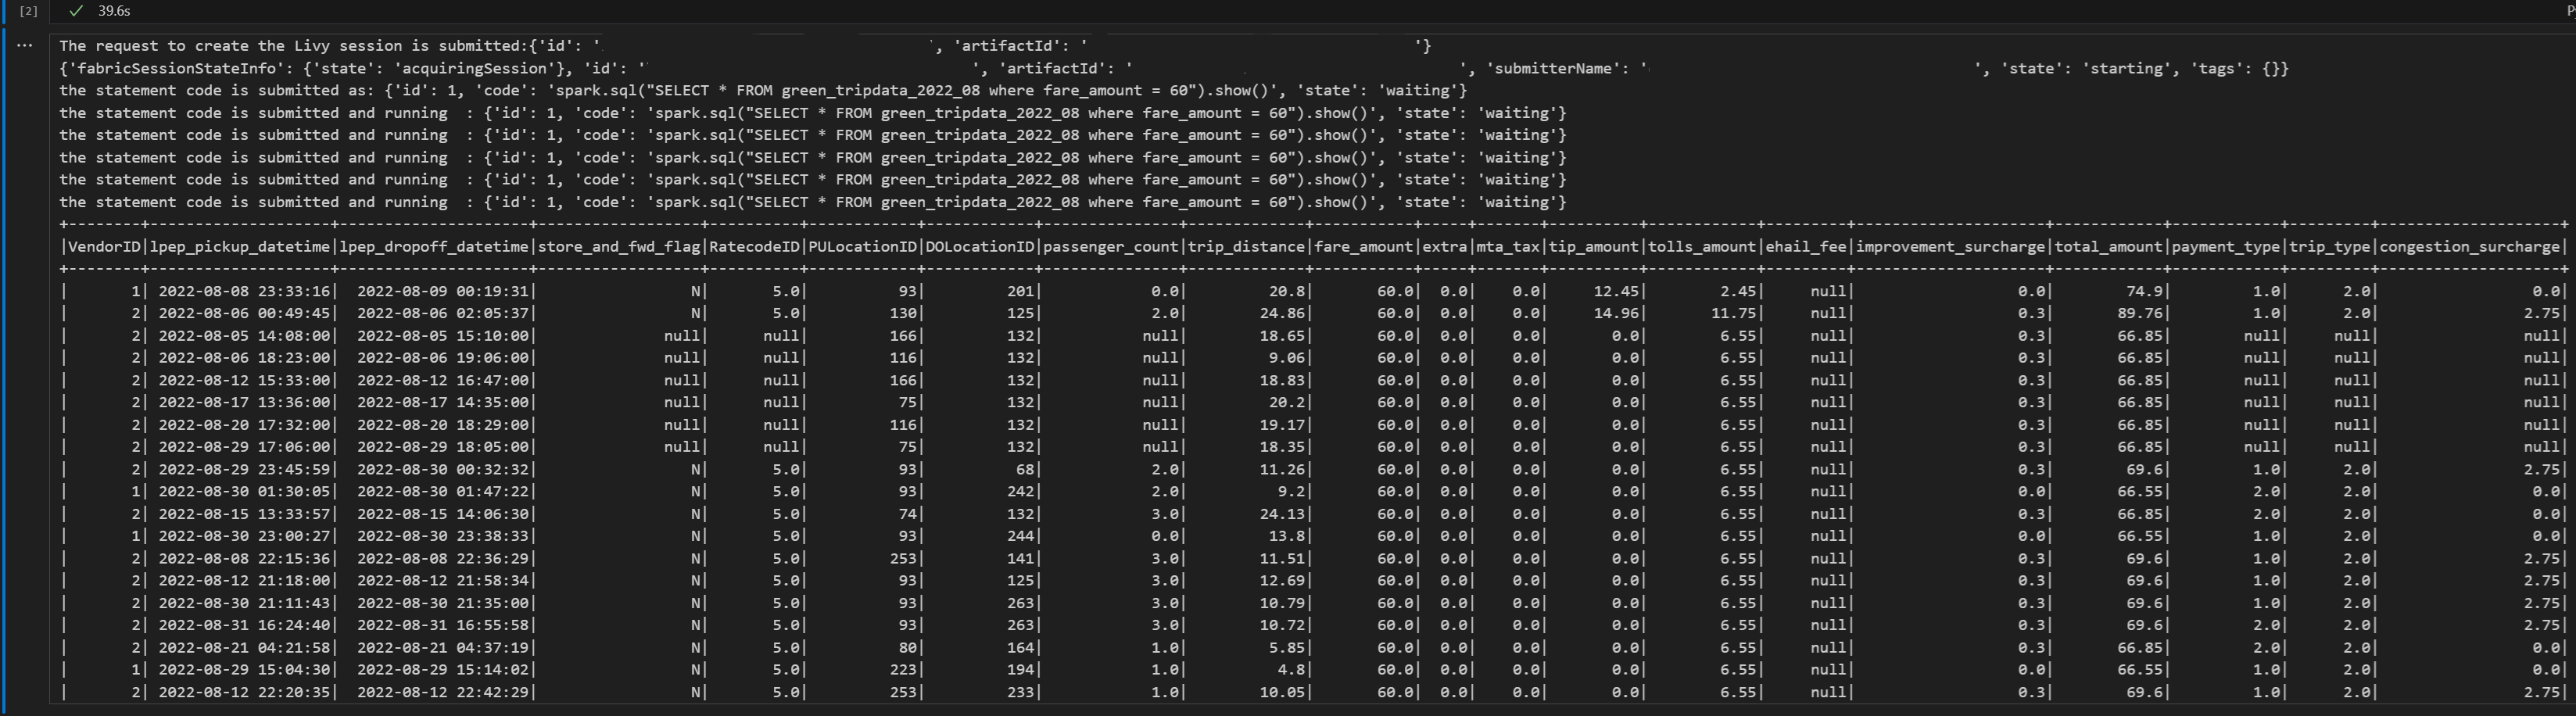
    # call get session API
import time

table_name = "green_tripdata_2022"

print("Checking session status...")

# Get current session status
get_session_response = requests.get(livy_session_url, headers=headers)
session_status = get_session_response.json()
print(f"Current session state: {session_status['state']}")

# Wait for session to become idle (ready to accept statements)
print("Waiting for session to become idle...")
while session_status["state"] != "idle":
    print(f"   Session state: {session_status['state']} - waiting 5 seconds...")
    time.sleep(5)
    get_session_response = requests.get(livy_session_url, headers=headers)
    session_status = get_session_response.json()

print("Session is now idle and ready to accept statements")

# Execute a Spark SQL statement
execute_statement_url = f"{livy_session_url}/statements"

# Define your Spark SQL query - Replace with your actual table and query
payload_data = {
    "code": "spark.sql(\"SELECT * FROM {table_name} WHERE column_name = 'some_value' LIMIT 10\").show()",
    "kind": "spark"  # Type of code (spark, pyspark, sql, etc.)
}

print("Submitting Spark SQL statement...")
print(f"Query: {payload_data['code']}")

try:
    # Submit the statement for execution
    execute_statement_response = requests.post(execute_statement_url, headers=headers, json=payload_data)

    if execute_statement_response.status_code == 200:
        statement_info = execute_statement_response.json()
        print('Statement submitted successfully')
        print(f"Statement Info: {json.dumps(statement_info, indent=2)}")

        # Get statement ID for monitoring
        statement_id = str(statement_info['id'])
        get_statement_url = f"{livy_session_url}/statements/{statement_id}"

        print(f"Statement ID: {statement_id}")

        # Monitor statement execution
        print("Monitoring statement execution...")
        get_statement_response = requests.get(get_statement_url, headers=headers)
        statement_status = get_statement_response.json()

        while statement_status["state"] != "available":
            print(f"   Statement state: {statement_status['state']} - waiting 5 seconds...")
            time.sleep(5)
            get_statement_response = requests.get(get_statement_url, headers=headers)
            statement_status = get_statement_response.json()

        # Retrieve and display results
        print("Statement execution completed!")
        if 'output' in statement_status and 'data' in statement_status['output']:
            results = statement_status['output']['data']['text/plain']
            print("Query Results:")
            print(results)
        else:
            print("No output data available")

    else:
        print(f"Failed to submit statement. Status code: {execute_statement_response.status_code}")
        print(f"Response: {execute_statement_response.text}")

except Exception as e:
    print(f"Error executing statement: {e}")
當您執行筆記本中的單元格時,應會看到在作業提交和結果返回的過程中列印的數行增量行。

使用 Livy API Spark 會話提交第二個 spark.sql 指令
新增另一個筆記本數據格,並插入此程序代碼。
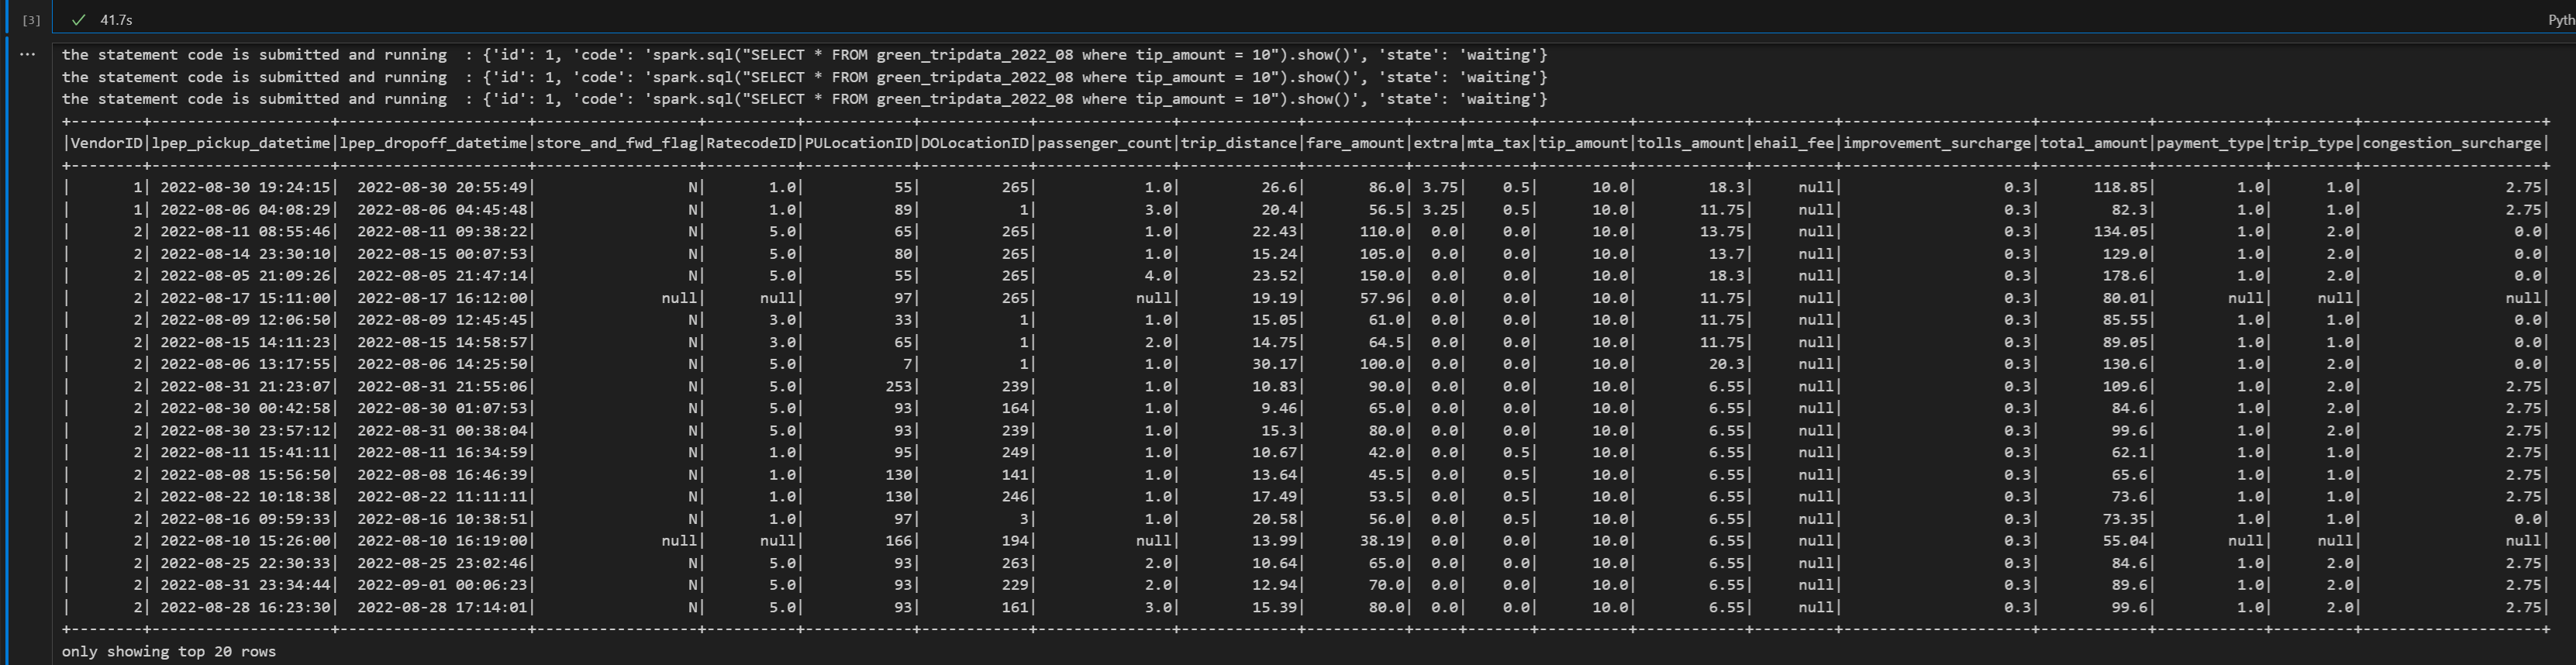
print("Executing additional Spark SQL statement...")

# Wait for session to be idle again
get_session_response = requests.get(livy_session_url, headers=headers)
session_status = get_session_response.json()

while session_status["state"] != "idle":
    print(f"   Waiting for session to be idle... Current state: {session_status['state']}")
    time.sleep(5)
    get_session_response = requests.get(livy_session_url, headers=headers)
    session_status = get_session_response.json()

# Execute another statement - Replace with your actual query
payload_data = {
    "code": f"spark.sql(\"SELECT COUNT(*) as total_records FROM {table_name}\").show()",
    "kind": "spark"
}

print(f"Executing query: {payload_data['code']}")

try:
    # Submit the second statement
    execute_statement_response = requests.post(execute_statement_url, headers=headers, json=payload_data)

    if execute_statement_response.status_code == 200:
        statement_info = execute_statement_response.json()
        print('Second statement submitted successfully')

        statement_id = str(statement_info['id'])
        get_statement_url = f"{livy_session_url}/statements/{statement_id}"

        # Monitor execution
        print("Monitoring statement execution...")
        get_statement_response = requests.get(get_statement_url, headers=headers)
        statement_status = get_statement_response.json()

        while statement_status["state"] != "available":
            print(f"   Statement state: {statement_status['state']} - waiting 5 seconds...")
            time.sleep(5)
            get_statement_response = requests.get(get_statement_url, headers=headers)
            statement_status = get_statement_response.json()

        # Display results
        print("Second statement execution completed!")
        if 'output' in statement_status and 'data' in statement_status['output']:
            results = statement_status['output']['data']['text/plain']
            print("Query Results:")
            print(results)
        else:
            print("No output data available")

    else:
        print(f"Failed to submit second statement. Status code: {execute_statement_response.status_code}")

except Exception as e:
    print(f"Error executing second statement: {e}")
當您執行筆記本中的單元格時,應會看到在作業提交和結果返回的過程中列印的數行增量行。

結束李維會議
新增另一個筆記本數據格,並插入此程序代碼。
print("Cleaning up Livy session...")

try:
    # Check current session status before deletion
    get_session_response = requests.get(livy_session_url, headers=headers)
    if get_session_response.status_code == 200:
        session_info = get_session_response.json()
        print(f"Session state before deletion: {session_info.get('state', 'unknown')}")

    print(f"Deleting session at: {livy_session_url}")

    # Delete the session
    delete_response = requests.delete(livy_session_url, headers=headers)

    if delete_response.status_code == 200:
        print("Session deleted successfully")
    elif delete_response.status_code == 404:
        print("Session was already deleted or not found")
    else:
        print(f"Delete request completed with status code: {delete_response.status_code}")
        print(f"Response: {delete_response.text}")

    print(f"Delete response details: {delete_response}")

except requests.exceptions.RequestException as e:
    print(f"Network error during session deletion: {e}")
except Exception as e:
    print(f"Error during session cleanup: {e}")
在監控中心檢視您的任務
您可以選取左側導覽連結中的 [監視],來存取監視中樞以檢視各種 Apache Spark 活動。
當工作階段進行中或處於已完成狀態時,您可以流覽至 [監視] 來檢視工作階段狀態。
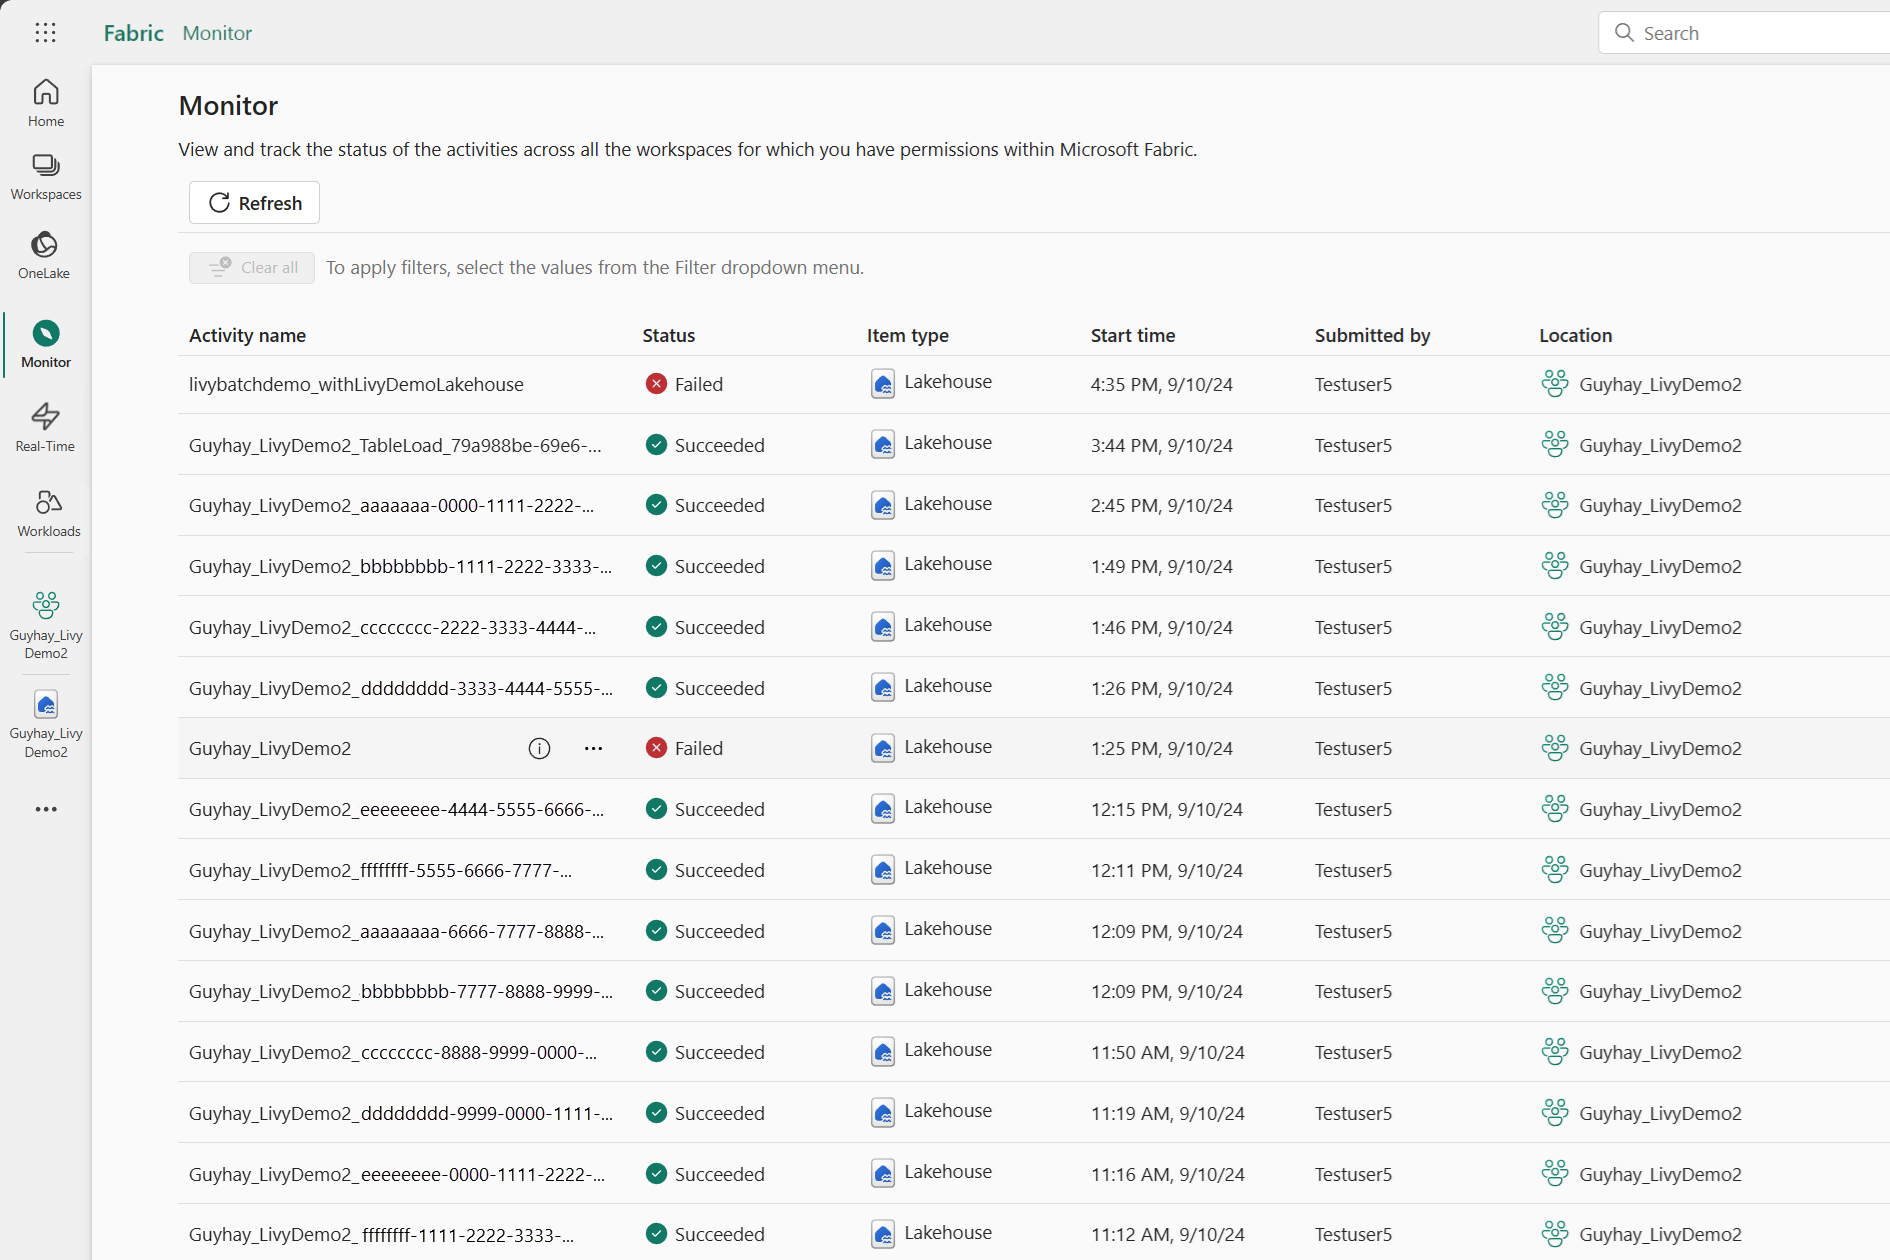
選取並開啟最新的活動名稱。

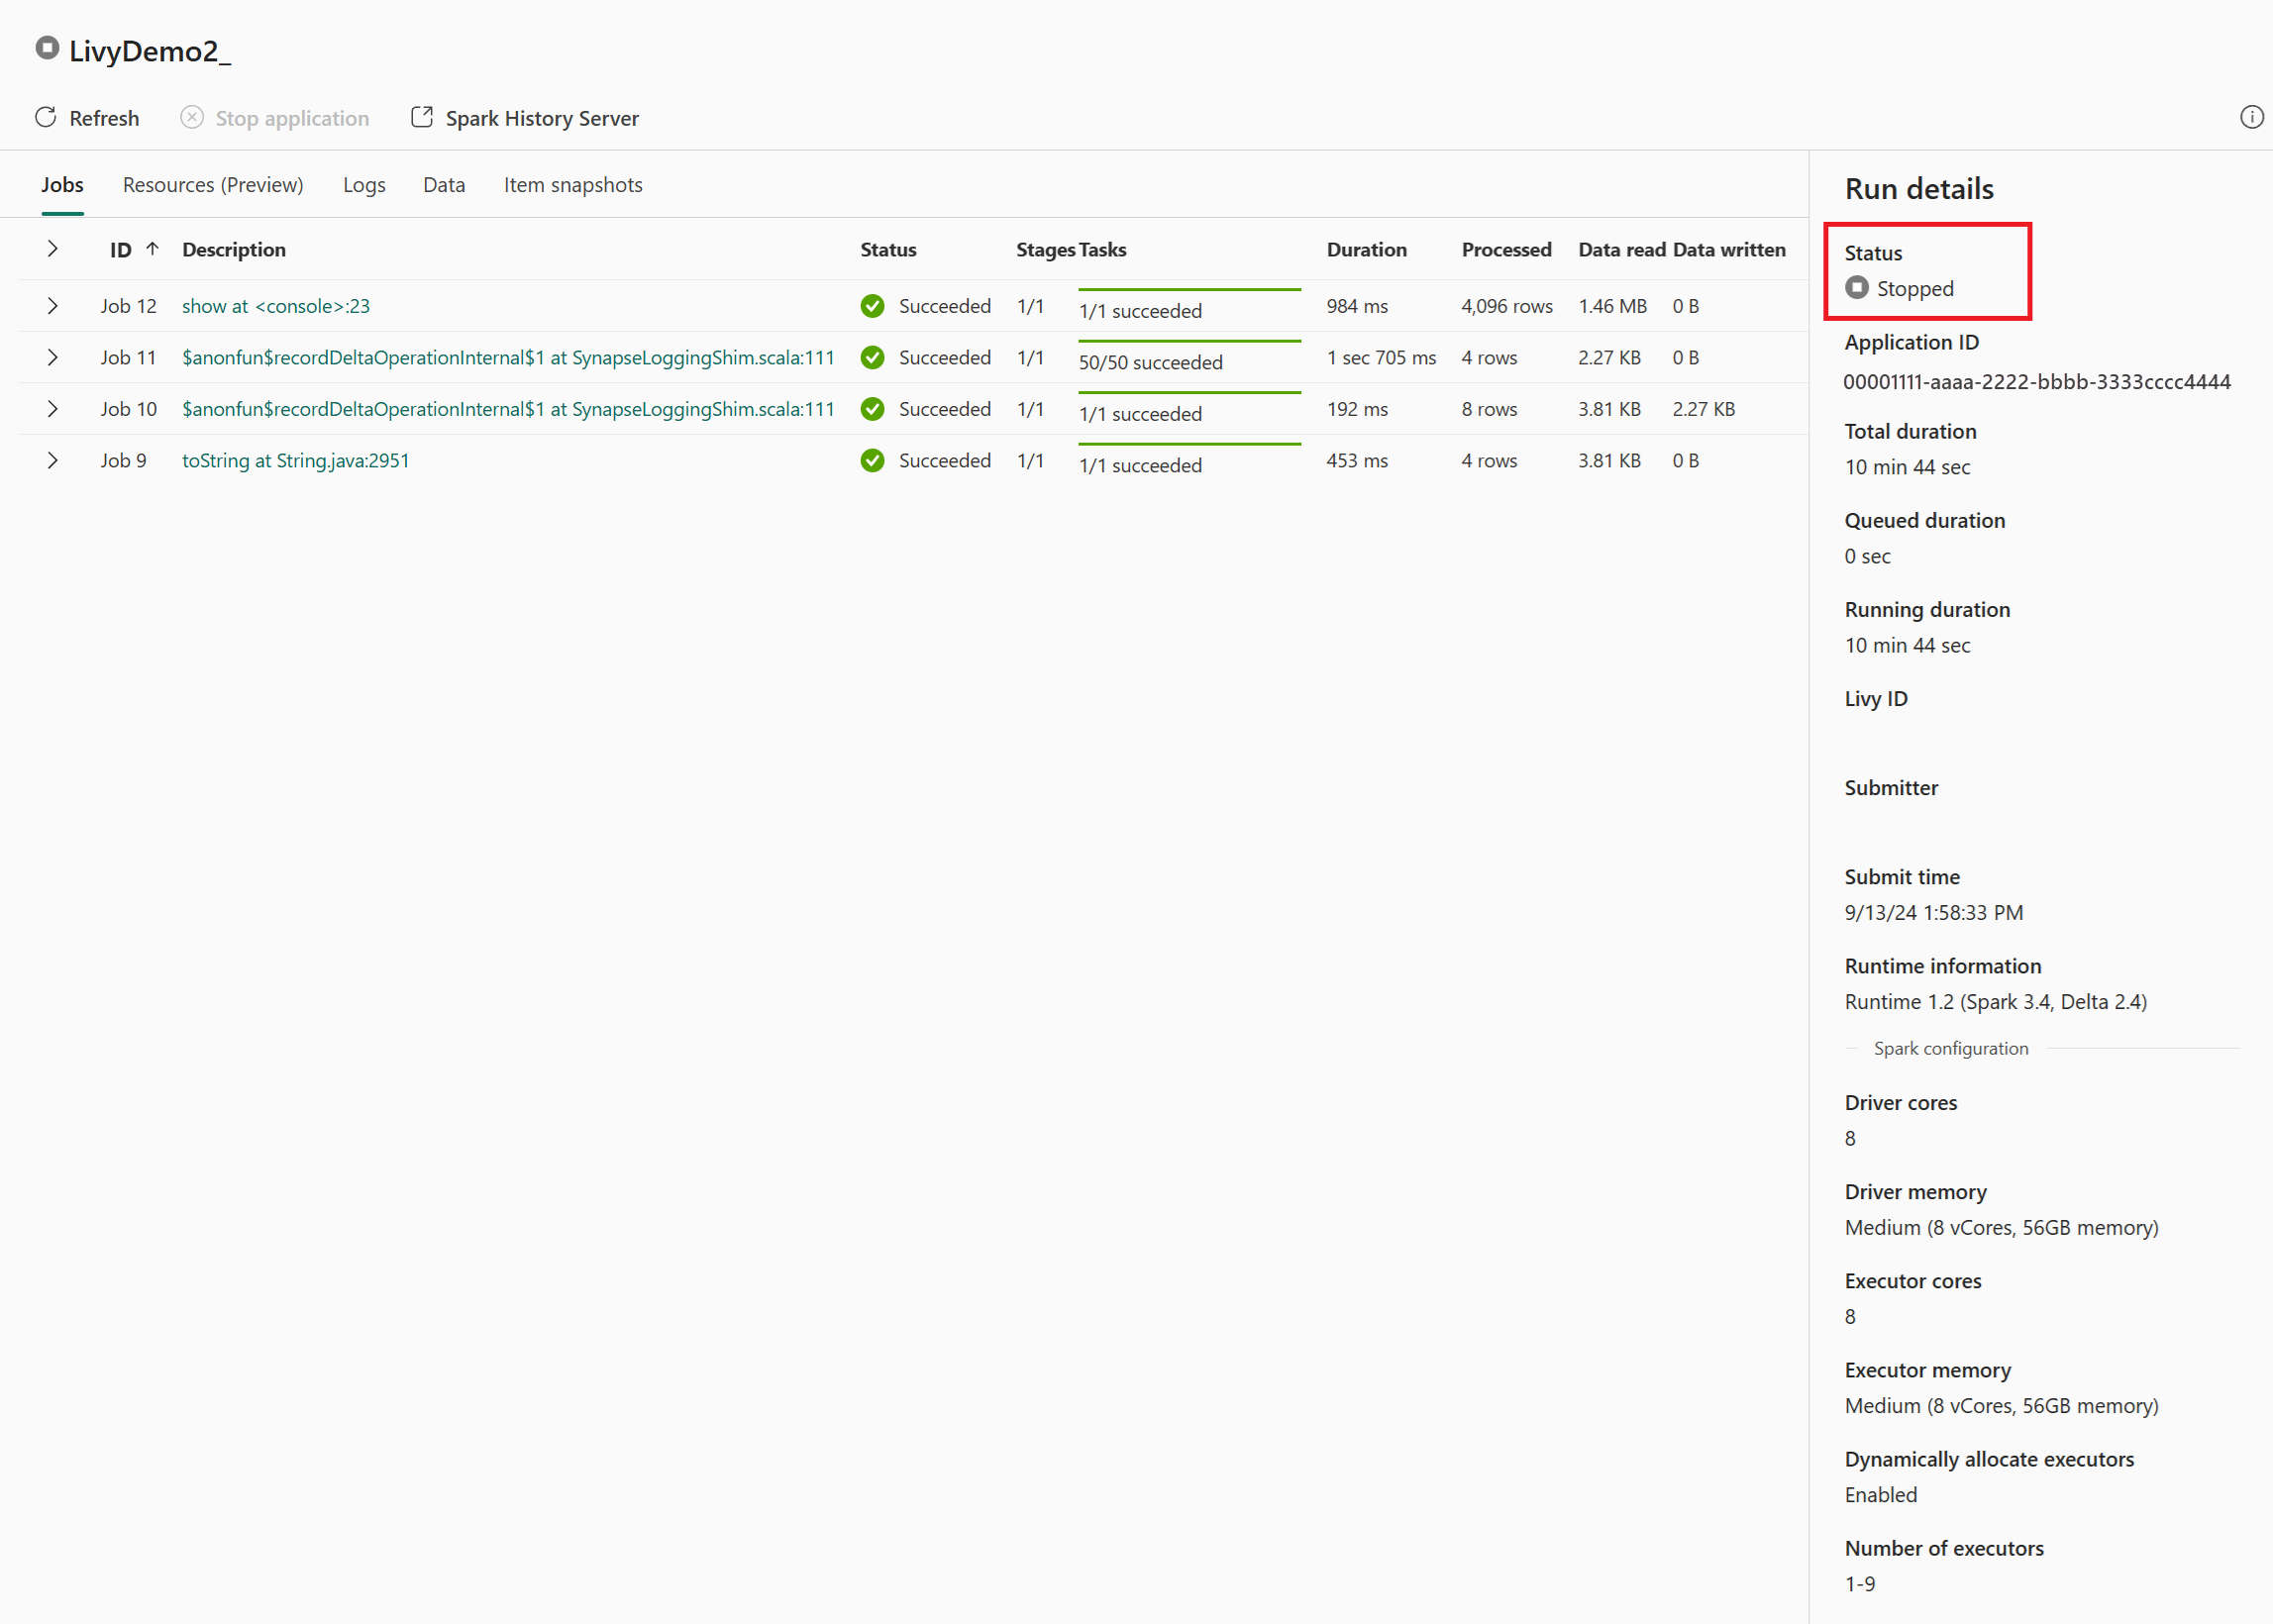
在此 Livy API 工作階段案例中,您可以看到先前的工作階段提交、執行詳細數據、Spark 版本和設定。 請注意右上方的已停止狀態。


總結整個流程,你需要一個遠端客戶端,例如 Visual Studio Code、Microsoft Entra app/SPN 憑證、Livy API 端點 URL、Lakehouse 認證,最後是 Session Livy API。