Xamarin.Forms CollectionView 教學課程
在嘗試此教學課程之前,您應該已成功完成:
- 建置您的第一個 Xamarin.Forms 應用程式 快速入門。
- StackLayout 教學課程。
- 方格教學課程。
- 標籤教學課程。
- 影像教學課程。
在本教學課程中,您會了解如何:
- 在 XAML 中建立 Xamarin.Forms
CollectionView。 - 在
CollectionView中填入資料。 - 回應所選取的
CollectionView項目。 - 自訂
CollectionView項目的外觀。
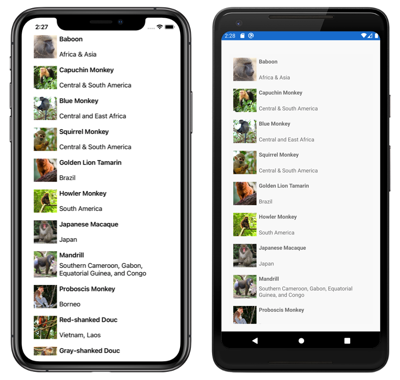
您將會使用 Visual Studio 2019 或 Visual Studio for Mac 建立示範如何自訂 CollectionView 外觀的簡單應用程式。 下列螢幕擷取畫面顯示的是最終的應用程式:
建立 CollectionView
若要完成此教學課程,您應該有 Visual Studio 2019 (最新版本),並已安裝 [使用 .NET 進行行動開發] 工作負載。 此外,您還需要配對的 Mac 才能在 iOS 上建置教學課程應用程式。 如需安裝 Xamarin 平台的相關資訊,請參閱安裝 Xamarin。 如需有關將 Visual Studio 2019 連線至 Mac 建置主機的相關資訊,請參閱為 Xamarin.iOS 開發與 Mac 配對。
啟動 Visual Studio,並建立名為 CollectionViewTutorial 的新空白Xamarin.Forms應用程式。
重要
本教學課程中的 C# 和 XAML 程式碼片段會要求將解決方案命名為 CollectionViewTutorial。 當您從本教學課程將程式碼複製到解決方案時,使用不同的名稱會導致建置錯誤。
如需有關建立之 .NET Standard 連結庫的詳細資訊,請參閱快速入門深入探討中的Xamarin.Forms應用程式剖析Xamarin.Forms。
在 [方案總管] 的 CollectionViewTutorial 專案中,按兩下 MainPage.xaml 將其開啟。 然後在 MainPage.xaml 中,移除所有範本程式碼,並取代為下列程式碼:
<?xml version="1.0" encoding="utf-8"?>
<ContentPage xmlns="http://xamarin.com/schemas/2014/forms"
             xmlns:x="http://schemas.microsoft.com/winfx/2009/xaml"
             x:Class="CollectionViewTutorial.MainPage">
    <StackLayout Margin="20,35,20,20">
        <CollectionView>
            <CollectionView.ItemsSource>
                <x:Array Type="{x:Type x:String}">
                  <x:String>Baboon</x:String>
                  <x:String>Capuchin Monkey</x:String>
                  <x:String>Blue Monkey</x:String>
                  <x:String>Squirrel Monkey</x:String>
                  <x:String>Golden Lion Tamarin</x:String>
                  <x:String>Howler Monkey</x:String>
                  <x:String>Japanese Macaque</x:String>
                </x:Array>
            </CollectionView.ItemsSource>
        </CollectionView>
    </StackLayout>
</ContentPage>
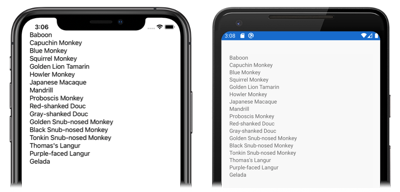
此程式碼會以宣告的方式定義頁面的使用者介面,其包含
StackLayout中的CollectionView。CollectionView.ItemsSource屬性會指定要顯示的項目,這些項目會定義在字串陣列中。在 Visual Studio 工具列中,按下 [啟動] 按鈕 (類似於 [播放] 按鈕的三角形按鈕),以啟動所選遠端 iOS 模擬器或 Android 模擬器內的應用程式:
在 Visual Studio 中,停止應用程式。
填入資料
CollectionView 會使用類型為 IEnumerable 的 ItemsSource 屬性來填入資料。 上一個步驟已使用字串陣列填入 XAML 中的 CollectionView。 不過,一般而言,CollectionView 會從程式碼中所定義且實作 IEnumerable 的集合填入資料。
在此練習中,您將修改 CollectionViewTutorial 專案,將資料從 List 中儲存的物件集合填入 CollectionView。
在 [方案總管] 的 CollectionViewTutorial 專案中,新增包含下列程式碼且名為
Monkey的類別:public class Monkey { public string Name { get; set; } public string Location { get; set; } public string ImageUrl { get; set; } public override string ToString() { return Name; } }此程式碼會定義
Monkey物件,此物件會儲存猴子影像的名稱、位置和 URL。 此外,該類別會覆寫ToString方法以傳回Name屬性值。在 [方案總管] 的 CollectionViewTutorial 專案中展開 MainPage.xaml,然後按兩下 MainPage.xaml.cs 將其開啟。 然後在 MainPage.xaml.cs 中,移除所有範本程式碼,並取代為下列程式碼:
using System.Collections.Generic;
using Xamarin.Forms;

namespace CollectionViewTutorial
{
    public partial class MainPage : ContentPage
    {
        public IList<Monkey> Monkeys { get; private set; }

        public MainPage()
        {
            InitializeComponent();

            Monkeys = new List<Monkey>();
            Monkeys.Add(new Monkey
            {
                Name = "Baboon",
                Location = "Africa & Asia",
                ImageUrl = "https://upload.wikimedia.org/wikipedia/commons/thumb/f/fc/Papio_anubis_%28Serengeti%2C_2009%29.jpg/200px-Papio_anubis_%28Serengeti%2C_2009%29.jpg"
            });

            Monkeys.Add(new Monkey
            {
                Name = "Capuchin Monkey",
                Location = "Central & South America",
                ImageUrl = "https://upload.wikimedia.org/wikipedia/commons/thumb/4/40/Capuchin_Costa_Rica.jpg/200px-Capuchin_Costa_Rica.jpg"
            });

            Monkeys.Add(new Monkey
            {
                Name = "Blue Monkey",
                Location = "Central and East Africa",
                ImageUrl = "https://upload.wikimedia.org/wikipedia/commons/thumb/8/83/BlueMonkey.jpg/220px-BlueMonkey.jpg"
            });

            Monkeys.Add(new Monkey
            {
                Name = "Squirrel Monkey",
                Location = "Central & South America",
                ImageUrl = "https://upload.wikimedia.org/wikipedia/commons/thumb/2/20/Saimiri_sciureus-1_Luc_Viatour.jpg/220px-Saimiri_sciureus-1_Luc_Viatour.jpg"
            });

            Monkeys.Add(new Monkey
            {
                Name = "Golden Lion Tamarin",
                Location = "Brazil",
                ImageUrl = "https://upload.wikimedia.org/wikipedia/commons/thumb/8/87/Golden_lion_tamarin_portrait3.jpg/220px-Golden_lion_tamarin_portrait3.jpg"
            });

            Monkeys.Add(new Monkey
            {
                Name = "Howler Monkey",
                Location = "South America",
                ImageUrl = "https://upload.wikimedia.org/wikipedia/commons/thumb/0/0d/Alouatta_guariba.jpg/200px-Alouatta_guariba.jpg"
            });

            Monkeys.Add(new Monkey
            {
                Name = "Japanese Macaque",
                Location = "Japan",
                ImageUrl = "https://upload.wikimedia.org/wikipedia/commons/thumb/c/c1/Macaca_fuscata_fuscata1.jpg/220px-Macaca_fuscata_fuscata1.jpg"
            });

            Monkeys.Add(new Monkey
            {
                Name = "Mandrill",
                Location = "Southern Cameroon, Gabon, Equatorial Guinea, and Congo",
                ImageUrl = "https://upload.wikimedia.org/wikipedia/commons/thumb/7/75/Mandrill_at_san_francisco_zoo.jpg/220px-Mandrill_at_san_francisco_zoo.jpg"
            });

            Monkeys.Add(new Monkey
            {
                Name = "Proboscis Monkey",
                Location = "Borneo",
                ImageUrl = "https://upload.wikimedia.org/wikipedia/commons/thumb/e/e5/Proboscis_Monkey_in_Borneo.jpg/250px-Proboscis_Monkey_in_Borneo.jpg"
            });

            Monkeys.Add(new Monkey
            {
                Name = "Red-shanked Douc",
                Location = "Vietnam, Laos",
                ImageUrl = "https://upload.wikimedia.org/wikipedia/commons/thumb/9/9f/Portrait_of_a_Douc.jpg/159px-Portrait_of_a_Douc.jpg"
            });

            Monkeys.Add(new Monkey
            {
                Name = "Gray-shanked Douc",
                Location = "Vietnam",
                ImageUrl = "https://upload.wikimedia.org/wikipedia/commons/thumb/0/0b/Cuc.Phuong.Primate.Rehab.center.jpg/320px-Cuc.Phuong.Primate.Rehab.center.jpg"
            });

            Monkeys.Add(new Monkey
            {
                Name = "Golden Snub-nosed Monkey",
                Location = "China",
                ImageUrl = "https://upload.wikimedia.org/wikipedia/commons/thumb/c/c8/Golden_Snub-nosed_Monkeys%2C_Qinling_Mountains_-_China.jpg/165px-Golden_Snub-nosed_Monkeys%2C_Qinling_Mountains_-_China.jpg"
            });

            Monkeys.Add(new Monkey
            {
                Name = "Black Snub-nosed Monkey",
                Location = "China",
                ImageUrl = "https://upload.wikimedia.org/wikipedia/commons/thumb/5/59/RhinopitecusBieti.jpg/320px-RhinopitecusBieti.jpg"
            });

            Monkeys.Add(new Monkey
            {
                Name = "Tonkin Snub-nosed Monkey",
                Location = "Vietnam",
                ImageUrl = "https://upload.wikimedia.org/wikipedia/commons/thumb/9/9c/Tonkin_snub-nosed_monkeys_%28Rhinopithecus_avunculus%29.jpg/320px-Tonkin_snub-nosed_monkeys_%28Rhinopithecus_avunculus%29.jpg"
            });

            Monkeys.Add(new Monkey
            {
                Name = "Thomas's Langur",
                Location = "Indonesia",
                ImageUrl = "https://upload.wikimedia.org/wikipedia/commons/thumb/3/31/Thomas%27s_langur_Presbytis_thomasi.jpg/142px-Thomas%27s_langur_Presbytis_thomasi.jpg"
            });

            Monkeys.Add(new Monkey
            {
                Name = "Purple-faced Langur",
                Location = "Sri Lanka",
                ImageUrl = "https://upload.wikimedia.org/wikipedia/commons/thumb/0/02/Semnopithèque_blanchâtre_mâle.JPG/192px-Semnopithèque_blanchâtre_mâle.JPG"
            });

            Monkeys.Add(new Monkey
            {
                Name = "Gelada",
                Location = "Ethiopia",
                ImageUrl = "https://upload.wikimedia.org/wikipedia/commons/thumb/1/13/Gelada-Pavian.jpg/320px-Gelada-Pavian.jpg"
            });

            BindingContext = this;
        }
    }
}
此程式碼會定義
IList<Monkey>類型的Monkeys屬性,並且將其初始化為類別建構函式中的空白清單。 接著,Monkey物件會新增至Monkeys集合,而頁面的BindingContext會設為MainPage物件。 如需屬性的詳細資訊BindingContext,請參閱數據系結指南中的Xamarin.Forms系結與系結內容。重要
BindingContext屬性會透過視覺化樹狀結構繼承。 因此,由於其已設定於ContentPage物件,所以ContentPage的子物件會繼承其值,包括CollectionView。在 MainPage.xaml 中修改
CollectionView宣告,以將ItemsSource屬性設定為Monkeys集合:<CollectionView ItemsSource="{Binding Monkeys}" />此程式碼資料會將
ItemsSource屬性繫結到Monkeys集合。 在執行階段中,CollectionView會針對Monkeys集合查看其BindingContext,並且從此集合填入資料。 如需數據系結的詳細資訊,請參閱 Xamarin.Forms 數據系結。在 Visual Studio 工具列中,按下 [啟動] 按鈕 (類似於 [播放] 按鈕的三角形按鈕),以啟動所選遠端 iOS 模擬器或 Android 模擬器內的應用程式:
CollectionView會顯示Monkeys集合中每個Monkey的Name屬性。 這是因為從集合顯示物件時,CollectionView預設會呼叫ToString方法 (已在Monkey類別中進行覆寫,進而傳回Name屬性值)。在 Visual Studio 中,停止應用程式。
回應項目選取
在 MainPage.xaml 中修改
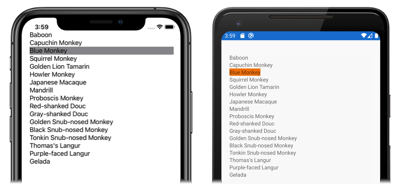
CollectionView宣告,以便其將SelectionMode屬性設定為Single,並設定SelectionChanged事件的處理常式:<CollectionView ItemsSource="{Binding Monkeys}" SelectionMode="Single" SelectionChanged="OnSelectionChanged" />此程式碼設定在
CollectionView中啟用單一項目選取,並將SelectionChanged事件設定為名為OnSelectionChanged的事件處理常式。 下一個步驟將會建立此事件處理常式。在 [方案總管] 的 CollectionViewTutorial 專案中展開 MainPage.xaml,然後按兩下 MainPage.xaml.cs 將其開啟。 然後,在 MainPage.xaml.cs 中,將
OnSelectionChanged事件處理常式新增至類別:void OnSelectionChanged(object sender, SelectionChangedEventArgs e) { Monkey selectedItem = e.CurrentSelection[0] as Monkey; }在
CollectionView中選取一個項目時,就會引發SelectionChanged事件,而這會執行OnSelectionChanged方法。 此方法的sender引數是負責引發事件的CollectionView物件,可用來存取CollectionView物件。OnSelectionChanged方法的SelectionChangedEventArgs引數會提供選取的項目。在 Visual Studio 工具列中,按下 [啟動] 按鈕 (類似於 [播放] 按鈕的三角形按鈕),以啟動所選遠端 iOS 模擬器或 Android 模擬器內的應用程式:
在
OnSelectionChanged事件處理常式中設定中斷點,然後在CollectionView中選取一個項目。 檢查selectedItem變數的值,以確保其包含您所選取項目的資料。在 Visual Studio 中,停止應用程式。
如需項目選取的詳細資訊,請參閱 Xamarin.Forms CollectionView 選取範圍。
自訂項目外觀
先前,已使用資料繫結在 CollectionView 中填入資料。 不過,儘管將資料繫結至集合,而集合中的每個物件已定義多個資料項目,但每個物件只會顯示單一資料項目 (Monkey 物件的 Name 屬性)。
在此練習中,您將修改 CollectionViewTutorial 專案,讓 CollectionView 在每個資料列中顯示多個資料項目。
在 MainPage.xaml 中修改
CollectionView宣告,以自訂每個資料項目的外觀:<CollectionView ItemsSource="{Binding Monkeys}" SelectionMode="Single" SelectionChanged="OnSelectionChanged"> <CollectionView.ItemTemplate> <DataTemplate> <Grid Padding="10" RowDefinitions="Auto, *" ColumnDefinitions="Auto, *"> <Image Grid.RowSpan="2" Source="{Binding ImageUrl}" Aspect="AspectFill" HeightRequest="60" WidthRequest="60" /> <Label Grid.Column="1" Text="{Binding Name}" FontAttributes="Bold" /> <Label Grid.Row="1" Grid.Column="1" Text="{Binding Location}" VerticalOptions="End" /> </Grid> </DataTemplate> </CollectionView.ItemTemplate> </CollectionView>此程式碼會將
CollectionView.ItemTemplate屬性設定為DataTemplate,以定義CollectionView中每個項目的外觀。DataTemplate的子系是Grid,其中包含Image物件和兩個Label物件。Image物件資料會將其Source屬性繫結至每個Monkey物件的ImageUrl屬性,而Label物件會將其Text屬性繫結至每個Monkey物件的Name和Location屬性。如需
CollectionView項目外觀的詳細資訊,請參閱定義項目外觀。 如需數據範本的詳細資訊,請參閱 Xamarin.Forms 數據範本。在 Visual Studio 工具列中,按下 [啟動] 按鈕 (類似於 [播放] 按鈕的三角形按鈕),以啟動所選遠端 iOS 模擬器或 Android 模擬器內的應用程式:
在 Visual Studio 中,停止應用程式。
恭喜!
恭喜您完成此教學課程,您已學會如何:
- 在 XAML 中建立 Xamarin.Forms
CollectionView。 - 在
CollectionView中填入資料。 - 回應所選取的
CollectionView項目。 - 自訂
CollectionView項目的外觀。
下一步
若要深入瞭解使用 建立行動應用程式 Xamarin.Forms的基本概念,請繼續進行快顯教學課程。
相關連結
在這個區段有遇到問題嗎? 如果有,請提供意見反應,好讓我們可以改善這個區段。


