Xamarin.Forms 本機資料庫教學課程
在嘗試此教學課程之前,您應該已成功完成:
- 建置您的第一個 Xamarin.Forms 應用程式 快速入門。
- StackLayout 教學課程。
- 按鈕教學課程。
- 項目教學課程。
- CollectionView 教學課程。
在本教學課程中,您會了解如何:
- 使用 NuGet 封裝管理員 將 SQLite.NET 新增至Xamarin.Forms專案。
- 建立資料存取類別。
- 取用資料存取類別。
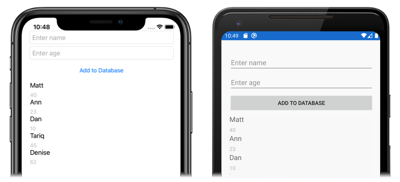
您將會使用 Visual Studio 2019 或 Visual Studio for Mac 來建立能示範如何在本機 SQLite.NET 資料庫中儲存資料的簡單應用程式。 下列螢幕擷取畫面顯示的是最終的應用程式:
新增 SQLite.NET
若要完成此教學課程,您應該有 Visual Studio 2019 (最新版本),並已安裝 [使用 .NET 進行行動開發] 工作負載。 此外,您還需要配對的 Mac 才能在 iOS 上建置教學課程應用程式。 如需安裝 Xamarin 平台的相關資訊,請參閱安裝 Xamarin。 如需有關將 Visual Studio 2019 連線至 Mac 建置主機的相關資訊,請參閱為 Xamarin.iOS 開發與 Mac 配對。
啟動 Visual Studio,並建立名為 LocalDatabaseTutorial 的新空白Xamarin.Forms應用程式。
重要
本教學課程中的 C# 和 XAML 程式碼片段會要求將解決方案命名為 LocalDatabaseTutorial。 當您從本教學課程將程式碼複製到解決方案時,使用不同的名稱會導致建置錯誤。
如需有關建立之 .NET Standard 連結庫的詳細資訊,請參閱快速入門深入探討中的Xamarin.Forms應用程式剖析Xamarin.Forms。
在 [方案總管] 中選取 [LocalDatabaseTutorial] 專案,並以滑鼠右鍵按一下 [管理 NuGet 套件...] 來將其選取:
![[新增 NuGet 套件] 功能表項目 螢幕擷取畫面:已選取 [管理 NuGet 套件] 功能表項目](images/vs/add-nuget-packages.png)
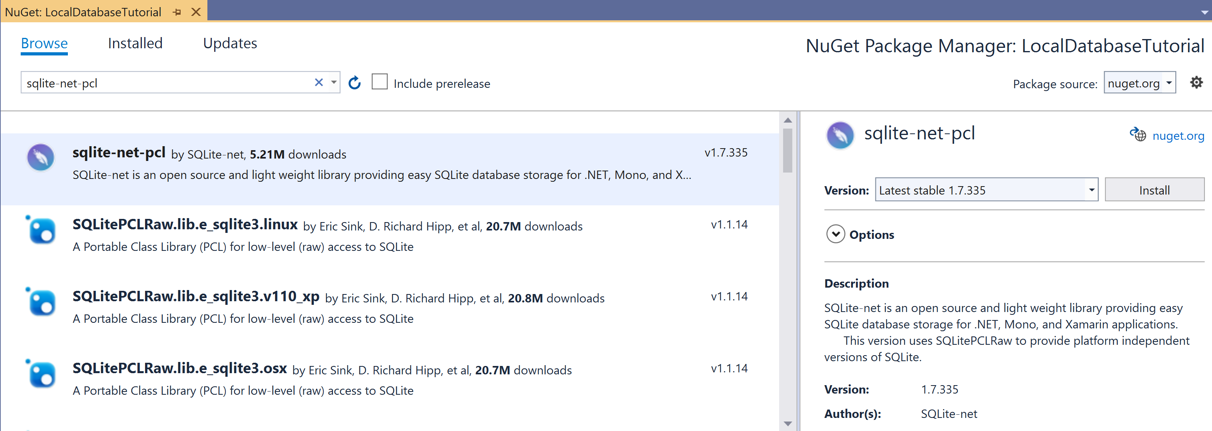
在 [NuGet 套件管理員] 中選取 [瀏覽] 索引標籤,搜尋 sqlite-net-pcl NuGet 套件並加以選取,然後按一下 [安裝] 按鈕,將其新增至專案:

注意
有許多具有類似名稱的 NuGet 套件。 正確的套件有下列屬性:
- 作者: SQLite-net
- NuGet 連結:sqlite-net-pcl
不論套件名稱為何,此 NuGet 套件可用於 .NET Standard 專案。
此套件會用來將資料庫作業併入應用程式。
重要
SQLite.NET 是 praeclarum/sqlite-net 存放庫所支援的第三方連結庫。
建置解決方案以確定沒有任何錯誤。
建立資料存取類別
在此練習中,您會將資料存取類別新增至 LocalDatabaseTutorial 專案,該專案用於將人員相關資料保存到資料庫。
在 [方案總管] 的 LocalDatabaseTutorial 專案中,將名為
Person的新類別新增到此專案。 然後在 Person.cs 中,移除所有範本程式碼,並取代為下列程式碼:using SQLite; namespace LocalDatabaseTutorial { public class Person { [PrimaryKey, AutoIncrement] public int ID { get; set; } public string Name { get; set; } public int Age { get; set; } } }此程式碼會定義
Person類別,以儲存應用程式中每個人員的相關資料。ID屬性會以PrimaryKey和AutoIncrement屬性標示,以確保資料庫中的每個Person執行個體都具有 SQLite.NET 所提供的唯一識別碼。在 [方案總管] 的 LocalDatabaseTutorial 專案中,將名為
Database的新類別新增到此專案。 然後在 Database.cs 中,移除所有範本程式碼,並取代為下列程式碼:using System.Collections.Generic; using System.Threading.Tasks; using SQLite; namespace LocalDatabaseTutorial { public class Database { readonly SQLiteAsyncConnection _database; public Database(string dbPath) { _database = new SQLiteAsyncConnection(dbPath); _database.CreateTableAsync<Person>().Wait(); } public Task<List<Person>> GetPeopleAsync() { return _database.Table<Person>().ToListAsync(); } public Task<int> SavePersonAsync(Person person) { return _database.InsertAsync(person); } } }此類別包含的程式碼可建立資料庫、從中讀取資料,以及將資料寫入其中。 此程式碼會使用非同步 SQLite.Net API,以將資料庫作業移至背景執行緒。 此外,
Database建構函式會採用資料庫檔案的路徑作為引數。 此路徑會由下一個練習中的App類別所提供。在 [方案總管] 中的 LocalDatabaseTutorial 專案中,展開 App.xaml,然後按兩下 App.xaml.cs 將其開啟。 接著,在 App.xaml.cs 中,移除所有範本程式碼,並取代為下列程式碼:
using System;
using System.IO;
using Xamarin.Forms;

namespace LocalDatabaseTutorial
{
    public partial class App : Application
    {
        static Database database;

        public static Database Database
        {
            get
            {
                if (database == null)
                {
                    database = new Database(Path.Combine(Environment.GetFolderPath(Environment.SpecialFolder.LocalApplicationData), "people.db3"));
                }
                return database;
            }
        }

        public App()
        {
            InitializeComponent();

            MainPage = new MainPage();
        }

        protected override void OnStart()
        {
            // Handle when your app starts
        }

        protected override void OnSleep()
        {
            // Handle when your app sleeps
        }

        protected override void OnResume()
        {
            // Handle when your app resumes
        }
    }
}
此程式碼會定義
Database屬性,該屬性會建立新的Database執行個體作為單例。 系統會將本機檔案路徑和檔名 (代表儲存資料庫的位置) 當作引數傳遞至Database類別建構函式。重要
將資料庫公開為唯一資料庫的優點為,所建立的單一資料庫連線會在應用程式執行時保持開啟,因此可避免每次執行資料庫作業時開啟和關閉資料庫檔案的費用。
建置解決方案以確定沒有任何錯誤。
取用資料存取類別
在此練習中,您將建立使用者介面來使用先前建立的資料存取類別。
在 [方案總管] 的 LocalDatabaseTutorial 專案中,按兩下 MainPage.xaml 將其開啟。 然後在 MainPage.xaml 中,移除所有範本程式碼,並取代為下列程式碼:
<?xml version="1.0" encoding="utf-8"?>
<ContentPage xmlns="http://xamarin.com/schemas/2014/forms"
             xmlns:x="http://schemas.microsoft.com/winfx/2009/xaml"
             x:Class="LocalDatabaseTutorial.MainPage">
    <StackLayout Margin="20,35,20,20">
        <Entry x:Name="nameEntry"
               Placeholder="Enter name" />
        <Entry x:Name="ageEntry"
               Placeholder="Enter age" />
        <Button Text="Add to Database"
                Clicked="OnButtonClicked" />
        <CollectionView x:Name="collectionView">
            <CollectionView.ItemTemplate>
                <DataTemplate>
                    <StackLayout>
                        <Label Text="{Binding Name}"
                               FontSize="Medium" />
                        <Label Text="{Binding Age}"
                               TextColor="Silver"
                               FontSize="Small" />
                    </StackLayout>
                </DataTemplate>
            </CollectionView.ItemTemplate>
        </CollectionView>
    </StackLayout>
</ContentPage>
此程式碼會以宣告的方式定義頁面的使用者介面,其包含兩個
Entry執行個體,Button和StackLayout中的CollectionView。 每個Entry都有其Placeholder屬性集,用來指定在使用者輸入之前顯示的預留位置文字。Button會將其Clicked事件設定為名為OnButtonClicked的事件處理常式 (將在下一個步驟中建立)。CollectionView會將其ItemTemplate屬性設定為DataTemplate,以使用StackLayout和兩個Label物件定義CollectionView中每個資料列的外觀。Label物件會將其Text屬性分別繫結到每個Person物件的Name和Age屬性。此外,
Entry執行個體和CollectionView會有以x:Name屬性指定的名稱。 這可讓程式碼後置檔案使用指派的名稱來存取這些物件。在 [方案總管] 的 LocalDatabaseTutorial 專案中展開 MainPage.xaml,然後按兩下 MainPage.xaml.cs 將其開啟。 然後,在 MainPage.xaml.cs 中,將
OnAppearing覆寫和OnButtonClicked事件處理常式新增至類別:protected override async void OnAppearing() { base.OnAppearing(); collectionView.ItemsSource = await App.Database.GetPeopleAsync(); } async void OnButtonClicked(object sender, EventArgs e) { if (!string.IsNullOrWhiteSpace(nameEntry.Text) && !string.IsNullOrWhiteSpace(ageEntry.Text)) { await App.Database.SavePersonAsync(new Person { Name = nameEntry.Text, Age = int.Parse(ageEntry.Text) }); nameEntry.Text = ageEntry.Text = string.Empty; collectionView.ItemsSource = await App.Database.GetPeopleAsync(); } }OnAppearing方法會將儲存在資料庫中的所有資料填入CollectionView。OnButtonClicked方法 (點選Button時執行) 會先將輸入的資料儲存到資料庫中,再清除兩個Entry執行個體,然後重新整理CollectionView中的資料。注意
OnAppearing方法覆寫會在ContentPage配置完成後 (但在變成可見狀態之前) 執行。 因此,這是設定檢視內容 Xamarin.Forms 的好位置。在 Visual Studio 工具列中,按下 [啟動] 按鈕 (類似於 [播放] 按鈕的三角形按鈕),以啟動所選遠端 iOS 模擬器或 Android 模擬器內的應用程式。
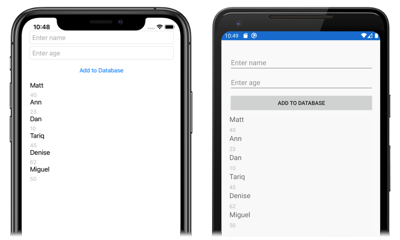
輸入數個資料項目,點選每個資料項目的
Button。 這會將資料儲存至資料庫,並以所有資料庫資料重新填入CollectionView:在 Visual Studio 中,停止應用程式。
如需 中 Xamarin.Forms本機資料庫的詳細資訊,請參閱 Xamarin.Forms 本機資料庫(指南)
恭喜!
恭喜您完成此教學課程,您已學會如何:
- 使用 NuGet 封裝管理員 將 SQLite.NET 新增至Xamarin.Forms專案。
- 建立資料存取類別。
- 取用資料存取類別。
下一步
若要深入瞭解使用 Xamarin.Forms建立行動應用程式的基本概念,請繼續進行Web服務教學課程。
相關連結
在這個區段有遇到問題嗎? 如果有,請提供意見反應,好讓我們可以改善這個區段。

![[新增 NuGet 套件] 功能表項目 螢幕擷取畫面:已選取 [新增 NuGet 套件] 功能表項目](images/vsmac/add-nuget-packages.png)

