在本使用 ASP.NET Core 進行 C# 開發的教學課程中,您會在 Visual Studio 中建立 C# ASP.NET Core Web 應用程式。
本教學課程會示範如何:
- 建立 Visual Studio 專案
- 建立 C# ASP.NET Core Web 應用程式
- 對 Web 應用程式進行變更
- 探索 IDE 功能
- 執行 Web 應用程式
先決條件
若要完成本教學課程,您需要:
- 已安裝 Visual Studio。 如需免費版本,請流覽 Visual Studio 下載頁面。 如需升級至最新 Visual Studio 版本的詳細資訊,請參閱 Visual Studio 更新。
- 已安裝的 ASP.NET 和 Web 開發 工作負載。 若要在 Visual Studio 中驗證或安裝此工作負載,請選取 [工具]>[取得工具和功能]。 如需詳細資訊,請參閱 變更工作負載或的個別元件。
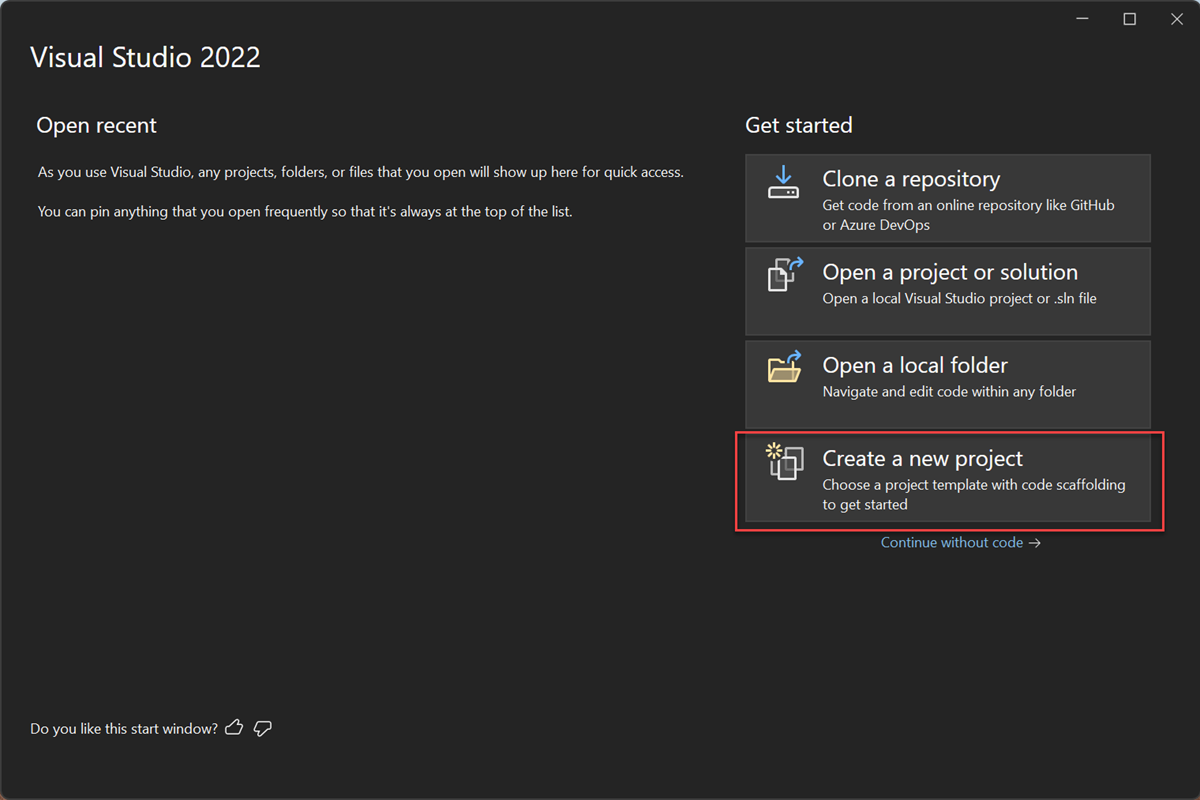
建立專案
首先,您建立 ASP.NET 核心專案。 專案類型隨附您建立功能齊全的網站所需的所有範本檔案。
在 [開始] 視窗上,選取 [建立新專案]。
在 [建立新專案 ] 視窗中,從 [語言] 清單中選取 C# 。 接下來,從 [所有平臺] 清單中選取 [Windows],然後從 [所有專案類型] 清單中選取 Web。
套用語言、平臺和專案類型篩選之後,請選取 ASP.NET Core Web App (Razor Pages) 範本,然後選取 [ 下一步]。
![螢幕擷取畫面顯示在 [建立新專案] 頁面上選取並反白顯示的 ASP.NET Core Web App 專案範本。](media/vs-2022/csharp-create-new-project-aspnet-core.png?view=vs-2022)
在 [設定您的新專案] 視窗中,在 [專案名稱] 欄位中輸入 MyCoreApp。 然後選取下一步。
![螢幕擷取畫面顯示 [在 Visual Studio 中設定您的新專案] 視窗,並在 [專案名稱] 欄位中輸入 MyCoreApp。](media/vs-2022/csharp-name-your-aspnet-app.png?view=vs-2022)
在 [其他資訊] 視窗中,確認 .NET 8.0 出現在 [目標架構] 欄位中。
在此視窗中,您可以啟用容器支援並新增驗證支援。 驗證 型別 的下拉式功能表具有以下四個選項:
- 無:無驗證。
- 個別帳戶:這些驗證會儲存在本機或 Azure 型資料庫中。
- Microsoft 身分識別平台:此選項會使用 Microsoft Entra ID 或 Microsoft 365 進行驗證。
- Windows:適用於內網應用。
取消勾選啟用 容器支援 方塊,然後針對驗證類型選取 無 。
![螢幕擷取畫面,顯示 [其他資訊] 視窗中的預設設定,其中目標架構設定為 .NET 8.0。](media/vs-2022/aspnet-core-enable-container-window.png?view=vs-2022)
選取 ,創建。
![螢幕擷取畫面顯示在 [建立新專案] 頁面上選取並反白顯示的 ASP.NET Core Web App 專案範本。](media/vs-2022/csharp-create-new-project-aspnet-core.png?view=vs-2022#lightbox)
![螢幕擷取畫面顯示 [在 Visual Studio 中設定您的新專案] 視窗,並在 [專案名稱] 欄位中輸入 MyCoreApp。](media/vs-2022/csharp-name-your-aspnet-app.png?view=vs-2022#lightbox)
![螢幕擷取畫面,顯示 [其他資訊] 視窗中的預設設定,其中目標架構設定為 .NET 8.0。](media/vs-2022/aspnet-core-additional-information.png?view=vs-2022#lightbox)
Visual Studio 會開啟您的新專案。
在 [開始] 視窗上,選取 [建立新專案]。

在 [建立新專案 ] 視窗中,從 [語言] 清單中選取 C# 。 接下來,從 [所有平臺] 清單中選取 [Windows],然後從 [所有專案類型] 清單中選取 Web。
套用語言、平臺和專案類型篩選之後,請選取 ASP.NET Core Web App (Razor Pages) 範本,然後選取 [ 下一步]。
![螢幕擷取畫面顯示在 [建立新專案] 頁面上選取並反白顯示的 ASP.NET Core Web App 專案範本。](media/visualstudio/csharp-create-new-project-aspnet-core.png?view=vs-2022)
在 [設定您的新專案] 視窗中,在 [專案名稱] 欄位中輸入 MyCoreApp。 然後選取下一步。
![螢幕擷取畫面顯示 [在 Visual Studio 中設定您的新專案] 視窗,並在 [專案名稱] 欄位中輸入 MyCoreApp。](media/visualstudio/csharp-name-your-aspnet-app.png?view=vs-2022)
在 「附加資訊 」視窗中,請確認 .NET 9.0 是否出現在 框架 欄位中。
在此視窗中,您可以啟用容器支援並新增驗證支援。 驗證 型別 的下拉式功能表具有以下四個選項:
- 無:無驗證。
- 個別帳戶:這些驗證會儲存在本機或 Azure 型資料庫中。
- Microsoft 身分識別平台:此選項會使用 Microsoft Entra ID 或 Microsoft 365 進行驗證。
- Windows:適用於內網應用。
取消勾選啟用 容器支援 方塊,然後針對驗證類型選取 無 。
![螢幕擷取畫面,顯示 [其他資訊] 視窗中的預設設定,其中目標架構設定為 .NET 8.0。](media/visualstudio/aspnet-core-enable-container-window.png?view=vs-2022)
選取 ,創建。
Visual Studio 會開啟您的新專案。
關於您的解決方案
此解決方案遵循 Razor Page 設計模式。 它與模型-視圖-控制器(MVC)設計模式有不同之處,因為它經過簡化,可以在 Razor 頁面本身內包含模型和控制器的程式碼。
瀏覽您的解決方案
專案範本會建立具有名為 MyCoreApp 的單一 ASP.NET 核心專案的解決方案。 選取 [方案總管] 索引標籤以檢視其內容。
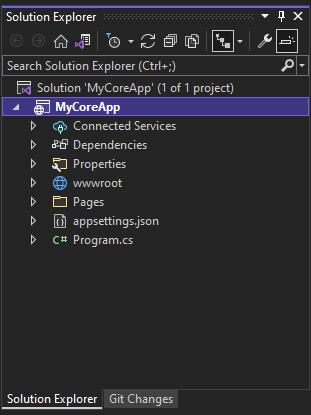
展開 Pages 資料夾。
![螢幕擷取畫面顯示 [方案總管] 中 [頁面] 資料夾的內容。](media/vs-2022/csharp-aspnet-solution-explorer-pages.png?view=vs-2022)
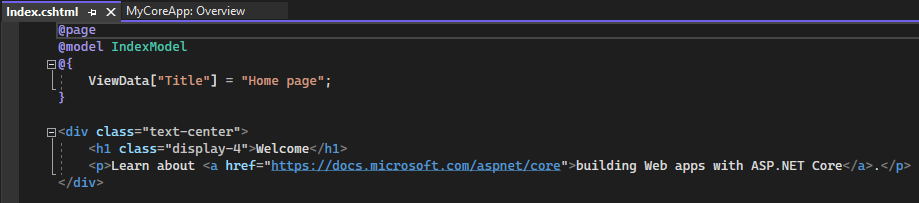
選取 Index.cshtml 檔案,然後在程式碼編輯器中檢視。
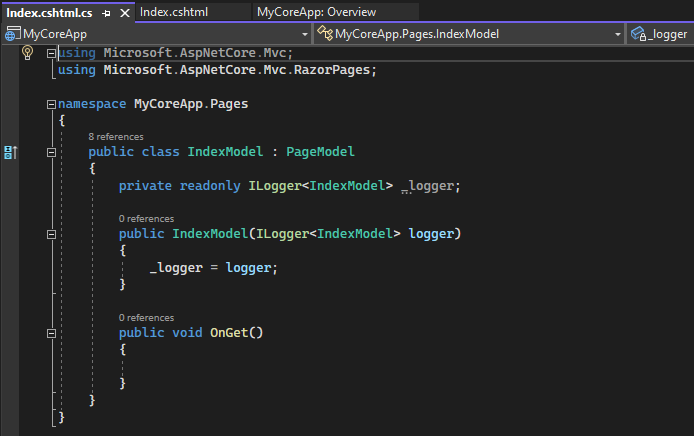
每個 .cshtml 檔案都有相關聯的程式碼檔案。 若要在編輯器中開啟程式碼檔,請在 [方案總管] 中展開 Index.cshtml 節點,然後選取 Index.cshtml.cs 檔案。
![螢幕擷取畫面顯示在 Visual Studio 的 [方案總管] 中選取的 Index.cshtml 檔案。](media/vs-2022/csharp-aspnet-choose-index-cshtml.png?view=vs-2022)
在程式碼編輯器中檢視 Index.cshtml.cs 檔案。
專案包含一個 wwwroot 資料夾,這是您網站的根目錄。 展開資料夾以檢視其內容。
![螢幕快照顯示在 Visual Studio 的 [方案總管] 中選取的 w w w 根資料夾。](media/vs-2022/csharp-aspnet-razor-solution-explorer-wwwroot.png?view=vs-2022)
您可以將靜態網站內容 (例如 CSS、影像和 JavaScript 程式庫) 直接放在您想要的路徑中。
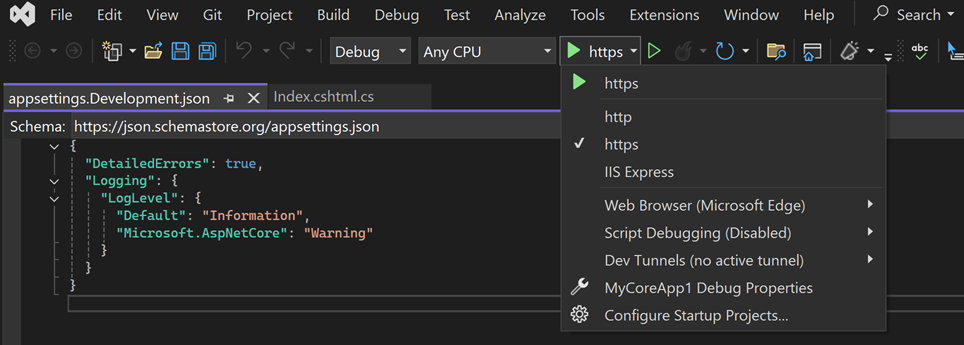
專案也包含在執行階段管理 Web 應用程式的組態檔。 預設應用程式 組態 儲存在 appsettings.json中。 不過,您可以使用 appsettings.Development.json覆寫這些設定。 展開 appsettings.json 檔案以檢視 appsettings.Development.json 檔案。
![螢幕擷取畫面顯示選取並展開 appsettings.json,這會在 Visual Studio 的 [方案總管] 中公開 appsettings.Development.json。](media/vs-2022/csharp-aspnet-razor-solution-explorer-appsettingsjson.png?view=vs-2022)
執行、偵錯及進行變更
在工具列中,選取 https 按鈕,以偵錯模式建置和執行應用程式。 或者,按 F5,或從功能表列移至 [偵錯>] 開始偵錯 。
備註
您可能還會收到一則訊息,詢問您是否要接受 ASP.NET Core SSL 憑證。 若要在網頁瀏覽器中檢視程式碼,請選取 [ 是],然後在收到後續安全性警告訊息時選取 [ 是 ]。 深入瞭解如何在 ASP.NET Core 中強制執行 SSL。
Visual Studio 會啟動瀏覽器視窗。 然後,您應該會在菜單欄中看到“主頁”和“隱私”頁面。
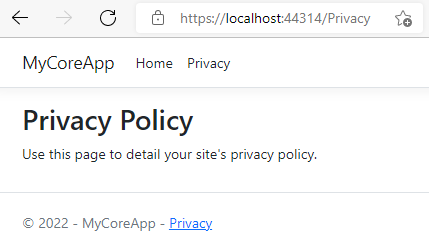
從功能表列中選取隱私權。 瀏覽器中的 [隱私權] 頁面會轉譯 Privacy.cshtml 檔案中設定的文字。
返回 Visual Studio,然後按 Shift+F5 停止偵錯。 此動作會關閉瀏覽器視窗中的專案。
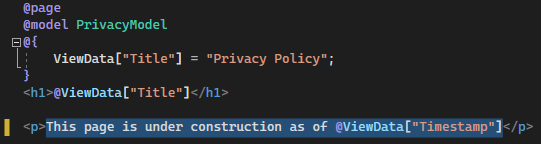
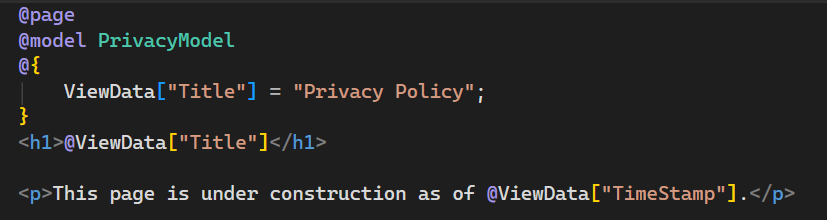
在 Visual Studio 中,開啟 Privacy.cshtml 進行編輯。 接下來,刪除句子「 使用此頁面詳細說明您網站的隱私權政策 」,並將其替換為「 此頁面截至 [“時間戳記”] 正在 @ViewData建構中)。
現在,讓我們進行程式碼變更。 選取 Privacy.cshtml.cs。 然後,選取下列捷徑來清除
using檔案頂端的指示詞:將滑鼠移至或選取灰色的
using指示詞。 「快速動作」燈泡會顯示在插入符號的下方或於左邊界。 選取燈泡,然後選擇[移除不必要的使用]旁的擴展箭頭。![螢幕擷取畫面顯示 Visual Studio Code 編輯器中的 Privacy.cshtml 檔案,其中 [快速動作] 工具提示已開啟,並醒目提示 [預覽變更]。](media/vs-2022/csharp-aspnet-remove-unnecessary-usings.png?view=vs-2022)
現在選取 [預覽變更] 以查看變更。
![螢幕擷取畫面顯示 [預覽變更] 對話方塊。對話方塊會顯示要移除的指示詞,並在移除之後預覽程式碼變更。](media/vs-2022/csharp-aspnet-preview-changes.png?view=vs-2022)
選取 ,然後套用。 Visual Studio 會從檔案中刪除不必要的
using指示詞。接下來,使用 DateTime.ToString 方法,為您的文化特性或區域格式化的目前日期建立字串。
- 方法的第一個引數指定日期的顯示方式。 此範例使用格式指定元 (
d) 來指出簡短的日期格式。 - 第二個引數是 CultureInfo 物件,可指定日期的文化特性或區域。 第二個參數決定了日期中任何單詞的語言以及使用的分隔符類型。
將
OnGet()中方法的主體變更為下列程式碼:public void OnGet() { string dateTime = DateTime.Now.ToString("d", new CultureInfo("en-US")); ViewData["TimeStamp"] = dateTime; }- 方法的第一個引數指定日期的顯示方式。 此範例使用格式指定元 (
請注意,下列
using指示詞會自動新增至檔案頂端:using System.Globalization;System.Globalization包含 CultureInfo 類別。按 F5 在網頁瀏覽器中開啟您的專案。
在網站頂端,選取 [隱私權] 以檢視您的變更。
![螢幕擷取畫面顯示 MyCoreApp 的 [隱私權] 頁面,其中包含新增日期所做的變更。](media/vs-2022/csharp-aspnet-browser-page-privacy-changed.png?view=vs-2022)
關閉網頁瀏覽器,按 Shift+F5 停止偵錯。
變更首頁
在 [方案總管] 中,展開 [頁面 ] 資料夾,然後選取 [Index.cshtml]。
![螢幕快照顯示在 [方案總管] 的 [頁面] 節點下選取的 Index.cshtml。](media/vs-2022/csharp-aspnet-index-page-cshtml-file.png?view=vs-2022)
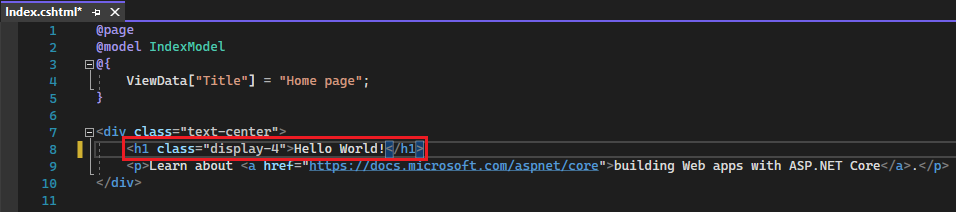
Index.cshtml 檔案相當於網頁應用程式中的首頁,在瀏覽器中執行。
在程式碼編輯器中,您會看到 首頁 上顯示之文字的 HTML 程式碼。
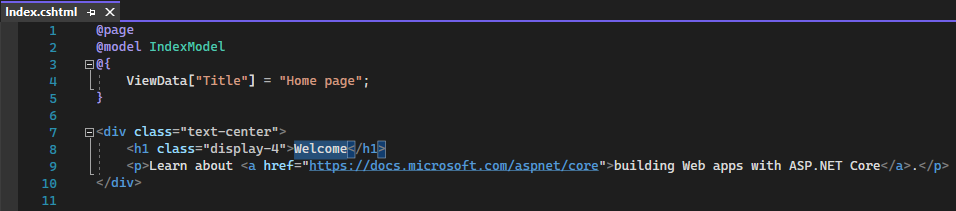
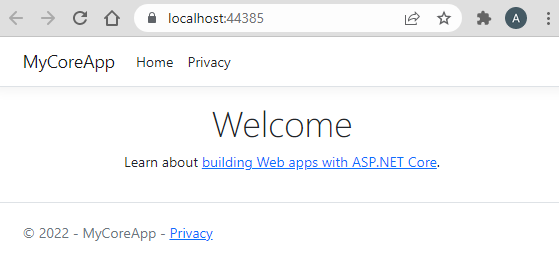
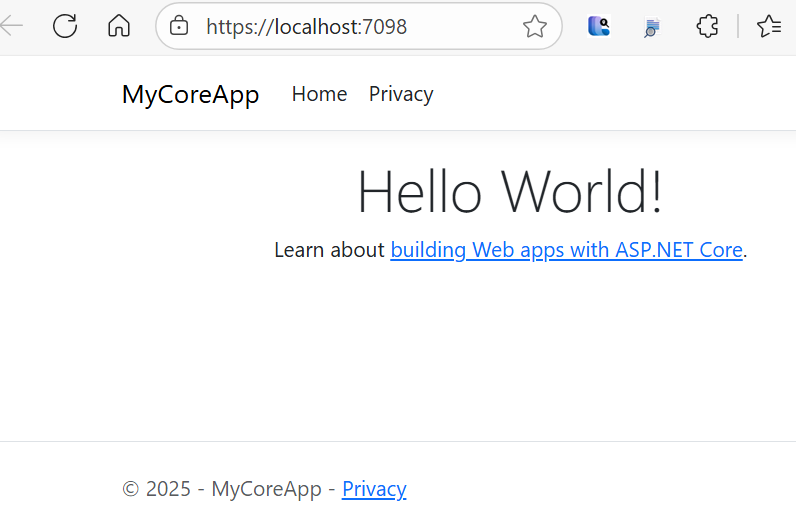
將 歡迎文字 替換為 Hello World!
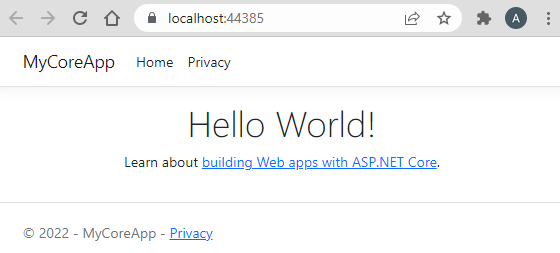
選取 https 或按 Ctrl+F5 執行應用程式,並在網頁瀏覽器中開啟它。

在網頁瀏覽器中,您會在 首頁 上看到新的變更。
關閉網頁瀏覽器,按 Shift+F5 停止偵錯,然後儲存您的專案。 您現在可以關閉 Visual Studio。
瀏覽您的解決方案
專案範本會建立具有名為 MyCoreApp 的單一 ASP.NET 核心專案的解決方案。 選取 [方案總管] 索引標籤以檢視其內容。

展開 Pages 資料夾。
![螢幕擷取畫面顯示 [方案總管] 中 [頁面] 資料夾的內容。](media/visualstudio/csharp-aspnet-solution-explorer-pages.png?view=vs-2022)
選取 Index.cshtml 檔案,然後在程式碼編輯器中檢視。

每個 .cshtml 檔案都有相關聯的程式碼檔案。 若要在編輯器中開啟程式碼檔,請在 [方案總管] 中展開 Index.cshtml 節點,然後選取 Index.cshtml.cs 檔案。
![螢幕擷取畫面顯示在 Visual Studio 的 [方案總管] 中選取的 Index.cshtml 檔案。](media/visualstudio/csharp-aspnet-choose-index-cshtml.png?view=vs-2022)
在程式碼編輯器中檢視 Index.cshtml.cs 檔案。

專案包含一個 wwwroot 資料夾,這是您網站的根目錄。 展開資料夾以檢視其內容。
![螢幕快照顯示在 Visual Studio 的 [方案總管] 中選取的 w w w 根資料夾。](media/visualstudio/csharp-aspnet-razor-solution-explorer-wwwroot.png?view=vs-2022)
您可以將靜態網站內容 (例如 CSS、影像和 JavaScript 程式庫) 直接放在您想要的路徑中。
專案也包含在執行階段管理 Web 應用程式的組態檔。 預設應用程式 組態 儲存在 appsettings.json中。 不過,您可以使用 appsettings.Development.json覆寫這些設定。 展開 appsettings.json 檔案以檢視 appsettings.Development.json 檔案。
![螢幕擷取畫面顯示選取並展開 appsettings.json,這會在 Visual Studio 的 [方案總管] 中公開 appsettings.Development.json。](media/visualstudio/csharp-aspnet-razor-solution-explorer-appsettingsjson.png?view=vs-2022)
執行、偵錯及進行變更
在工具列中,選取 https 按鈕,以偵錯模式建置和執行應用程式。 或者,按 F5,或從功能表列移至 [偵錯>] 開始偵錯 。

備註
您可能還會收到一則訊息,詢問您是否要接受 ASP.NET Core SSL 憑證。 若要在網頁瀏覽器中檢視程式碼,請選取 [ 是],然後在收到後續安全性警告訊息時選取 [ 是 ]。 深入瞭解如何在 ASP.NET Core 中強制執行 SSL。
Visual Studio 會啟動瀏覽器視窗。 然後,您應該會在菜單欄中看到“主頁”和“隱私”頁面。
從功能表列中選取隱私權。 瀏覽器中的 [隱私權] 頁面會轉譯 Privacy.cshtml 檔案中設定的文字。

返回 Visual Studio,然後按 Shift+F5 停止偵錯。 此動作會關閉瀏覽器視窗中的專案。
在 Visual Studio 中,開啟 Privacy.cshtml 進行編輯。 接下來,刪除句子「 使用此頁面詳細說明您網站的隱私權政策 」,並將其替換為「 此頁面截至 [“時間戳記”] 正在 @ViewData建構中)。
現在,讓我們進行程式碼變更。 選取 Privacy.cshtml.cs。 然後,選取下列捷徑來清除
using檔案頂端的指示詞:將滑鼠移至或選取灰色的
using指示詞。 「快速動作」燈泡會顯示在插入符號的下方或於左邊界。 選取燈泡,然後選擇[移除不必要的使用]旁的擴展箭頭。![螢幕擷取畫面顯示 Visual Studio Code 編輯器中的 Privacy.cshtml 檔案,其中 [快速動作] 工具提示已開啟,並醒目提示 [預覽變更]。](media/visualstudio/csharp-aspnet-remove-unnecessary-usings.png?view=vs-2022)
現在選取 [預覽變更] 以查看變更。
選取 ,然後套用。 Visual Studio 會從檔案中刪除不必要的
using指示詞。接下來,使用 DateTime.ToString 方法,為您的文化特性或區域格式化的目前日期建立字串。
- 方法的第一個引數指定日期的顯示方式。 此範例使用格式指定元 (
d) 來指出簡短的日期格式。 - 第二個引數是 CultureInfo 物件,可指定日期的文化特性或區域。 第二個參數決定了日期中任何單詞的語言以及使用的分隔符類型。
將
OnGet()中方法的主體變更為下列程式碼:public void OnGet() { string dateTime = DateTime.Now.ToString("d", new CultureInfo("en-US")); ViewData["TimeStamp"] = dateTime; }- 方法的第一個引數指定日期的顯示方式。 此範例使用格式指定元 (
請注意,下列
using指示詞會自動新增至檔案頂端:using System.Globalization;System.Globalization包含 CultureInfo 類別。按 F5 在網頁瀏覽器中開啟您的專案。
在網站頂端,選取 [隱私權] 以檢視您的變更。
![螢幕擷取畫面顯示 MyCoreApp 的 [隱私權] 頁面,其中包含新增日期所做的變更。](media/visualstudio/csharp-aspnet-browser-page-privacy-changed.png?view=vs-2022)
關閉網頁瀏覽器,按 Shift+F5 停止偵錯。
變更首頁
在 [方案總管] 中,展開 [頁面 ] 資料夾,然後選取 [Index.cshtml]。
![螢幕快照顯示在 [方案總管] 的 [頁面] 節點下選取的 Index.cshtml。](media/visualstudio/csharp-aspnet-index-page-cshtml-file.png?view=vs-2022)
Index.cshtml 檔案相當於網頁應用程式中的首頁,在瀏覽器中執行。

在程式碼編輯器中,您會看到 首頁 上顯示之文字的 HTML 程式碼。

將 歡迎文字 替換為 Hello World!

選取 https 或按 Ctrl+F5 執行應用程式,並在網頁瀏覽器中開啟它。

在網頁瀏覽器中,您會在 首頁 上看到新的變更。
關閉網頁瀏覽器,按 Shift+F5 停止偵錯,然後儲存您的專案。 您現在可以關閉 Visual Studio。
後續步驟
恭喜您完成本教學課程! 我們希望您喜歡學習 C#、ASP.NET Core 和 Visual Studio IDE。 若要深入瞭解如何使用 C# 和 ASP.NET 建立 Web 應用程式或網站,請繼續執行下列教學課程:
或者,瞭解如何使用 Docker 容器化 Web 應用程式: