WinUI 3 應用程式中的資料綁定能讓你有效率地將控制項與資料來源連結。 瞭解如何將控制項繫結至單一專案或專案集合、控制專案轉譯、實作詳細資料檢視,以及設定資料格式以供顯示。 如需詳細資訊,請參閱 深入資料繫結。
先決條件
這個主題假設你知道如何用 Windows App SDK 建立基本的 WinUI 應用程式。 如需建立第一個 WinUI 應用程式的指示,請參閱 建立 WinUI 應用程式。
建立專案
建立一個新的 WinUI 空白應用程式(封裝) C# 專案。 將它命名為 「Quickstart」。
繫結至單一項目
每個系結都包含系結目標和系結來源。 一般而言,目標是控件或其他UI元素的屬性,而來源是類別實例的屬性(資料模型或檢視模型)。 這個範例示範如何將控件系結至單一專案。 目標是 Text的 TextBlock 屬性。 來源是名為 Recording 的簡單類別實例,代表音頻錄製。 讓我們先看看課程。
將新類別新增至專案,並將類別命名為 Recording。
namespace Quickstart
{
    public class Recording
    {
        public string ArtistName { get; set; }
        public string CompositionName { get; set; }
        public DateTime ReleaseDateTime { get; set; }
        public Recording()
        {
            ArtistName = "Wolfgang Amadeus Mozart";
            CompositionName = "Andante in C for Piano";
            ReleaseDateTime = new DateTime(1761, 1, 1);
        }
        public string OneLineSummary
        {
            get
            {
                return $"{CompositionName} by {ArtistName}, released: "
                    + ReleaseDateTime.ToString("d");
            }
        }
    }
    public class RecordingViewModel
    {
        private Recording defaultRecording = new();
        public Recording DefaultRecording { get { return defaultRecording; } }
    }
}
接下來,從代表您的標記窗口的類別中,公開綁定來源類別。 將類型的 RecordingViewModel 屬性新增至 MainWindow.xaml.cs。
namespace Quickstart
{
    public sealed partial class MainWindow : Window
    {
        public MainWindow()
        {
            this.InitializeComponent();
        }
        public RecordingViewModel ViewModel{ get; } = new RecordingViewModel();
    }
}
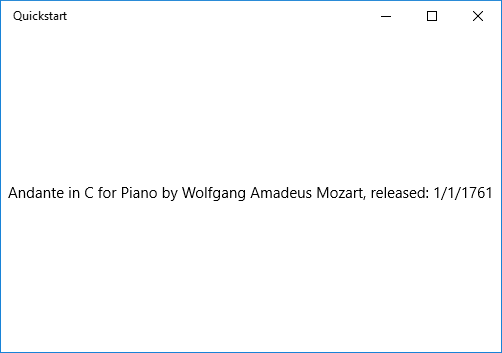
最後一個部分是將 TextBlock 系結至 ViewModel.DefaultRecording.OneLineSummary 屬性。
<Window x:Class="Quickstart.MainWindow" ... >
    <Grid>
        <TextBlock Text="{x:Bind ViewModel.DefaultRecording.OneLineSummary}"
                   HorizontalAlignment="Center"
                   VerticalAlignment="Center"/>
    </Grid>
</Window>
以下是結果。
繫結至項目集合
常見的情境是繫結至業務對象的集合。 在 C# 中,使用泛型 ObservableCollection<T> 類別進行資料繫結。 它會實作 INotifyCollectionChanged 介面,當新增或移除專案時,會提供繫結的變更通知。 不過,由於 .NET 8 及以後版本的 WinUI Release 模式有已知的錯誤,在某些情況下你可能需要使用 List<T>,尤其是當你的收藏是靜態且初始化後沒有改變時。 如果您的 UI 需要在執行階段集合變更時更新,請使用 ObservableCollection<T>。 如果您只需要顯示一組固定的項目, List<T> 就足夠了。 此外,如果您希望您的綁定控制項隨集合中物件屬性的變更而更新,這些物件應該實作 INotifyPropertyChanged。 如需詳細資訊,請參閱 深入數據綁定。
注意
使用 List<T>,您可能不會收到集合變更的變更通知。 如果您需要回應變更,請考慮使用 ObservableCollection<T>。 在此範例中,您不需要回應集合變更,因此 List<T> 就足夠了。
下列範例會將 ListView 繫結至物件集合 Recording 。 首先,將集合新增至您的檢視模型。 將這些新成員新增至班級 RecordingViewModel 。
public class RecordingViewModel
{
    ...
    private List<Recording> recordings = new();
    public List<Recording> Recordings{ get{ return recordings; } }
    public RecordingViewModel()
    {
        recordings.Add(new Recording(){ ArtistName = "Johann Sebastian Bach",
            CompositionName = "Mass in B minor", ReleaseDateTime = new DateTime(1748, 7, 8) });
        recordings.Add(new Recording(){ ArtistName = "Ludwig van Beethoven",
            CompositionName = "Third Symphony", ReleaseDateTime = new DateTime(1805, 2, 11) });
        recordings.Add(new Recording(){ ArtistName = "George Frideric Handel",
            CompositionName = "Serse", ReleaseDateTime = new DateTime(1737, 12, 3) });
    }
}
然後將 ListView 繫結至 ViewModel.Recordings 屬性。
<Window x:Class="Quickstart.MainWindow" ... >
    <Grid>
        <ListView ItemsSource="{x:Bind ViewModel.Recordings}"
                  HorizontalAlignment="Center"
                  VerticalAlignment="Center"/>
    </Grid>
</Window>
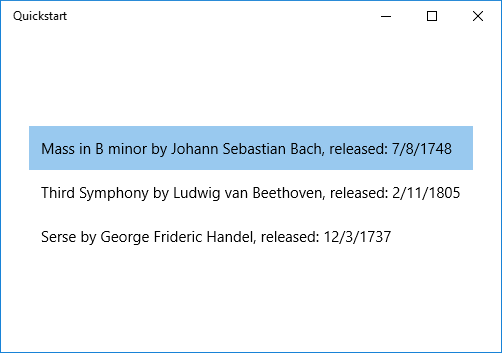
您尚未為Recording類別提供資料範本,因此 UI 框架目前能執行的最佳選項是針對ListView中的每個項目呼叫ToString。 的 ToString 預設實作會傳回類型名稱。

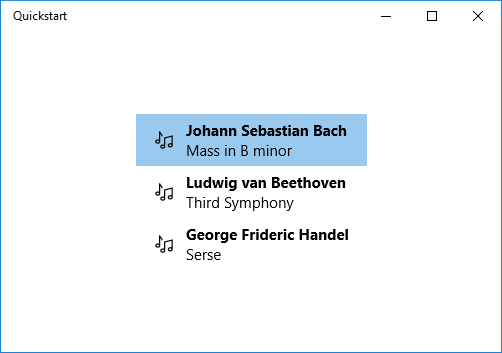
若要修正此問題,您可以覆寫 ToString 以傳回 的 OneLineSummary值,也可以提供資料範本。 資料範本選項是更常見且彈性的解決方案。 您可以使用內容控制件的 ContentTemplate 屬性或專案控制件的 ItemTemplate 屬性來指定數據範本。 您可以透過以下兩種方式設計資料範本 Recording 以及結果的插圖。
<ListView ItemsSource="{x:Bind ViewModel.Recordings}"
HorizontalAlignment="Center" VerticalAlignment="Center">
    <ListView.ItemTemplate>
        <DataTemplate x:DataType="local:Recording">
            <TextBlock Text="{x:Bind OneLineSummary}"/>
        </DataTemplate>
    </ListView.ItemTemplate>
</ListView>
<ListView ItemsSource="{x:Bind ViewModel.Recordings}"
HorizontalAlignment="Center" VerticalAlignment="Center">
    <ListView.ItemTemplate>
        <DataTemplate x:DataType="local:Recording">
            <StackPanel Orientation="Horizontal" Margin="6">
                <SymbolIcon Symbol="Audio" Margin="0,0,12,0"/>
                <StackPanel>
                    <TextBlock Text="{x:Bind ArtistName}" FontWeight="Bold"/>
                    <TextBlock Text="{x:Bind CompositionName}"/>
                </StackPanel>
            </StackPanel>
        </DataTemplate>
    </ListView.ItemTemplate>
</ListView>
如需 XAML 語法的詳細資訊,請參閱 使用 XAML 建立 UI。 如需控制項設定的詳細資訊,請參閱使用 XAML 定義版面設定 。
新增詳細資料檢視
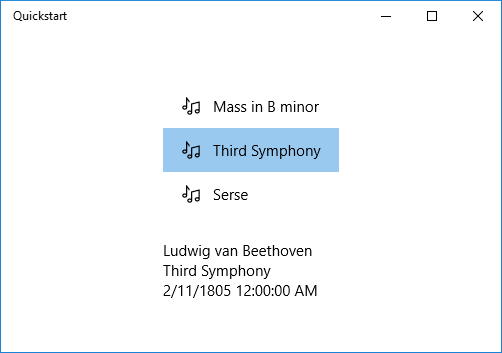
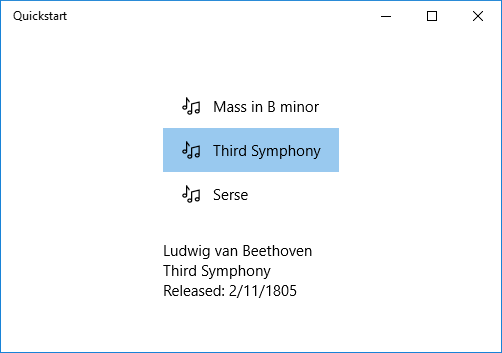
您可以選擇在 ListView 項目中顯示
您可以透過兩種方式實作此安排。 您可以將詳細檢視系結至 ListView的 SelectedItem 屬性。 或者您可以使用 CollectionViewSource。 在此情況下,您會將 ListView 和詳細資料檢視繫結至 CollectionViewSource。 此方法會為您處理目前選取的項目。 以下各節顯示了這兩種技術,它們都給出了相同的結果(如圖所示)。
注意
到目前為止,在本主題中,您只使用了 {x:Bind} 標記擴充。 但下列各節中顯示的這兩種技術都需要更彈性 (但效能較差) 的 {Binding} 標記延伸模組。
首先,這裡是 SelectedItem 技術。 對於 C# 應用程式,唯一必要的變更是標記。
<Window x:Class="Quickstart.MainWindow" ... >
    <Grid>
        <StackPanel HorizontalAlignment="Center" VerticalAlignment="Center">
            <ListView x:Name="recordingsListView" ItemsSource="{x:Bind ViewModel.Recordings}">
                <ListView.ItemTemplate>
                    <DataTemplate x:DataType="local:Recording">
                        <StackPanel Orientation="Horizontal" Margin="6">
                            <SymbolIcon Symbol="Audio" Margin="0,0,12,0"/>
                            <StackPanel>
                                <TextBlock Text="{x:Bind CompositionName}"/>
                            </StackPanel>
                        </StackPanel>
                    </DataTemplate>
                </ListView.ItemTemplate>
            </ListView>
            <StackPanel DataContext="{Binding SelectedItem, ElementName=recordingsListView}"
            Margin="0,24,0,0">
                <TextBlock Text="{Binding ArtistName}"/>
                <TextBlock Text="{Binding CompositionName}"/>
                <TextBlock Text="{Binding ReleaseDateTime}"/>
            </StackPanel>
        </StackPanel>
    </Grid>
</Window>
針對 CollectionViewSource 技術,先將 CollectionViewSource 新增為頂層 Grid的資源。
<Grid.Resources>
    <CollectionViewSource x:Name="RecordingsCollection" Source="{x:Bind ViewModel.Recordings}"/>
</Grid.Resources>
注意
WinUI 中的 Window 類別沒有 Resources 屬性。 您可以將 CollectionViewSource 新增至最上層的 Grid(或其他上層 UI 元素,例如 StackPanel)中。 如果您在 Page內工作,您可以將 CollectionViewSource 新增至 Page.Resources。
然後,調整 ListView 上的繫結 (不再需要命名) 和詳細數據檢視,以使用 CollectionViewSource。 藉由將詳細檢視直接繫結至CollectionViewSource,這表示您想要將繫結設定為目前項目,而這個路徑無法在集合本身中找到。 您不需要將 CurrentItem 屬性指定為系結的路徑,不過如果有任何模棱兩可的情況,您可以這麼做。
...
<ListView ItemsSource="{Binding Source={StaticResource RecordingsCollection}}">
...
<StackPanel DataContext="{Binding Source={StaticResource RecordingsCollection}}" ...>
...
每個案例的結果都相同。
格式化或轉換資料值以供顯示
上面的渲染有一個問題。 屬性 ReleaseDateTime 不僅僅是日期,它是 DateTime。 因此,它的顯示精度比您需要的要高。 其中一個解決方案是將字串屬性加入 Recording 類別,以傳回對等的 ReleaseDateTime.ToString("d")。 命名該屬性 ReleaseDate 表示它傳回日期,而不是日期和時間。 進一步命名它 ReleaseDateAsString 表示它傳回一個字串。
更靈活的解決方案是使用值轉換器。 以下是如何撰寫您自己的值轉換器的範例。 將下列程式碼新增至 Recording.cs 原始程式碼檔案。
public class StringFormatter : Microsoft.UI.Xaml.Data.IValueConverter
{
    // This converts the value object to the string to display.
    // This will work with most simple types.
    public object Convert(object value, Type targetType,
        object parameter, string language)
    {
        // Retrieve the format string and use it to format the value.
        string formatString = parameter as string;
        if (!string.IsNullOrEmpty(formatString))
        {
            return string.Format(formatString, value);
        }

        // If the format string is null or empty, simply
        // call ToString() on the value.
        return value.ToString();
    }

    // No need to implement converting back on a one-way binding
    public object ConvertBack(object value, Type targetType,
        object parameter, string language)
    {
        throw new NotImplementedException();
    }
}
現在,您可以將StringFormatter的實例新增為資源,並在顯示TextBlock屬性時使用綁定ReleaseDateTime來利用它。
<Grid.Resources>
    ...
    <local:StringFormatter x:Key="StringFormatterValueConverter"/>
</Grid.Resources>
...
<TextBlock Text="{Binding ReleaseDateTime,
    Converter={StaticResource StringFormatterValueConverter},
    ConverterParameter=Released: \{0:d\}}"/>
...
如您所見,為了格式化的靈活性,標記通過轉換器參數將格式字符串傳遞到轉換器中。 在本主題所示的程式代碼範例中,C# 值轉換器會使用該參數。
以下是結果。
Binding 和 x:Bind 之間的差異
在 WinUI 應用程式中使用資料繫結時,您可能會遇到兩個主要繫結機制: Binding 和 x:Bind。 雖然兩者都用於將 UI 元素連接到資料來源,但它們有明顯的差異:
-
x:Bind:提供編譯時間檢查、更好的效能,並且是強型別。 它非常適合您在編譯階段知道資料結構的案例。 -
Binding:提供執行階段評估,且針對動態案例更靈活,例如在編譯階段不知道資料結構時。
x:Bind 不支援的案例
雖然功能強大,但 x:Bind 在某些情況下您無法使用它:
-
動態資料結構:如果資料結構在編譯階段未知,則無法使用
x:Bind。 -
元素對元素繫結:
x:Bind不支援直接在兩個 UI 元素之間繫結。 -
繫結至
DataContext:x:Bind不會自動繼承父元素的DataContext屬性。 -
雙
Mode=TwoWay向繫結:雖然支援,x:Bind然而,無論使用單向或雙向繫結,針對您想要 UI 在來源變更時更新的任何屬性都需明確實現INotifyPropertyChanged。 雙向繫結的主要差異在於,變更也會從 UI 流回來源。
如需實際範例,以及更深入地了解何時使用它們,請參閱下列主題:
