Poznámka:
Přístup k této stránce vyžaduje autorizaci. Můžete se zkusit přihlásit nebo změnit adresáře.
Přístup k této stránce vyžaduje autorizaci. Můžete zkusit změnit adresáře.
This article describes how to configure Microsoft Azure Backup Server (MABS) to protect SQL Server databases on Azure Stack.
SQL Server databases protection workflow
Management of the SQL Server database backup to Azure and recovery from Azure involves:
- Create a backup policy to protect SQL Server databases
- Create on-demand backup copies
- Recover the database from Disks, and from Azure
Supported scenarios and limitations
Before you back up SQL Server on Azure Stack, review the following supported scenarios and limitations:
- Pokud máte databázi se soubory ve vzdálené sdílené složce, ochrana selže s ID chyby 104. MABS nepodporuje ochranu dat SQL Serveru ve vzdálené sdílené složce.
- MABS nemůže chránit databáze uložené ve vzdálených sdílených složkách SMB.
- Ensure that the availability group replicas are configured as read-only.
- Musíte explicitně přidat systémový účet NTAuthority\System do skupiny Sysadmin na SQL Serveru.
- Při provádění obnovení alternativního umístění pro částečně obsaženou databázi je nutné zajistit, aby cílová instance SQL má povolenou funkci Obsažené databáze .
- Pokud provádíte obnovení alternativního umístění pro databázi streamu souborů, musíte zajistit, aby cílová instance SQL má povolenou funkci databáze streamu souborů.
- Ochrana sql Serveru AlwaysOn:
- MABS detects Availability Groups when running inquiry at protection group creation.
- MABS detekuje selhání a pokračuje v ochraně databáze.
- MABS podporuje konfigurace clusteru s více lokalitami pro instanci SQL Serveru.
- Když chráníte databáze, které používají funkci AlwaysOn, má MABS následující omezení:
- MABS bude dodržovat zásady zálohování pro skupiny dostupnosti nastavené v SQL Serveru na základě předvoleb zálohování následujícím způsobem:
- Prefer secondary - Backups should occur on a secondary replica except when the primary replica is the only replica online. Pokud je k dispozici více sekundárních replik, bude pro zálohování vybrán uzel s nejvyšší prioritou zálohování. If only the primary replica is available, then the backup should occur on the primary replica.
- Pouze sekundární – Zálohování by se nemělo provádět na primární replice. Pokud je primární replika jedinou online replikou, nemělo by dojít k zálohování.
- Primary - Backups should always occur on the primary replica.
- Any Replica - Backups can happen on any of the availability replicas in the availability group. Uzel, ze který se má zálohovat, bude založený na prioritách zálohování pro každý z uzlů.
-
Poznámka:
- Backups can happen from any readable replica - that is, primary, synchronous secondary, asynchronous secondary.
- Pokud je některá replika vyloučená ze zálohy, například je povolená možnost Vyloučit repliku nebo je označena jako nečitelná, nebude tato replika vybrána pro zálohování v rámci žádné z možností.
- Pokud je k dispozici a čitelných více replik, bude uzel s nejvyšší prioritou zálohování vybrán pro zálohování.
- Pokud zálohování na vybraném uzlu selže, operace zálohování selže.
- Obnovení do původního umístění se nepodporuje.
- MABS bude dodržovat zásady zálohování pro skupiny dostupnosti nastavené v SQL Serveru na základě předvoleb zálohování následujícím způsobem:
- Problémy se zálohováním SQL Serveru 2014 nebo novějším:
- SQL server 2014 added a new feature to create a database for on-premises SQL Server on Microsoft Azure Blob storage. MaBS se nedá použít k ochraně této konfigurace.
- U možnosti SQL AlwaysOn existují některé známé problémy s předvolbou preferování sekundárního zálohování. MABS vždy provádí zálohování ze sekundárního serveru. Pokud není nalezena žádná sekundární, zálohování se nezdaří.
Požadavky
Before you back up SQL Server on Azure Stack, install and prepare Azure Backup Server.
Vytvoření zásad zálohování
To create a backup policy to protect SQL Server databases to Azure, follow these steps:
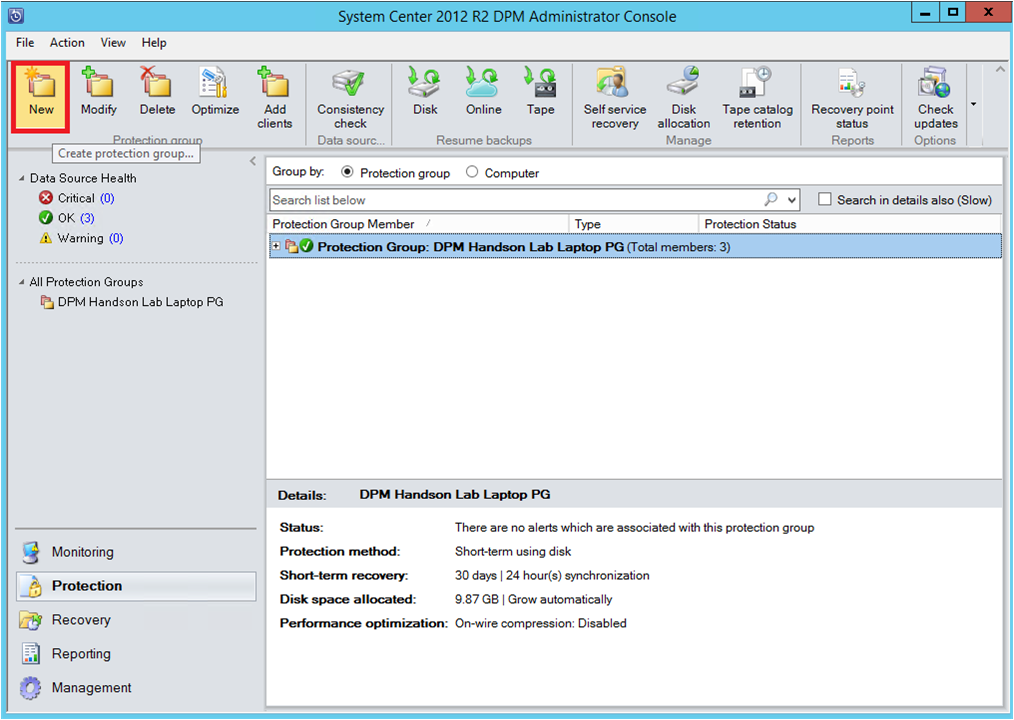
On the Azure Backup Server, select the Protection workspace.
On the tool menu, select New to create a new protection group.
Azure Backup Server starts the Protection Group wizard, which leads you through creating a Protection Group. Vyberte Další.
On the Select Protection Group Type blade, select Servers.

On the Select Group Members blade, the Available members list displays the various data sources. Select + to expand a folder and reveal the subfolders. Select the checkbox to select an item.
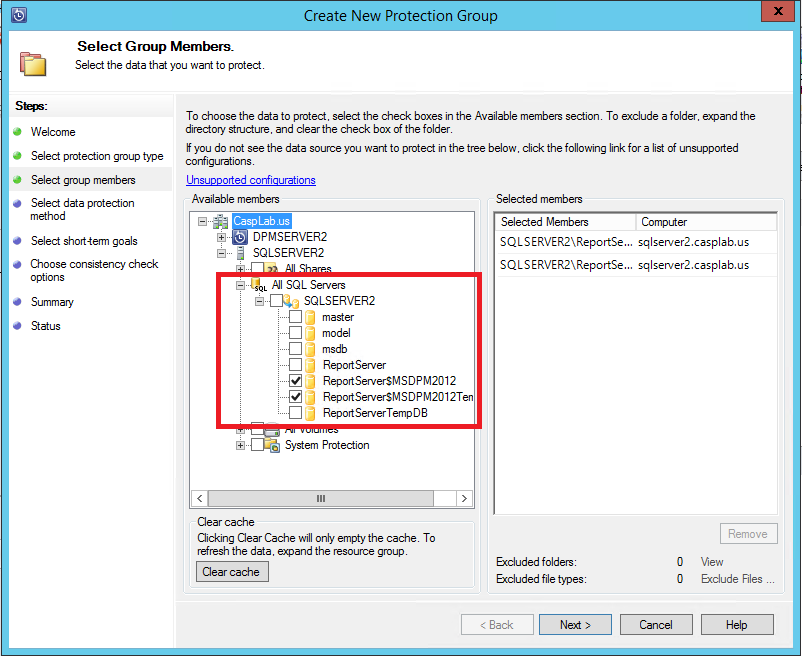
All selected items appear in the Selected members list. After selecting the servers or databases you want to protect, select Next.
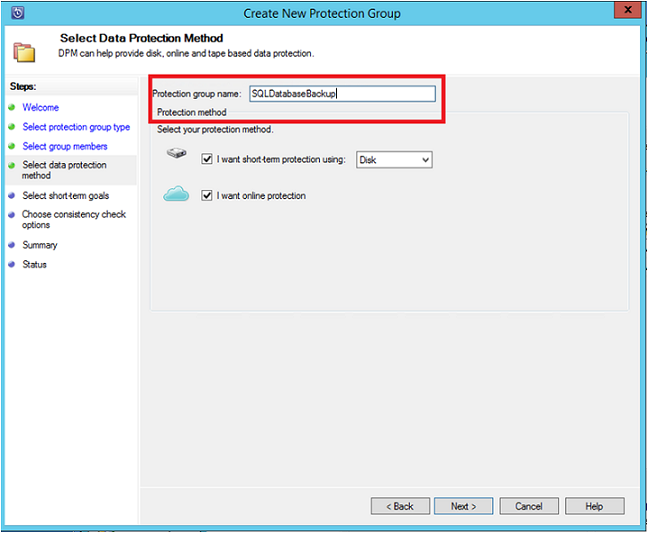
On the Select Data Protection Method blade, provide a name for the protection group and select the I want online Protection checkbox.
On the Specify Short-Term Goals blade, include the necessary inputs to create backup points to disk, and select Next.
In the example, Retention range is 5 days, Synchronization frequency is once every 15 minutes, which is the backup frequency. Express Full Backup is set to 8:00 P.M.
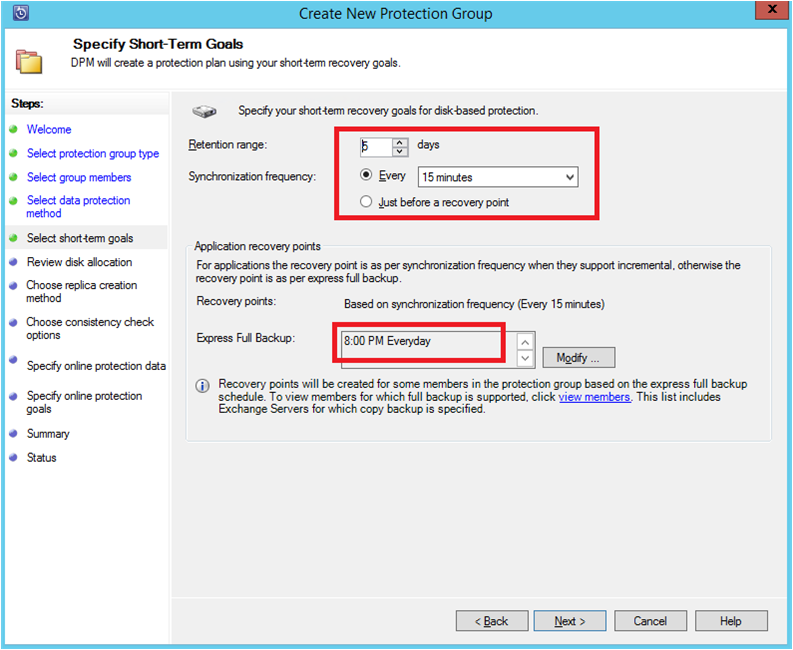
Poznámka:
In the example shown, at 8:00 PM every day a backup point is created by transferring the modified data from the previous day’s 8:00 PM backup point. Tento proces se nazývá Expresní úplné zálohování. Transaction logs are synchronized every 15 minutes. If you need to recover the database at 9:00 PM, the point is created from the logs from the last express full backup point (8PM in this case).
On the Review disk allocation blade, verify the overall storage space available, and the potential disk space. Vyberte Další.
On the Choose Replica Creation Method, choose how to create your first recovery point. You can transfer the initial backup manually (off network) to avoid bandwidth congestion or over the network. If you choose to wait to transfer the first backup, you can specify the time for the initial transfer. Vyberte Další.
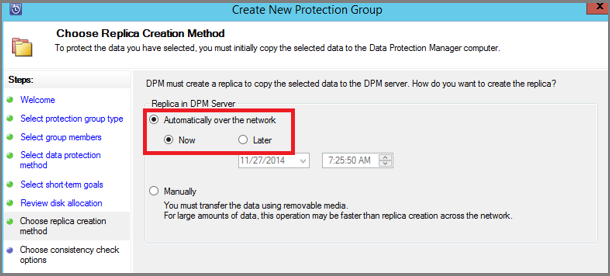
The initial backup copy requires transferring the entire data source (SQL Server database) from production server (SQL Server computer) to Azure Backup Server. This data might be large, and transferring the data over the network could exceed bandwidth. For this reason, you can choose to transfer the initial backup: Manually (using removable media) to avoid bandwidth congestion, or Automatically over the network (at a specified time).
Once the initial backup is complete, the rest of the backups are incremental backups on the initial backup copy. Přírůstkové zálohy jsou obvykle malé a snadno se přenášejí přes síť.
Choose when you want the consistency check to run and select Next.
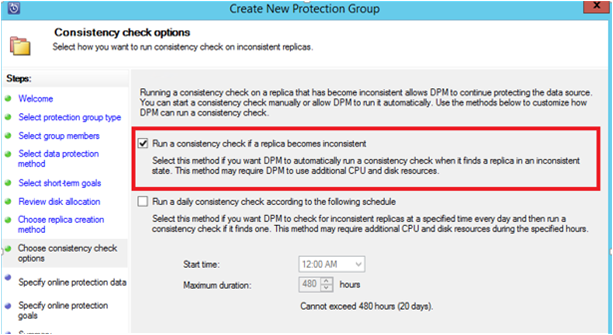
Azure Backup Server performs a consistency check on the integrity of the backup point. Azure Backup Server calculates the checksum of the backup file on the production server (SQL Server computer in this scenario) and the backed-up data for that file. If there's a conflict, it's assumed the backed-up file on Azure Backup Server is corrupt. Azure Backup Server rectifies the backed-up data by sending the blocks corresponding to the checksum mismatch. Because consistency checks are performance-intensive, you can schedule the consistency check or run it automatically.
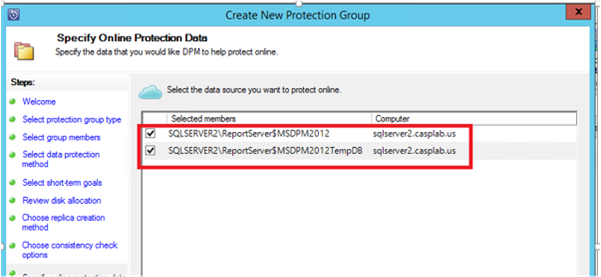
To specify online protection of the datasources, select the databases to be protected to Azure and select Next.
Choose backup schedules and retention policies that suit the organization policies.
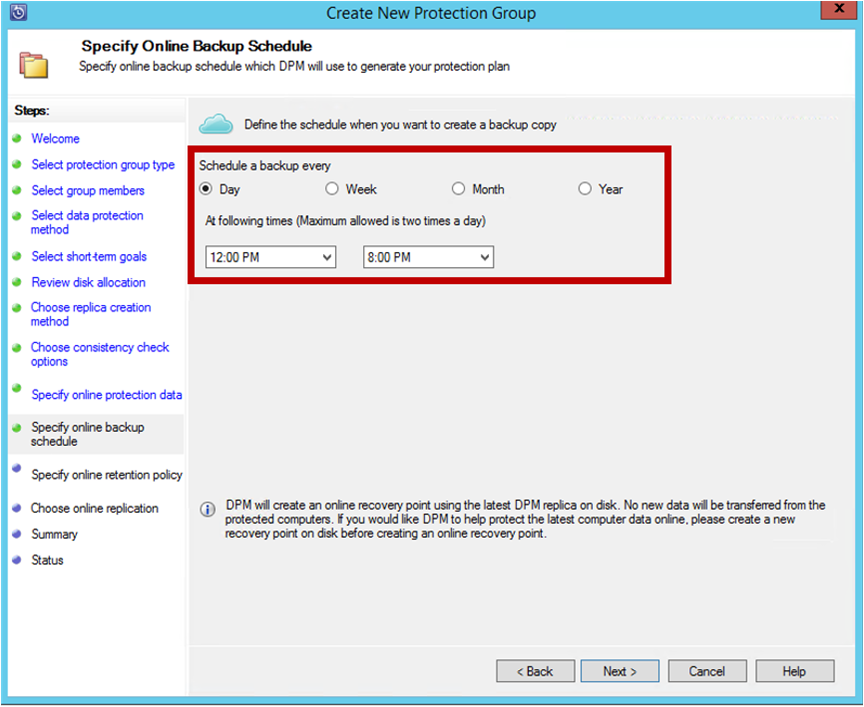
In this example, backups are taken once a day at 12:00 PM and 8 PM.
Poznámka:
It’s a good practice to have a few short-term recovery points on disk, for quick recovery. Tyto body obnovení se používají k provoznímu zotavení. Azure serves as a good offsite location with higher SLAs and guaranteed availability.
Best Practice: If you schedule backups to Azure to start after the local disk backups complete, the latest disk backups are always copied to Azure.
Zvolte plán zásad uchovávání informací. The details on how the retention policy works are provided at Use Azure Backup to replace your tape infrastructure article.
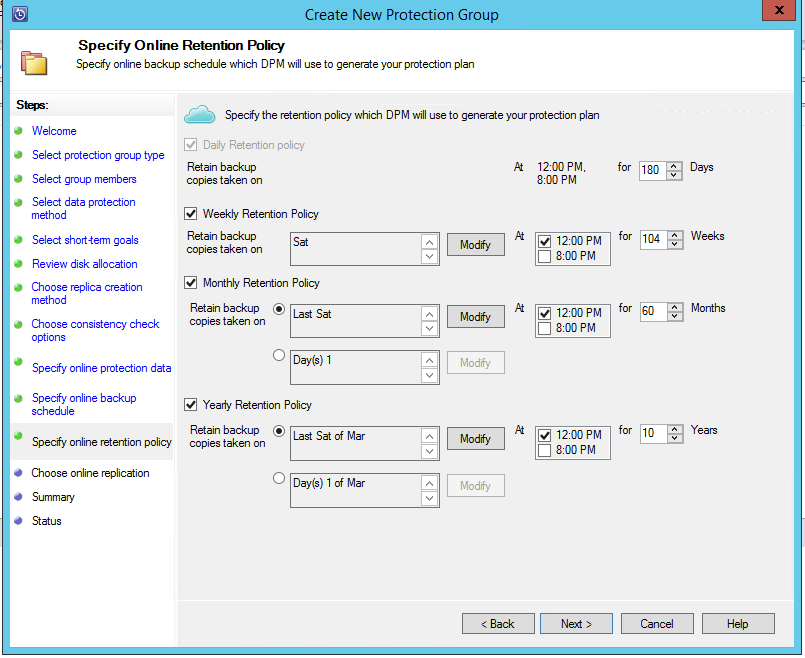
V tomto příkladu:
- Backups are taken once a day at 12:00 PM and 8 PM and are retained for 180 days.
- The backup on Saturday at 12:00 P.M. is retained for 104 weeks
- The backup on Last Saturday at 12:00 P.M. is retained for 60 months
- The backup on Last Saturday of March at 12:00 P.M. is retained for 10 years
Select Next and select the appropriate option for transferring the initial backup copy to Azure. You can choose Automatically over the network
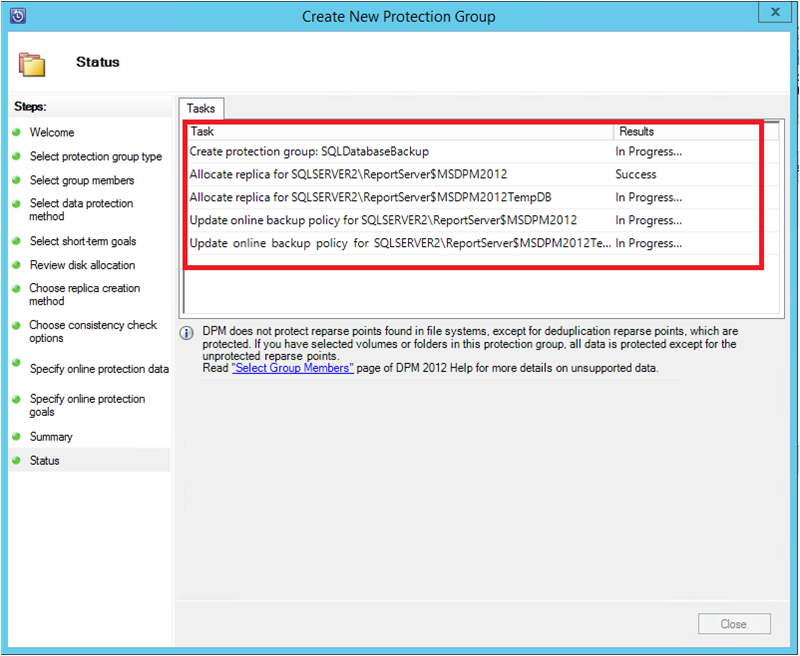
Once you review the policy details in the Summary blade, select Create group to complete the workflow. You can select Close and monitor the job progress in Monitoring workspace.
Spusťte zálohu na vyžádání
A recovery point is created only when the first backup occurs. After creating a backup policy, you can trigger the creation of a recovery point manually, rather than waiting for the scheduler to take the backup.
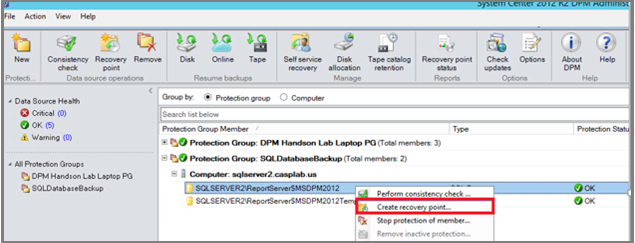
To run an on-demand backup of a SQL Server database, follow these steps:
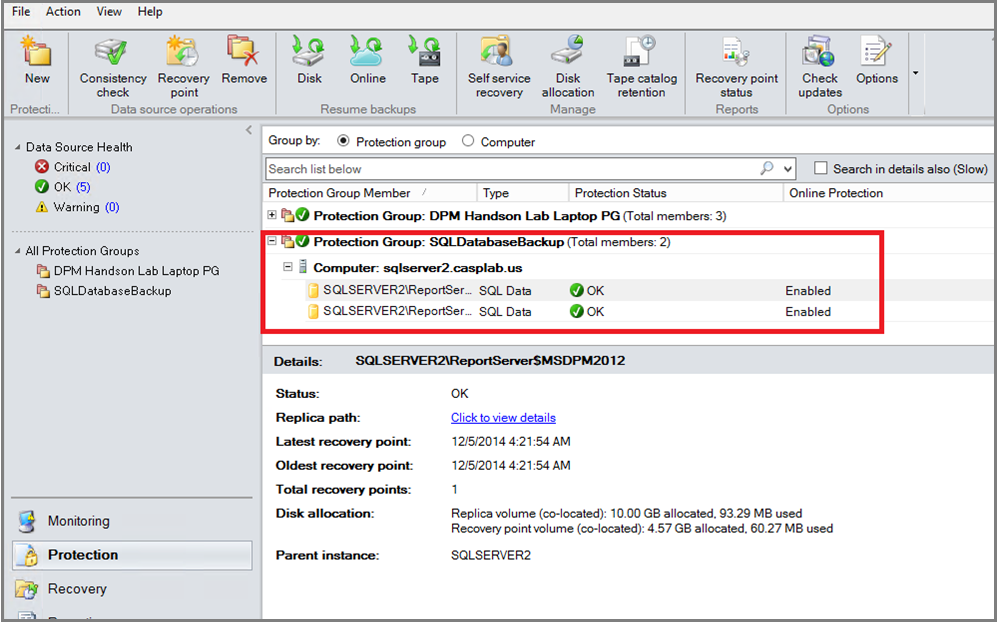
Wait until the protection group status shows OK for the database before creating the recovery point.
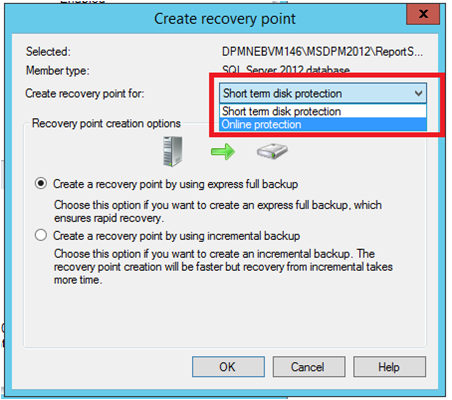
Right-click the database and select Create Recovery Point.
Choose Online Protection in the drop-down menu and select OK to start creation of a recovery point in Azure.
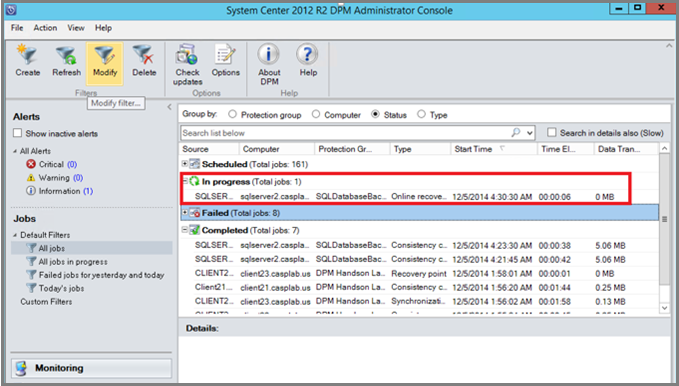
View the job progress in the Monitoring workspace.
Recover the database from Azure
To recover a protected entity (SQL Server database) from Azure, follow these steps:
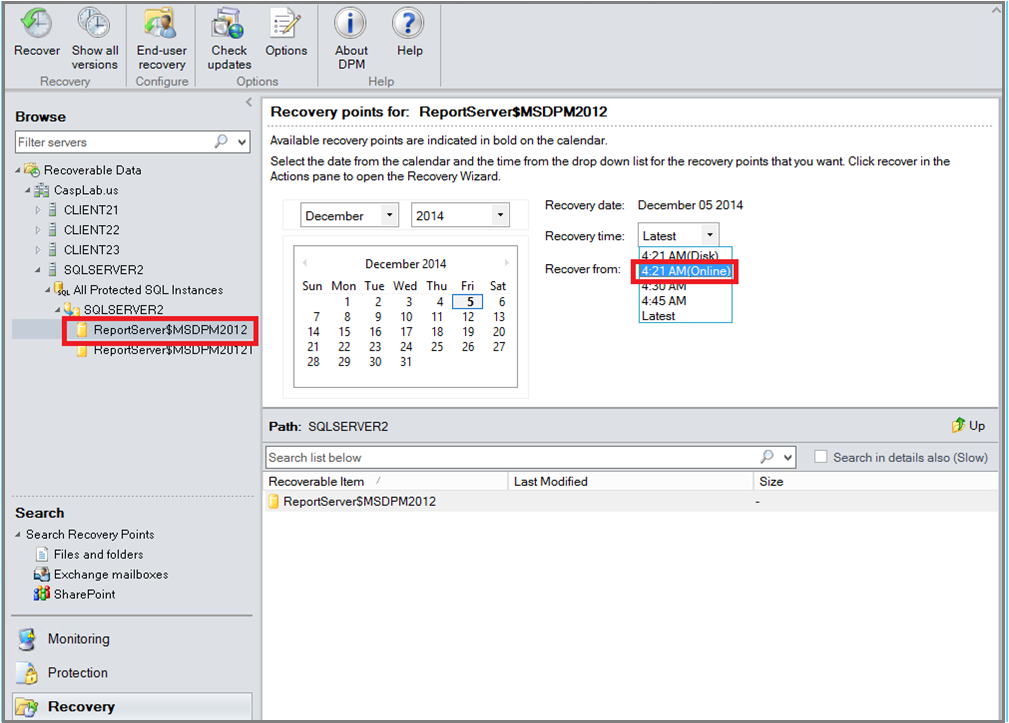
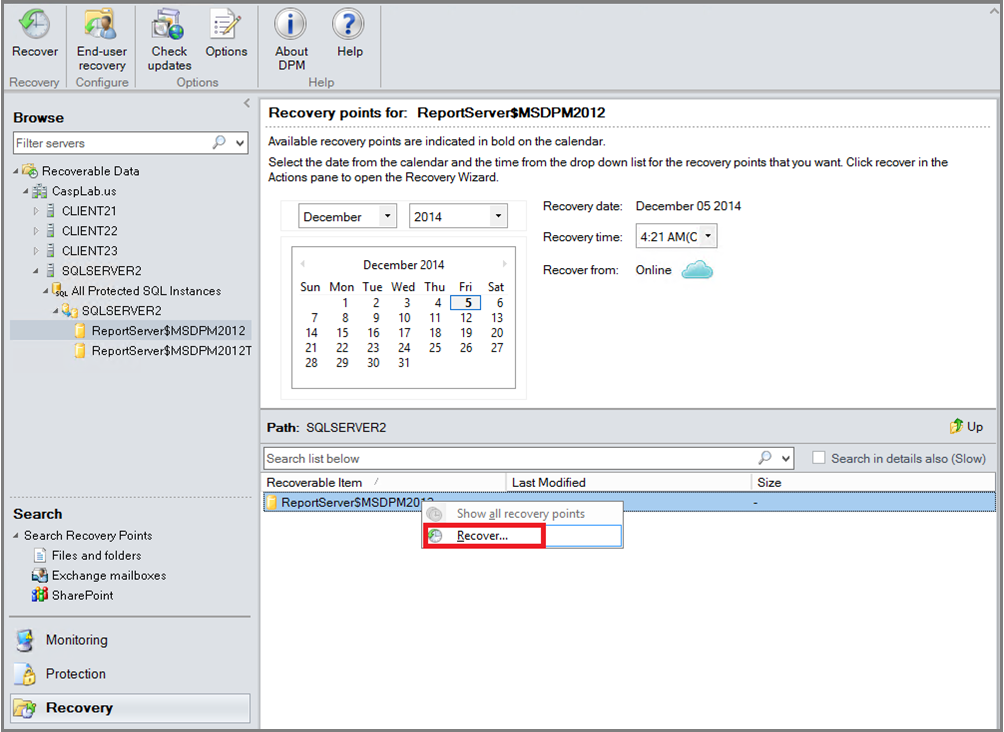
Open the Azure Backup Server Management Console. Navigate to Recovery workspace where you can see the protected servers. Browse the required database (in this case ReportServer$MSDPM2012). Select a Recovery from time that's specified as an Online point.
Klikněte pravým tlačítkem myši na název databáze a vyberte Obnovit.
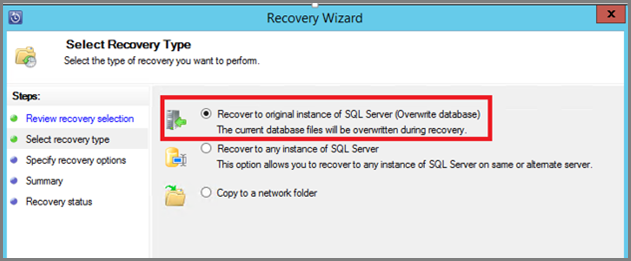
MABS shows the details of the recovery point. Vyberte Další. Chcete-li přepsat databázi, vyberte typ obnovení do původní instance SQL Serveru. Vyberte Další.
In this example, MABS recovers the database to another SQL Server instance, or to a standalone network folder.
On the Specify Recovery options blade, you can select the recovery options like Network bandwidth usage throttling to throttle the bandwidth used by recovery. Vyberte Další.
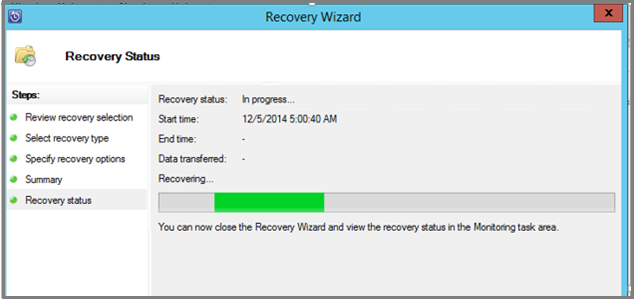
On the Summary blade, you see all the recovery configurations provided so far. Vyberte Obnovit.
The Recovery status shows the database being recovered. Výběrem možnosti Zavřít můžete průvodce zavřít a zobrazit průběh v pracovním prostoru Monitorování .
Once the recovery is completed, the restored database is application consistent.