Rychlý start: Připojení k hovoru do místnosti
Požadavky
- Účet Azure s aktivním předplatným. Vytvoření účtu zdarma
- Aktivní prostředek služby Communication Services a připojovací řetězec. Vytvořte prostředek komunikační služby.
- Dvě nebo více identit uživatelů komunikace Vytváření a správa přístupových tokenů nebo rychlého vytváření identit pro testování
- Vytvořená místnost a účastník se do ní přidal. Vytváření a správa místností
Získání přístupového tokenu uživatele
Pokud jste už vytvořili uživatele a přidali je jako účastníky v místnosti podle části Nastavení účastníků místnosti na této stránce, můžete tyto uživatele použít přímo k připojení k místnosti.
V opačném případě budete muset pro každého účastníka hovoru vytvořit přístupový token uživatele. Naučte se vytvářet a spravovat přístupové tokeny uživatelů. K vytvoření uživatele a přístupového tokenu můžete také použít Azure CLI a spustit následující příkaz s připojovací řetězec. Po vytvoření uživatelů budete je muset přidat do místnosti jako účastníky, aby se mohli připojit k místnosti.
az communication identity token issue --scope voip --connection-string "yourConnectionString"
Podrobnosti najdete v tématu Použití Azure CLI k vytváření a správě přístupových tokenů.
Poznámka:
K místnostem je možné přistupovat pomocí knihovny uživatelského rozhraní služeb Azure Communication Services. Knihovna uživatelského rozhraní umožňuje vývojářům přidat do své aplikace klienta volání, který je povolená místností, pouze s několika řádky kódu.
Připojení k hovoru do místnosti
Pokud chcete postupovat podle tohoto rychlého startu, můžete si stáhnout rychlý start pro volání místnosti na GitHubu.
Požadavky
- Potřebujete mít Node.js 18. Instalační program msi můžete použít k instalaci.
Nastavení
Vytvoření nové aplikace Node.js
Otevřete terminál nebo příkazové okno, vytvořte pro aplikaci nový adresář a přejděte na něj.
mkdir calling-rooms-quickstart && cd calling-rooms-quickstart
Spuštěním příkazu npm init -y vytvořte soubor package.json s výchozím nastavením.
npm init -y
Nainstalujte balíček .
npm install Pomocí příkazu nainstalujte sadu SDK pro volání služeb Azure Communication Services pro JavaScript.
Důležité
V tomto rychlém startu se používá verze 1.14.1sady SDK pro volání služeb Azure Communication Services . Možnost připojit se k volání do místnosti a zobrazit role účastníků hovorů je k dispozici v sadě JavaScript SDK pro volání pro webové prohlížeče verze 1.13.1 a vyšší.
npm install @azure/communication-common --save
npm install @azure/communication-calling@1.14.1 --save
Nastavení architektury aplikace
V tomto rychlém startu se k vytvoření balíčku prostředků aplikace používá Webpack. Spuštěním následujícího příkazu nainstalujte webpackbalíčky a webpack-cli npm a webpack-dev-server uveďte je jako vývojové závislosti ve vaší package.json:
npm install copy-webpack-plugin@^11.0.0 webpack@^5.88.2 webpack-cli@^5.1.4 webpack-dev-server@^4.15.1 --save-dev
Tady je kód:
Vytvořte index.html soubor v kořenovém adresáři projektu. Tento soubor používáme ke konfiguraci základního rozložení, které uživateli umožňuje připojit se k volání místností.
<!-- index.html-->
<!DOCTYPE html>
<html>
    <head>
        <title>Azure Communication Services - Rooms Call Sample</title>
        <link rel="stylesheet" type="text/css" href="styles.css"/>
    </head>
    <body>
        <h4>Azure Communication Services - Rooms Call Sample</h4>
        <input id="user-access-token"
            type="text"
            placeholder="User access token"
            style="margin-bottom:1em; width: 500px;"/>
        <button id="initialize-call-agent" type="button">Initialize Call Agent</button>
        <br>
        <br>
        <input id="acs-room-id"
            type="text"
            placeholder="Enter Room Id"
            style="margin-bottom:1em; width: 500px; display: block;"/>
        <button id="join-room-call-button" type="button" disabled="true">Join Room Call</button>
        <button id="hangup-call-button" type="button" disabled="true">Hang up Call</button>
        <button id="start-video-button" type="button" disabled="true">Start Video</button>
        <button id="stop-video-button" type="button" disabled="true">Stop Video</button>
        <br>
        <br>
        <div id="connectedLabel" style="color: #13bb13;" hidden>Room Call is connected!</div>
        <br>
        <div id="remoteVideosGallery" style="width: 40%;" hidden>Remote participants' video streams:</div>
        <br>
        <div id="localVideoContainer" style="width: 30%;" hidden>Local video stream:</div>
        <!-- points to the bundle generated from client.js -->
        <script src="./main.js"></script>
    </body>
</html>
Vytvořte soubor v kořenovém adresáři projektu, který bude index.js obsahovat logiku aplikace pro účely tohoto rychlého startu. Do index.js přidejte následující kód:
// Make sure to install the necessary dependencies
const { CallClient, VideoStreamRenderer, LocalVideoStream } = require('@azure/communication-calling');
const { AzureCommunicationTokenCredential } = require('@azure/communication-common');
const { AzureLogger, setLogLevel } = require("@azure/logger");
// Set the log level and output
setLogLevel('verbose');
AzureLogger.log = (...args) => {
    console.log(...args);
};

// Calling web sdk objects
let callAgent;
let deviceManager;
let call;
let localVideoStream;
let localVideoStreamRenderer;

// UI widgets
let userAccessToken = document.getElementById('user-access-token');
let acsRoomId = document.getElementById('acs-room-id');
let initializeCallAgentButton = document.getElementById('initialize-call-agent');
let startCallButton = document.getElementById('join-room-call-button');
let hangUpCallButton = document.getElementById('hangup-call-button');
let startVideoButton = document.getElementById('start-video-button');
let stopVideoButton = document.getElementById('stop-video-button');
let connectedLabel = document.getElementById('connectedLabel');
let remoteVideosGallery = document.getElementById('remoteVideosGallery');
let localVideoContainer = document.getElementById('localVideoContainer');

/**
 * Using the CallClient, initialize a CallAgent instance with a CommunicationUserCredential which enable us to join a rooms call.
 */
initializeCallAgentButton.onclick = async () => {
    try {
        const callClient = new CallClient();
        tokenCredential = new AzureCommunicationTokenCredential(userAccessToken.value.trim());
        callAgent = await callClient.createCallAgent(tokenCredential)
        // Set up a camera device to use.
        deviceManager = await callClient.getDeviceManager();
        await deviceManager.askDevicePermission({ video: true });
        await deviceManager.askDevicePermission({ audio: true });

        startCallButton.disabled = false;
        initializeCallAgentButton.disabled = true;
    } catch(error) {
        console.error(error);
    }
}


startCallButton.onclick = async () => {
    try {
        const localVideoStream = await createLocalVideoStream();
        const videoOptions = localVideoStream ? { localVideoStreams: [localVideoStream] } : undefined;

        const roomCallLocator = { roomId: acsRoomId.value.trim() };
        call = callAgent.join(roomCallLocator, { videoOptions });

        // Subscribe to the call's properties and events.
        subscribeToCall(call);
    } catch (error) {
        console.error(error);
    }
}

/**
 * Subscribe to a call obj.
 * Listen for property changes and collection updates.
 */
subscribeToCall = (call) => {
    try {
        // Inspect the initial call.id value.
        console.log(`Call Id: ${call.id}`);
        //Subscribe to call's 'idChanged' event for value changes.
        call.on('idChanged', () => {
            console.log(`Call Id changed: ${call.id}`);
        });

        // Inspect the initial call.state value.
        console.log(`Call state: ${call.state}`);
        // Subscribe to call's 'stateChanged' event for value changes.
        call.on('stateChanged', async () => {
            console.log(`Call state changed: ${call.state}`);
            if(call.state === 'Connected') {
                connectedLabel.hidden = false;
                startCallButton.disabled = true;
                hangUpCallButton.disabled = false;
                startVideoButton.disabled = false;
                stopVideoButton.disabled = false;
                remoteVideosGallery.hidden = false;
            } else if (call.state === 'Disconnected') {
                connectedLabel.hidden = true;
                startCallButton.disabled = false;
                hangUpCallButton.disabled = true;
                startVideoButton.disabled = true;
                stopVideoButton.disabled = true;
                remoteVideosGallery.hidden = true;
                console.log(`Call ended, call end reason={code=${call.callEndReason.code}, subCode=${call.callEndReason.subCode}}`);
            }
        });
        call.on('isLocalVideoStartedChanged', () => {
            console.log(`isLocalVideoStarted changed: ${call.isLocalVideoStarted}`);
        });
        console.log(`isLocalVideoStarted: ${call.isLocalVideoStarted}`);
        call.localVideoStreams.forEach(async (lvs) => {
            localVideoStream = lvs;
            await displayLocalVideoStream();
        });
        call.on('localVideoStreamsUpdated', e => {
            e.added.forEach(async (lvs) => {
                localVideoStream = lvs;
                await displayLocalVideoStream();
            });
            e.removed.forEach(lvs => {
               removeLocalVideoStream();
            });
        });

        // Inspect the call's current remote participants and subscribe to them.
        call.remoteParticipants.forEach(remoteParticipant => {
            subscribeToRemoteParticipant(remoteParticipant);
        });
        // Subscribe to the call's 'remoteParticipantsUpdated' event to be
        // notified when new participants are added to the call or removed from the call.
        call.on('remoteParticipantsUpdated', e => {
            // Subscribe to new remote participants that are added to the call.
            e.added.forEach(remoteParticipant => {
                subscribeToRemoteParticipant(remoteParticipant)
            });
            // Unsubscribe from participants that are removed from the call
            e.removed.forEach(remoteParticipant => {
                console.log('Remote participant removed from the call.');
            });
        });
    } catch (error) {
        console.error(error);
    }
}

/**
 * Subscribe to a remote participant obj.
 * Listen for property changes and collection udpates.
 */
subscribeToRemoteParticipant = (remoteParticipant) => {
    try {
        // Inspect the initial remoteParticipant.state value.
        console.log(`Remote participant state: ${remoteParticipant.state}`);
        // Subscribe to remoteParticipant's 'stateChanged' event for value changes.
        remoteParticipant.on('stateChanged', () => {
            console.log(`Remote participant state changed: ${remoteParticipant.state}`);
        });

        // Inspect the remoteParticipants's current videoStreams and subscribe to them.
        remoteParticipant.videoStreams.forEach(remoteVideoStream => {
            subscribeToRemoteVideoStream(remoteVideoStream)
        });
        // Subscribe to the remoteParticipant's 'videoStreamsUpdated' event to be
        // notified when the remoteParticiapant adds new videoStreams and removes video streams.
        remoteParticipant.on('videoStreamsUpdated', e => {
            // Subscribe to new remote participant's video streams that were added.
            e.added.forEach(remoteVideoStream => {
                subscribeToRemoteVideoStream(remoteVideoStream)
            });
            // Unsubscribe from remote participant's video streams that were removed.
            e.removed.forEach(remoteVideoStream => {
                console.log('Remote participant video stream was removed.');
            })
        });
    } catch (error) {
        console.error(error);
    }
}

/**
 * Subscribe to a remote participant's remote video stream obj.
 * You have to subscribe to the 'isAvailableChanged' event to render the remoteVideoStream. If the 'isAvailable' property
 * changes to 'true', a remote participant is sending a stream. Whenever availability of a remote stream changes
 * you can choose to destroy the whole 'Renderer', a specific 'RendererView' or keep them, but this will result in displaying blank video frame.
 */
subscribeToRemoteVideoStream = async (remoteVideoStream) => {
    let renderer = new VideoStreamRenderer(remoteVideoStream);
    let view;
    let remoteVideoContainer = document.createElement('div');
    remoteVideoContainer.className = 'remote-video-container';

    const createView = async () => {
        // Create a renderer view for the remote video stream.
        view = await renderer.createView();
        // Attach the renderer view to the UI.
        remoteVideoContainer.appendChild(view.target);
        remoteVideosGallery.appendChild(remoteVideoContainer);
    }

    // Remote participant has switched video on/off
    remoteVideoStream.on('isAvailableChanged', async () => {
        try {
            if (remoteVideoStream.isAvailable) {
                await createView();
            } else {
                view.dispose();
                remoteVideosGallery.removeChild(remoteVideoContainer);
            }
        } catch (e) {
            console.error(e);
        }
    });

    // Remote participant has video on initially.
    if (remoteVideoStream.isAvailable) {
        try {
            await createView();
        } catch (e) {
            console.error(e);
        }
    }
}

/**
 * Start your local video stream.
 * This will send your local video stream to remote participants so they can view it.
 */
startVideoButton.onclick = async () => {
    try {
        const localVideoStream = await createLocalVideoStream();
        await call.startVideo(localVideoStream);
    } catch (error) {
        console.error(error);
    }
}

/**
 * Stop your local video stream.
 * This will stop your local video stream from being sent to remote participants.
 */
stopVideoButton.onclick = async () => {
    try {
        await call.stopVideo(localVideoStream);
    } catch (error) {
        console.error(error);
    }
}

/**
 * To render a LocalVideoStream, you need to create a new instance of VideoStreamRenderer, and then
 * create a new VideoStreamRendererView instance using the asynchronous createView() method.
 * You may then attach view.target to any UI element.
 */
createLocalVideoStream = async () => {
    const camera = (await deviceManager.getCameras())[0];
    if (camera) {
        return new LocalVideoStream(camera);
    } else {
        console.error(`No camera device found on the system`);
    }
}

/**
 * Display your local video stream preview in your UI
 */
displayLocalVideoStream = async () => {
    try {
        localVideoStreamRenderer = new VideoStreamRenderer(localVideoStream);
        const view = await localVideoStreamRenderer.createView();
        localVideoContainer.hidden = false;
        localVideoContainer.appendChild(view.target);
    } catch (error) {
        console.error(error);
    }
}

/**
 * Remove your local video stream preview from your UI
 */
removeLocalVideoStream = async() => {
    try {
        localVideoStreamRenderer.dispose();
        localVideoContainer.hidden = true;
    } catch (error) {
        console.error(error);
    }
}

/**
 * End current room call
 */
hangUpCallButton.addEventListener("click", async () => {
    await call.hangUp();
});
Přidání kódu místního serveru webpacku
V kořenovém adresáři projektu vytvořte soubor s názvem webpack.config.js , který bude obsahovat logiku místního serveru pro účely tohoto rychlého startu. Do webpack.config.js přidejte následující kód:
const path = require('path');
const CopyPlugin = require("copy-webpack-plugin");

module.exports = {
    mode: 'development',
    entry: './index.js',
    output: {
        filename: 'main.js',
        path: path.resolve(__dirname, 'dist'),
    },
    devServer: {
        static: {
            directory: path.join(__dirname, './')
        },
    },
    plugins: [
        new CopyPlugin({
            patterns: [
                './index.html'
            ]
        }),
    ]
};
Spuštění kódu
Použijte k webpack-dev-server sestavení a spuštění aplikace. Spuštěním následujícího příkazu sbalte hostitele aplikace v místním webovém serveru:
`npx webpack serve --config webpack.config.js`
- Otevřete prohlížeč a přejděte na http://localhost:8080/.
- Do prvního vstupního pole zadejte platný přístupový token uživatele.
- Klikněte na "Inicializovat agenta volání" a zadejte ID místnosti.
- Klikněte na Připojit se k hovoru do místnosti.
Právě jste se úspěšně připojili k volání místnosti!
Principy připojení k hovoru do místnosti
Veškerý kód, který jste přidali do aplikace Rychlý start, vám umožnil úspěšně spustit a připojit se k hovoru do místnosti. Tady jsou další informace o tom, k jakým dalším metodám a obslužných rutinám máte přístup k místnostem za účelem rozšíření funkcí ve vaší aplikaci.
Pokud chcete zobrazit roli místních nebo vzdálených účastníků hovoru, přihlaste se k odběru obslužné rutiny níže.
// Subscribe to changes for your role in a call
 const callRoleChangedHandler = () => {
 	console.log(call.role);
 };

 call.on('roleChanged', callRoleChangedHandler);

// Subscribe to role changes for remote participants
 const subscribeToRemoteParticipant = (remoteParticipant) => {
 	remoteParticipant.on('roleChanged', () => {
 	    console.log(remoteParticipant.role);
 	});
 }
Další informace o rolích účastníků hovoru místností najdete v dokumentaci k konceptu místností.
Připojení k hovoru do místnosti
Pokud chcete postupovat podle tohoto rychlého startu, můžete si stáhnout rychlý start pro volání místnosti na GitHubu.
Nastavení
Vytvoření projektu Xcode
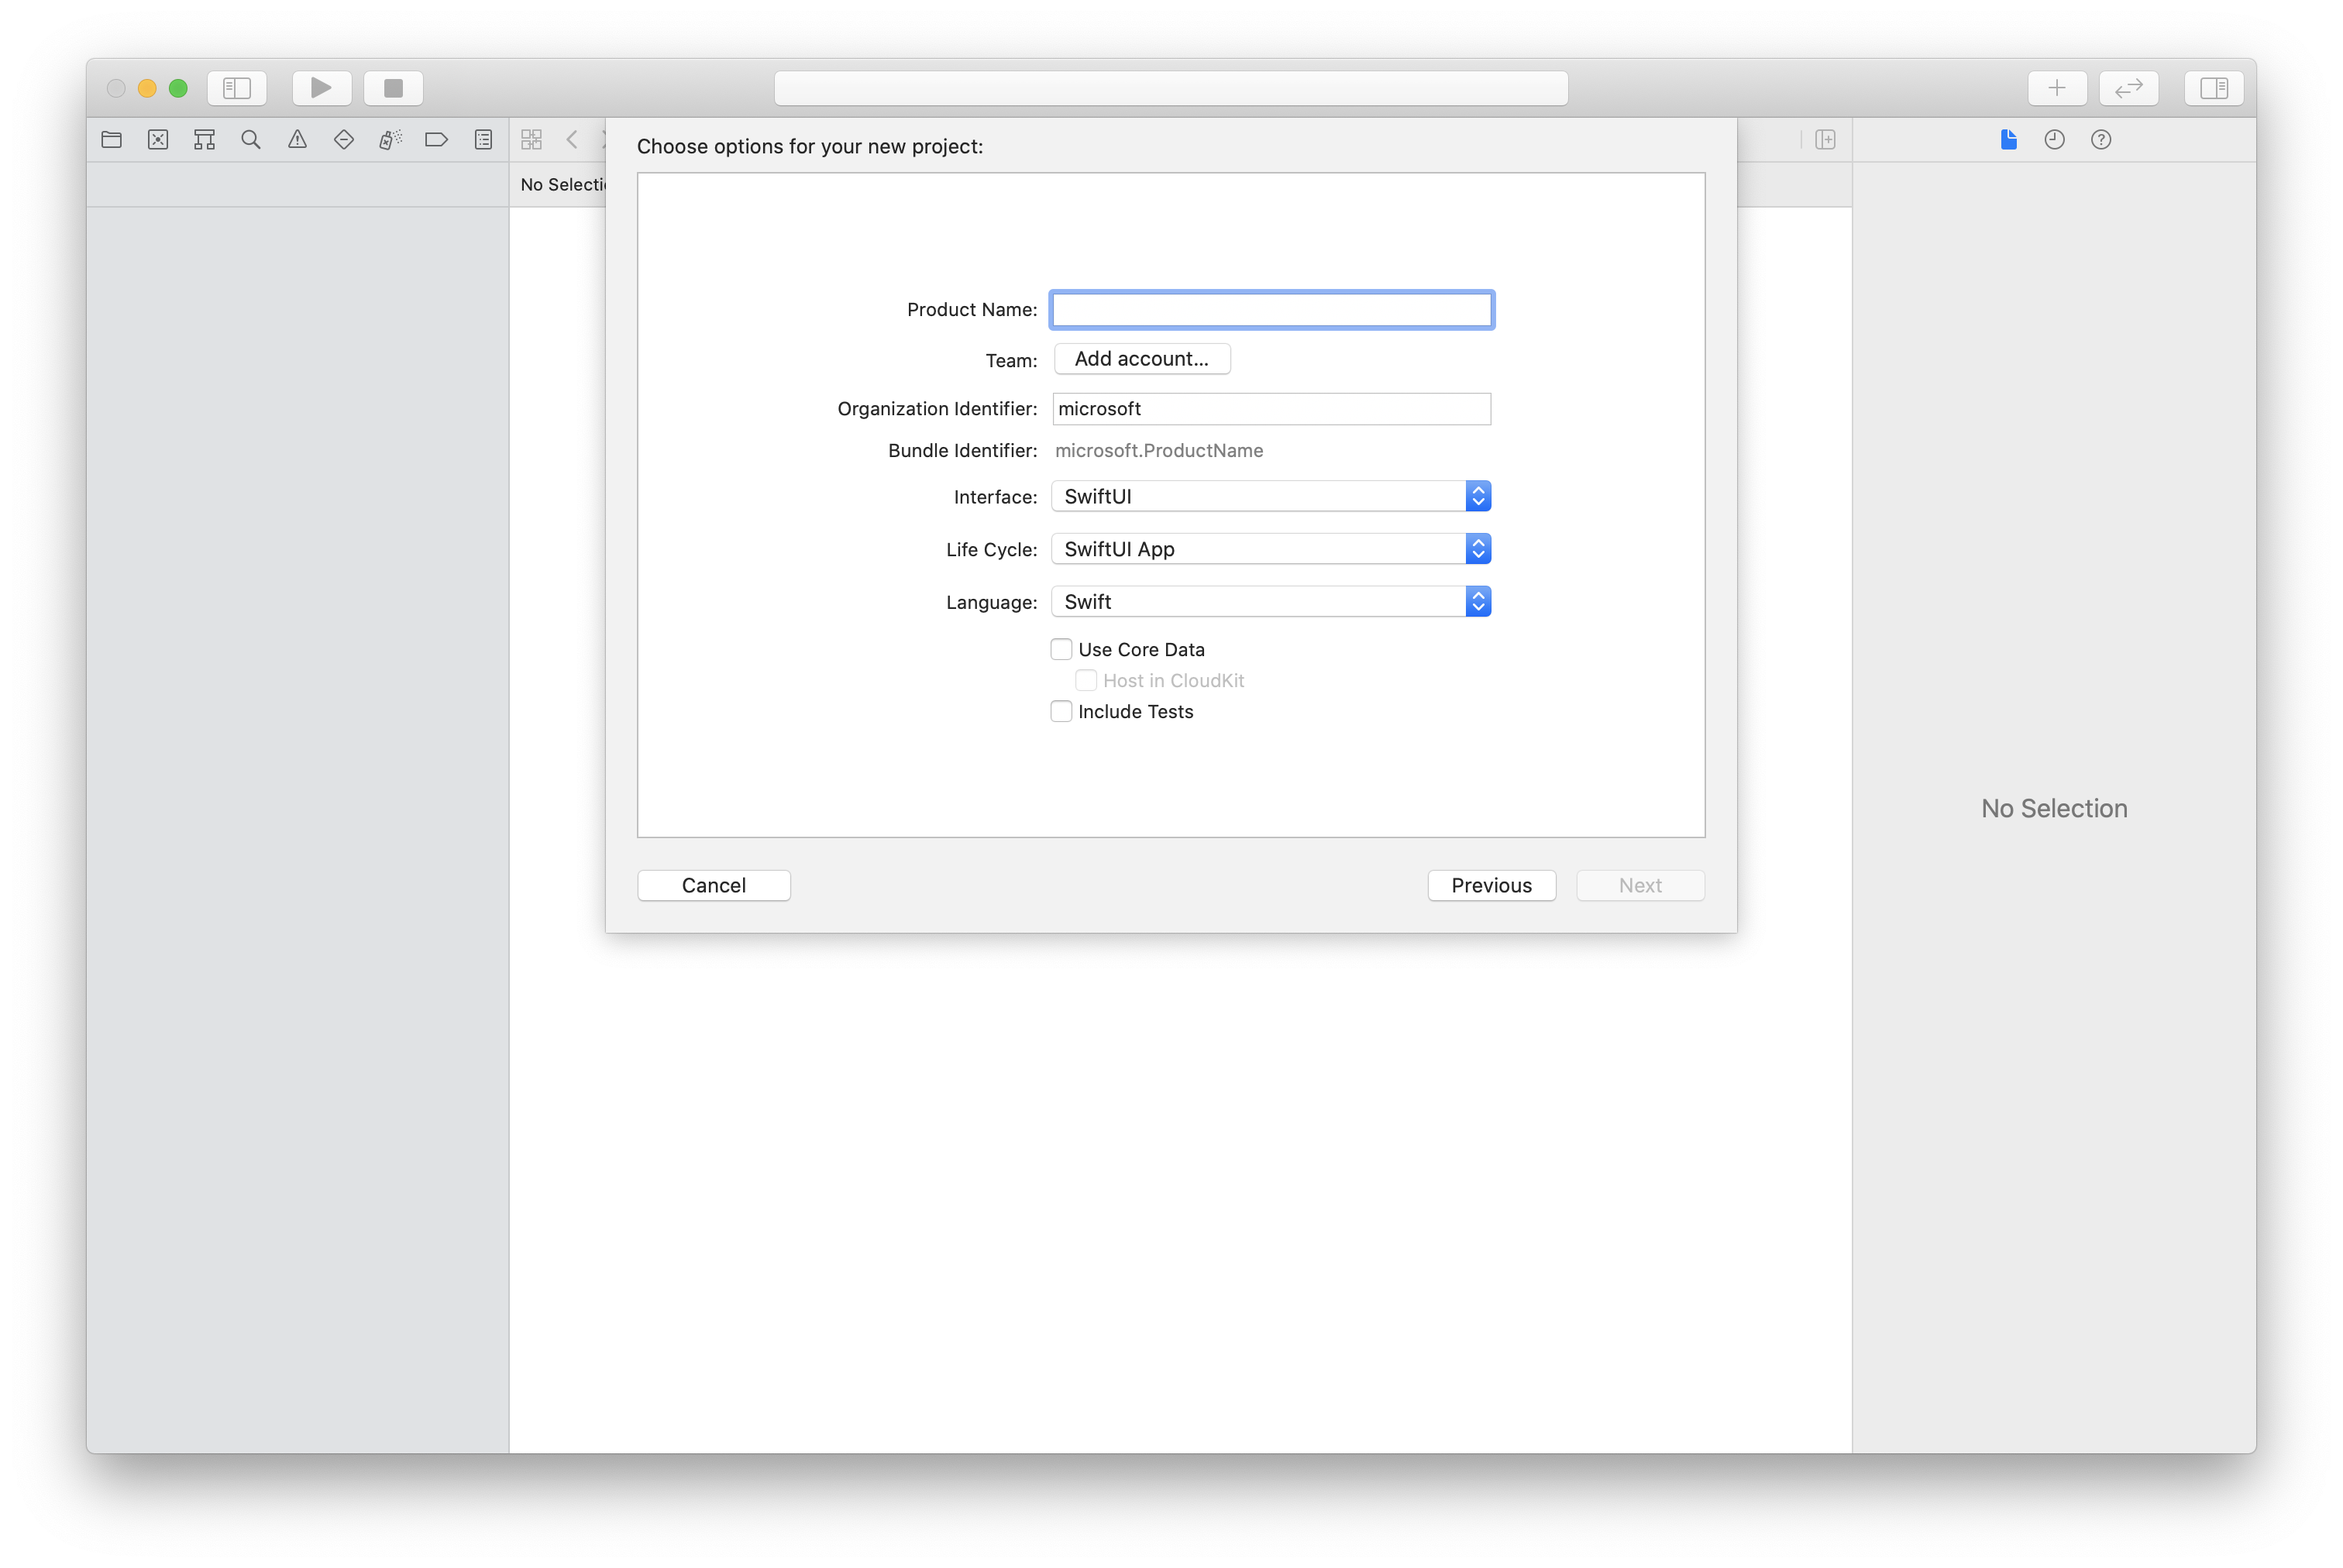
V Xcode vytvořte nový projekt pro iOS a vyberte šablonu aplikace s jedním zobrazením. Tento kurz používá architekturu SwiftUI, takže byste měli nastavit jazyk na Swift a uživatelské rozhraní na SwiftUI.
Instalace CocoaPods
Tento průvodce použijte k instalaci CocoaPods na Mac.
Instalace balíčku a závislostí pomocí CocoaPods
Pokud chcete vytvořit podfile pro vaši aplikaci, otevřete terminál a přejděte do složky projektu a spusťte inicializaci podu.
Do souboru Podfile přidejte následující kód a uložte ho:
platform :ios, '13.0'
use_frameworks!

target 'roomsquickstart' do
  pod 'AzureCommunicationCalling', '~> 2.5.0'
end
Spusťte instalaci podu.
.xcworkspaceOtevřete soubor pomocí Xcode.
Žádost o přístup k mikrofonu a fotoaparátu
Pokud chcete získat přístup k mikrofonu a fotoaparátu zařízení, musíte aktualizovat seznam vlastností informací aplikace pomocí NSMicrophoneUsageDescription a NSCameraUsageDescription. Nastavte přidruženou hodnotu na řetězec, který bude zahrnut v dialogovém okně, který systém používá k vyžádání přístupu od uživatele.
Klikněte pravým tlačítkem myši na Info.plist položku stromu projektu a vyberte Otevřít jako > zdrojový kód. Přidejte následující řádky oddílu nejvyšší úrovně <dict> a pak soubor uložte.
<key>NSMicrophoneUsageDescription</key>
<string>Need microphone access for VOIP calling.</string>
<key>NSCameraUsageDescription</key>
<string>Need camera access for video calling</string>
Nastavení architektury aplikace
Otevřete soubor projektu ContentView.swift a přidejte deklaraci importu do horní části souboru pro import AzureCommunicationCalling knihovny a AVFoundation. AvFoundation se používá k zachycení zvukového oprávnění z kódu.
import AzureCommunicationCalling
import AVFoundation
Objektový model
Následující třídy a rozhraní zpracovávají některé z hlavních funkcí sady SDK pro volání služeb Azure Communication Services pro iOS.
| Název | Popis |
|---|---|
| CallClient | CallClient je hlavní vstupní bod do volající sady SDK. |
| CallAgent | CallAgent slouží ke spouštění a správě volání. |
| CommunicationTokenCredential | CommunicationTokenCredential se používá jako přihlašovací údaje tokenu k vytvoření instance CallAgent. |
| CommunicationIdentifier | CommunicationIdentifier se používá k reprezentaci identity uživatele a může mít jednu z následujících hodnot: CommunicationUserIdentifier/Telefon NumberIdentifier/CallingApplication. |
| RoomCallLocator | CallAgent používá callagent k připojení k volání do místnosti. |
Vytvoření agenta volání
Nahraďte implementaci struktury ContentView některými jednoduchými ovládacími prvky uživatelského rozhraní, které uživateli umožňují zahájit a ukončit volání. K těmto ovládacím prvkům připojíme obchodní logiku v tomto rychlém startu.
struct ContentView: View {
    @State var roomId: String = ""
    @State var callObserver:CallObserver?
    @State var previewRenderer: VideoStreamRenderer? = nil
    @State var previewView: RendererView? = nil
    @State var sendingLocalVideo: Bool = false
    @State var speakerEnabled: Bool = false
    @State var muted: Bool = false
    @State var callClient: CallClient?
    @State var call: Call?
    @State var callHandler: CallHandler?
    @State var callAgent: CallAgent?
    @State var deviceManager: DeviceManager?
    @State var localVideoStreams: [LocalVideoStream]?
    @State var callState: String = "Unknown"
    @State var showAlert: Bool = false
    @State var alertMessage: String = ""
    @State var participants: [[Participant]] = [[]]

    var body: some View {
        NavigationView {
            ZStack {
                if (call == nil) {
                    Form {
                        Section {
                            TextField("Room ID", text: $roomId)
                            Button(action: joinRoomCall) {
                                Text("Join Room Call")
                            }
                        }
                    }
                    .navigationBarTitle("Rooms Quickstart")
                } else {
                    ZStack {
                        VStack {
                            ForEach(participants, id:\.self) { array in
                                HStack {
                                    ForEach(array, id:\.self) { participant in
                                        ParticipantView(self, participant)
                                    }
                                }
                                .frame(maxWidth: .infinity, maxHeight: 200, alignment: .topLeading)
                            }
                        }
                        .background(Color.black)
                        .frame(maxWidth: .infinity, maxHeight: .infinity, alignment: .topLeading)
                        VStack {
                            if (sendingLocalVideo) {
                                HStack {
                                    RenderInboundVideoView(view: $previewView)
                                        .frame(width:90, height:160)
                                        .padding(10)
                                        .background(Color.green)
                                }
                                .frame(maxWidth: .infinity, alignment: .trailing)
                            }
                            HStack {
                                Button(action: toggleMute) {
                                    HStack {
                                        Text(muted ? "Unmute" : "Mute")
                                    }
                                    .frame(width:80)
                                    .padding(.vertical, 10)
                                    .background(Color(.lightGray))
                                }
                                Button(action: toggleLocalVideo) {
                                    HStack {
                                        Text(sendingLocalVideo ? "Video-Off" : "Video-On")
                                    }
                                    .frame(width:80)
                                    .padding(.vertical, 10)
                                    .background(Color(.lightGray))
                                }
                            }
                            .frame(maxWidth: .infinity, alignment: .leading)
                            .padding(.horizontal, 10)
                            .padding(.vertical, 5)
                            HStack {
                                Button(action: leaveRoomCall) {
                                    HStack {
                                        Text("Leave Room Call")
                                    }
                                    .frame(width:80)
                                    .padding(.vertical, 10)
                                    .background(Color(.red))
                                }
                            }
                            .frame(maxWidth: .infinity, alignment: .leading)
                            .padding(.horizontal, 10)
                            .padding(.vertical, 5)
                            HStack {
                                Text("Status:")
                                Text(callState)
                            }
                            .padding(.vertical, 10)
                        }
                        .frame(maxWidth: .infinity, maxHeight: .infinity, alignment: .bottomLeading)
                    }
                }
            }
        }
        .onAppear{
            // Authenticate the client
            // Initialize the CallAgent and access Device Manager
            // Ask for permissions
        }
    }
}

//Functions and Observers

struct HomePageView_Previews: PreviewProvider {
    static var previews: some View {
        HomePageView()
    }
}
Ověření klienta
Abychom mohli inicializovat instanci CallAgent, potřebujeme přístupový token uživatele, který nám umožní připojit se k volání do místnosti.
Jakmile máte token, přidejte do zpětného onAppear volání následující kód .ContentView.swift Musíte nahradit <USER ACCESS TOKEN> platným přístupovým tokenem uživatele pro váš prostředek:
var userCredential: CommunicationTokenCredential?
do {
    userCredential = try CommunicationTokenCredential(token: "<USER ACCESS TOKEN>")
} catch {
    print("ERROR: It was not possible to create user credential.")
    return
}
Inicializace callagentu a přístup k Správce zařízení
Chcete-li vytvořit CallAgent instance z CallClient, použijte callClient.createCallAgent metodu, která asynchronně vrátí CallAgent objekt po inicializaci. DeviceManager umožňuje vytvořit výčet místních zařízení, která se dají použít při volání k přenosu zvukových datových proudů nebo datových proudů videa. Umožňuje také požádat uživatele o oprávnění pro přístup k mikrofonu nebo fotoaparátu.
self.callClient = CallClient()
self.callClient?.createCallAgent(userCredential: userCredential!) { (agent, error) in
    if error != nil {
        print("ERROR: It was not possible to create a call agent.")
        return
    } else {
        self.callAgent = agent
        print("Call agent successfully created.")
        self.callAgent!.delegate = callHandler
        self.callClient?.getDeviceManager { (deviceManager, error) in
            if (error == nil) {
                print("Got device manager instance")
                self.deviceManager = deviceManager
            } else {
                print("Failed to get device manager instance")
            }
        }
    }
}
Požádat o oprávnění
Do zpětného onAppear volání musíme přidat následující kód, abychom požádali o oprávnění pro zvuk a video.
AVAudioSession.sharedInstance().requestRecordPermission { (granted) in
    if granted {
        AVCaptureDevice.requestAccess(for: .video) { (videoGranted) in
            /* NO OPERATION */
        }
    }
}
Připojení k hovoru do místnosti
Metoda joinRoomCall je nastavena jako akce, která se provede při klepnutí na tlačítko Připojit se k místnosti volání. V tomto rychlém startu jsou hovory ve výchozím nastavení zvukové, ale můžou mít zapnuté video, jakmile se připojí místnost.
func joinRoomCall() {
    if self.callAgent == nil {
        print("CallAgent not initialized")
        return
    }

    if (self.roomId.isEmpty) {
        print("Room ID not set")
        return
    }

    // Join a call with a Room ID
    let options = JoinCallOptions()
    let audioOptions = AudioOptions()
    audioOptions.muted = self.muted

    options.audioOptions = audioOptions

    let roomCallLocator = RoomCallLocator(roomId: roomId)
    self.callAgent!.join(with: roomCallLocator, joinCallOptions: options) { (call, error) in
        self.setCallAndObserver(call: call, error: error)
    }
}
CallObserver slouží ke správě událostí mid-call a vzdálených účastníků. Nastavíme pozorovatele ve setCallAndOberserver funkci.
func setCallAndObserver(call:Call!, error:Error?) {
    if (error == nil) {
        self.call = call
        self.callObserver = CallObserver(view:self)

        self.call!.delegate = self.callObserver

        if (self.call!.state == CallState.connected) {
            self.callObserver!.handleInitialCallState(call: call)
        }
    } else {
        print("Failed to get call object")
    }
}
Opuštění hovoru z místnosti
Metoda leaveRoomCall je nastavena jako akce, která se provede při klepnutí na tlačítko Opustit místnost volání. Zpracovává opuštění hovoru a vyčistí všechny vytvořené prostředky.
private func leaveRoomCall() {
    if (self.sendingLocalVideo) {
        self.call!.stopVideo(stream: self.localVideoStreams!.first!) { (error) in
            if (error != nil) {
                print("Failed to stop video")
            } else {
                self.sendingLocalVideo = false
                self.previewView = nil
                self.previewRenderer?.dispose()
                self.previewRenderer = nil
            }
        }
    }
    self.call?.hangUp(options: nil) { (error) in }
    self.participants.removeAll()
    self.call?.delegate = nil
    self.call = nil
}
Vysílání videa
Během hovoru do místnosti můžeme použít startVideo nebo stopVideo zahájit nebo ukončit odesílání LocalVideoStream vzdáleným účastníkům.
func toggleLocalVideo() {
    if (self.sendingLocalVideo) {
        self.call!.stopVideo(stream: self.localVideoStreams!.first!) { (error) in
            if (error != nil) {
                print("Cannot stop video")
            } else {
                self.sendingLocalVideo = false
                self.previewView = nil
                self.previewRenderer!.dispose()
                self.previewRenderer = nil
            }
        }
    } else {
        let availableCameras = self.deviceManager!.cameras
        let scalingMode:ScalingMode = .crop
        if (self.localVideoStreams == nil) {
            self.localVideoStreams = [LocalVideoStream]()
        }
        self.localVideoStreams!.append(LocalVideoStream(camera: availableCameras.first!))
        self.previewRenderer = try! VideoStreamRenderer(localVideoStream: self.localVideoStreams!.first!)
        self.previewView = try! previewRenderer!.createView(withOptions: CreateViewOptions(scalingMode:scalingMode))
        self.call!.startVideo(stream: self.localVideoStreams!.first!) { (error) in
            if (error != nil) {
                print("Cannot start video")
            }
            else {
                self.sendingLocalVideo = true
            }
        }
    }
}
Ztlumení místního zvuku
Během hovoru v místnosti můžeme použít mute nebo unMute ztlumit nebo zrušit ztlumení mikrofonu.
func toggleMute() {
    if (self.muted) {
        call!.unmuteOutgoingAudio(completionHandler: { (error) in
            if error == nil {
                self.muted = false
            }
        })
    } else {
        call!.muteOutgoingAudio(completionHandler: { (error) in
            if error == nil {
                self.muted = true
            }
        })
    }
}
Zpracování aktualizací volání
Pokud chcete řešit aktualizace volání, implementujte CallHandler pro zpracování událostí aktualizace. Vložte následující implementaci do CallHandler.swiftsouboru .
final class CallHandler: NSObject, CallAgentDelegate {
    public var owner: ContentView?

    private static var instance: CallHandler?
    static func getOrCreateInstance() -> CallHandler {
        if let c = instance {
            return c
        }
        instance = CallHandler()
        return instance!
    }

    private override init() {}

    public func callAgent(_ callAgent: CallAgent, didUpdateCalls args: CallsUpdatedEventArgs) {
        if let removedCall = args.removedCalls.first {
            owner?.call = nil
        }
    }
}
Potřebujeme vytvořit instanci tak, že do zpětného CallHandleronAppearContentView.swiftvolání přidáme následující kód:
self.callHandler = CallHandler.getOrCreateInstance()
self.callHandler.owner = self
Po úspěšném vytvoření callagentu nastavte delegáta na CallAgent:
self.callAgent!.delegate = callHandler
Vzdálená správa účastníků
Všichni vzdálení účastníci jsou reprezentováni typem RemoteParticipant a jsou k dispozici prostřednictvím remoteParticipants kolekce v instanci volání. Můžeme implementovat Participant třídu pro správu aktualizací ve vzdálených video streamech vzdálených účastníků mimo jiné.
class Participant: NSObject, RemoteParticipantDelegate, ObservableObject {
    private var videoStreamCount = 0
    private let innerParticipant:RemoteParticipant
    private let call:Call
    private var renderedRemoteVideoStream:RemoteVideoStream?

    @Published var state:ParticipantState = ParticipantState.disconnected
    @Published var isMuted:Bool = false
    @Published var isSpeaking:Bool = false
    @Published var hasVideo:Bool = false
    @Published var displayName:String = ""
    @Published var videoOn:Bool = true
    @Published var renderer:VideoStreamRenderer? = nil
    @Published var rendererView:RendererView? = nil
    @Published var scalingMode: ScalingMode = .fit

    init(_ call: Call, _ innerParticipant: RemoteParticipant) {
        self.call = call
        self.innerParticipant = innerParticipant
        self.displayName = innerParticipant.displayName

        super.init()

        self.innerParticipant.delegate = self

        self.state = innerParticipant.state
        self.isMuted = innerParticipant.isMuted
        self.isSpeaking = innerParticipant.isSpeaking
        self.hasVideo = innerParticipant.videoStreams.count > 0
        if(self.hasVideo) {
            handleInitialRemoteVideo()
        }
    }

    deinit {
        self.innerParticipant.delegate = nil
    }

    func getMri() -> String {
        Utilities.toMri(innerParticipant.identifier)
    }

    func set(scalingMode: ScalingMode) {
        if self.rendererView != nil {
            self.rendererView!.update(scalingMode: scalingMode)
        }
        self.scalingMode = scalingMode
    }

    func handleInitialRemoteVideo() {
        renderedRemoteVideoStream = innerParticipant.videoStreams[0]
        renderer = try! VideoStreamRenderer(remoteVideoStream: renderedRemoteVideoStream!)
        rendererView = try! renderer!.createView()
    }

    func toggleVideo() {
        if videoOn {
            rendererView = nil
            renderer?.dispose()
            videoOn = false
        }
        else {
            renderer = try! VideoStreamRenderer(remoteVideoStream: innerParticipant.videoStreams[0])
            rendererView = try! renderer!.createView()
            videoOn = true
        }
    }

    func remoteParticipant(_ remoteParticipant: RemoteParticipant, didUpdateVideoStreams args: RemoteVideoStreamsEventArgs) {
        let hadVideo = hasVideo
        hasVideo = innerParticipant.videoStreams.count > 0
        if videoOn {
            if hadVideo && !hasVideo {
                // Remote user stopped sharing
                rendererView = nil
                renderer?.dispose()
            } else if hasVideo && !hadVideo {
                // remote user started sharing
                renderedRemoteVideoStream = innerParticipant.videoStreams[0]
                renderer = try! VideoStreamRenderer(remoteVideoStream: renderedRemoteVideoStream!)
                rendererView = try! renderer!.createView()
            } else if hadVideo && hasVideo {
                if args.addedRemoteVideoStreams.count > 0 {
                    if renderedRemoteVideoStream?.id == args.addedRemoteVideoStreams[0].id {
                        return
                    }

                    // remote user added a second video, so switch to the latest one
                    guard let rendererTemp = renderer else {
                        return
                    }
                    rendererTemp.dispose()
                    renderedRemoteVideoStream = args.addedRemoteVideoStreams[0]
                    renderer = try! VideoStreamRenderer(remoteVideoStream: renderedRemoteVideoStream!)
                    rendererView = try! renderer!.createView()
                } else if args.removedRemoteVideoStreams.count > 0 {
                    if args.removedRemoteVideoStreams[0].id == renderedRemoteVideoStream!.id {
                        // remote user stopped sharing video that we were rendering but is sharing
                        // another video that we can render
                        renderer!.dispose()

                        renderedRemoteVideoStream = innerParticipant.videoStreams[0]
                        renderer = try! VideoStreamRenderer(remoteVideoStream: renderedRemoteVideoStream!)
                        rendererView = try! renderer!.createView()
                    }
                }
            }
        }
    }

    func remoteParticipant(_ remoteParticipant: RemoteParticipant, didChangeDisplayName args: PropertyChangedEventArgs) {
        self.displayName = innerParticipant.displayName
    }
}

class Utilities {
    @available(*, unavailable) private init() {}

    public static func toMri(_ id: CommunicationIdentifier?) -> String {

        if id is CommunicationUserIdentifier {
            let communicationUserIdentifier = id as! CommunicationUserIdentifier
            return communicationUserIdentifier.identifier
        } else {
            return "<nil>"
        }
    }
}
Streamy videa vzdáleného účastníka
Můžeme vytvořit, abychom ParticipantView zvládli vykreslování video streamů vzdálených účastníků. Vložte implementaci do ParticipantView.swift
struct ParticipantView : View, Hashable {
    static func == (lhs: ParticipantView, rhs: ParticipantView) -> Bool {
        return lhs.participant.getMri() == rhs.participant.getMri()
    }

    private let owner: HomePageView

    @State var showPopUp: Bool = false
    @State var videoHeight = CGFloat(200)
    @ObservedObject private var participant:Participant

    var body: some View {
        ZStack {
            if (participant.rendererView != nil) {
                HStack {
                    RenderInboundVideoView(view: $participant.rendererView)
                }
                .background(Color(.black))
                .frame(height: videoHeight)
                .animation(Animation.default)
            } else {
                HStack {
                    Text("No incoming video")
                }
                .background(Color(.red))
                .frame(height: videoHeight)
            }
        }
    }

    func hash(into hasher: inout Hasher) {
        hasher.combine(participant.getMri())
    }

    init(_ owner: HomePageView, _ participant: Participant) {
        self.owner = owner
        self.participant = participant
    }

    func resizeVideo() {
        videoHeight = videoHeight == 200 ? 150 : 200
    }

    func showAlert(_ title: String, _ message: String) {
        DispatchQueue.main.asyncAfter(deadline: .now() + 0.1) {
            self.owner.alertMessage = message
            self.owner.showAlert = true
        }
    }
}

struct RenderInboundVideoView: UIViewRepresentable {
    @Binding var view:RendererView!

    func makeUIView(context: Context) -> UIView {
        return UIView()
    }

    func updateUIView(_ uiView: UIView, context: Context) {
        for view in uiView.subviews {
            view.removeFromSuperview()
        }
        if (view != nil) {
            uiView.addSubview(view)
        }
    }
}
Přihlášení k odběru událostí
Můžeme implementovat CallObserver třídu pro přihlášení k odběru kolekce událostí, které mají být upozorněny, když hodnoty, například remoteParticipants, změnit během volání.
public class CallObserver : NSObject, CallDelegate
{
    private var owner: ContentView
    private var firstTimeCallConnected: Bool = true

    init(view: ContentView) {
        owner = view
        super.init()
    }

    public func call(_ call: Call, didChangeState args: PropertyChangedEventArgs) {
        let state = CallObserver.callStateToString(state:call.state)
        owner.callState = state
        if (call.state == CallState.disconnected) {
            owner.leaveRoomCall()
        }
        else if (call.state == CallState.connected) {
            if(self.firstTimeCallConnected) {
                self.handleInitialCallState(call: call);
            }
            self.firstTimeCallConnected = false;
        }
    }

    public func handleInitialCallState(call: Call) {
        // We want to build a matrix with max 2 columns

        owner.callState = CallObserver.callStateToString(state:call.state)
        var participants = [Participant]()

        // Add older/existing participants
        owner.participants.forEach { (existingParticipants: [Participant]) in
            participants.append(contentsOf: existingParticipants)
        }
        owner.participants.removeAll()

        // Add new participants to the collection
        for remoteParticipant in call.remoteParticipants {
            let mri = Utilities.toMri(remoteParticipant.identifier)
            let found = participants.contains { (participant) -> Bool in
                participant.getMri() == mri
            }

            if !found {
                let participant = Participant(call, remoteParticipant)
                participants.append(participant)
            }
        }

        // Convert 1-D array into a 2-D array with 2 columns
        var indexOfParticipant = 0
        while indexOfParticipant < participants.count {
            var newParticipants = [Participant]()
            newParticipants.append(participants[indexOfParticipant])
            indexOfParticipant += 1
            if (indexOfParticipant < participants.count) {
                newParticipants.append(participants[indexOfParticipant])
                indexOfParticipant += 1
            }
            owner.participants.append(newParticipants)
        }
    }

    public func call(_ call: Call, didUpdateRemoteParticipant args: ParticipantsUpdatedEventArgs) {
        var participants = [Participant]()
        // Add older/existing participants
        owner.participants.forEach { (existingParticipants: [Participant]) in
            participants.append(contentsOf: existingParticipants)
        }
        owner.participants.removeAll()

        // Remove deleted participants from the collection
        args.removedParticipants.forEach { p in
            let mri = Utilities.toMri(p.identifier)
            participants.removeAll { (participant) -> Bool in
                participant.getMri() == mri
            }
        }

        // Add new participants to the collection
        for remoteParticipant in args.addedParticipants {
            let mri = Utilities.toMri(remoteParticipant.identifier)
            let found = participants.contains { (view) -> Bool in
                view.getMri() == mri
            }

            if !found {
                let participant = Participant(call, remoteParticipant)
                participants.append(participant)
            }
        }

        // Convert 1-D array into a 2-D array with 2 columns
        var indexOfParticipant = 0
        while indexOfParticipant < participants.count {
            var array = [Participant]()
            array.append(participants[indexOfParticipant])
            indexOfParticipant += 1
            if (indexOfParticipant < participants.count) {
                array.append(participants[indexOfParticipant])
                indexOfParticipant += 1
            }
            owner.participants.append(array)
        }
    }

    private static func callStateToString(state:CallState) -> String {
        switch state {
        case .connected: return "Connected"
        case .connecting: return "Connecting"
        case .disconnected: return "Disconnected"
        case .disconnecting: return "Disconnecting"
        case .none: return "None"
        default: return "Unknown"
        }
    }
}
Spuštění kódu
Aplikaci můžete sestavit a spustit v simulátoru iOS tak, že vyberete Spuštění produktu > nebo pomocí klávesové zkratky (⌘-R).
Možnost připojit se k volání do místnosti a zobrazit role účastníků hovorů je dostupná v sadě iOS Mobile Calling SDK verze 2.5.0 a vyšší.
Další informace o rolích účastníků hovoru místností najdete v dokumentaci k konceptu místností.
Ukázková aplikace
Pokud chcete postupovat podle tohoto rychlého startu, můžete si stáhnout rychlý start pro volání místnosti na GitHubu.
Nastavení projektu
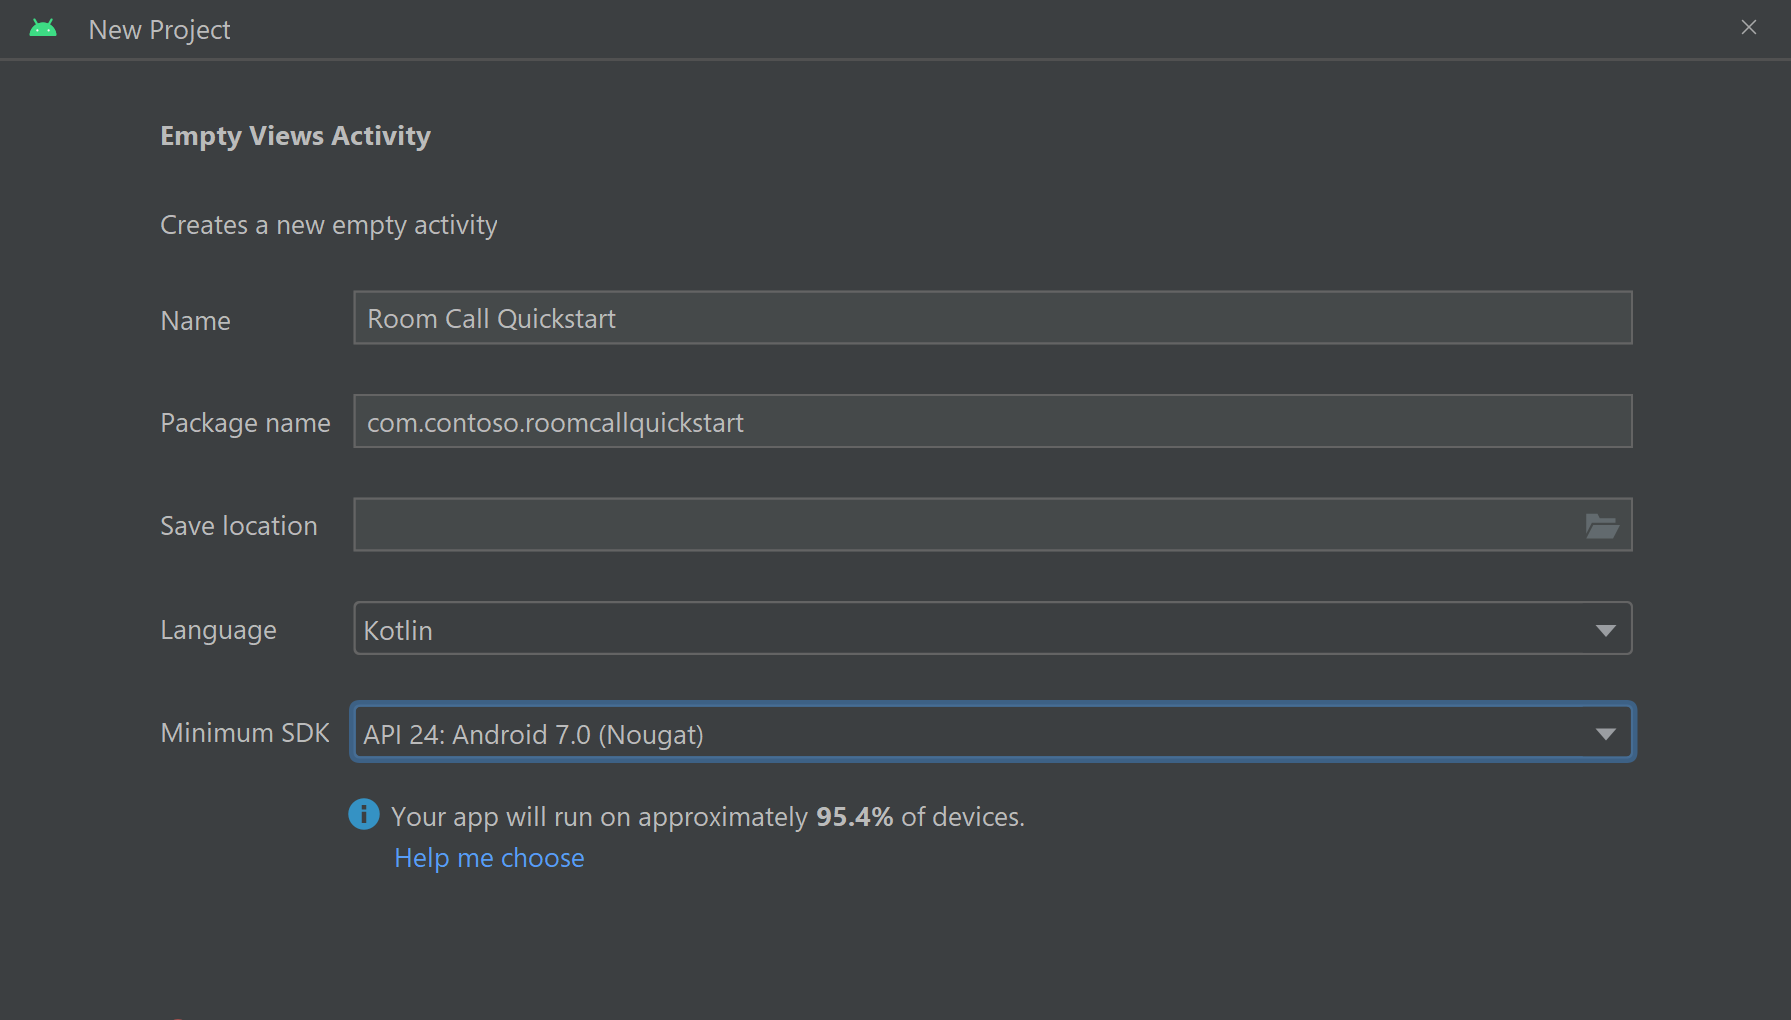
Vytvoření aplikace pro Android s prázdnou aktivitou
V Android Studiu vytvořte nový projekt:
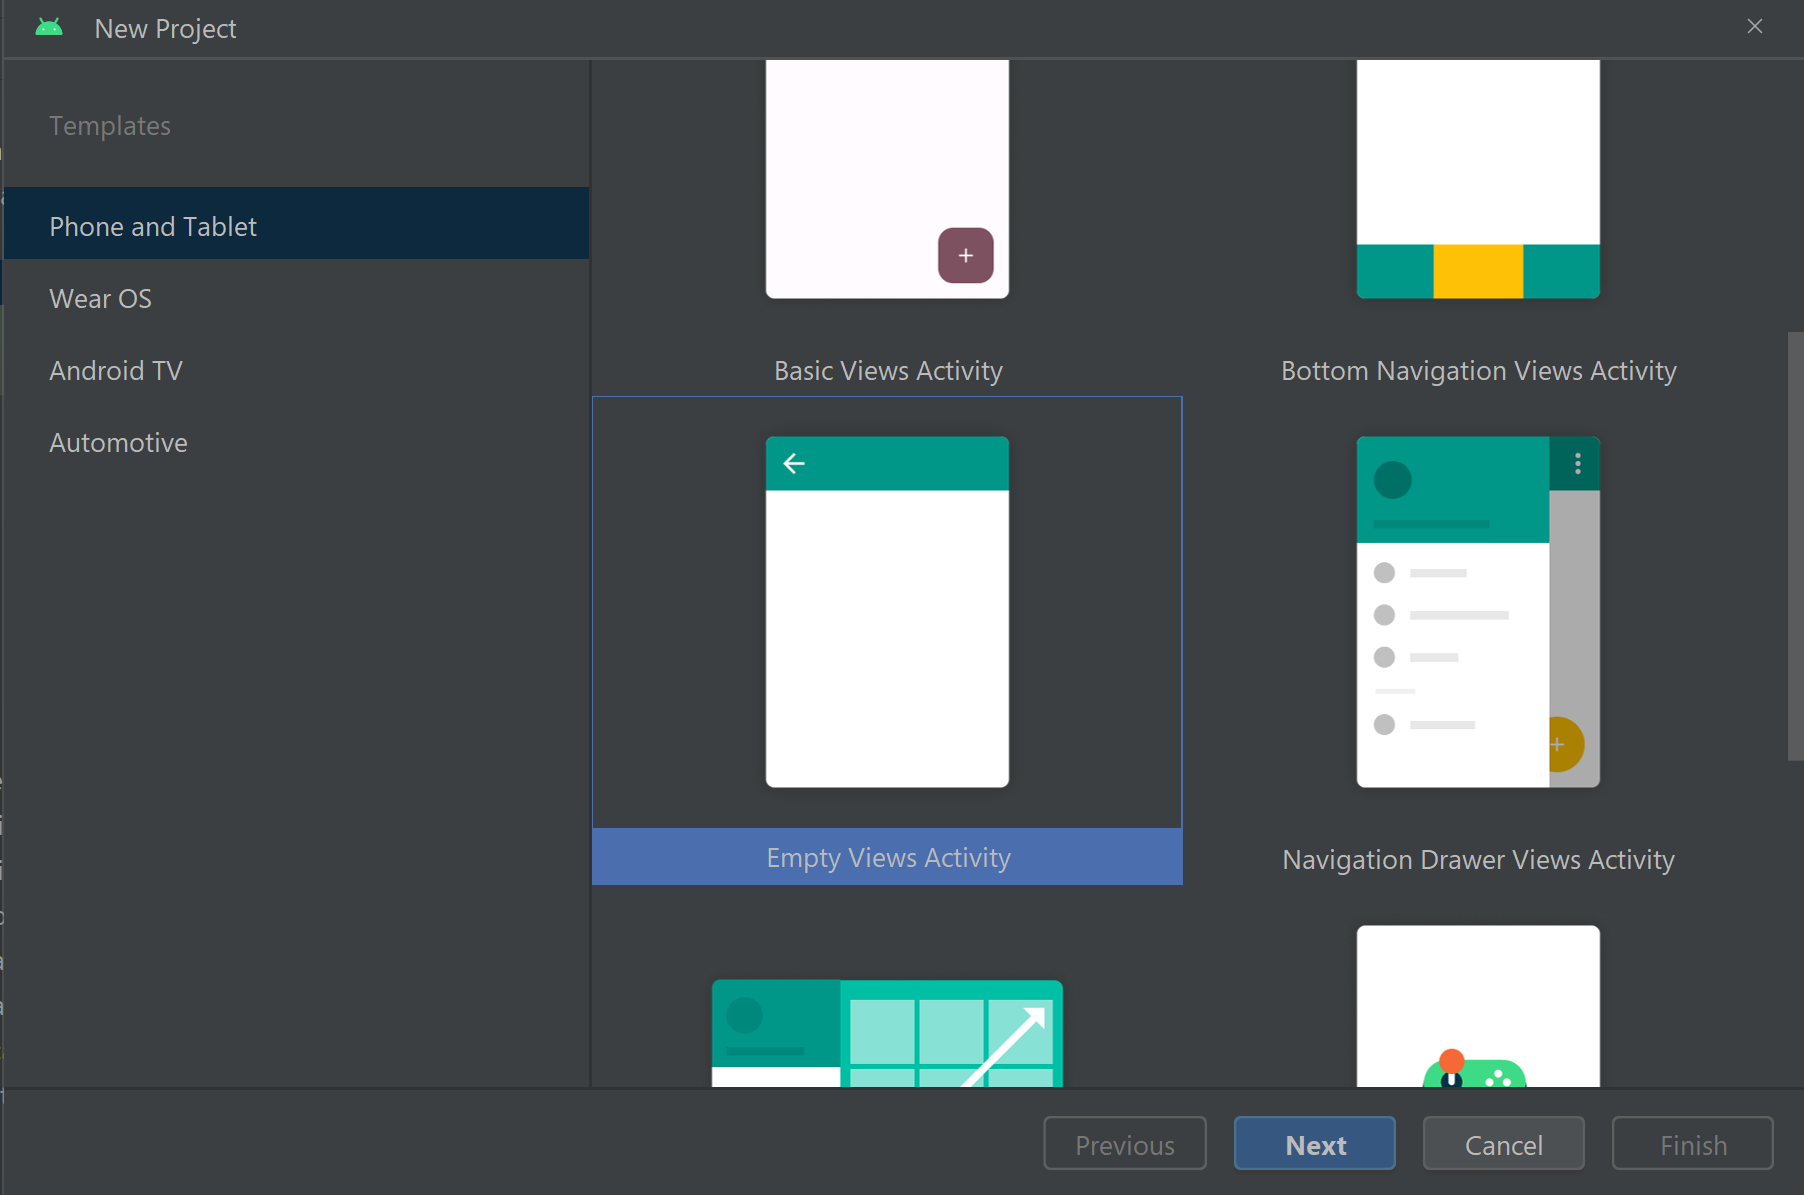
Pojmenujte projekt Rychlý start Pro volání do místnosti a vyberte Kotlin.
Nainstalujte balíček .
Na úrovni build.gradlemodulu přidejte do oddílu dependencies následující řádek.
dependencies {
    ...
    //Ability to join a Rooms calls is available in 2.4.0 or above.
    implementation 'com.azure.android:azure-communication-calling:2.4.0'
    ...
}
Přidání oprávnění k manifestu aplikace
Pokud chcete požádat o oprávnění požadovaná k volání, musíte nejprve deklarovat oprávnění v manifestu aplikace (app/src/main/AndroidManifest.xml). Zkopírujte následující soubor manifestu:
<?xml version="1.0" encoding="utf-8"?>
<manifest xmlns:android="http://schemas.android.com/apk/res/android">

    <uses-feature
        android:name="android.hardware.camera"
        android:required="false" />

    <uses-permission android:name="android.permission.INTERNET" />
    <uses-permission android:name="android.permission.ACCESS_NETWORK_STATE" />
    <uses-permission android:name="android.permission.ACCESS_WIFI_STATE" />
    <uses-permission android:name="android.permission.RECORD_AUDIO" />
    <uses-permission android:name="android.permission.CAMERA" />

    <application
        android:allowBackup="true"
        android:icon="@mipmap/ic_launcher"
        android:label="@string/app_name"
        android:roundIcon="@mipmap/ic_launcher_round"
        android:supportsRtl="true"
        android:theme="@style/Theme.AppTheme">

        <!--Our Calling SDK depends on the Apache HTTP SDK.
    When targeting Android SDK 28+, this library needs to be explicitly referenced.
    See https://developer.android.com/about/versions/pie/android-9.0-changes-28#apache-p-->
        <uses-library android:name="org.apache.http.legacy" android:required="false"/>
        <activity
            android:name=".MainActivity"
            android:exported="true">
            <intent-filter>
                <action android:name="android.intent.action.MAIN" />

                <category android:name="android.intent.category.LAUNCHER" />
            </intent-filter>
        </activity>
    </application>

</manifest>
Nastavení rozložení aplikace
Potřebujete textový vstup pro ID místnosti, tlačítko pro umístění hovoru a tlačítko navíc pro zavěsení hovoru.
Přejděte na app/src/main/res/layout/activity_main.xmlpoložku a nahraďte obsah souboru následujícím kódem:
<?xml version="1.0" encoding="utf-8"?>
<androidx.constraintlayout.widget.ConstraintLayout
    xmlns:android="http://schemas.android.com/apk/res/android"
    xmlns:app="http://schemas.android.com/apk/res-auto"
    xmlns:tools="http://schemas.android.com/tools"
    android:layout_width="match_parent"
    android:layout_height="match_parent"
    tools:context=".MainActivity">

    <TextView
        android:id="@+id/text_role"
        android:layout_width="wrap_content"
        android:layout_height="wrap_content"
        android:text="Role:"
        android:textSize="16sp"
        android:textStyle="bold"
        app:layout_constraintTop_toTopOf="parent"
        app:layout_constraintStart_toStartOf="parent"
        app:layout_constraintEnd_toEndOf="parent"
        android:layout_marginTop="16dp" />

    <TextView
        android:id="@+id/text_call_status"
        android:layout_width="wrap_content"
        android:layout_height="wrap_content"
        android:text="Call Status"
        android:textSize="16sp"
        android:textStyle="bold"
        app:layout_constraintTop_toTopOf="parent"
        app:layout_constraintStart_toStartOf="parent"
        app:layout_constraintEnd_toEndOf="parent"
        android:layout_marginTop="48dp" />

    <EditText
        android:id="@+id/room_id"
        android:layout_width="match_parent"
        android:layout_height="wrap_content"
        android:ems="10"
        android:hint="Room ID"
        android:inputType="textPersonName"
        android:layout_marginTop="100dp"
        android:layout_marginHorizontal="20dp"
        app:layout_constraintTop_toTopOf="parent"
        app:layout_constraintStart_toStartOf="parent"
        app:layout_constraintEnd_toEndOf="parent" />

    <LinearLayout
        android:layout_width="match_parent"
        android:layout_height="wrap_content"
        android:layout_marginBottom="260dp"
        android:gravity="center"
        app:layout_constraintBottom_toBottomOf="parent"
        app:layout_constraintEnd_toEndOf="parent"
        app:layout_constraintStart_toStartOf="parent">

        <Button
            android:id="@+id/call_button"
            android:layout_width="wrap_content"
            android:layout_marginEnd="32dp"
            android:layout_height="wrap_content"
            android:text="Start Call" />

        <Button
            android:id="@+id/hangup_button"
            android:layout_width="wrap_content"
            android:layout_height="wrap_content"
            android:text="Hangup" />

    </LinearLayout>

</androidx.constraintlayout.widget.ConstraintLayout>
Vytvoření hlavní aktivity
Když máte vytvořené rozložení, můžete přidat logiku pro zahájení volání místnosti. Aktivita zpracovává žádosti o oprávnění modulu runtime, vytvoření agenta volání a umístění hovoru při stisknutí tlačítka.
Metoda onCreate vyvolá getAllPermissions a createAgenta přidá vazby pro tlačítko volání.
K této události dochází pouze jednou při vytvoření aktivity. Další informace o onCreatetom najdete v průvodci Vysvětlení životního cyklu aktivity.
Přejděte do souboru MainActivity.kt a nahraďte obsah následujícím kódem:
package com.contoso.roomscallquickstart

import android.Manifest
import android.annotation.SuppressLint
import android.content.pm.PackageManager
import android.media.AudioManager
import android.os.Bundle
import android.widget.Button
import android.widget.EditText
import android.widget.TextView
import android.widget.Toast
import androidx.appcompat.app.AppCompatActivity
import androidx.core.app.ActivityCompat
import com.azure.android.communication.calling.Call
import com.azure.android.communication.calling.CallAgent
import com.azure.android.communication.calling.CallClient
import com.azure.android.communication.calling.HangUpOptions
import com.azure.android.communication.calling.JoinCallOptions
import com.azure.android.communication.calling.RoomCallLocator
import com.azure.android.communication.common.CommunicationTokenCredential
import java.util.concurrent.ExecutionException

class MainActivity : AppCompatActivity() {
    private val allPermissions = arrayOf(
        Manifest.permission.RECORD_AUDIO,
        Manifest.permission.CAMERA,
        Manifest.permission.READ_PHONE_STATE
    )

    private val userToken = "<ACS_USER_TOKEN>"
    private lateinit var callAgent: CallAgent
    private var call: Call? = null

    private lateinit var roleTextView: TextView
    private lateinit var statusView: TextView

    override fun onCreate(savedInstanceState: Bundle?) {
        super.onCreate(savedInstanceState)
        setContentView(R.layout.activity_main)

        getAllPermissions()
        createCallAgent()

        val callButton: Button = findViewById(R.id.call_button)
        callButton.setOnClickListener { startCall() }

        val hangupButton: Button = findViewById(R.id.hangup_button)
        hangupButton.setOnClickListener { endCall() }

        roleTextView = findViewById(R.id.text_role)
        statusView = findViewById(R.id.text_call_status)

        volumeControlStream = AudioManager.STREAM_VOICE_CALL
    }

    /**
     * Start a call
     */
    private fun startCall() {
        if (userToken.startsWith("<")) {
            Toast.makeText(this, "Please enter token in source code", Toast.LENGTH_SHORT).show()
            return
        }

        val roomIdView: EditText = findViewById(R.id.room_id)
        val roomId = roomIdView.text.toString()
        if (roomId.isEmpty()) {
            Toast.makeText(this, "Please enter room ID", Toast.LENGTH_SHORT).show()
            return
        }

        val joinCallOptions = JoinCallOptions()

        val roomCallLocator = RoomCallLocator(roomId)
        call = callAgent.join(applicationContext, roomCallLocator, joinCallOptions)

        call?.addOnStateChangedListener { setCallStatus(call?.state.toString()) }

        call?.addOnRoleChangedListener { setRoleText(call?.callParticipantRole.toString()) }
    }

    /**
     * Ends the call previously started
     */
    private fun endCall() {
        try {
            call?.hangUp(HangUpOptions())?.get()
        } catch (e: ExecutionException) {
            Toast.makeText(this, "Unable to hang up call", Toast.LENGTH_SHORT).show()
        }
    }

    /**
     * Create the call callAgent
     */
    private fun createCallAgent() {
            try {
                val credential = CommunicationTokenCredential(userToken)
                callAgent = CallClient().createCallAgent(applicationContext, credential).get()
            } catch (ex: Exception) {
                Toast.makeText(
                    applicationContext,
                    "Failed to create call callAgent.",
                    Toast.LENGTH_SHORT
                ).show()
            }
    }

    /**
     * Request each required permission if the app doesn't already have it.
     */
    private fun getAllPermissions() {
        val permissionsToAskFor = mutableListOf<String>()
        for (permission in allPermissions) {
            if (ActivityCompat.checkSelfPermission(this, permission) != PackageManager.PERMISSION_GRANTED) {
                permissionsToAskFor.add(permission)
            }
        }
        if (permissionsToAskFor.isNotEmpty()) {
            ActivityCompat.requestPermissions(this, permissionsToAskFor.toTypedArray(), 1)
        }
    }

    /**
     * Ensure all permissions were granted, otherwise inform the user permissions are missing.
     */
    override fun onRequestPermissionsResult(
        requestCode: Int,
        permissions: Array<out String>,
        grantResults: IntArray
    ) {
        super.onRequestPermissionsResult(requestCode, permissions, grantResults)
        var allPermissionsGranted = true
        for (result in grantResults) {
            allPermissionsGranted = allPermissionsGranted && (result == PackageManager.PERMISSION_GRANTED)
        }
        if (!allPermissionsGranted) {
            Toast.makeText(this, "All permissions are needed to make the call.", Toast.LENGTH_LONG).show()
            finish()
        }
    }

    @SuppressLint("SetTextI18n")
    private fun setCallStatus(status: String?) {
        runOnUiThread {
            statusView.text = "Call Status: $status"
        }
    }
    @SuppressLint("SetTextI18n")
    private fun setRoleText(role: String?) {
        runOnUiThread {
            roleTextView.text = "Role: $role"
        }
    }
}
Poznámka:
Při návrhu aplikace zvažte, kdy by se tato oprávnění měla požadovat. Oprávnění by se měla vyžadovat podle potřeby, a ne předem. Další informace najdete v průvodci oprávněními androidu.
Spusťte projekt
Před spuštěním projektu nahraďte <ACS_USER_TOKEN>MainActivity.kt přístupovým tokenem služby Azure Communication Services.
private val userToken = "<ACS_USER_TOKEN>"
Spusťte projekt v emulátoru nebo fyzickém zařízení.
Mělo by se zobrazit pole pro zadání ID místnosti a tlačítka pro zahájení hovoru v místnosti. Zadejte ID místnosti a ověřte, že se stav hovoru změnil spolu s vaší rolí.
Principy připojení k hovoru do místnosti
Veškerý kód, který jste přidali do aplikace Rychlý start, vám umožnil úspěšně spustit a připojit se k hovoru do místnosti. Musíme se podrobně ponořit do toho, jak to všechno funguje a jaké další metody a obslužné rutiny můžete přistupovat k místnostem.
Volání do místnosti jsou připojena k CallAgent vytvoření s platným tokenem uživatele:
private fun createCallAgent() {
    try {
        val credential = CommunicationTokenCredential(userToken)
        callAgent = CallClient().createCallAgent(applicationContext, credential).get()
    } catch (ex: Exception) {
        Toast.makeText(
            applicationContext,
            "Failed to create call callAgent.",
            Toast.LENGTH_SHORT
        ).show()
    }
}
Pomocí CallAgent a RoomCallLocatormůžeme spojit volání místnosti pomocí CallAgent.join metody, která vrací Call objekt:
 val joinCallOptions = JoinCallOptions()
 val roomCallLocator = RoomCallLocator(roomId)
 call = callAgent.join(applicationContext, roomCallLocator, joinCallOptions)
Další přizpůsobení nad rámec MainActivity.ktsouboru zahrnuje přihlášení k odběru Call událostí pro získání aktualizací:
call.addOnRemoteParticipantsUpdatedListener { args: ParticipantsUpdatedEvent? ->
    handleRemoteParticipantsUpdate(
        args!!
    )
}

call.addOnStateChangedListener { args: PropertyChangedEvent? ->
    this.handleCallOnStateChanged(
        args!!
    )
}
Pomocí následujících metod a obslužných rutin můžete MainActivity.kt dále zobrazit roli místních nebo vzdálených účastníků volání.
// Get your role in the call
call.getCallParticipantRole();

// Subscribe to changes for your role in a call
private void isCallRoleChanged(PropertyChangedEvent propertyChangedEvent) {
    // handle self-role change
}

call.addOnRoleChangedListener(isCallRoleChanged);

// Subscribe to role changes for remote participants
private void isRoleChanged(PropertyChangedEvent propertyChangedEvent) {
    // handle remote participant role change
}

remoteParticipant.addOnRoleChangedListener(isRoleChanged);

// Get role of the remote participant
remoteParticipant.getCallParticipantRole();
Možnost připojit se k volání do místnosti a zobrazit role účastníků hovorů je dostupná v sadě Android Mobile Call SDK verze 2.4.0 a vyšší.
Další informace o rolích účastníků hovoru místností najdete v dokumentaci k konceptu místností.
Připojení k hovoru do místnosti
Pokud se chcete připojit k hovoru do místnosti, nastavte aplikaci pro Windows pomocí průvodce přidáním videohovorů do klientské aplikace . Případně si můžete stáhnout rychlý start pro videohovory na GitHubu.
Vytvořte s callAgent platným tokenem uživatele:
var creds = new CallTokenCredential("<user-token>");

CallAgentOptions callAgentOptions = new CallAgentOptions();
callAgentOptions.DisplayName = "<display-name>";
callAgent = await callClient.CreateCallAgentAsync(creds, callAgentOptions);
callAgent Pomocí volání místnosti a RoomCallLocator připojit se k ní, CallAgent.JoinAsync metoda vrátí CommunicationCall objekt:
RoomCallLocator roomCallLocator = new RoomCallLocator('<RoomId>');

CommunicationCall communicationCall = await callAgent.JoinAsync(roomCallLocator, joinCallOptions);
Přihlaste se k odběru CommunicationCall událostí a získejte aktualizace:
private async void CommunicationCall_OnStateChanged(object sender, PropertyChangedEventArgs args) {
	var call = sender as CommunicationCall;
	if (sender != null)
	{
		switch (call.State){
			// Handle changes in call state
		}
	}
}
Pokud chcete zobrazit roli účastníků hovoru, přihlaste se k odběru změn role:
private void RemoteParticipant_OnRoleChanged(object sender, Azure.Communication.Calling.WindowsClient.PropertyChangedEventArgs args)
{
    _ = Windows.ApplicationModel.Core.CoreApplication.MainView.CoreWindow.Dispatcher.RunAsync(CoreDispatcherPriority.Normal, () =>
    {
        System.Diagnostics.Trace.WriteLine("Raising Role change, new Role: " + remoteParticipant_.Role);
        PropertyChanged(this, new System.ComponentModel.PropertyChangedEventArgs("RemoteParticipantRole"));
    });
}
Možnost připojit se k volání do místnosti a zobrazit role účastníků hovoru je k dispozici ve verzi Windows NuGet verze 1.1.0 a vyšší.
Další informace o rolích účastníků hovoru místností najdete v dokumentaci k konceptu místností.
Další kroky
V této části jste se naučili:
- Přidání videohovorů do aplikace
- Předání identifikátoru místnosti volající sadě SDK
- Připojení k volání místnosti z aplikace
Můžete také chtít:
- Informace o konceptech místností
- Informace o konceptech hlasových hovorů a videohovorů
- Další informace o konceptech ověřování
Váš názor
Připravujeme: V průběhu roku 2024 budeme postupně vyřazovat problémy z GitHub coby mechanismus zpětné vazby pro obsah a nahrazovat ho novým systémem zpětné vazby. Další informace naleznete v tématu: https://aka.ms/ContentUserFeedback.
Odeslat a zobrazit názory pro