Note
Access to this page requires authorization. You can try signing in or changing directories.
Access to this page requires authorization. You can try changing directories.
This article demonstrates a Java Spring Boot web app that uses the Microsoft Entra ID Spring Boot Starter client library for Java for authentication, authorization, and token acquisition. The app uses the OpenID Connect protocol to sign in users, and restricts access to pages based on Microsoft Entra ID security group membership.
The following diagram shows the topology of the app:
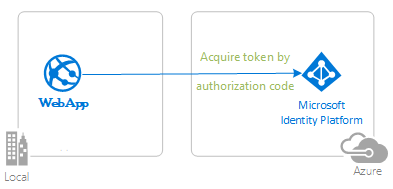
The client app uses the Microsoft Entra ID Spring Boot Starter client library for Java to sign in users in a Microsoft Entra ID tenant and obtain an ID token from Microsoft Entra ID.
The ID token contains the groups claim. The application loads claims into the Spring GrantedAuthorities list for the signed-in user. These values determine which pages the user is authorized to access.
For a video that covers this scenario, see Implement authorization in your applications using app roles, security groups, scopes, and directory roles.
Prerequisites
- JDK version 15. This sample was developed on a system with Java 15, but it might be compatible with other versions.
- Maven 3
- Java Extension Pack for Visual Studio Code is recommended for running this sample in Visual Studio Code.
- A Microsoft Entra ID tenant. For more information, see Quickstart: Set up a tenant.
- A user account in your Microsoft Entra ID tenant. This sample doesn't work with a personal Microsoft account. Therefore, if you signed in to the Azure portal with a personal account and you don't have a user account in your directory, you need to create one now.
- Two security groups, named
AdminGroupandUserGroup, containing the user or users that you want to sign and test this sample. Alternatively, you can add the user to two existing security groups in your tenant. If you choose to use existing groups, be sure to modify the sample configuration to use your existing security groups' name and object ID. - Visual Studio Code
- Azure Tools for Visual Studio Code
Recommendations
- Some familiarity with the Spring Framework.
- Some familiarity with Linux/OSX terminal.
- jwt.ms for inspecting your tokens.
- Fiddler for monitoring your network activity and troubleshooting.
- Follow the Microsoft Entra Blog to stay up-to-date with the latest developments.
Set up the sample
The following sections show you how to set up the sample application.
Clone or download the sample repository
To clone the sample, open a Bash window and use the following command:
git clone https://github.com/Azure-Samples/ms-identity-msal-java-samples.git
cd 4-spring-web-app/3-Authorization-II/groups
Alternatively, navigate to the ms-identity-msal-java-samples repository, then download it as a .zip file and extract it to your hard drive.
Important
To avoid file path length limitations on Windows, clone or extract the repository into a directory near the root of your hard drive.
Register the sample application with your Microsoft Entra ID tenant
There's one project in this sample. The following sections show you how to register the app using the Azure portal.
Choose the Microsoft Entra ID tenant where you want to create your applications
To choose your tenant, use the following steps:
Sign in to the Azure portal.
If your account is present in more than one Microsoft Entra ID tenant, select your profile in the corner of the Azure portal, and then select Switch directory to change your session to the desired Microsoft Entra ID tenant.
Register the app (java-spring-webapp-groups)
To register the app, use the following steps:
Navigate to the Azure portal and select Microsoft Entra ID.
Select App Registrations on the navigation pane, then select New registration.
In the Register an application page that appears, enter the following application registration information:
- In the Name section, enter a meaningful application name for display to users of the app - for example,
java-spring-webapp-groups. - Under Supported account types, select Accounts in this organizational directory only.
- In the Redirect URI (optional) section, select Web in the combo-box and enter the following redirect URI:
http://localhost:8080/login/oauth2/code/.
- In the Name section, enter a meaningful application name for display to users of the app - for example,
Select Register to create the application.
On the app's registration page, find and copy the Application (client) ID value to use later. You use this value in your app's configuration file or files.
On the app's registration page, select Certificates & secrets on the navigation pane to open the page where you can generate secrets and upload certificates.
In the Client secrets section, select New client secret.
Type a description - for example, app secret.
Select one of the available durations: 6 months, 12 months, or Custom.
Select Add. The generated value is displayed.
Copy and save the generated value for use in later steps. You need this value for your code's configuration files. This value isn't displayed again, and you can't retrieve it by any other means. So, be sure to save it from the Azure portal before you navigate to any other screen or pane.
On the app's registration page, select API permissions on the navigation pane to open the page where you can add access to the APIs that your application needs.
Select Add a permission.
Ensure that the Microsoft APIs tab is selected.
In the Commonly used Microsoft APIs section, select Microsoft Graph.
In the Delegated permissions section, select GroupMember.Read.All from the list. Use the search box if necessary. This permission is necessary for getting group memberships via Graph if the overage scenario occurs.
Select the button to grant admin consent for
GroupMember.Read.All.Select Add permissions.
Create security groups
To create security groups, use the following steps:
Navigate to the Azure portal and select Microsoft Entra ID.
Select Groups on the navigation pane.
In the Groups pane, select New Group, and then provide the following information:
- For Group Type, select Security.
- For Group Name, enter AdminGroup.
- For Group Description, enter Admin Security Group.
- Add Group Owners and Group Members that you want to use and test in this sample.
- Select Create.
In the Groups pane, select New Group, and then provide the following information:
- For Group Type, select Security.
- For Group Name, enter UserGroup.
- For Group Description, enter User Security Group.
- Add Group Owners and Group Members that you want to use and test in this sample.
- Select Create.
For more information, see Manage Microsoft Entra groups and group membership.
Configure security groups
You have the following options on how you can further configure your application to receive the groups claim:
Receive all the groups that the signed-in user is assigned to in a Microsoft Entra ID tenant, included nested groups. For more information, see the section Configure your application to receive all the groups the signed-in user is assigned to, including nested groups.
Receive the groups claim values from a filtered set of groups that your application is programmed to work with. For more information, see the section Configure your application to receive the groups claim values from a filtered set of groups a user might be assigned to. This option isn't available in the Microsoft Entra ID Free edition.
Note
To get the on-premise group's samAccountName or On Premises Group Security Identifier instead of the group ID, see the section Prerequisites for using group attributes synchronized from Active Directory in Configure group claims for applications by using Microsoft Entra ID.
Configure your application to receive all the groups the signed-in user is assigned to, including nested groups
To configure the app, use the following steps:
On the app's registration page, select Token Configuration on the navigation pane to open the page where you can configure the claims provided tokens issued to your application.
Select Add groups claim to open the Edit Groups Claim screen.
Select Security groups OR All groups (includes distribution lists but not groups assigned to the application). Choosing both negates the effect of the Security Groups option.
Under the ID section, select Group ID. This selection causes Microsoft Entra ID to send the object ID of the groups the user is assigned to in the groups claim of the ID token that your app receives after signing-in a user.
Configure your application to receive the groups claim values from a filtered set of groups a user might be assigned to
This option is useful when the following cases are true:
- Your application is interested in a selected set of groups that a signing-in user might be assigned to.
- Your app isn't interested in every security group this user is assigned to in the tenant.
This option helps your application avoid the overage issue.
Note
This feature isn't available in the Microsoft Entra ID Free edition.
Nested group assignments aren't available when you use this option.
To enable this option in your app, use the following steps:
On the app's registration page, select Token Configuration on the navigation pane to open the page where you can configure the claims provided tokens issued to your application.
Select Add groups claim to open the Edit Groups Claim screen.
Select Groups assigned to the application and don't selection any other options. If you choose more options, such as Security Groups or All groups (includes distribution lists but not groups assigned to the application), these options negate the effect of the Groups assigned to the application option.
Under the ID section, select Group ID. This selection causes Microsoft Entra ID to send the object ID of the groups the user is assigned to in the groups claim of the ID token that your app receives after signing-in a user.
If you're exposing a Web API using the Expose an API option, then you can also choose the Group ID option under the Access section. This selection causes Microsoft Entra ID to send the object ID of the groups the user is assigned to in the groups claim of the access token issued to the client applications of your API.
On the app's registration page, select Overview on the navigation pane to open the Application overview screen.
Select the hyperlink with the name of your application in Managed application in local directory. This field title might be truncated - for example, Managed application in .... When you select this link, you navigate to the Enterprise Application Overview page associated with the service principal for your application in the tenant where you created it. You can navigate back to the app registration page by using the back button of your browser.
Select Users and groups on the navigation pane to open the page where you can assign users and groups to your application.
Select Add user.
Select User and Groups from the resultant screen.
Choose the groups that you want to assign to this application.
Select Select to finish selecting the groups.
Select Assign to finish the group assignment process.
Your application now receives these selected groups in the groups claim when a user signing in to your app is a member of one or more these assigned groups.
Select Properties on the navigation pane to open the page that lists the basic properties of your application. Set the User assignment required? flag to Yes.
Important
When you set User assignment required? to Yes, Microsoft Entra ID checks that only users assigned to your application in the Users and groups pane are able to sign-in to your app. You can assign users directly or by assigning security groups they belong to.
Configure your code sample to use your app registration and security groups (java-spring-webapp-groups)
Use the following steps to configure the app:
Note
In the following steps, ClientID is the same as Application ID or AppId.
Open the project in your IDE.
Open the src\main\resources\application.yml file.
Find the placeholder
Enter_Your_Tenant_ID_Hereand replace the existing value with your Microsoft Entra tenant ID.Find the placeholder
Enter_Your_Client_ID_Hereand replace the existing value with the application ID orclientIdof thejava-spring-webapp-groupsapp copied from the Azure portal.Find the placeholder
Enter_Your_Client_Secret_Hereand replace the existing value with the value you saved during the creation ofjava-spring-webapp-groupscopied from the Azure portal.Find the placeholder
Enter_Your_Admin_Group_ID_Hereand replace the existing value with theobjectIdvalue of your AdminGroup.Find the placeholder
Enter_Your_User_Group_ID_Hereand replace the existing value with theobjectIdvalue of your UserGroup.Open the src/main/java/com/microsoft/azuresamples/msal4j/msidentityspringbootwebapp/SampleController.java file.
Find the placeholder
Enter_Your_Admin_Group_ID_Hereand replace the existing value with theobjectIdvalue of your AdminGroup.Find the placeholder
Enter_Your_User_Group_ID_Hereand replace the existing value with theobjectIdvalue of your UserGroup.
Run the sample
The following sections show you how to deploy the sample to Azure Container Apps.
Prerequisites
- An Azure account. If you don't have one, create a free account. You need the
ContributororOwnerpermission on the Azure subscription to proceed. For more information, see Assign Azure roles using the Azure portal. - The Azure CLI.
- The Azure Container Apps CLI extension, version
0.3.47or higher. To install the latest version, use theaz extension add --name containerapp --upgrade --allow-previewcommand. - The Java Development Kit, version 17 or higher.
- Maven.
Prepare the Spring project
Use the following steps to prepare the project:
Use the following Maven command to build the project:
mvn clean verifyRun the sample project locally by using the following command:
mvn spring-boot:run
Setup
To sign in to Azure from the CLI, run the following command and follow the prompts to complete the authentication process.
az login
To ensure you're running the latest version of the CLI, run the upgrade command.
az upgrade
Next, install or update the Azure Container Apps extension for the CLI.
If you receive errors about missing parameters when you run az containerapp commands in Azure CLI, be sure you have the latest version of the Azure Container Apps extension installed.
az extension add --name containerapp --upgrade
Note
Starting in May 2024, Azure CLI extensions no longer enable preview features by default. To access Container Apps preview features, install the Container Apps extension with --allow-preview true.
az extension add --name containerapp --upgrade --allow-preview true
Now that the current extension or module is installed, register the Microsoft.App and Microsoft.OperationalInsights namespaces.
Note
Azure Container Apps resources have migrated from the Microsoft.Web namespace to the Microsoft.App namespace. Refer to Namespace migration from Microsoft.Web to Microsoft.App in March 2022 for more details.
az provider register --namespace Microsoft.App
az provider register --namespace Microsoft.OperationalInsights
Create the Azure Container Apps environment
Now that your Azure CLI setup is complete, you can define the environment variables that are used throughout this article.
Define the following variables in your bash shell.
export RESOURCE_GROUP="ms-identity-containerapps"
export LOCATION="canadacentral"
export ENVIRONMENT="env-ms-identity-containerapps"
export API_NAME="ms-identity-api"
export JAR_FILE_PATH_AND_NAME="./target/ms-identity-spring-boot-webapp-0.0.1-SNAPSHOT.jar"
Create a resource group.
az group create  \
    --name $RESOURCE_GROUP \
    --location $LOCATION \
Create an environment with an auto-generated Log Analytics workspace.
az containerapp env create \
    --name $ENVIRONMENT \
    --resource-group $RESOURCE_GROUP \
    --location $LOCATION
Show the default domain of the container app environment. Note down this domain to use in later sections.
az containerapp env show \
    --name $ENVIRONMENT \
    --resource-group $RESOURCE_GROUP \
    --query properties.defaultDomain
Prepare the app for deployment
When you deploy your application to Azure Container Apps, your redirect URL changes to the redirect URL of your deployed app instance in Azure Container Apps. Use the following steps to change these settings in your application.yml file:
Navigate to your app's src\main\resources\application.yml file and change the value of
post-logout-redirect-urito your deployed app's domain name, as shown in the following example. Be sure to replace<API_NAME>and<default-domain-of-container-app-environment>with your actual values. For example, with the default domain for your Azure Container App environment from the previous step andms-identity-apifor your app name, you would usehttps://ms-identity-api.<default-domain>for thepost-logout-redirect-urivalue.post-logout-redirect-uri: https://<API_NAME>.<default-domain-of-container-app-environment>After saving this file, use the following command to rebuild your app:
mvn clean package
Important
The application.yml file of the application currently holds the value of your client secret in the client-secret parameter. It isn't good practice to keep this value in this file. You might also be taking a risk if you commit the file to a Git repository. For the recommended approach, see Manage secrets in Azure Container Apps.
Update your Microsoft Entra ID app registration
Because the redirect URI changes to your deployed app on Azure Container Apps, you also need to change the redirect URI in your Microsoft Entra ID app registration. Use the following steps to make this change:
Navigate to the Microsoft identity platform for developers App registrations page.
Use the search box to search for your app registration - for example,
java-servlet-webapp-authentication.Open your app registration by selecting its name.
Select Authentication from the menu.
In the Web - Redirect URIs section, select Add URI.
Fill out the URI of your app, appending
/login/oauth2/code/- for example,https://<containerapp-name>.<default domain of container app environment>/login/oauth2/code/.Select Save.
Deploy the app
Deploy the JAR package to Azure Container Apps.
Note
If necessary, you can specify the JDK version in the Java build environment variables. For more information, see Build environment variables for Java in Azure Container Apps.
Now you can deploy your WAR file with the az containerapp up CLI command.
az containerapp up \
    --name $API_NAME \
    --resource-group $RESOURCE_GROUP \
    --location $LOCATION \
    --environment $ENVIRONMENT \
    --artifact <JAR_FILE_PATH_AND_NAME> \
    --ingress external \
    --target-port 8080 \
    --query properties.configuration.ingress.fqdn
Note
The default JDK version is 17. If you need to change the JDK version for compatibility with your application, you can use the --build-env-vars BP_JVM_VERSION=<YOUR_JDK_VERSION> argument to adjust the version number.
For more build environment variables, see Build environment variables for Java in Azure Container Apps.
Validate the app
In this example, the containerapp up command includes the --query properties.configuration.ingress.fqdn argument, which returns the fully qualified domain name (FQDN), also known as the app's URL. Use the following steps to check the app's logs to investigate any deployment issue:
Access the output application URL from the Outputs page of the Deployment section.
From the navigation pane of the Azure Container Apps instance Overview page, select Logs to check the app's logs.
Explore the sample
Use the following steps to explore the sample:
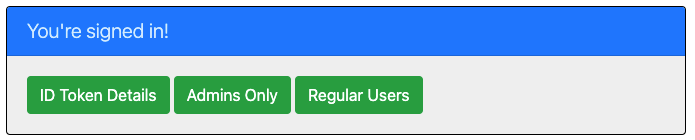
- Notice the signed-in or signed-out status displayed at the center of the screen.
- Select the context-sensitive button in the corner. This button reads Sign In when you first run the app. Alternatively, select token details, admins only, or regular users. Because these pages are protected and require authentication, you're automatically redirected to the sign-in page.
- On the next page, follow the instructions and sign in with an account in the Microsoft Entra ID tenant.
- On the consent screen, notice the scopes that are being requested.
- Upon successful completion of the sign-in flow, you should be redirected to the home page - which shows the sign in status - or one of the other pages, depending on which button triggered your sign-in flow.
- Notice that the context-sensitive button now says Sign out and displays your username.
- If you're on the home page, select ID Token Details to see some of the ID token's decoded claims, including groups.
- Select Admins Only to view the
/admin_only. Only users belonging to theAdminGroupsecurity group can view this page. Otherwise, an authorization failure message is displayed. - Select Regular Users to view the
/regular_userpage. Only users belonging to theUserGroupsecurity group can view this page. Otherwise, an authorization failure message is displayed. - Use the button in the corner to sign out. The status page reflects the new state.
About the code
This sample demonstrates how to use Microsoft Entra ID Spring Boot Starter client library for Java to sign in users into your Microsoft Entra ID tenant. The sample also makes use of the Spring Oauth2 Client and Spring Web boot starters. The sample uses claims from the ID token obtained from Microsoft Entra ID to display the details of the signed-in user, and to restrict access to some pages by using the groups claim for authorization.
Contents
The following table shows the contents of the sample project folder:
| File/folder | Description |
|---|---|
| pom.xml | Application dependencies. |
| src/main/resources/templates/ | Thymeleaf Templates for UI. |
| src/main/resources/application.yml | Application and Microsoft Entra ID Boot Starter Library Configuration. |
| src/main/java/com/microsoft/azuresamples/msal4j/msidentityspringbootwebapp/ | This directory contains the main application entry point, controller, and config classes. |
| .../MsIdentitySpringBootWebappApplication.java | Main class. |
| .../SampleController.java | Controller with endpoint mappings. |
| .../SecurityConfig.java | Security configuration - for example, which routes require authentication. |
| .../Utilities.java | Utility class - for example, filter ID token claims. |
| CHANGELOG.md | List of changes to the sample. |
| CONTRIBUTING.md | Guidelines for contributing to the sample. |
| LICENSE | The license for the sample. |
ID token claims
To extract token details, the app makes use of Spring Security's AuthenticationPrincipal and OidcUser object in a request mapping, as shown in the following example. See the Sample Controller for the full details of how this app makes use of ID token claims.
import org.springframework.security.oauth2.core.oidc.user.OidcUser;
import org.springframework.security.core.annotation.AuthenticationPrincipal;
//...
@GetMapping(path = "/some_path")
public String tokenDetails(@AuthenticationPrincipal OidcUser principal) {
    Map<String, Object> claims = principal.getIdToken().getClaims();
}
Process a groups claim in the ID token
The groups claim of the token includes the names of the groups that the signed-in user is assigned to, as shown in the following example:
{
  ...
  "groups": [
    "xyz-id-xyz",
    "xyz-id-xyz",]
  ...
}
A common way to access the group names is documented in the ID token claims section.
Microsoft Entra ID Boot Starter v3.5 and higher parses the groups claim automatically and adds each group to the signed-in user's Authorities. This configuration enables developers to make use of groups with Spring PrePost condition annotations using the hasAuthority method. For example, you can find the following @PreAuthorize conditions demonstrated in SampleController.java:
@GetMapping(path = "/admin_only")
@PreAuthorize("hasAuthority('enter-admin-group-id-here')")
public String adminOnly(Model model) {
    // restrict to users who belong to AdminGroup
}
@GetMapping(path = "/regular_user")
@PreAuthorize("hasAnyAuthority('enter-user-group-id-here','enter-admin-group-id-here')")
public String regularUser(Model model) {
    // restrict to users who belong to any of UserGroup or AdminGroup
}
The following code gets a full list of authorities for a given user:
@GetMapping(path = "/some_path")
public String tokenDetails(@AuthenticationPrincipal OidcUser principal) {
   Collection<? extends GrantedAuthority> authorities = principal.getAuthorities();
}
Sign-in and sign-out links
For sign-in, the app makes a request to the Microsoft Entra ID sign-in endpoint automatically configured by Microsoft Entra ID Spring Boot Starter client library for Java, as shown in the following example:
<a class="btn btn-success" href="/oauth2/authorization/azure">Sign In</a>
For sign-out, the app makes a POST request to the logout endpoint, as shown in the following example:
<form action="#" th:action="@{/logout}" method="post">
  <input class="btn btn-warning" type="submit" value="Sign Out" />
</form>
Authentication-dependent UI elements
The app has some simple logic in the UI template pages for determining content to display based on whether the user is authenticated, as shown in the following example using Spring Security Thymeleaf tags:
<div sec:authorize="isAuthenticated()">
  this content only shows to authenticated users
</div>
<div sec:authorize="isAnonymous()">
  this content only shows to not-authenticated users
</div>
Protect routes with AADWebSecurityConfigurerAdapter
By default, the app protects the ID Token Details, Admins Only, and Regular Users pages so that only signed-in users can access them. The app configures these routes using the app.protect.authenticated property from the application.yml file. To configure your app's specific requirements, you can extend AADWebSecurityConfigurationAdapter in one of your classes. For an example, see this app's SecurityConfig class, shown in the following code:
@EnableWebSecurity
@EnableGlobalMethodSecurity(prePostEnabled = true)
public class SecurityConfig extends AADWebSecurityConfigurerAdapter{
  @Value( "${app.protect.authenticated}" )
  private String[] protectedRoutes;

    @Override
    public void configure(HttpSecurity http) throws Exception {
    // use required configuration form AADWebSecurityAdapter.configure:
    super.configure(http);
    // add custom configuration:
    http.authorizeRequests()
      .antMatchers(protectedRoutes).authenticated()     // limit these pages to authenticated users (default: /token_details, /admin_only, /regular_user)
      .antMatchers("/**").permitAll();                  // allow all other routes.
    }
}
The groups overage claim
To ensure that the token size doesn't exceed HTTP header size limits, the Microsoft identity platform limits the number of object IDs that it includes in the groups claim.
The overage limit is 150 for SAML tokens, 200 for JWT tokens, 6 for single-page applications. If a user is a member of more groups than the overage limit, then the Microsoft identity platform doesn't emit the group IDs in the groups claim in the token. Instead, it includes an overage claim in the token that indicates to the application to query the Microsoft Graph API to retrieve the user's group membership.
Microsoft Entra ID Boot Starter v3.5 and higher parses the groups claim automatically and adds each group to the signed-in user's Authorities. The starter automatically handles the groups overage scenario.
Note
We strongly advise you use the group filtering feature, if possible, to avoid running into group overages. For more information, see the section Configure your application to receive the groups claim values from a filtered set of groups a user might be assigned to.
Create the overage scenario for testing
You can use the BulkCreateGroups.ps1 file provided in the AppCreationScripts folder to create a large number of groups and assign users to them. This file helps test overage scenarios during development. Remember to change the user's objectId provided in the BulkCreateGroups.ps1 script.
Handling overage requires a call to Microsoft Graph to read the signed-in user's group memberships, so your app needs to have the User.Read and GroupMember.Read.All permissions for the getMemberGroups function to execute successfully.
Important
For the overage scenario, make sure you've granted Admin Consent for the Microsoft Graph API's GroupMember.Read.All scope for both the client and service apps. For more information, see the app registration steps earlier in this article.
Update the Microsoft Entra ID app registration (java-spring-webapp-groups)
To update the app registration, use the following steps:
Navigate back to the Azure portal.
On the navigation pane, select Azure Active Directory, and then select App registrations (Preview).
In the resulting screen, select the
java-spring-webapp-groupsapplication.On the app's registration page, select Authentication from the menu.
In the Redirect URIs section, update the reply URLs to match the site URL of your Azure deployment - for example,
https://java-spring-webapp-groups.azurewebsites.net/login/oauth2/code/.
Important
If your app is using an in-memory storage, Azure App Services spins down your web site if it's inactive, and any records that your app was keeping are emptied. Also, if you increase the instance count of your website, requests are distributed among the instances. Thus, your apps records aren't the same on each instance.
More information
- Microsoft identity platform documentation
- Overview of Microsoft Authentication Library (MSAL)
- Quickstart: Register an application with the Microsoft identity platform
- Quickstart: Configure a client application to access web APIs
- Understanding Microsoft Entra ID application consent experiences
- Understand user and admin consent
- Application and service principal objects in Azure Active Directory
- National Clouds
- MSAL code samples
For more information about how OAuth 2.0 protocols work in this scenario and other scenarios, see Authentication Scenarios for Microsoft Entra ID.