Microsoft Security | Microsoft Entra | Microsoft Entra ID
A cloud-based identity and access management service for securing user authentication and resource access
This browser is no longer supported.
Upgrade to Microsoft Edge to take advantage of the latest features, security updates, and technical support.
' cx='32' cy='32' r='32' /%3E%3Ctext x='50%25' y='55%25' dominant-baseline='middle' text-anchor='middle' fill='%23FFF' %3ERD%3C/text%3E%3C/svg%3E)
Im trying to add custom attributes for spouses name, pets name, etc, I found the place in External Identities and added them but it doesn't seem to sync to my local users list, did I miss a step, or do I need to wait for it?
Thank you for providing further information, but I don't see how this helps me. I don't need outside linkages or new users sign-ups, these are existing associates in an O365 / Entra deployment and I'm trying to add optional information like spouse's and pet's names, to show up when someone queries another associates information. Right now, all the default fields are visible, like phone numbers, supervisor and department. I need to add non-default values, I can't imagine I'm the first person who ever wanted to do this. There is no easy way to accomplish this? I have created all the fields in external identity already but see no way to link them to our existing Entra data entries.
' cx='32' cy='32' r='32' /%3E%3Ctext x='50%25' y='55%25' dominant-baseline='middle' text-anchor='middle' fill='%23FFF' %3ESM%3C/text%3E%3C/svg%3E)
Hello Ryan Dinshah,
Please make sure if you have added self-service sign-up user flows for B2B collaboration.
For applications you build, you can create user flows that allow a user to sign up for an app and create a new guest account. A self-service sign-up user flow defines the series of steps the user follows during sign-up, the identity providers you allow them to use, and the user attributes you want to collect. You can associate one or more applications with a single user flow.
Prerequisites
Before you begin you may need to add identity providers and define custom attributes.
Note:
Please follow the below mentioned steps if you are using Workforce tenant.
Define custom attributes (optional)
User attributes are values collected from the user during self-service sign-up. Microsoft Entra External ID comes with a built-in set of attributes, but you can create custom attributes for use in your user flow. You can also read and write these attributes by using the Microsoft Graph API.
For each application, you might have different requirements for the information you want to collect during sign-up. Microsoft Entra External ID comes with a built-in set of information stored in attributes, such as Given Name, Surname, City, and Postal Code. With Microsoft Entra External ID, you can extend the set of attributes stored on a guest account when the external user signs up through a user flow.
You can create custom attributes in the Microsoft Entra admin center and use them in your self-service sign-up user flows. You can also read and write these attributes by using the Microsoft Graph API.
Create a custom attribute
1.Sign in to the Microsoft Entra admin center as at least a User Administrator.
2.Browse to Entra ID > External Identities > Overview.
3.Select Custom user attributes. The available user attributes are listed.

4.To add an attribute, select Add.
5.In the Add an attribute pane, enter the following values:
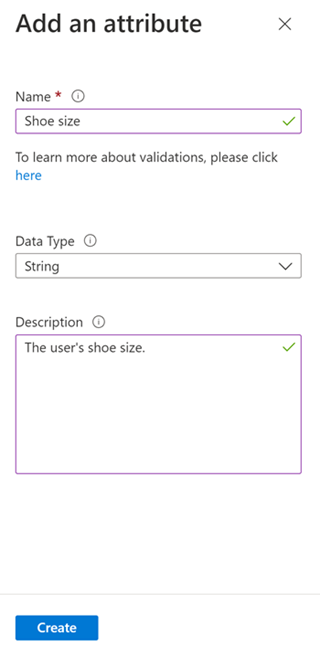
6.Select Create.
When you add a custom attribute to the list of user attributes, it becomes available for use in your user flows. However, the attribute is only created the first time it’s used in any user flow. Once you’ve created a new user through a user flow that includes the newly added custom attribute, the object can be queried in Microsoft Graph Explorer. You should now see ShoeSize in the list of attributes collected during the sign-up journey on the user object. You can call the Graph API from your application to get the data from this attribute after it's added to the user object.
Reference documents which will be helpful:
Add B2B Guest Sign-in - Microsoft Entra External ID
Add custom attributes - Microsoft Entra External ID
Note:
Please follow the below suggested steps if you are using External tenant.
If your app requires more information than the built-in user attributes provide, you can add your own attributes. We refer to these attributes as custom user attributes.
To define a custom user attribute, you first create the attribute at the tenant level so it can be used in any user flow in the tenant. Then you assign the attribute to your sign-up user flow and configure how you want it to appear on the sign-up page.
Learn more about custom user attributes in User profile attributes article.
Create custom user attributes
1.Sign in to the Microsoft Entra admin center.
2.If you have access to multiple tenants, use the Settings icon ![]() in the top menu to switch to your external tenant from the Directories + subscriptions menu.
in the top menu to switch to your external tenant from the Directories + subscriptions menu.
3.Browse to Entra ID > External Identities > Overview.
4.Select Custom user attributes. The list contains all user attributes available in the tenant, including any custom user attributes that have been created. The Attribute type column indicates whether an attribute is built-in or custom.
5.Select Add. In the Add an attribute pane, enter a Name for the custom attribute (for example, "Terms of use").
6.In Data Type, choose String, Boolean, or Int depending on the type of data and user input control you want to create. String attributes have a default user input type value of TextBox, but you're able to change this in a later step (for example if you want to configure radio buttons or multiselect checkboxes).
7.(Optional) In Description, enter a description of the custom attribute for internal use. This description isn't visible to the user.

8.Select Create. The custom attribute is now available in the list of user attributes and can be added to your user flows.
Include the custom user attribute in a sign-up flow
Follow these steps to add custom user attributes to a user flow you've already created. (If you need to create a new user flow, see Create a sign-up and sign-in user flow for customers.)
1.Sign in to the Microsoft Entra admin center.
2.If you have access to multiple tenants, use the Settings icon ![]() in the top menu to switch to your external tenant from the Directories + subscriptions menu.
in the top menu to switch to your external tenant from the Directories + subscriptions menu.
3.Browse to Entra ID > External Identities > User flows.
4.Select the user flow from the list.
5.Select User attributes. The list includes any custom user attributes you defined as described in the previous section. For example, the new Terms of use attribute now appears in the list. Choose all the attributes you want to collect from the user during sign-up.

6.Select Save
Reference document which will be helpful:
Define custom attributes - Microsoft Entra External ID
I hope the above provided information is helpful. Please reach out to me if you are having any queries or clarification in any of the above mentioned steps.
Thank you for providing further information, but I don't see how this helps me. I don't need outside linkages or new users sign-ups, these are existing associates in an O365 / Entra deployment and I'm trying to add optional information like spouse's and pet's names, to show up when someone queries another associates information. Right now, all the default fields are visible, like phone numbers, supervisor and department. I need to add non-default values, I can't imagine I'm the first person who ever wanted to do this. There is no easy way to accomplish this? I have created all the fields in external identity already but see no way to link them to our existing Entra data entries.
Hello Ryan Dinshah,
Thank you for your response.
I understand that you have added optional information like spouse's and pet's names in External Identities, but please note that if you have configured any application in Microsoft Entra External ID, then you can pass these optional claims of users to be visible in the tokens, but the additional user's attributes which you have added will not be visible under Local User's Properties section from Microsoft Entra ID.
Please note that under User's Properties section, you can only see the default attributes like User's Identity information like First Name, Last Name, UPN, Phone Number, City, State, Country, etc and Job Information, Contact information details about the User.
Please let me know if you have any queries.
Hello Ryan Dinshah,
I am just checking in to see if you had a chance to review my above comment where I have answered for your latest query.
Please review it and let me know if you have any questions.
I did review the extra comments, thank you.