Azure Managed Application with managed identity
Note
Managed identity support for Azure Managed Applications is currently in preview. Use the 2018-09-01-preview api version to utilize managed identity.
Learn how to configure a managed application to contain a managed identity. A managed identity can be used to allow the customer to grant the managed application access to existing resources. The Azure platform manages the identity and doesn't require you to provision or rotate any secrets. For more about managed identities in Microsoft Entra ID, see Managed identities for Azure resources.
Your application can be granted two types of identities:
- A system-assigned managed identity is tied to your application and is deleted if your app is deleted. An app can only have one system-assigned managed identity.
- A user-assigned managed identity is a standalone Azure resource that can be assigned to your app. An app can have multiple user-assigned managed identities.
How to use managed identity
Managed identity enables many scenarios for managed applications. Some common scenarios that can be solved are:
- Deploying a managed application linked to existing Azure resources. An example is deploying an Azure virtual machine (VM) within the managed application that is attached to an existing network interface.
- Granting the managed application and publisher access to Azure resources outside the managed resource group.
- Providing an operational identity of managed applications for Activity Log and other services within Azure.
Adding managed identity
Creating a managed application with a managed identity requires another property to be set on the Azure resource. The following example shows a sample identity property:
{
  "identity": {
    "type": "SystemAssigned, UserAssigned",
    "userAssignedIdentities": {
      "/subscriptions/aaaa0a0a-bb1b-cc2c-dd3d-eeeeee4e4e4e/resourceGroups/testRG/providers/Microsoft.ManagedIdentity/userassignedidentites/myuserassignedidentity": {}
    }
  }
}
There are two common ways to create a managed application with identity: createUiDefinition.json and Azure Resource Manager templates. For simple single create scenarios, createUiDefinition should be used to enable managed identity, because it provides a richer experience. However, when dealing with advanced or complex systems that require automated or multiple managed application deployments, templates can be used.
Using createUiDefinition
A managed application can be configured with managed identity through the createUiDefinition.json. In the outputs section, the key managedIdentity can be used to override the identity property of the managed application template. The following sample enables a system-assigned managed identity on the managed application. More complex identity objects can be formed by using createUiDefinition elements to ask the consumer for inputs. These inputs can be used to construct managed applications with user-assigned managed identity.
"outputs": {
  "managedIdentity": { "Type": "SystemAssigned" }
}
When to use createUiDefinition for managed identity
The following are some recommendations on when to use createUiDefinition to enable a managed identity on managed applications.
- The managed application creation goes through the Azure portal or Azure Marketplace.
- The managed identity requires complex consumer input.
- The managed identity is needed on creation of the managed application.
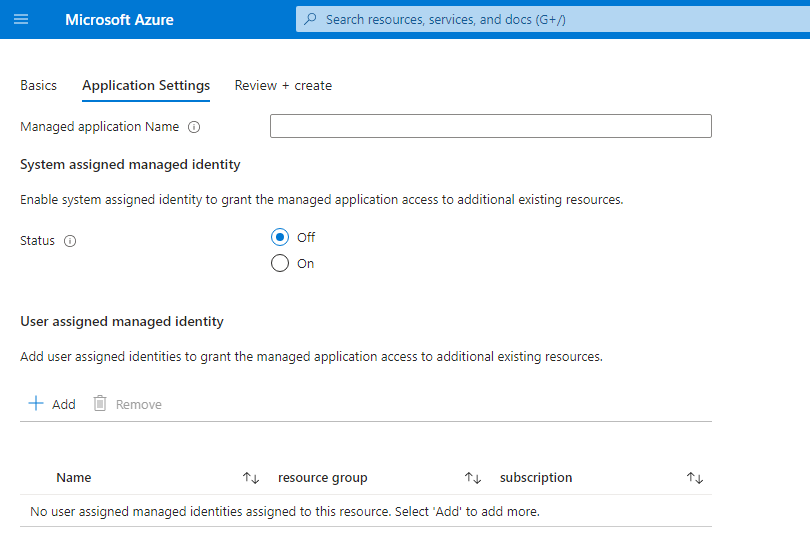
Managed identity createUiDefinition control
The createUiDefinition.json supports a built-in managed identity control.
{
  "$schema": "https://schema.management.azure.com/schemas/0.1.2-preview/CreateUIDefinition.MultiVm.json#",
  "handler": "Microsoft.Azure.CreateUIDef",
  "version": "0.1.2-preview",
  "parameters": {
    "basics": [],
    "steps": [
      {
        "name": "applicationSettings",
        "label": "Application Settings",
        "subLabel": {
          "preValidation": "Configure your application settings",
          "postValidation": "Done"
        },
        "bladeTitle": "Application Settings",
        "elements": [
          {
            "name": "appName",
            "type": "Microsoft.Common.TextBox",
            "label": "Managed application Name",
            "toolTip": "Managed application instance name",
            "visible": true
          },
          {
            "name": "appIdentity",
            "type": "Microsoft.ManagedIdentity.IdentitySelector",
            "label": "Managed Identity Configuration",
            "toolTip": {
              "systemAssignedIdentity": "Enable system assigned identity to grant the managed application access to additional existing resources.",
              "userAssignedIdentity": "Add user assigned identities to grant the managed application access to additional existing resources."
            },
            "defaultValue": {
              "systemAssignedIdentity": "Off"
            },
            "options": {
              "hideSystemAssignedIdentity": false,
              "hideUserAssignedIdentity": false,
              "readOnlySystemAssignedIdentity": false
            },
            "visible": true
          }
        ]
      }
    ],
    "outputs": {
      "applicationResourceName": "[steps('applicationSettings').appName]",
      "location": "[location()]",
      "managedIdentity": "[steps('applicationSettings').appIdentity]"
    }
  }
}
Using Azure Resource Manager templates
Note
Marketplace managed application templates are automatically generated for customers going through the Azure portal create experience.
For these scenarios, the managedIdentity output key on the createUiDefinition must be used to enabled identity.
The managed identity can also be enabled through Azure Resource Manager templates. The following sample enables a system-assigned managed identity on the managed application. More complex identity objects can be formed by using Azure Resource Manager template parameters to provide inputs. These inputs can be used to construct managed applications with user-assigned managed identity.
When to use Azure Resource Manager templates for managed identity
The following are some recommendations on when to use Azure Resource Manager templates for enabling managed identity on managed applications.
- Managed applications can be programmatically deployed based on a template.
- Custom role assignments for the managed identity are needed to provision the managed application.
- The managed application doesn't need the Azure portal and Marketplace creation flow.
SystemAssigned template
A basic Azure Resource Manager template that deploys a managed application with system-assigned managed identity.
"resources": [
  {
    "type": "Microsoft.Solutions/applications",
    "name": "[parameters('applicationName')]",
    "apiVersion": "2018-09-01-preview",
    "location": "[parameters('location')]",
    "identity": {
        "type": "SystemAssigned"
    },
    "properties": {
        "ManagedResourceGroupId": "[parameters('managedByResourceGroupId')]",
        "parameters": { }
    }
  }
]
UserAssigned template
A basic Azure Resource Manager template that deploys a managed application with a user-assigned managed identity.
"resources": [
  {
    "type": "Microsoft.ManagedIdentity/userAssignedIdentities",
    "name": "[parameters('managedIdentityName')]",
    "apiVersion": "2018-11-30",
    "location": "[parameters('location')]"
  },
  {
    "type": "Microsoft.Solutions/applications",
    "name": "[parameters('applicationName')]",
    "apiVersion": "2018-09-01-preview",
    "location": "[parameters('location')]",
    "identity": {
        "type": "UserAssigned",
        "userAssignedIdentities": {
            "[resourceID('Microsoft.ManagedIdentity/userAssignedIdentities/',parameters('managedIdentityName'))]": {}
        }
    },
    "properties": {
        "ManagedResourceGroupId": "[parameters('managedByResourceGroupId')]",
        "parameters": { }
    }
  }
]
Granting access to Azure resources
Once a managed application is granted an identity, it can be granted access to existing Azure resources by creating a role assignment.
To do so, search for and select the name of the managed application or user-assigned managed identity, and then select Access control (IAM). For detailed steps, see Assign Azure roles using the Azure portal.
Linking existing Azure resources
Note
A user-assigned managed identity must be configured before deploying the managed application. In addition, linked resource deployment of managed applications is only supported for the Marketplace kind.
Managed identity can also be used to deploy a managed application that requires access to existing resources during its deployment. When the customer provisions the managed application, user-assigned managed identities can be added to provide more authorizations to the mainTemplate deployment.
Authoring the createUiDefinition with a linked resource
When you link the deployment of the managed application to existing resources, both the existing Azure resource and a user-assigned managed identity with the applicable role assignment on that resource must be provided.
A sample createUiDefinition.json that requires two inputs: a network interface resource ID and a user assigned managed identity resource ID.
{
  "$schema": "https://schema.management.azure.com/schemas/0.1.2-preview/CreateUIDefinition.MultiVm.json#",
  "handler": "Microsoft.Azure.CreateUIDef",
  "version": "0.1.2-preview",
  "parameters": {
    "basics": [
      {}
    ],
    "steps": [
      {
        "name": "managedApplicationSetting",
        "label": "Managed Application Settings",
        "subLabel": {
          "preValidation": "Managed Application Settings",
          "postValidation": "Done"
        },
        "bladeTitle": "Managed Application Settings",
        "elements": [
          {
            "name": "networkInterfaceId",
            "type": "Microsoft.Common.TextBox",
            "label": "Network interface resource ID",
            "defaultValue": "/subscriptions/aaaa0a0a-bb1b-cc2c-dd3d-eeeeee4e4e4e/resourceGroups/testRG/providers/Microsoft.Network/networkInterfaces/existingnetworkinterface",
            "toolTip": "Must represent the identity as an Azure Resource Manager resource identifier format ex. /subscriptions/sub1/resourcegroups/myGroup/providers/Microsoft.Network/networkInterfaces/networkinterface1",
            "visible": true
          },
          {
            "name": "userAssignedId",
            "type": "Microsoft.Common.TextBox",
            "label": "User-assigned managed identity resource ID",
            "defaultValue": "/subscriptions/aaaa0a0a-bb1b-cc2c-dd3d-eeeeee4e4e4e/resourceGroups/testRG/providers/Microsoft.ManagedIdentity/userassignedidentites/myuserassignedidentity",
            "toolTip": "Must represent the identity as an Azure Resource Manager resource identifier format ex. /subscriptions/sub1/resourcegroups/myGroup/providers/Microsoft.ManagedIdentity/userAssignedIdentities/identity1",
            "visible": true
          }
        ]
      }
    ],
    "outputs": {
      "existingNetworkInterfaceId": "[steps('managedApplicationSetting').networkInterfaceId]",
      "managedIdentity": "[parse(concat('{\"Type\":\"UserAssigned\",\"UserAssignedIdentities\":{',string(steps('managedApplicationSetting').userAssignedId),':{}}}'))]"
    }
  }
}
This createUiDefinition.json generates a create user experience that has two fields. The first field allows the user to enter in the Azure resource ID for the resource being linked to the managed application deployment. The second is for a consumer to enter the user-assigned managed identity Azure resource ID, which has access to the linked Azure resource. The generated experience would look like:

Authoring the mainTemplate with a linked resource
In addition to updating the createUiDefinition, the main template also needs to be updated to accept the passed in linked resource ID. The main template can be updated to accept the new output by adding a new parameter. Since the managedIdentity output overrides the value on the generated managed application template, it isn't passed to the main template and shouldn't be included in the parameters section.
A sample main template that sets the network profile to an existing network interface provided by the createUiDefinition.json.
{
  "$schema": "https://schema.management.azure.com/schemas/2015-01-01/deploymentTemplate.json#",
  "contentVersion": "1.0.0.0",
  "parameters": {
    "existingNetworkInterfaceId": { "type": "string" }
  },
  "variables": {
  },
  "resources": [
    {
      "apiVersion": "2016-04-30-preview",
      "type": "Microsoft.Compute/virtualMachines",
      "name": "myLinkedResourceVM",
      "location": "[resourceGroup().location]",
      "properties": {
        …,
        "networkProfile": {
          "networkInterfaces": [
            {
              "id": "[parameters('existingNetworkInterfaceId')]"
            }
          ]
        }
      }
    }
  ]
}
Consuming the managed application with a linked resource
Once the managed application package is created, the managed application can be consumed through the Azure portal. Before it can be consumed, there are several prerequisite steps.
- An instance of the required linked Azure resource must be created.
- The user-assigned managed identity must be created and given role assignments to the linked resource.
- The existing linked resource ID and the user-assigned managed identity ID are provided to the createUiDefinition.
Accessing the managed identity token
The token of the managed application can now be accessed through the listTokens API from the publisher tenant. An example request might look like:
POST https://management.azure.com/subscriptions/{subscriptionId}/resourceGroups/{resourceGroup}/providers/Microsoft.Solutions/applications/{applicationName}/listTokens?api-version=2018-09-01-preview HTTP/1.1

{
  "authorizationAudience": "https://management.azure.com/",
  "userAssignedIdentities": [
      "/subscriptions/{subscriptionId}/resourceGroups/{resourceGroup}/providers/Microsoft.ManagedIdentity/userAssignedIdentities/{userAssignedIdentityName}"
  ]
}
Request Body Parameters:
| Parameter | Required | Description |
|---|---|---|
authorizationAudience |
no | The App ID URI of the target resource. It also is the aud (audience) claim of the issued token. The default value is "https://management.azure.com/" |
userAssignedIdentities |
no | The list of user-assigned managed identities to retrieve a token for. If not specified, listTokens returns the token for the system-assigned managed identity. |
A sample response might look like:
HTTP/1.1 200 OK
Content-Type: application/json

{
  "value": [
    {
      "access_token": "eyJ0eXAi…",
      "expires_in": "2…",
      "expires_on": "1557…",
      "not_before": "1557…",
      "authorizationAudience": "https://management.azure.com/",
      "resourceId": "/subscriptions/{subscriptionId}/resourceGroups/{resourceGroup}/providers/Microsoft.Solutions/applications/{applicationName}",
      "token_type": "Bearer"
    }
  ]
}
The response contains an array of tokens under the value property:
| Parameter | Description |
|---|---|
access_token |
The requested access token. |
expires_in |
The number of seconds the access token is valid. |
expires_on |
The timespan when the access token expires. This value is represented as the number of seconds from epoch. |
not_before |
The timespan when the access token takes effect. This value is represented as the number of seconds from epoch. |
authorizationAudience |
The aud (audience) the access token was request for. This value is the same as what was provided in the listTokens request. |
resourceId |
The Azure resource ID for the issued token. This value is either the managed application ID or the user-assigned managed identity ID. |
token_type |
The type of the token. |