Note
Access to this page requires authorization. You can try signing in or changing directories.
Access to this page requires authorization. You can try changing directories.
Applies to: ![]() Azure SQL Database
Azure SQL Database
This quickstart describes how to connect an application to a database in Azure SQL Database and perform queries using .NET and the Microsoft.Data.SqlClient library. This quickstart follows the recommended passwordless approach to connect to the database. You can learn more about passwordless connections on the passwordless hub.
Prerequisites
- An Azure subscription.
- An Azure SQL database configured for authentication with Microsoft Entra ID (formerly Azure Active Directory). You can create one using the Create database quickstart.
- The latest version of the Azure CLI.
- Visual Studio or later with the ASP.NET and web development workload.
- .NET 7.0 or later.
Configure the database
Secure, passwordless connections to Azure SQL Database require certain database configurations. Verify the following settings on your logical server in Azure to properly connect to Azure SQL Database in both local and hosted environments:
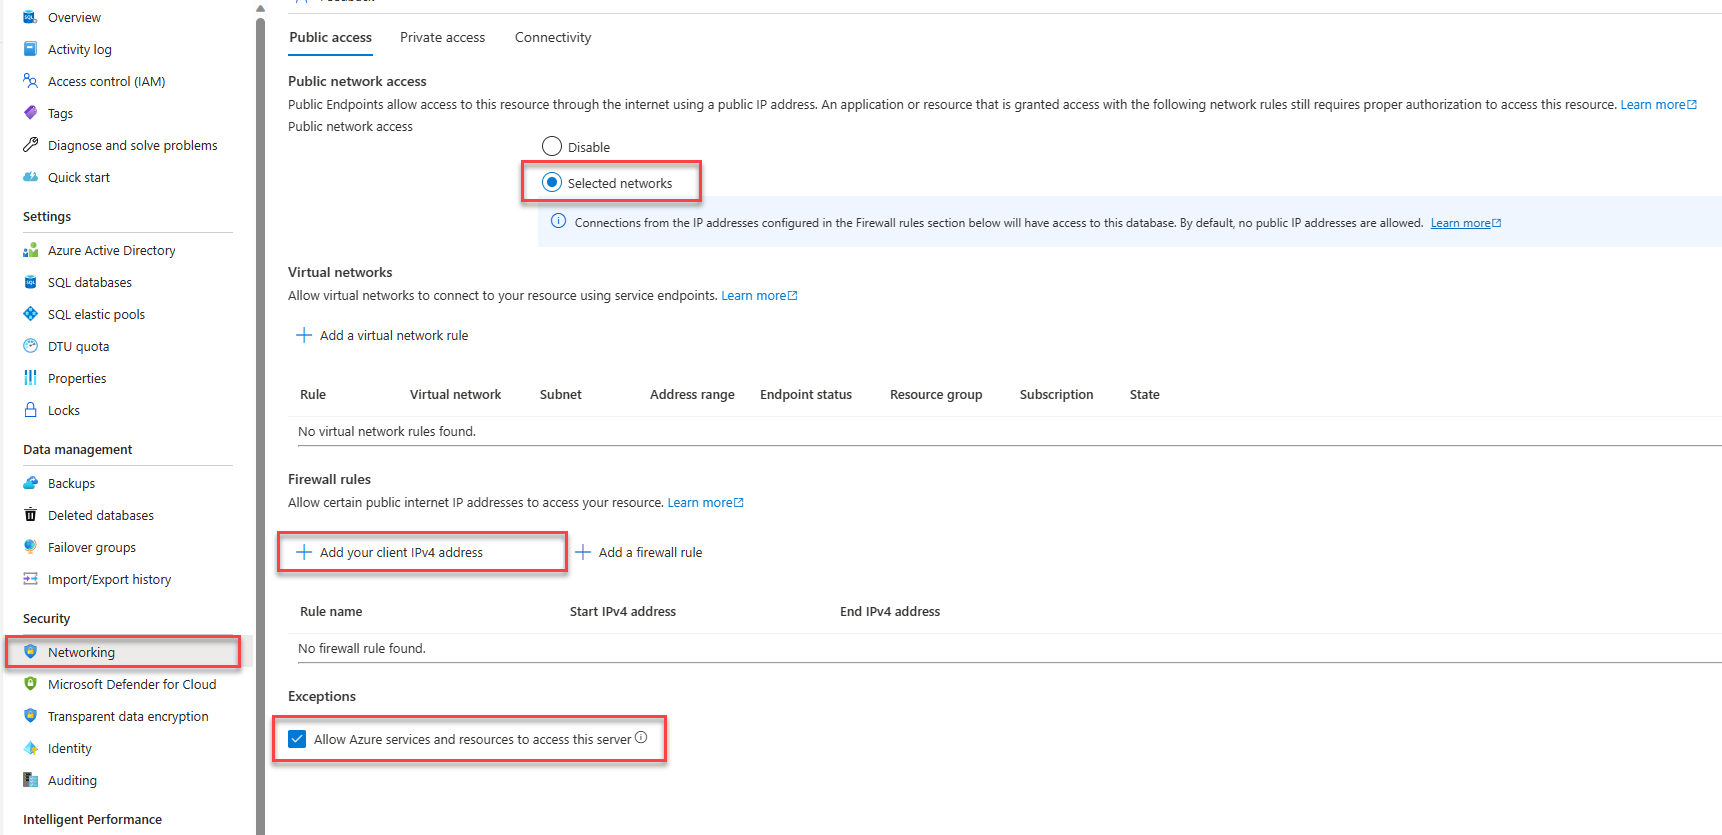
For local development connections, make sure your Azure SQL logical server is configured to allow your local machine IP address and other Azure services to connect:
In the Azure portal, in the resource menu, under Security, select Networking.
Select the Selected networks button to show additional configuration options.
Select Add your client IPv4 address(xx.xx.xx.xx) to add a firewall rule that will enable connections from your local machine IPv4 address. Alternatively, you can also select + Add a firewall rule to enter a specific IP address of your choice.
Make sure the Allow Azure services and resources to access this server checkbox is selected.
Warning
Enabling the Allow Azure services and resources to access this server setting is not a recommended security practice for production scenarios. Real applications should implement more secure approaches, such as stronger firewall restrictions or virtual network configurations.
You can read more about database security configurations on the following resources:
The server must also have Microsoft Entra authentication enabled and have a Microsoft Entra admin account assigned. For local development connections, the Microsoft Entra admin account should be an account you can also log into Visual Studio or the Azure CLI with locally. You can verify whether your server has Microsoft Entra authentication enabled on the Microsoft Entra ID page of your logical server.
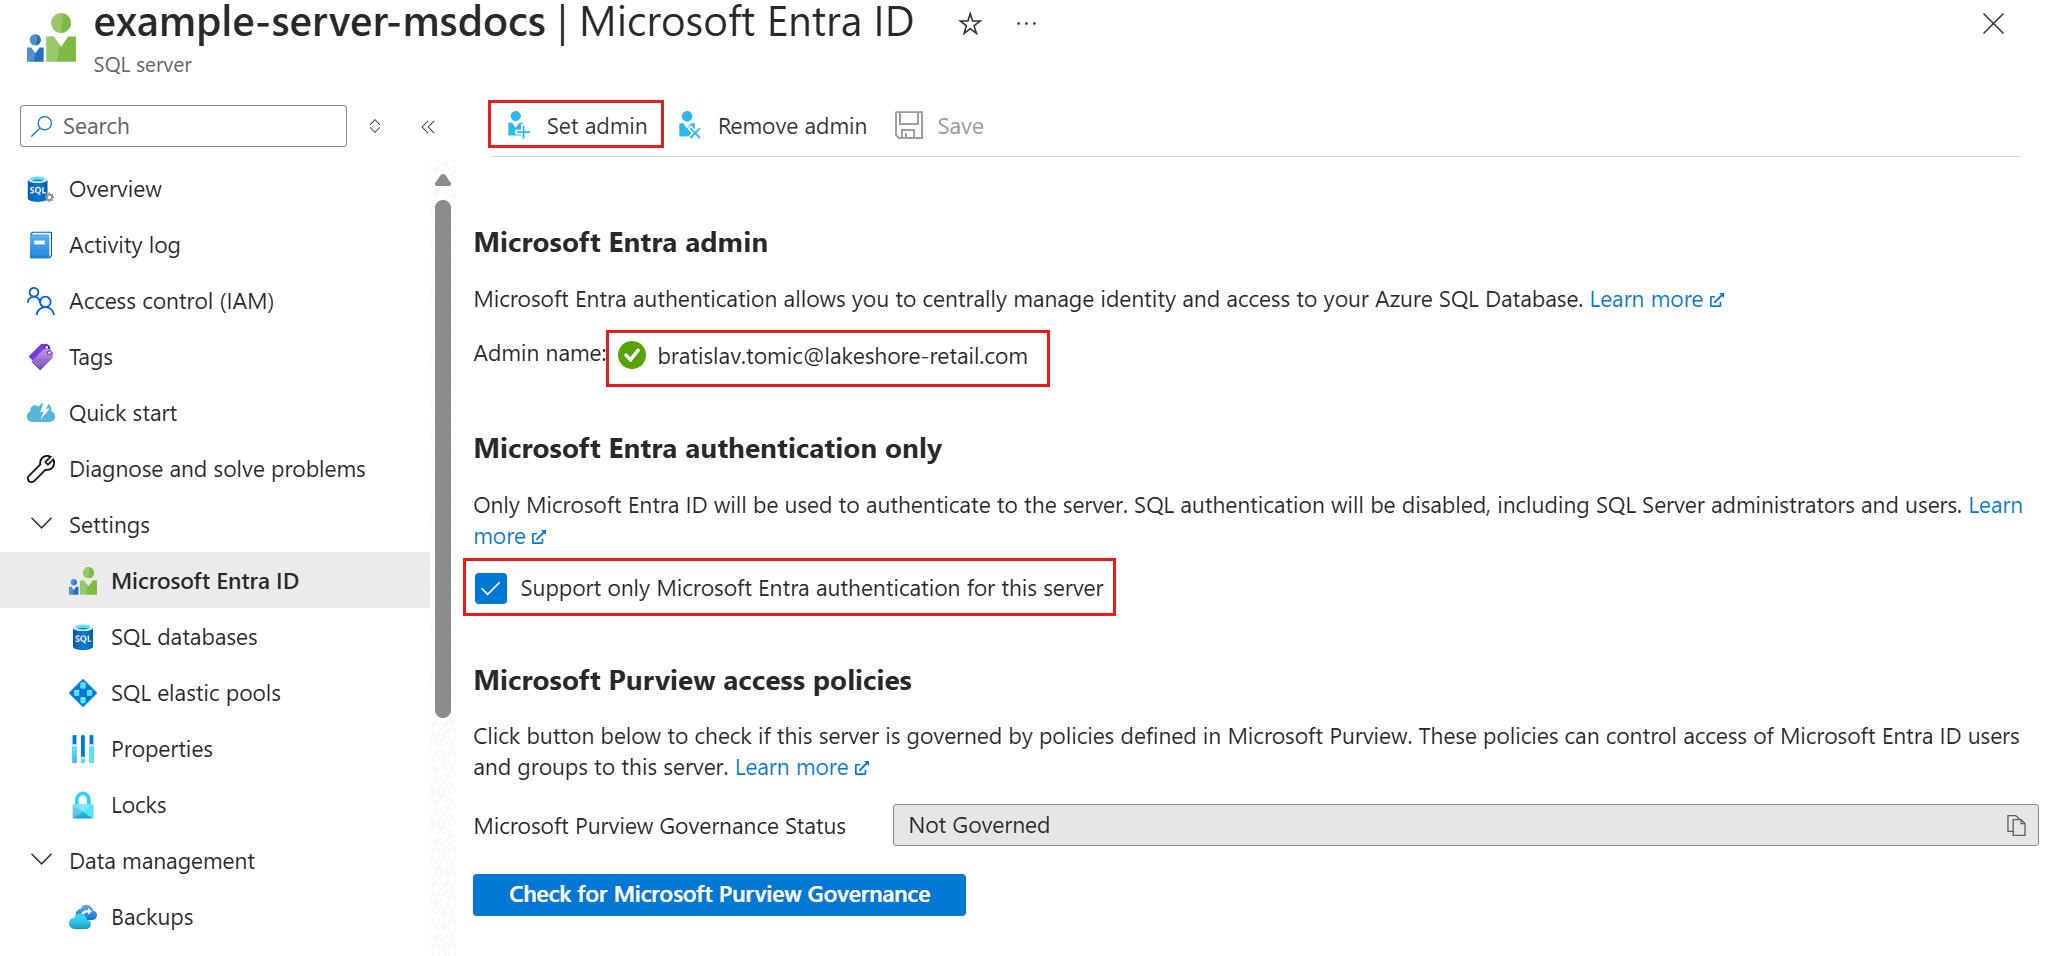
If you're using a personal Azure account, make sure you have Microsoft Entra setup and configured for Azure SQL Database in order to assign your account as a server admin. If you're using a corporate account, Microsoft Entra ID will most likely already be configured for you.


Create the project
For the steps ahead, create a .NET Minimal Web API using either the .NET CLI or Visual Studio 2022.
In the Visual Studio menu, navigate to File > New > Project...
In the dialog window, enter ASP.NET into the project template search box and select the ASP.NET Core Web API result. Choose Next at the bottom of the dialog.
For the Project Name, enter DotNetSQL. Leave the default values for the rest of the fields and select Next.
For the Framework, select .NET 7.0 and uncheck Use controllers (uncheck to use minimal APIs). This quickstart uses a Minimal API template to streamline endpoint creation and configuration.
Choose Create. The new project opens inside the Visual Studio environment.
Add the Microsoft.Data.SqlClient library
To connect to Azure SQL Database by using .NET, install Microsoft.Data.SqlClient. This package acts as a data provider for connecting to databases, executing commands, and retrieving results.
Note
Make sure to install Microsoft.Data.SqlClient and not System.Data.SqlClient. Microsoft.Data.SqlClient is a newer version of the SQL client library that provides additional capabilities.
In the Solution Explorer window, right-click the project's Dependencies node and select Manage NuGet Packages.
In the resulting window, search for SqlClient. Locate the
Microsoft.Data.SqlClientresult and select Install.
Configure the connection string
For local development with passwordless connections to Azure SQL Database, add the following ConnectionStrings section to the appsettings.json file. Replace the <database-server-name> and <database-name> placeholders with your own values.
"ConnectionStrings": {
    "AZURE_SQL_CONNECTIONSTRING": "Server=tcp:<database-server-name>.database.windows.net,1433;Initial Catalog=<database-name>;Encrypt=True;TrustServerCertificate=False;Connection Timeout=30;Authentication=\"Active Directory Default\";"
}
The passwordless connection string sets a configuration value of Authentication="Active Directory Default", which instructs the Microsoft.Data.SqlClient library to connect to Azure SQL Database using a class called DefaultAzureCredential. DefaultAzureCredential enables passwordless connections to Azure services and is provided by the Azure Identity library on which the SQL client library depends. DefaultAzureCredential supports multiple authentication methods and determines which to use at runtime for different environments.
For example, when the app runs locally, DefaultAzureCredential authenticates via the user you're signed into Visual Studio with, or other local tools like the Azure CLI. Once the app deploys to Azure, the same code discovers and applies the managed identity that is associated with the hosted app, which you'll configure later. The Azure Identity library overview explains the order and locations in which DefaultAzureCredential looks for credentials.
Note
Passwordless connection strings are safe to commit to source control, since they don't contain secrets such as usernames, passwords, or access keys.
Add the code to connect to Azure SQL Database
Replace the contents of the Program.cs file with the following code, which performs the following important steps:
- Retrieves the passwordless connection string from
appsettings.json - Creates a
Personstable in the database during startup (for testing scenarios only) - Creates an
HTTP GETendpoint to retrieve all records stored in thePersonstable - Creates an
HTTPPOST endpoint to add new records to thePersonstable
using Microsoft.Data.SqlClient;

var builder = WebApplication.CreateBuilder(args);

builder.Services.AddEndpointsApiExplorer();
builder.Services.AddSwaggerGen();

var app = builder.Build();

// For production scenarios, consider keeping Swagger configurations behind the environment check
// if (app.Environment.IsDevelopment())
// {
    app.UseSwagger();
    app.UseSwaggerUI();
// }

app.UseHttpsRedirection();

string connectionString = app.Configuration.GetConnectionString("AZURE_SQL_CONNECTIONSTRING")!;

try
{
    // Table would be created ahead of time in production
    using var conn = new SqlConnection(connectionString);
    conn.Open();

    var command = new SqlCommand(
        "CREATE TABLE Persons (ID int NOT NULL PRIMARY KEY IDENTITY, FirstName varchar(255), LastName varchar(255));",
        conn);
    using SqlDataReader reader = command.ExecuteReader();
}
catch (Exception e)
{
    // Table may already exist
    Console.WriteLine(e.Message);
}

app.MapGet("/Person", () => {
    var rows = new List<string>();

    using var conn = new SqlConnection(connectionString);
    conn.Open();

    var command = new SqlCommand("SELECT * FROM Persons", conn);
    using SqlDataReader reader = command.ExecuteReader();

    if (reader.HasRows)
    {
        while (reader.Read())
        {
            rows.Add($"{reader.GetInt32(0)}, {reader.GetString(1)}, {reader.GetString(2)}");
        }
    }

    return rows;
})
.WithName("GetPersons")
.WithOpenApi();

app.MapPost("/Person", (Person person) => {
    using var conn = new SqlConnection(connectionString);
    conn.Open();

    var command = new SqlCommand(
        "INSERT INTO Persons (firstName, lastName) VALUES (@firstName, @lastName)",
        conn);

    command.Parameters.Clear();
    command.Parameters.AddWithValue("@firstName", person.FirstName);
    command.Parameters.AddWithValue("@lastName", person.LastName);

    using SqlDataReader reader = command.ExecuteReader();
})
.WithName("CreatePerson")
.WithOpenApi();

app.Run();
Finally, add the Person class to the bottom of the Program.cs file. This class represents a single record in the database's Persons table.
public class Person
{
    public required string FirstName { get; set; }
    public required string LastName { get; set; }
}
Run and test the app locally
The app is ready to be tested locally. Make sure you're signed in to Visual Studio or the Azure CLI with the same account you set as the admin for your database.
Press the run button at the top of Visual Studio to launch the API project.
On the Swagger UI page, expand the POST method and select Try it.
Modify the sample JSON to include values for the
firstandlastname. Select Execute to add a new record to the database. The API returns a successful response.
Expand the
GETmethod on the Swagger UI page and select Try it. Choose Execute, and the person you just created is returned.

Deploy to Azure App Service
The app is ready to be deployed to Azure. Visual Studio can create an Azure App Service and deploy your application in a single workflow.
Make sure the app is stopped and builds successfully.
In Visual Studio's Solution Explorer window, right-click on the top-level project node and select Publish.
In the publishing dialog, select Azure as the deployment target, and then select Next.
For the specific target, select Azure App Service (Windows), and then select Next.
Select the + icon to create a new App Service to deploy to and enter the following values:
- Name: Leave the default value.
- Subscription name: Select the subscription to deploy to.
- Resource group: Select New and create a new resource group called msdocs-dotnet-sql.
- Hosting Plan: Select New to open the hosting plan dialog. Leave the default values and select OK.
- Select Create to close the original dialog. Visual Studio creates the App Service resource in Azure.

Once the resource is created, make sure it's selected in the list of app services, and then select Next.
On the API Management step, select the Skip this step checkbox at the bottom and then choose Finish.
On the Finish step, select Close if the dialog doesn't close automatically.
Select Publish in the upper right of the publishing profile summary to deploy the app to Azure.

When the deployment finishes, Visual Studio launches the browser to display the hosted app, but at this point the app doesn't work correctly on Azure. You still need to configure the secure connection between the App Service and the SQL database to retrieve your data.
Connect the App Service to Azure SQL Database
The following steps are required to create a passwordless connection between the App Service instance and Azure SQL Database:
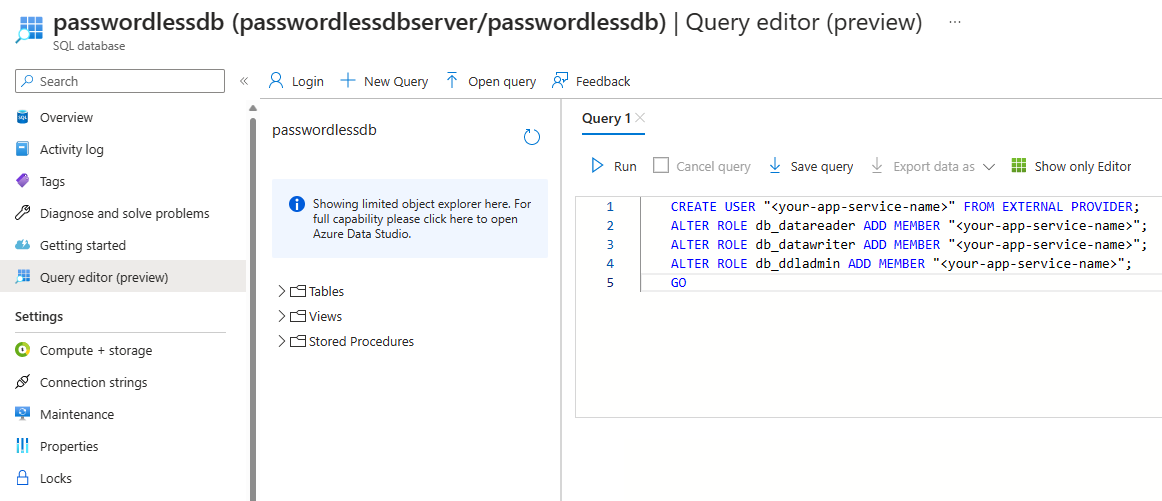
- Create a managed identity for the App Service. The
Microsoft.Data.SqlClientlibrary included in your app will automatically discover the managed identity, just like it discovered your local Visual Studio user. - Create a SQL database user and associate it with the App Service managed identity.
- Assign SQL roles to the database user that allow for read, write, and potentially other permissions.
There are multiple tools available to implement these steps:
Service Connector is a tool that streamlines authenticated connections between different services in Azure. Service Connector currently supports connecting an App Service to a SQL database via the Azure CLI using the az webapp connection create sql command. This single command completes the three steps mentioned above for you.
az webapp connection create sql \
    -g <app-service-resource-group> \
    -n <app-service-name> \
    --tg <database-server-resource-group> \
    --server <database-server-name> \
    --database <database-name> \
    --system-identity
You can verify the changes made by Service Connector on the App Service settings.
Navigate to the Identity page for your App Service. Under the System assigned tab, the Status should be set to On. This value means that a system-assigned managed identity was enabled for your app.
Navigate to the Configuration page for your App Service. Under the Connection strings tab, you should see a connection string called AZURE_SQL_CONNECTIONSTRING. Select the Click to show value text to view the generated passwordless connection string. The name of this connection string matches the one you configured in your app, so it will be discovered automatically when running in Azure.
Important
Although this solution provides a simple approach for getting started, it's not a best practice for production-grade environments. In those scenarios, the app shouldn't perform all operations using a single, elevated identity. You should try to implement the principle of least privilege by configuring multiple identities with specific permissions for specific tasks.
You can read more about configuring database roles and security on the following resources:
Test the deployed application
Select the Browse button at the top of App Service overview page to launch the root url of your app.
Append the
/swagger/index.htmlpath to the URL to load the same Swagger test page you used locally.Execute test
GETand POST requests to verify that the endpoints work as expected.Tip
If you receive a 500 Internal Server error while testing, it might be due to your database networking configurations. Verify that your logical server is configured with the settings outlined in the Configure the database section.
Your application is now connected to Azure SQL Database in both local and hosted environments.
Clean up the resources
When you are finished working with the Azure SQL Database, delete the resource to avoid unintended costs.
In the Azure portal search bar, search for Azure SQL and select the matching result.
Locate and select your database in the list of databases.
On the Overview page of your Azure SQL Database, select Delete.
On the Azure you sure you want to delete... page that opens, type the name of your database to confirm, and then select Delete.