Note
Access to this page requires authorization. You can try signing in or changing directories.
Access to this page requires authorization. You can try changing directories.
Applies to: ![]() Azure SQL Database
Azure SQL Database ![]() Azure SQL Managed Instance
Azure SQL Managed Instance
Visual Studio Code is a graphical code editor for Linux, macOS, and Windows. It supports extensions, including the mssql extension for querying SQL Server, Azure SQL Database, Azure SQL Managed Instance, SQL database in Microsoft Fabric, and other platforms. In this quickstart, you use Visual Studio Code to connect to Azure SQL Database or Azure SQL Managed Instance and then run Transact-SQL statements to query, insert, update, and delete data.
Prerequisites
A database in Azure SQL Database or Azure SQL Managed Instance. You can use one of these quickstarts to create and then configure a database in Azure SQL Database:
Action Azure SQL Database Azure SQL Managed Instance Create Portal Portal CLI CLI PowerShell PowerShell Configure Server-level IP firewall rule) Connectivity from a virtual machine (VM) Connectivity from on-premises Load data Wide World Importers loaded per quickstart Restore Wide World Importers Restore or import Adventure Works from a BACPAC file from GitHub Important
The scripts in this article are written to use the Adventure Works database. With a SQL Managed Instance, you must either import the Adventure Works database into an instance database or modify the scripts in this article to use the Wide World Importers database.
Install Visual Studio Code
Make sure you have installed the latest Visual Studio Code. For installation guidance, see Install Visual Studio Code.
Configure Visual Studio Code
To configure Visual Studio Code for connecting to Azure SQL Database or Azure SQL Managed Instance, you need to install the necessary extensions and dependencies based on your operating system. Follow the steps below for your specific OS to get started.
Windows
Load the mssql extension by following these steps:
- Open Visual Studio Code.
- Open the Extensions pane (or Ctrl + Shift + X).
- Search for
sqland then install the SQL Server (mssql) extension.
For additional installation guidance, see mssql for Visual Studio Code.
macOS
For macOS, you need to install OpenSSL, which is a prerequisite for .NET Core that mssql extension uses. Open your terminal and enter the following commands to install brew and OpenSSL.
ruby -e "$(curl -fsSL https://raw.githubusercontent.com/Homebrew/install/master/install)"
brew update
brew install openssl
mkdir -p /usr/local/lib
ln -s /usr/local/opt/openssl/lib/libcrypto.1.0.0.dylib /usr/local/lib/
ln -s /usr/local/opt/openssl/lib/libssl.1.0.0.dylib /usr/local/lib/
Linux (Ubuntu)
Load the mssql extension by following these steps:
- Open Visual Studio Code.
- Open the Extensions pane (or Ctrl + Shift + X).
- Search for
sqland then install the SQL Server (mssql) extension.
For additional installation guidance, see mssql for Visual Studio Code.
Get server connection information
Get the connection information you need to connect to Azure SQL Database. You need the fully qualified server name or host name, database name, and login information for the upcoming procedures.
Sign in to the Azure portal.
Navigate to the SQL databases or SQL Managed Instances page.
On the Overview page, review the fully qualified server name next to Server name for SQL Database or the fully qualified server name next to Host for a SQL Managed Instance. To copy the server name or host name, hover over it and select the Copy icon.
Set language mode to SQL
In Visual Studio Code, set the language mode to SQL to enable mssql commands and T-SQL IntelliSense.
Open a new Visual Studio Code window.
Press Ctrl + N. A new plain text file opens.
Select Plain Text in the status bar's lower right-hand corner.
In the Select language mode dropdown list that opens, select SQL.
Connect to your database
Use Visual Studio Code to establish a connection to your server.
Important
Before continuing, make sure that you have your server and sign-in information ready. Once you begin entering the connection profile information, if you change your focus from Visual Studio Code, you have to restart creating the profile.
In Visual Studio Code, press Ctrl + Shift + P (or F1) to open the Command Palette.
Type
connectand then choose MS SQL:Connect.Select + Create Connection Profile.
Follow the prompts to specify the new profile's connection properties. After specifying each value, press Enter to continue.
Property Suggested value Description Server name The fully qualified server name Something like: <Contoso-server-name>.database.windows.net.Database name mySampleDatabase The database to connect to. Authentication SQL Login This tutorial uses SQL Authentication. User name User name The user name of the server admin account used to create the server. Password (SQL Login) Password The password of the server admin account used to create the server. Save Password? Yes or No Select Yes if you don't want to enter the password each time. Enter a name for this profile A profile name, such as mySampleProfile A saved profile speeds your connection on subsequent logins. If successful, a notification appears saying your profile is created and connected.
Query data
Run the following SELECT Transact-SQL statement to query for the top 20 products by category.
In the editor window, paste the following SQL query.
SELECT pc.Name AS CategoryName,
    p.name AS ProductName
FROM [SalesLT].[ProductCategory] pc
INNER JOIN [SalesLT].[Product] p
    ON pc.ProductCategoryId = p.ProductCategoryId;
Press Ctrl + Shift + E to run the query and display results from the
ProductandProductCategorytables.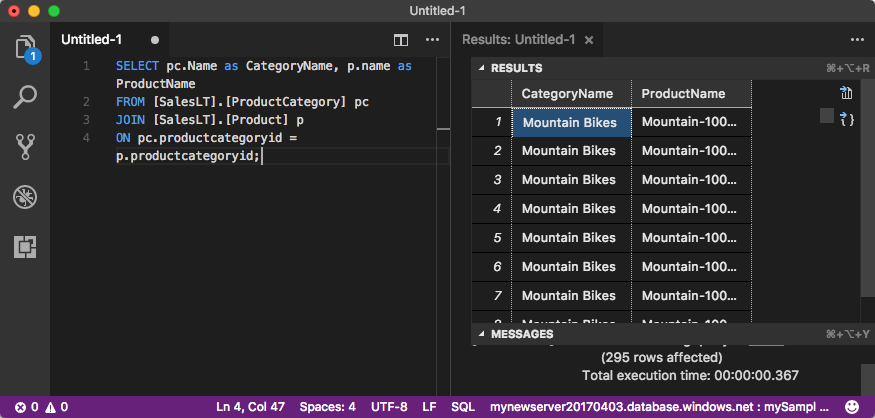

Insert data
Run the following INSERT Transact-SQL statement to add a new product into the SalesLT.Product table.
Replace the previous query with this one.
INSERT INTO [SalesLT].[Product] (
    [Name],
    [ProductNumber],
    [Color],
    [ProductCategoryID],
    [StandardCost],
    [ListPrice],
    [SellStartDate]
 )
 VALUES (
    'myNewProduct',
    123456789,
    'NewColor',
    1,
    100,
    100,
    GETDATE()
 );
Press Ctrl + Shift + E to insert a new row in the
Producttable.
Update data
Run the following UPDATE Transact-SQL statement to update the added product.
Replace the previous query with this one:
UPDATE [SalesLT].[Product]
SET [ListPrice] = 125
WHERE Name = 'myNewProduct';
Press Ctrl + Shift + E to update the specified row in the
Producttable.
Delete data
Run the following DELETE Transact-SQL statement to remove the new product.
Replace the previous query with this one:
DELETE FROM [SalesLT].[Product]
WHERE Name = 'myNewProduct';
Press Ctrl + Shift + E to delete the specified row in the
Producttable.