Note
Access to this page requires authorization. You can try signing in or changing directories.
Access to this page requires authorization. You can try changing directories.
Applies to:  Azure SQL Managed Instance
This article teaches you how to extend an Always On availability group with multiple databases between SQL Server and Azure SQL Managed Instance with the Managed Instance link by using SQL Server Management Studio (SSMS), PowerShell, or Azure CLI.
This article covers multiple-database link mode, which replicates all databases in an availability group through one link. Single-database link mode replicates one database per link.
Note
Support for linking multiple databases in an Always On availability group between SQL Server and Azure SQL Managed Instance is currently in preview.
Overview
When you extend an Always On availability group between SQL Server and Azure SQL Managed Instance, you create a link that replicates multiple databases in an availability group to the target replica. The link uses a distributed availability group to replicate changes in near-real time from the current primary replica to read-only database copies on the secondary replica. This ensures that the read-only copies on the secondary remain up-to-date with the primary.
You can use an existing availability group or start with standalone databases. When you select standalone databases in SSMS, the wizard creates a single-node availability group on the initial primary and replicates the selected databases through one link.
Either SQL Server or Azure SQL Managed Instance can be the initial primary. Creating the link from SQL Managed Instance requires SQL Server 2022 or SQL Server 2025 with the required cumulative update and a matching SQL Managed Instance update policy. The creation examples in this article start from SQL Server. They don't walk through creation from SQL Managed Instance. Failover with role reversal between SQL Server and Azure SQL Managed Instance is supported for instances configured with matching update policies.
Supportability
The following requirements apply to extending an availability group through a multiple-database link during preview. SQL Server on both Windows and Linux is supported. You must install the required cumulative update (CU). Earlier builds don't support this feature.
| SQL Server version | Required update | Supported editions |
|---|---|---|
| SQL Server 2022 (16.x) | CU27 or later | Enterprise and Developer |
| SQL Server 2025 (17.x) | CU9 or later | Enterprise and Developer |
Consider the following:
- Standard edition isn't supported because basic availability groups support only one database.
- SQL Server 2019 and earlier versions aren't supported for multiple-database link mode because they lack the required technology introduced in SQL Server 2022.
- To create the link from SQL Managed Instance or reverse roles back to SQL Server, your SQL managed instance must use the update policy that matches your SQL Server version. For one-way replication and cutover from SQL Server, the destination update policy must match, or be higher than, your SQL Server version.
- SQL Server 2022 supports replication to instances configured with the SQL Server 2022, SQL Server 2025, and Always-up-to-date policies.
- SQL Server 2025 supports replication to instances configured with the SQL Server 2025 and Always-up-to-date policies, but not SQL Server 2022. You can't replicate data or fail back to SQL Server after cutover if the policies don't match.
For SQL Server versions and editions that support single-database links, see Managed Instance link version supportability.
Caution
Every SQL Server replica in your availability group must use the same supported SQL Server version, have the required cumulative update or later installed, and have multiple-database link mode enabled. Don't mix replicas that support multiple-database link mode with replicas on earlier builds or with the feature disabled. Mixing these configurations can cause SQL Server to behave unpredictably.
Prerequisites
To extend your availability group between SQL Server and Azure SQL Managed Instance, you need the following prerequisites:
- An active Azure subscription. If you don't have one, create a free account.
- A supported SQL Server version and edition with the required service update installed. You can use an existing Always On availability group or standalone databases that SSMS places in a new single-node availability group. Contained availability groups aren't supported.
- Azure SQL Managed Instance with an update policy appropriate for your scenario. A matching policy is required when SQL Managed Instance is the initial primary or for role reversal. Get started if you don't have a SQL managed instance.
- SQL Server Management Studio (SSMS) 22.10.2 or later.
- For scripted configuration, Azure PowerShell with the Az module version 16.3.0 or later and Az.Sql version 7.1.0 or later, or Azure CLI version 2.90.0 or later. You can also use Azure Cloud Shell. Verify that the installed modules or CLI meet these version requirements.
- A properly prepared environment.
- For a multiple-node availability group, a configured availability group listener. Use the listener's IP address when configuring the link, not an individual SQL Server replica's IP address. Using the listener lets the link continue working after a local availability group failover.
- No existing links on any SQL Server replica when you enable multiple-database link mode. Before you start, remove all links that use the older single-database link mode.
- Sufficient available database capacity and storage on the target managed instance for all databases in your availability group. Review resource limits.
Permissions
For SQL Server, you need sysadmin permissions.
For Azure SQL Managed Instance, you need to be a member of the SQL Managed Instance Contributor role, or have the following custom role permissions:
| Microsoft.Sql/ resource | Necessary permissions |
|---|---|
| Microsoft.Sql/managedInstances | /read, /write |
| Microsoft.Sql/managedInstances/hybridCertificate | /action |
| Microsoft.Sql/managedInstances/databases | /read, /delete, /write, /completeRestore/action, /readBackups/action, /restoreDetails/read |
| Microsoft.Sql/managedInstances/distributedAvailabilityGroups | /read, /write, /delete, /setRole/action |
| Microsoft.Sql/managedInstances/endpointCertificates | /read |
| Microsoft.Sql/managedInstances/hybridLink | /read, /write, /delete |
| Microsoft.Sql/managedInstances/serverTrustCertificates | /write, /delete, /read |
Enable multiple-database link mode
Support for multiple-database link mode is disabled by default during preview. Use the built-in sys.sp_multidb_milink stored procedure to enable it on every SQL Server replica in the availability group, or on the SQL Server instance where you plan to create a single-node group.
Warning
Remove all existing links before enabling or disabling multiple-database link mode. Changing the setting while links are active can result in unpredictable SQL Server behavior. Don't mix single-database and multiple-database links. When changing modes, remove the links first, change the setting on every SQL Server replica, and then create new links.
Run the following command on every SQL Server replica to enable multiple-database link mode:
EXEC sys.sp_multidb_milink 1;
The setting persists across SQL Server restarts, so you only need to enable it once on each replica.
To check the setting, run the stored procedure without a parameter on each replica. It returns 1 when enabled and 0 when disabled:
EXEC sys.sp_multidb_milink;
If the stored procedure isn't available, verify that the replica has a supported SQL Server version and cumulative update installed.
To disable multiple-database link mode, first remove all links, and then run the following command on every SQL Server replica:
EXEC sys.sp_multidb_milink 0;
Prepare the availability group databases
Set each SQL Server database you want to replicate to the full recovery model, and then create a full backup. Both existing availability group databases and standalone databases require this preparation. Use the SSMS backup procedure in the link configuration guide.
Caution
If your databases use Transparent Data Encryption (TDE), prepare the encryption certificates or keys on the destination before creating the link. Without them, the link can't replicate the encrypted databases.
For SQL Server databases, migrate the TDE certificate to SQL Managed Instance. For encrypted SQL Managed Instance databases linked to SQL Server, use a customer-managed key accessible to the destination SQL Server. Review TDE preparation for the link for the requirements in each direction.
The link replicates all databases in the selected availability group. You can't choose a subset, so check the target SQL managed instance's available capacity before you create the link. The destination must not contain databases with the same names as the databases you want to replicate. Existing databases with different names are allowed, subject to the instance's capacity limits.
The link supports replicating user databases only. Replication of system databases isn't supported. To replicate instance-level objects stored in master or msdb, script them out and run T-SQL scripts on the destination instance.
Configure the listener and certificates
For a multiple-node availability group, use the listener's IP address when configuring the link, both in SSMS and in scripts. The listener directs connections to the current primary replica. Don't use the IP address of an individual SQL Server replica as the link's partner endpoint. Without the listener, the link doesn't continue working after a local availability group failover. For a single-node availability group, including one created by the SSMS wizard for standalone databases, use that SQL Server instance's IP endpoint.
The SSMS wizard exchanges certificates between Azure SQL Managed Instance and only the current SQL Server primary replica. It doesn't configure certificate trust on the other SQL Server replicas. You must manually copy and configure the required certificates on every other SQL Server replica so that the link can continue working after a local availability group failover. This manual step applies to both SSMS and scripted configuration. Review Establish trust between instances for the certificate exchange steps.
Prepare for scripted link creation
Use SSMS for the recommended setup experience. The wizard automates many configuration steps. If you don't need scripted automation, skip this section and continue to the SSMS tab in Extend the availability group.
Scripted setup is an advanced option that requires experience configuring availability groups, endpoints, and certificate trust. Complete these steps only if you're using PowerShell or Azure CLI with SQL Server as the initial primary.
The checklist covers both existing availability groups and standalone databases. After you prepare the databases, trust, and endpoint, reuse your existing availability group or create one in step 4. Then create the distributed availability group. The PowerShell and Azure CLI link creation commands don't create the availability group for you.
For a script tailored to your environment, use the SSMS link wizard and select Script on its Summary page. Review the generated script and execute it separately.
- Enable multiple-database link mode on every SQL Server replica, or on the standalone SQL Server instance, and prepare the databases.
- Establish trust between instances. Follow the certificate creation, public-key exchange, root-certificate import, and certificate-chain validation steps. For a multiple-node group, apply the certificate requirements to every SQL Server replica, not only the current primary.
- Secure the database mirroring endpoint. If your availability group already has an endpoint, use Alter an existing endpoint instead of creating another one. Retain the configured endpoint port for the link creation command.
- Prepare the availability group. If you already have an availability group containing all databases you want to replicate, reuse it and skip creating a new group. If you start with standalone databases, first create an availability group on SQL Server. In the SQL Server initial primary tab, use the single-node
CREATE AVAILABILITY GROUPexample withCLUSTER_TYPE = NONE, but replaceFOR DATABASE [<DatabaseName>]with the complete database list, such asFOR DATABASE [DB01], [DB03], [DB05], [DB07]. Set<AGNameOnSQLServer>to the name you want to give the new group. Run this script before continuing to distributed availability group creation. Don't run it against an existing group or change an existing group's cluster configuration. - Create the distributed availability group on SQL Server. Use the SQL Server initial primary tab and start at the distributed availability group creation instructions. Set
<AGNameOnSQLServer>to the availability group you reused or created in the preceding step. For a multiple-node group, use the listener's IP address for<SQLServerIP>. For a single-node group, use the SQL Server instance's endpoint. Retain<DAGName>as your link name and<AGNameOnSQLMI>as the managed-instance availability group name for the creation command below. - Verify the availability groups on SQL Server. Confirm that both the Always On availability group and the distributed availability group are present. Then return to Extend the availability group, select PowerShell or Azure CLI, and run the multiple-database creation command in this article instead of the other guide's single-database command.
Extend the availability group
To retain log records needed for seeding, the recommended approach is to enable trace flag 12381 on supported SQL Server builds before creating links, especially for large databases or many databases in multiple-database link mode. However, the flag isn't required, and there are alternative mitigations, listed in Troubleshoot error 1412. With the flag enabled, log backups can continue, but retained log records aren't made reusable. Monitor SQL Server log growth and free disk space, and disable the flag as soon as seeding finishes for all links being created.
Use SSMS to automate link creation, or choose PowerShell or Azure CLI for advanced scripted configuration. The following examples use SQL Server as the initial primary. You can also start from SQL Managed Instance with a matching update policy, but that creation workflow isn't covered here.
For scripted configuration, complete the scripted setup steps to reuse or create an availability group containing all databases you want to replicate, and then create the distributed availability group before running the PowerShell or Azure CLI creation command. Alternatively, if you start with standalone databases, the SSMS procedure in this section automatically creates the single-node availability group as part of link setup.
For multiple-database link mode, explicitly specify MultiDatabase in scripts and supply all database names in the availability group. PowerShell defaults to SingleDatabase if -LinkMode is omitted. Use -LinkMode MultiDatabase in PowerShell or --link-mode MultiDatabase in Azure CLI.
Warning
Don't create a link with MultiDatabase link mode unless every SQL Server replica has the required cumulative update and multiple-database link mode enabled through the sys.sp_multidb_milink stored procedure. Using this mode with SQL Server builds that don't support it can cause SQL Server to behave unpredictably. Review Supportability and Enable multiple-database link mode first.
Use the New SQL Managed Instance link wizard in SSMS to create a link from an existing availability group or standalone databases to Azure SQL Managed Instance.
Open SSMS and connect to SQL Server. For a multiple-node availability group, connect through the listener's IP address. For standalone databases or a single-node group, connect to the SQL Server instance.
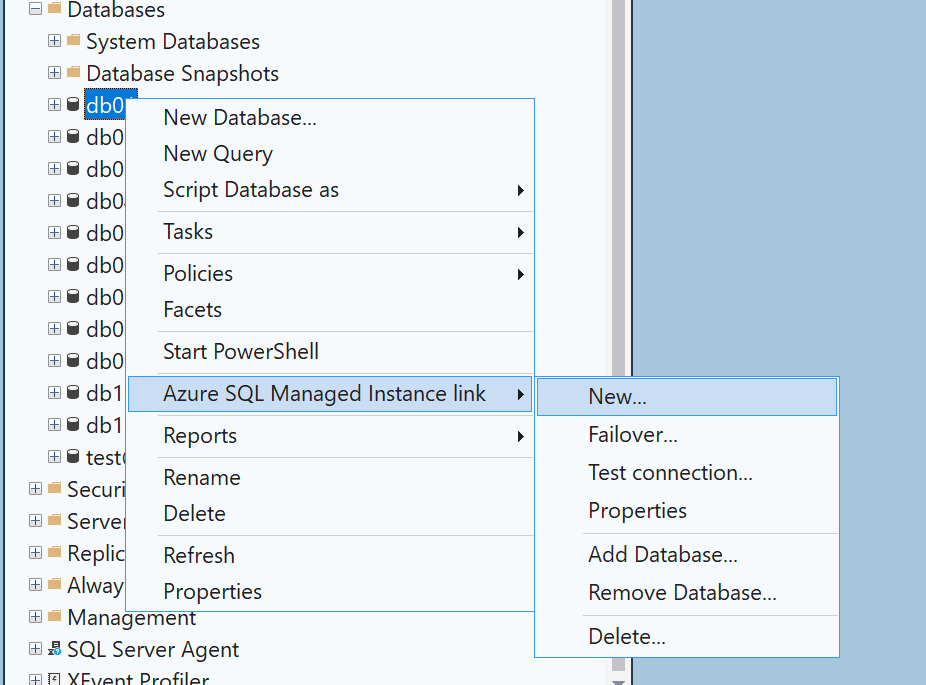
In Object Explorer, right-click a database you want to replicate, hover over Azure SQL Managed Instance link, and select New... to open the New SQL Managed Instance link wizard.
On the Introduction page of the wizard, select Next.
On the Specify Link Options page, verify that multiple-database link mode is enabled, and provide a name for your link. The mode checkbox is read-only: it reflects the
sys.sp_multidb_milinksetting on SQL Server. You can't enable the mode by selecting the checkbox. If the mode isn't enabled, check the SQL Server version and cumulative update, and enable the feature on all replicas before continuing. Use lowercase letters for the link name. Hyphens are allowed except at the beginning or end. Select Next.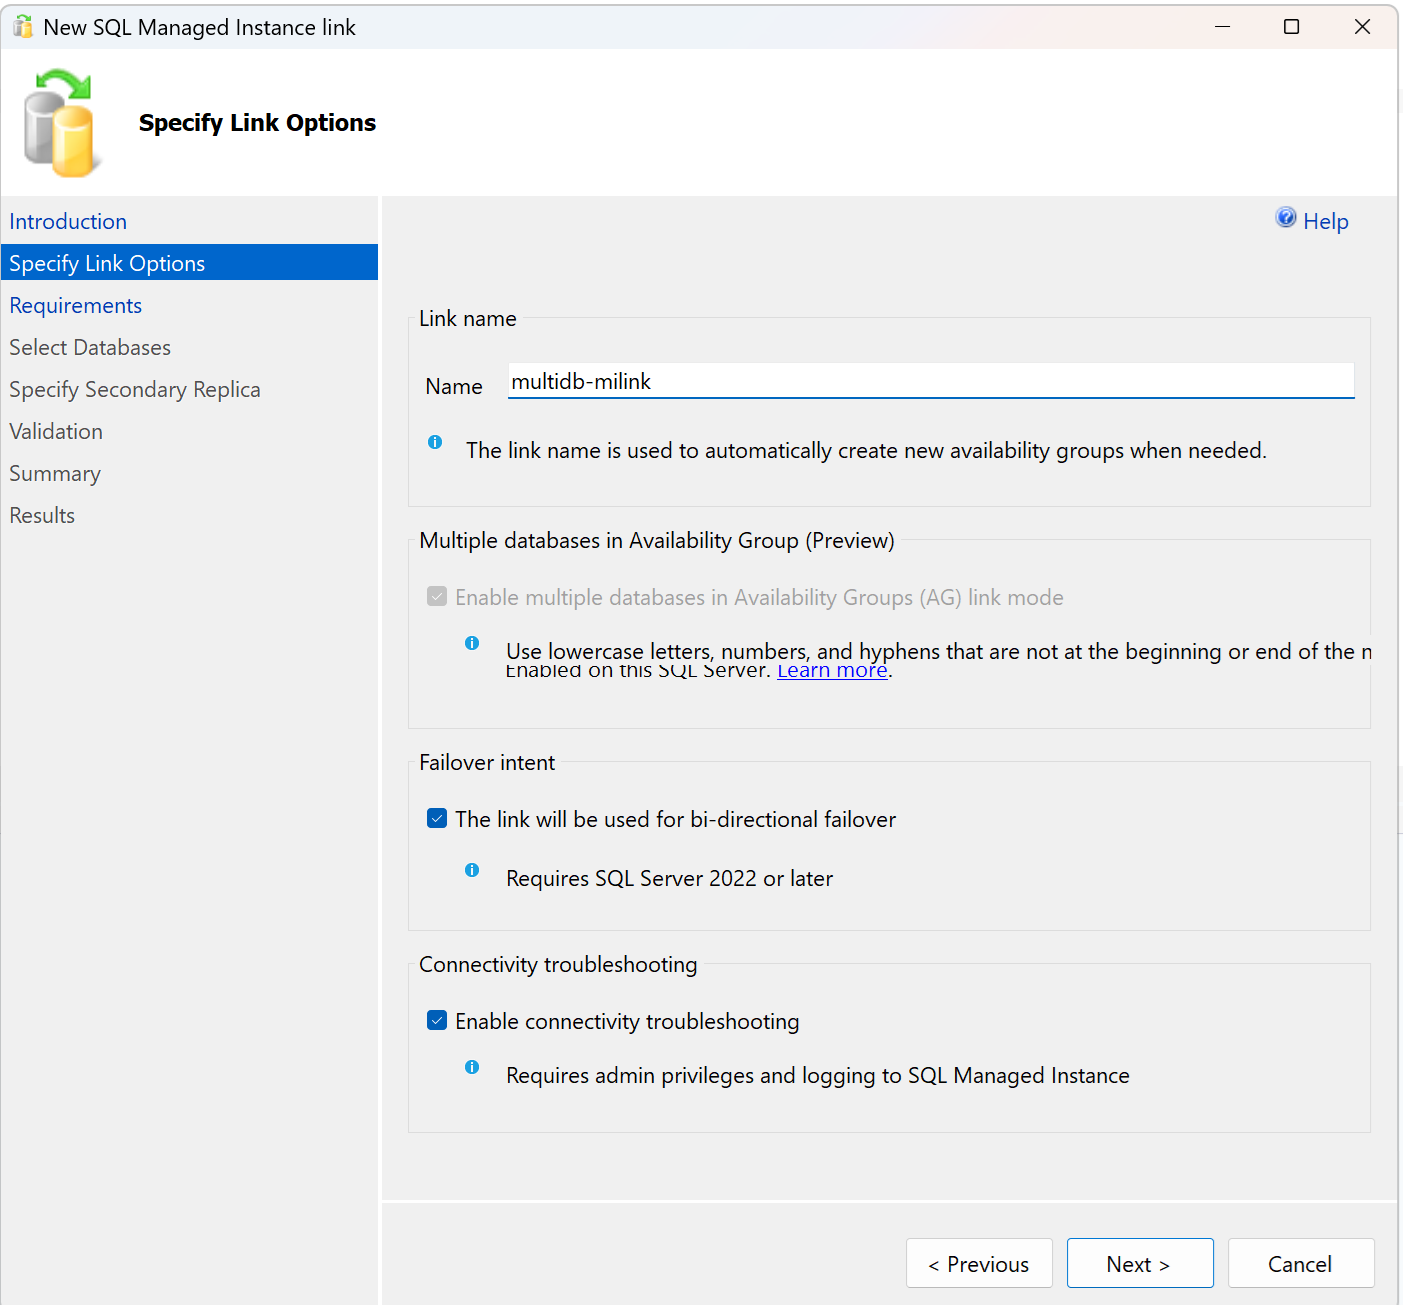
On the Requirements page, the wizard validates requirements to establish a link to your secondary. Select Next after all the requirements are validated, or resolve any requirements that aren't met and then select Re-run Validation.
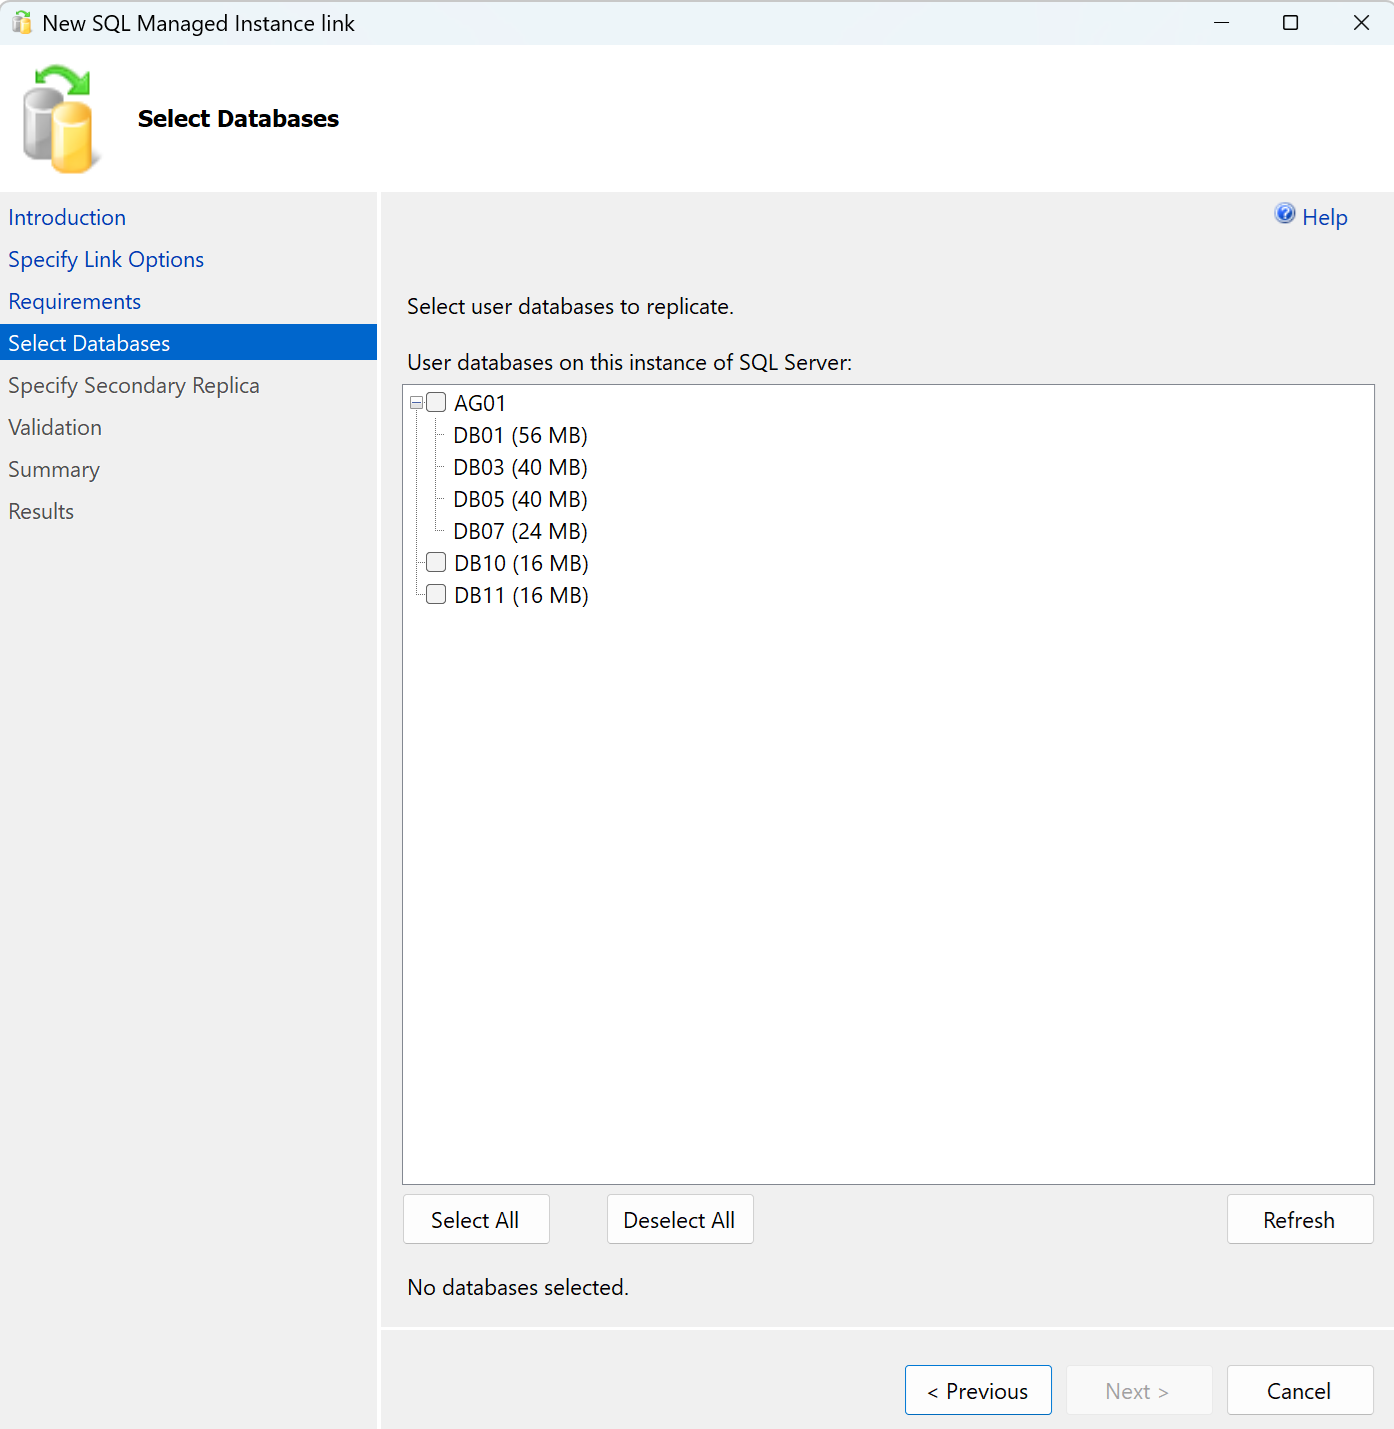
On the Select Databases page, choose either an existing availability group or standalone databases:
- Select AG01 to replicate all its databases, such as DB01, DB03, DB05, and DB07.
- Or select standalone DB10 and DB11. With multiple-database link mode enabled, SSMS creates a single-node availability group on the current SQL Server instance, places both databases in it, and replicates them through one link.
Review the selection, and then select Next.
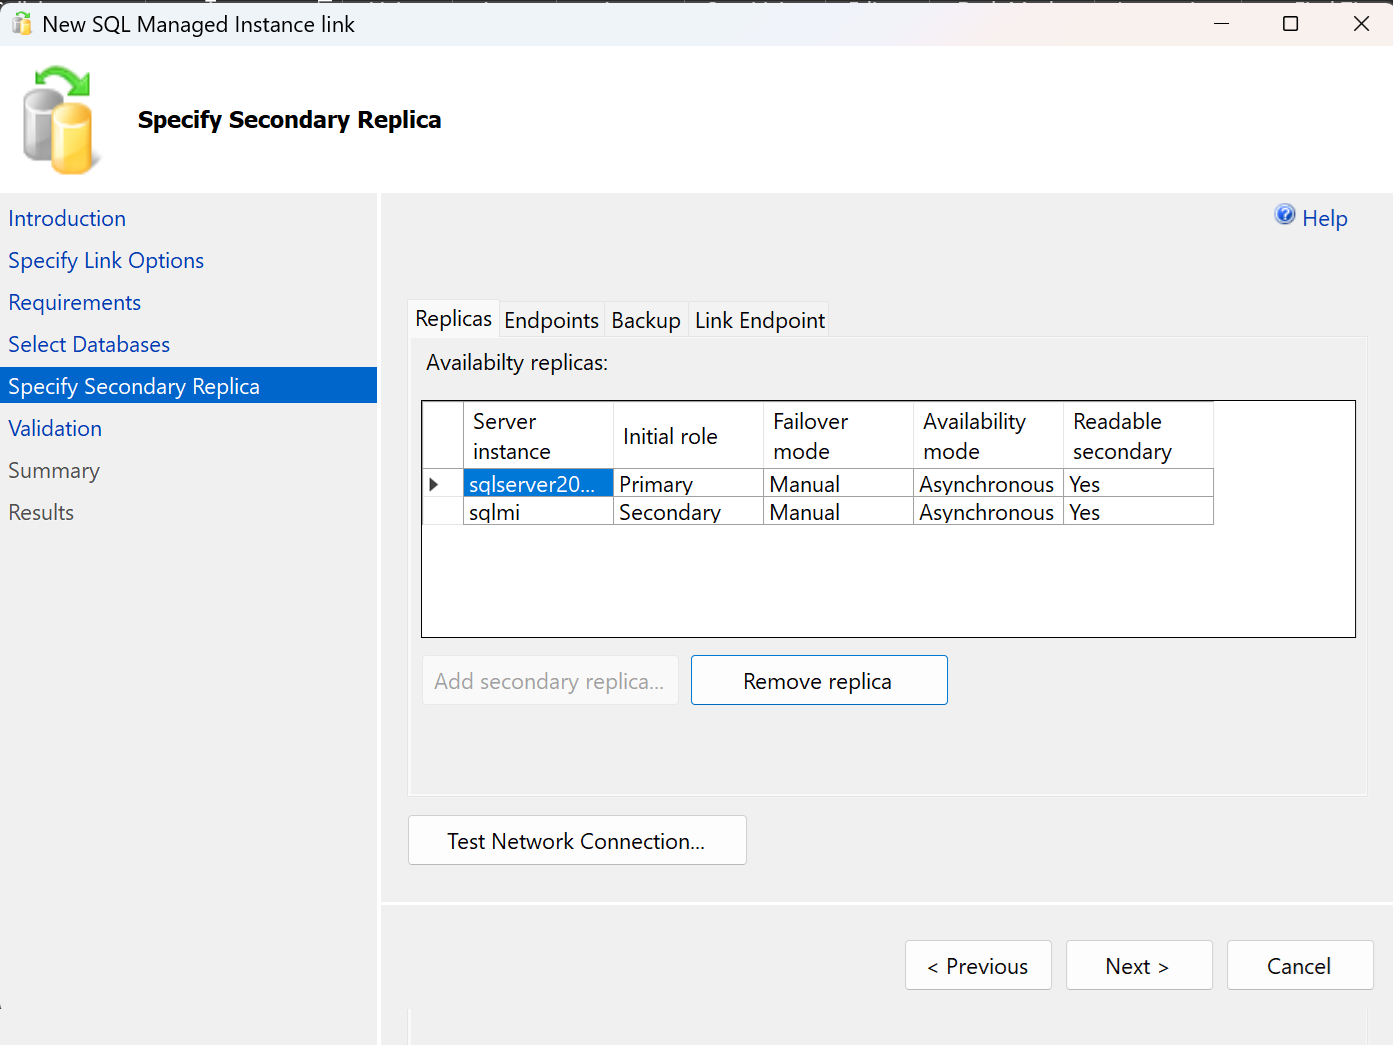
On the Specify Secondary Replica page, select Add secondary replica. If SQL managed instance is your secondary, sign in to Azure, and choose the subscription, resource group, and secondary SQL managed instance to connect to your instance.
Review the endpoint settings and complete the remaining validation steps as described in Configure link with SSMS.
On the Summary page, review your configuration once more. Optionally, select Script to generate a script. Select Finish when you're ready to create the link.
After all steps finish, the Results page shows check marks next to the successfully completed actions. You can now close the window.
Multiple-database mode replicates the databases in your availability group through one link. This approach differs from selecting multiple databases in single-database mode, which creates a separate link for each database.
Verify replication
After you create the link or add databases, data replicates from the current primary to the current secondary replica. Either SQL Server or Azure SQL Managed Instance can be the initial primary. After role reversal, data replicates in the opposite direction. Depending on database size and network speed, each database might initially be in a Restoring state on the secondary replica. After initial seeding finishes, the database is restored to the secondary replica and ready for read-only workloads.
On either replica, use Object Explorer in SSMS to view the Synchronized state of each replicated database. Expand Always On High Availability and Availability Groups to view the distributed availability group created for the link.
When SQL Server is primary, you can continue transaction log backups during seeding if trace flag 12381 is enabled on a supported build. If you pause log backups to prevent premature truncation, resume them after initial seeding finishes. For each database without a log backup schedule, take the first transaction log backup only after initial seeding finishes, not during seeding. After seeding completes for all links being created, disable the flag if you enabled it and take SQL Server transaction log backups regularly while SQL Server remains primary. When Azure SQL Managed Instance is primary, it takes transaction log backups automatically. You don't need to take manual SQL Server log backups for these databases while SQL Server is secondary.
Premature log truncation during seeding can cause errors 1408 and 1412 in the SQL Managed Instance error log. On builds that support it, trace flag 12381 prevents this truncation. Disable it once seeding completes for all links being created, and monitor transaction log usage, growth rate, and free disk space while it's enabled. Log backups can continue while required records remain retained. This retention doesn't replace regular log backups after seeding. See Prevent premature log truncation.
Add databases
Use the SSMS wizard to add databases from the current primary, whether it's SQL Server or SQL Managed Instance. The wizard automates the required changes. For advanced automation, use PowerShell or the Azure CLI. Adding a database is a single operation on the primary side.
Before adding databases, verify that the existing link uses multiple-database link mode and that the destination has sufficient available database capacity and storage, with no existing database names that conflict with the new databases. When SQL Server is primary, set each new database that isn't already in the availability group to the full recovery model, and create a full backup by using the SSMS backup procedure.
Add databases with SSMS
Use the Add Database to Azure SQL Managed Instance Link wizard to add databases to an existing multiple-database link:
Connect to the current primary in SSMS. In Object Explorer, expand Always On High Availability and Availability Groups.
Right-click the distributed availability group for your link, hover over Azure SQL Managed Instance link, and select Add Database....
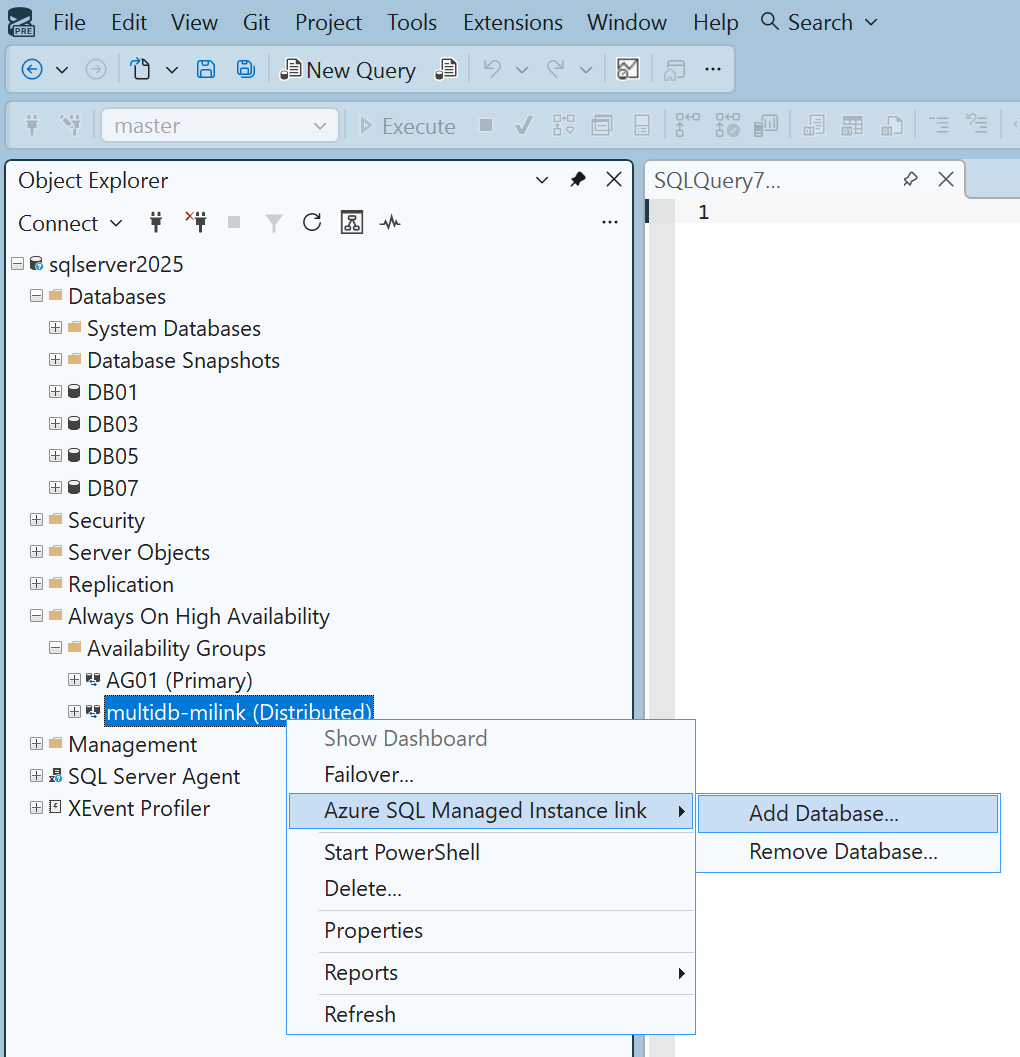
Proceed through Introduction and Azure Login, and then select your multiple-database link on the Select Link page.
On the Select Databases page, select the databases you want to add. You can only add databases with a Ready state. Databases already in the link are shown as Already part of the selected link. Resolve any eligibility issues before continuing.
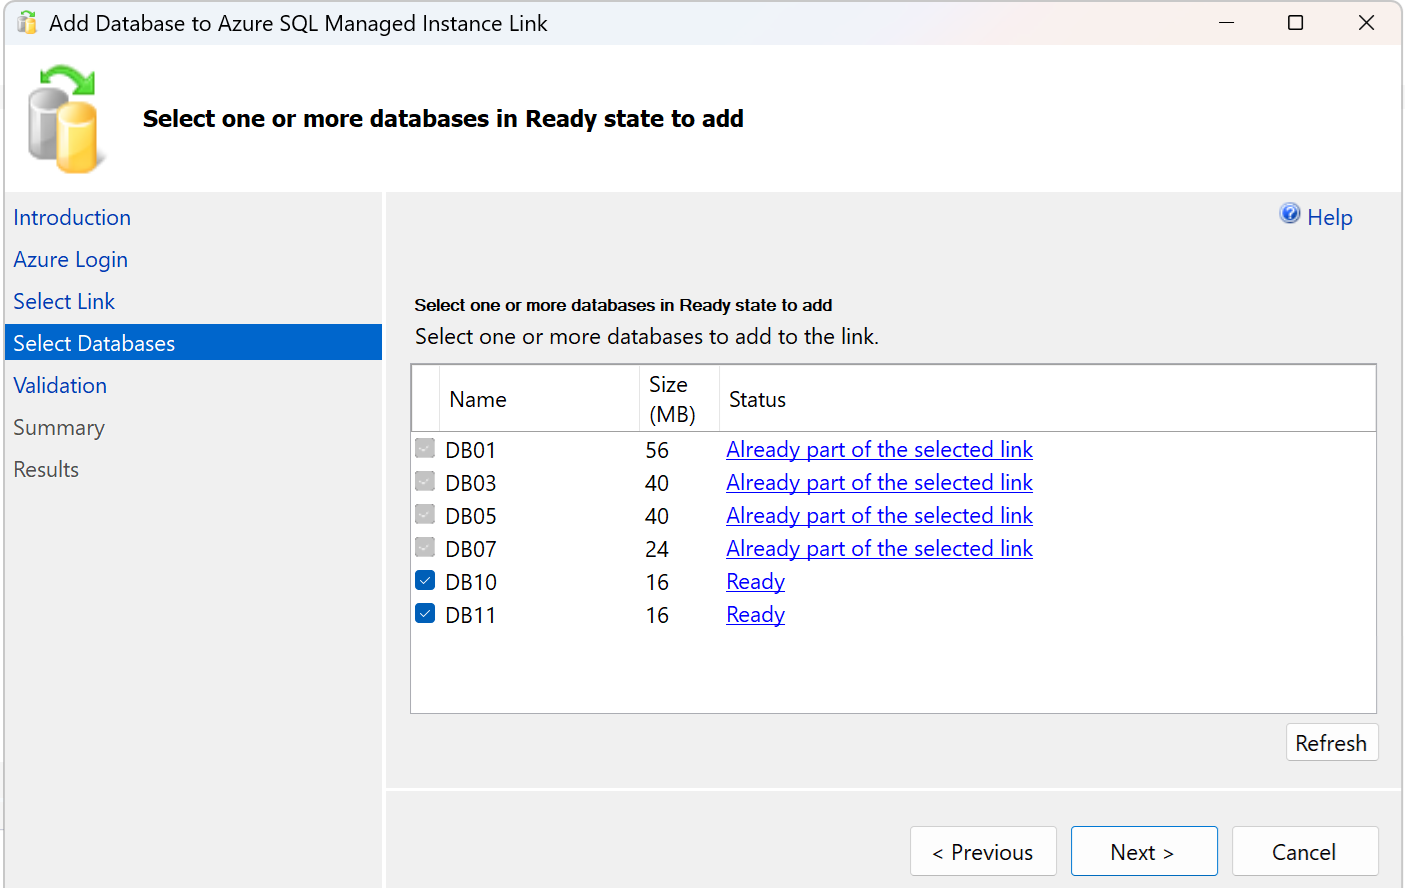
Complete Validation and review Summary. Select Finish to execute the change, or select Script to generate a script without executing the change so you can review, customize, and run it separately. If you execute the change in the wizard, review Results before closing it.
Add databases with scripts
Run the addition on the current primary. Follow the instructions for that instance.
When SQL Server is primary
Use T-SQL to add each database to the availability group. The link propagates the addition to SQL Managed Instance. No further action is needed on SQL Managed Instance. Don't run a PowerShell or Azure CLI update for this addition.
When SQL Managed Instance is primary
Use PowerShell or Azure CLI to update the link on SQL Managed Instance. The link automatically propagates the added databases to the availability group. No separate step on SQL Server is required. Supply the complete intended membership, including all existing databases you want to retain and the new databases. The supplied list replaces the current membership. Omitting a database removes it from the link's membership.
For example, to add DB09 when the link already contains DB01, DB03, DB05, and DB07, retain those four names in the list, and also add DB09 to the list. Replace the resource and database names with your values.
| PowerShell variable | Azure CLI variable | Description |
|---|---|---|
$ResourceGroup |
ResourceGroupName |
Resource group that contains the SQL managed instance. |
$ManagedInstanceName |
ManagedInstanceName |
Name of the SQL managed instance that hosts the link. |
$DAGName |
DAGName |
Existing link name, matching the distributed availability group name used during creation. |
$DatabaseNames |
DatabaseNames |
Complete list of existing databases to retain and new databases to add. The example retains DB01, DB03, DB05, and DB07, and adds DB09. |
Use Update-AzSqlInstanceLink in PowerShell. Reuse $ResourceGroup, $ManagedInstanceName, and $DAGName from creation, or set them to the resource group, instance, and link you want to update:
# Include every existing database to retain and each new database to add.
$DatabaseNames = @("DB01", "DB03", "DB05", "DB07", "DB09")

Update-AzSqlInstanceLink -ResourceGroupName $ResourceGroup -InstanceName $ManagedInstanceName -Name $DAGName -Database $DatabaseNames
Repeat the replication verification steps for each newly added database. Follow the manual log backup steps only when SQL Server is primary.
Remove databases
Use the SSMS wizard on the current primary to automate removal on both sides. Removing a database requires removing it from the link on SQL Managed Instance and from the availability group. Removing it on only one side doesn't complete the operation.
Warning
If you remove a database from the link on SQL Managed Instance but leave it in the availability group, the availability group becomes unhealthy. Complete removal on both sides. For scripted removal, follow the section for your current primary.
Remove databases with SSMS
The following steps apply whether SQL Server or SQL Managed Instance is primary:
Connect to the current primary in SSMS. In Object Explorer, expand Always On High Availability and Availability Groups.
Right-click the distributed availability group for the link, hover over Azure SQL Managed Instance link, and select Remove Database....
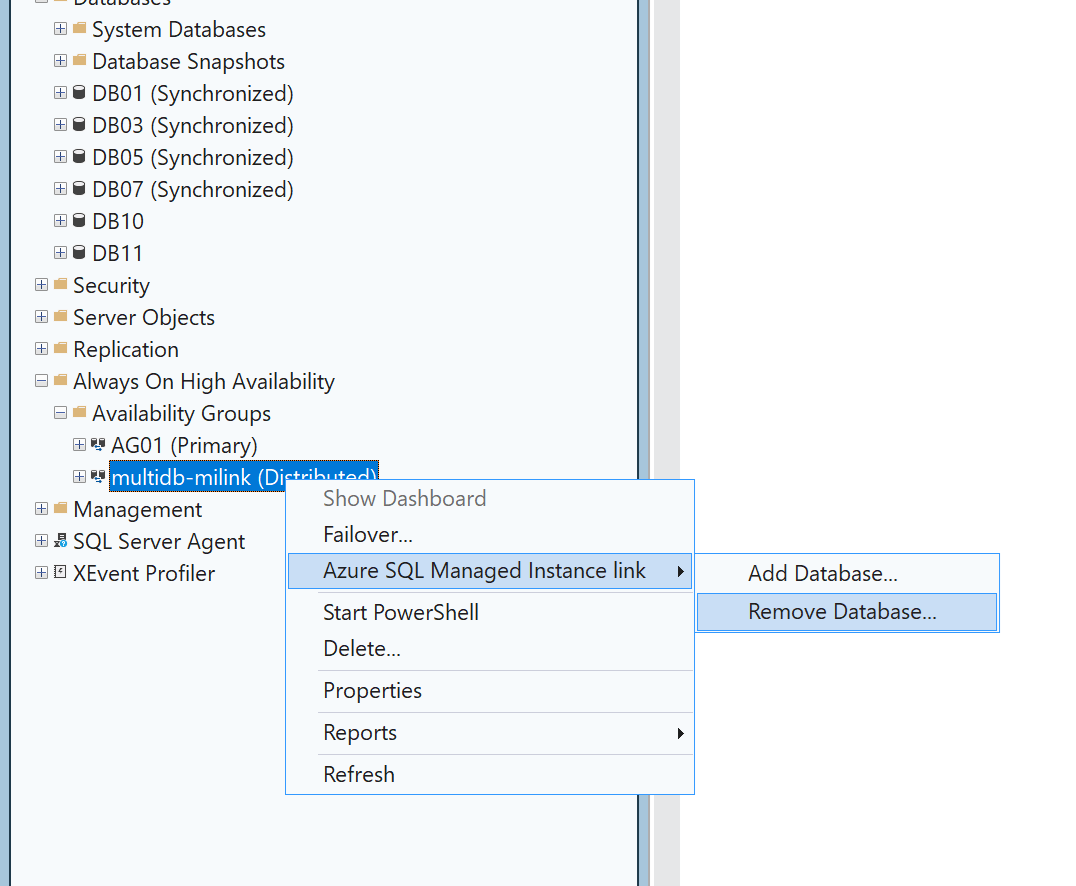
In the Remove Database from Azure SQL Managed Instance Link wizard, proceed through Introduction and Azure Login, and select the link on Select Link.
On Select Databases, select the databases to remove. For example, select DB05 to remove it from the link, and then select Next.
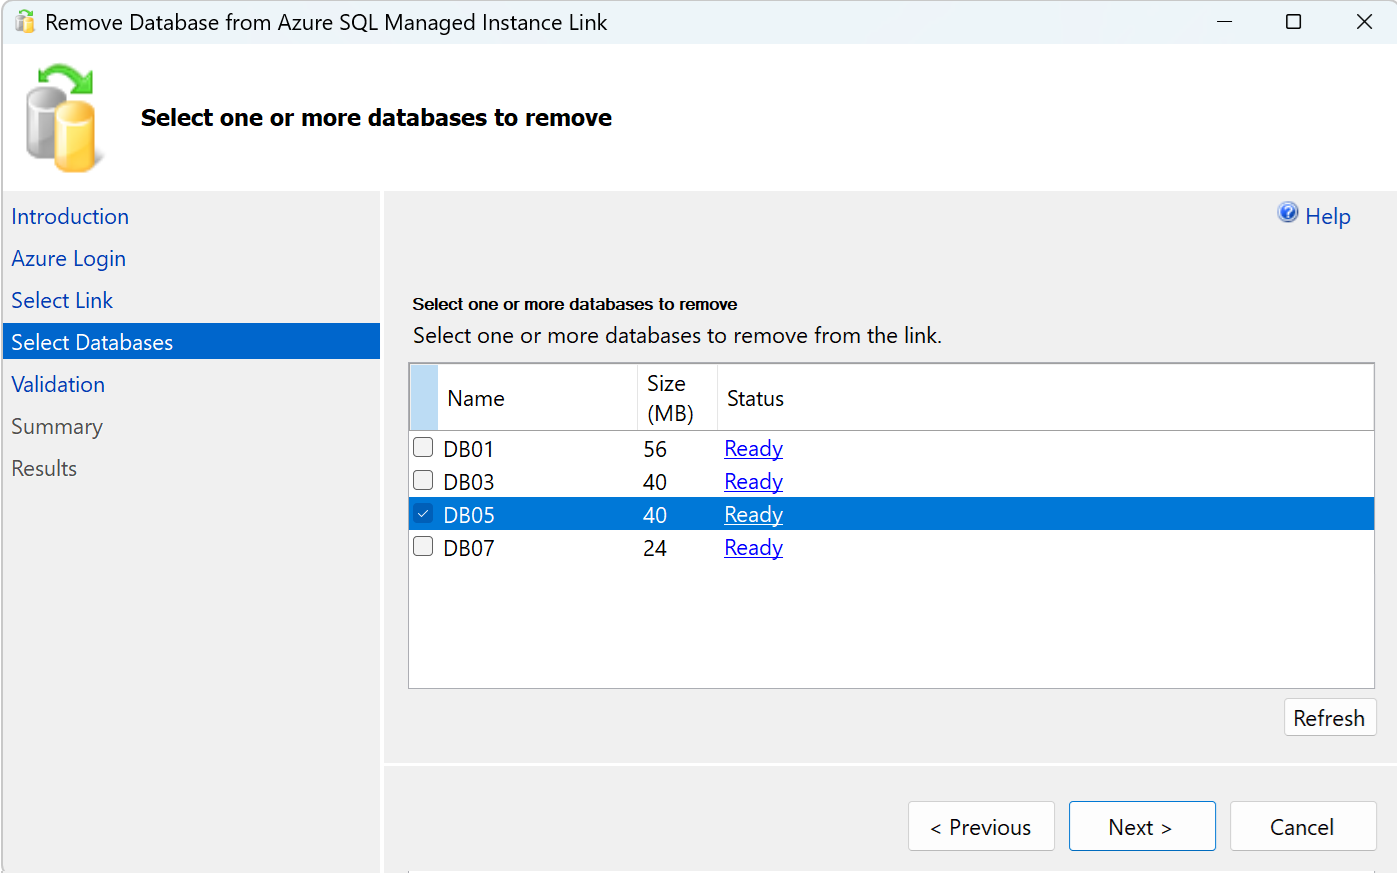
Complete Validation, review Summary, and select Finish to execute the removal or Script to review the generated commands first. Check Results for successful completion before closing the wizard.
Remove databases with scripts
Remove the databases on both instances. The current primary determines which instance to update first.
The PowerShell and Azure CLI examples use the following variables:
| PowerShell variable | Azure CLI variable | Description |
|---|---|---|
$ResourceGroup |
ResourceGroupName |
Resource group that contains the SQL managed instance. |
$ManagedInstanceName |
ManagedInstanceName |
Name of the SQL managed instance that hosts the link. |
$DAGName |
DAGName |
Existing link name, matching the distributed availability group name used during creation. |
$DatabaseNames |
DatabaseNames |
Complete list of databases to retain, excluding those to remove. The examples exclude DB05 and retain DB01, DB03, DB07, and DB09. |
When SQL Server is primary
- Use T-SQL to remove the databases from the availability group.
- Use PowerShell or Azure CLI to remove the databases from the link on SQL Managed Instance, as shown in this section.
For the SQL Managed Instance step, supply the complete list of databases to retain, omitting only those you want to remove. For example, if the link contains DB01, DB03, DB05, DB07, and DB09, the following command removes DB05 and retains the other four. Replace the resource and database names with your values.
Use Update-AzSqlInstanceLink. Reuse $ResourceGroup, $ManagedInstanceName, and $DAGName from creation, or set them to the resource group, instance, and link you want to update:
# Include only the databases to retain, excluding DB05.
$DatabaseNames = @("DB01", "DB03", "DB07", "DB09")

Update-AzSqlInstanceLink -ResourceGroupName $ResourceGroup -InstanceName $ManagedInstanceName -Name $DAGName -Database $DatabaseNames
When SQL Managed Instance is primary
- Use PowerShell or Azure CLI to remove the databases from the link on SQL Managed Instance, as shown in this section.
- Use T-SQL on SQL Server to remove the databases from its availability group. Removal isn't complete until you finish this step.
For the SQL Managed Instance step, supply the complete list of databases to retain, omitting only those you want to remove. For example, if the link contains DB01, DB03, DB05, DB07, and DB09, the following command removes DB05 and retains the other four. Replace the resource and database names with your values.
Use Update-AzSqlInstanceLink. Reuse $ResourceGroup, $ManagedInstanceName, and $DAGName from creation, or set them to the resource group, instance, and link you want to update:
# Include only the databases to retain, excluding DB05.
$DatabaseNames = @("DB01", "DB03", "DB07", "DB09")

Update-AzSqlInstanceLink -ResourceGroupName $ResourceGroup -InstanceName $ManagedInstanceName -Name $DAGName -Database $DatabaseNames
Confirm that the removed databases no longer belong to the link or the availability group. Removing a database from replication isn't the same as deleting its retained copy. Review the databases on both instances before deciding whether to delete a copy you no longer need.
Fail over or cut over to Azure
Use the existing failover procedures in SSMS or scripts to reverse roles between SQL Server and Azure SQL Managed Instance. Role reversal requires the SQL managed instance to use the update policy that matches your SQL Server version. For one-way replication and cutover to Azure SQL Managed Instance, its update policy must match or be higher than your SQL Server version. You can't replicate data or fail back to SQL Server afterward if the policies don't match. Review the supported combinations. For migration and cutover guidance, see Migrate with the link.
Monitor and troubleshoot replication
Use the following dynamic management views (DMVs) and catalog view on SQL Server to check the main availability group, replica connectivity, and each database's replication health:
| View | Information |
|---|---|
| sys.availability_groups | Availability groups, excluding internal per-database replication groups. |
| sys.dm_hadr_availability_replica_states | Role, connectivity, and synchronization health for the main group and internal per-database replication groups. |
| sys.dm_hadr_database_replica_states | Database-level replication state and synchronization health. |
sys.dm_hadr_internal_availability_groups |
Internal replication groups created for individual databases in multiple-database link mode. |
sys.dm_hadr_internal_availability_replicas |
Replicas belonging to the internal per-database replication groups in multiple-database link mode. |
SELECT * FROM sys.availability_groups;
SELECT * FROM sys.dm_hadr_availability_replica_states;
SELECT * FROM sys.dm_hadr_database_replica_states;
SELECT * FROM sys.dm_hadr_internal_availability_groups;
SELECT * FROM sys.dm_hadr_internal_availability_replicas;
If the internal replication DMVs aren't available, or executing the sys.sp_multidb_milink stored procedure reports that it isn't available, verify the installed SQL Server version and cumulative update on that replica. For general connectivity and replication troubleshooting, see Troubleshoot the Managed Instance link.
Limitations
Consider the following limitations when extending an availability group through a multiple-database link:
- Link names must use lowercase letters. Hyphens are allowed, but a name can't begin or end with a hyphen.
- Don't downgrade any SQL Server replica below SQL Server 2022 CU27 or SQL Server 2025 CU9, as applicable, while a link in multiple-database mode is active. Downgrading below the required CU can cause unpredictable issues even without a failover.
- Contained availability groups aren't supported.
- Single-database links and multiple-database links can't coexist on the same SQL Server instance.
- You can't change a link's mode in place. To switch between single-database and multiple-database link modes, remove all existing links, change the mode on every SQL Server replica, and then recreate the links in the new mode.
- When you create a link for an existing availability group, all databases in that group must be replicated. You can't select only a subset of the databases in that group.
- The remaining database capacity on the target SQL managed instance limits the number of databases you can replicate. General Purpose and Business Critical support up to 100 databases per instance, and Next-gen General Purpose supports up to 500. Existing databases count toward these limits. For example, an instance with a 100-database limit and 10 existing databases has capacity for 90 more databases. For more information, see resource limits.
- Adding databases to the availability group beyond the target SQL managed instance's available database capacity can succeed on SQL Server, but replication to SQL Managed Instance fails. This condition can leave the link in an inconsistent state that requires manual removal of the nonreplicated databases from the availability group.
- Adding databases is propagated through the link, but removing a database on one side doesn't automatically remove it on the other side. If you remove a database from the availability group, its copy remains on SQL Managed Instance. If you remove a database from the link on SQL Managed Instance, the database remains in the availability group without replication through the link and requires manual cleanup.
- When adding databases to an existing link through SSMS, you can only add databases with a Ready state. You can't add databases that belong to another availability group or have a name that already exists on the destination.