Configure storage for SQL Server on Azure VMs
Applies to: ![]() SQL Server on Azure VM
SQL Server on Azure VM
This article teaches you how to configure your storage for your SQL Server on Azure Virtual Machines (VMs) deployed through the Azure Marketplace using Premium SSD.
SQL Server VMs deployed through marketplace images automatically follow default storage best practices which can be modified during deployment. Some of these configuration settings can be changed after deployment.
Note
This article is only applicable to SQL Server on Azure VMs using Premium Storage, not Premium SSD v2 storage.
Prerequisites
To use the automated storage configuration settings, your virtual machine requires the following characteristics:
- Provisioned with a SQL Server gallery image.
- Uses the Resource Manager deployment model.
- Uses premium SSDs.
New VMs
The following sections describe how to configure storage for new SQL Server virtual machines.
Azure portal
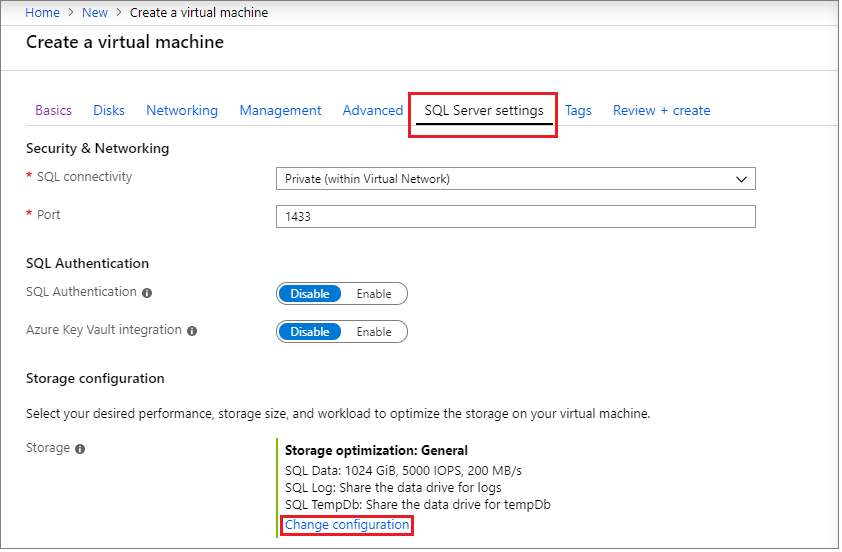
When provisioning an Azure VM using a SQL Server gallery image, select Change configuration under Storage on the SQL Server Settings tab to open the Configure storage page. You can either leave the values at default, or modify the type of disk configuration that best suits your needs based on your workload.
Note
If you selected a supported VM size, you can use Premium SSD v2, which gives you granular control over disk size, IOPS, and throughput.
Choose the drive location for your data files and log files, specifying the disk type, and number of disks. Use the IOPS values to determine the best storage configuration to meet your business needs. Choosing premium storage sets the caching to ReadOnly for the data drive, and None for the log drive as per SQL Server VM performance best practices.
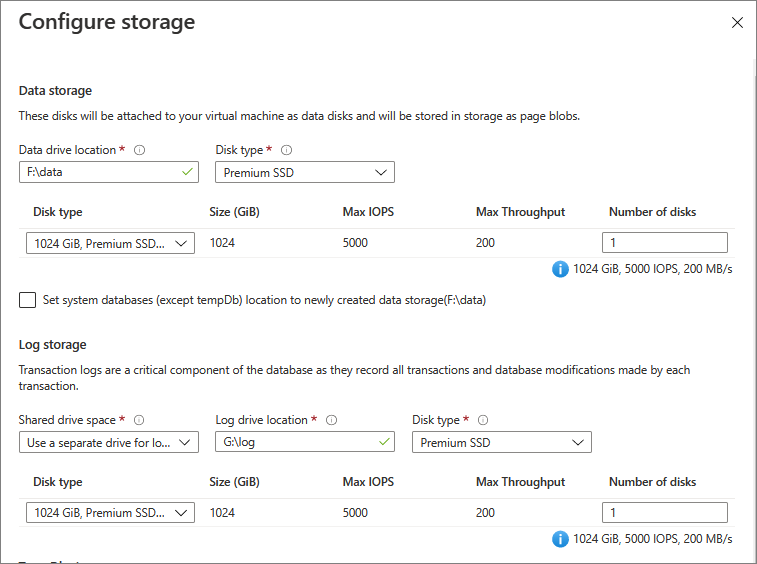
The disk configuration is completely customizable so that you can configure the storage topology, disk type and IOPS you need for your SQL Server VM workload. You also have the ability to use Ultradisk as an option for the Disk type if your SQL Server VM is in one of the supported regions and you've enabled ultra disks for your subscription.
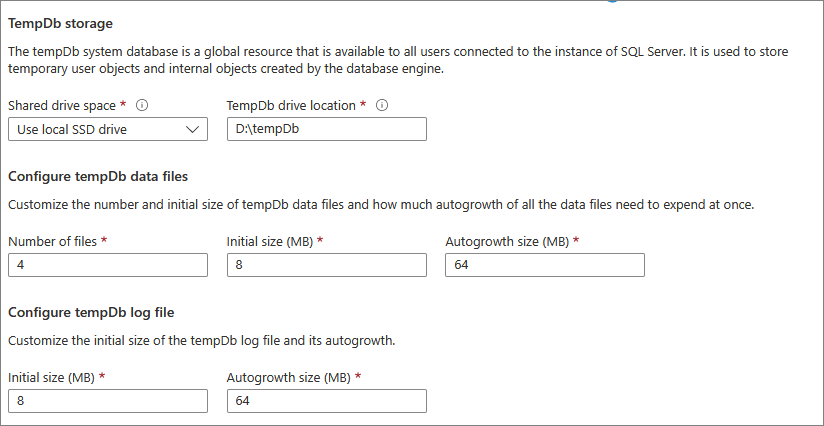
Configure your tempdb database settings under TempDb storage, such as the location of the database files, as well as the number of files, initial size, and autogrowth size in MB.
- Currently, during deployment, the max number of
tempdbfiles is 8, but more files can be added after the SQL Server VM is deployed. - If you configure the SQL Server instance
tempdbon the D: local SSD volume as recommended, the SQL IaaS Agent extension manages the folders and permissions needed upon reprovisioning. This doesn't require that you created the SQL virtual machine with an image from the Azure Marketplace.
Additionally, you have the ability to set the caching for the disks. Azure VMs have a multi-tier caching technology called Blob Cache when used with Premium Disks. Blob Cache uses a combination of the Virtual Machine RAM and local SSD for caching.
Disk caching for Premium SSD can be ReadOnly, *ReadWrite, or None.
ReadOnly caching is highly beneficial for SQL Server data files that are stored on Premium Storage. ReadOnly caching brings low read latency, high read IOPS, and throughput as, reads are performed from cache, which is within the VM memory and local SSD. These reads are much faster than reads from data disk, which is from Azure Blob storage. Premium storage doesn't count the reads served from cache toward the disk IOPS and throughput. Therefore, your applicable is able to achieve higher total IOPS and throughput.
None cache configuration should be used for the disks hosting SQL Server Log file as the log file is written sequentially and doesn't benefit from ReadOnly caching.
ReadWrite caching shouldn't be used to host SQL Server files as SQL Server doesn't support data consistency with the ReadWrite cache. Writes waste capacity of the ReadOnly blob cache and latencies slightly increase if writes go through ReadOnly blob cache layers.
Tip
Be sure that your storage configuration matches the limitations imposed by the the selected VM size. Choosing storage parameters that exceed the performance cap of the VM size will result in warning:
The desired performance might not be reached due to the maximum virtual machine disk performance cap. Either decrease the IOPs by changing the disk type, or increase the performance cap limitation by increasing the VM size. This will not stop provisioning.
Based on your choices, Azure performs the following storage configuration tasks after creating the VM:
- Creates and attaches Premium SSDs to the virtual machine.
- Configures the data disks to be accessible to SQL Server.
- Configures the data disks into a storage pool based on the specified size and performance (IOPS and throughput) requirements.
- Associates the storage pool with a new drive on the virtual machine.
For a full walkthrough of how to create a SQL Server VM in the Azure portal, see the provisioning tutorial.
Resource Manager templates
If you use the following Resource Manager templates, two premium data disks are attached by default, with no storage pool configuration. However, you can customize these templates to change the number of premium data disks that are attached to the virtual machine.
Quickstart template
You can use the following quickstart template to deploy a SQL Server VM using storage optimization.
Note
Some VM sizes might not have temporary or local storage. If you deploy a SQL Server on Azure VM without temporary storage, tempdb data and log files are placed in the data folder.
Existing VMs
Note
Storage is only configurable for SQL Server VMs that were deployed from a SQL Server image in Azure Marketplace, and not currently supported for Premium SSD v2 disks. To modify disk configurations on an Azure virtual machine with self-installed SQL Server, use the Disks pane.
Modify existing drives
For existing SQL Server VMs that have been deployed through Azure Marketplace, you can modify some storage settings in the Azure portal through the SQL virtual machines resource, or on the Disks pane.
To modify the storage settings, open your SQL virtual machines resource, and select Storage configuration under Settings, where you can:
- Add additional disks
- Configure or expand existing disks
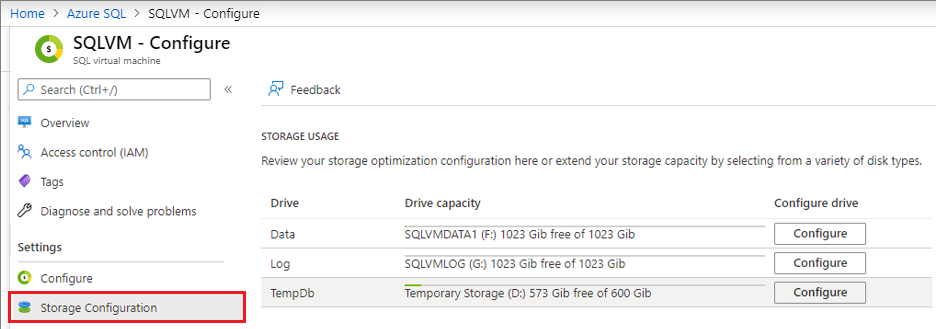
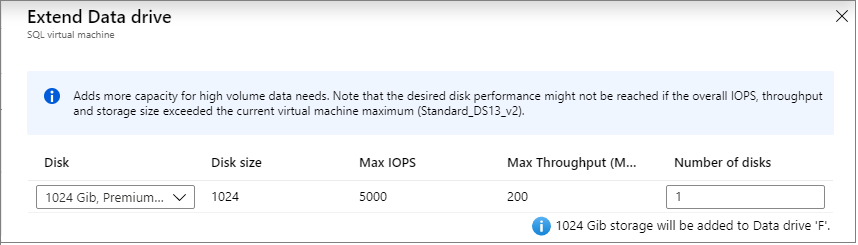
Selecting Configure opens the Extend Data drive page, allowing you to change the disk type, as well as add additional disks. You can also add disks through the Disks pane.
If you've already reached the maximum disks supported for a particular VM size, you may need to Resize the VM.
Modifying tempdb
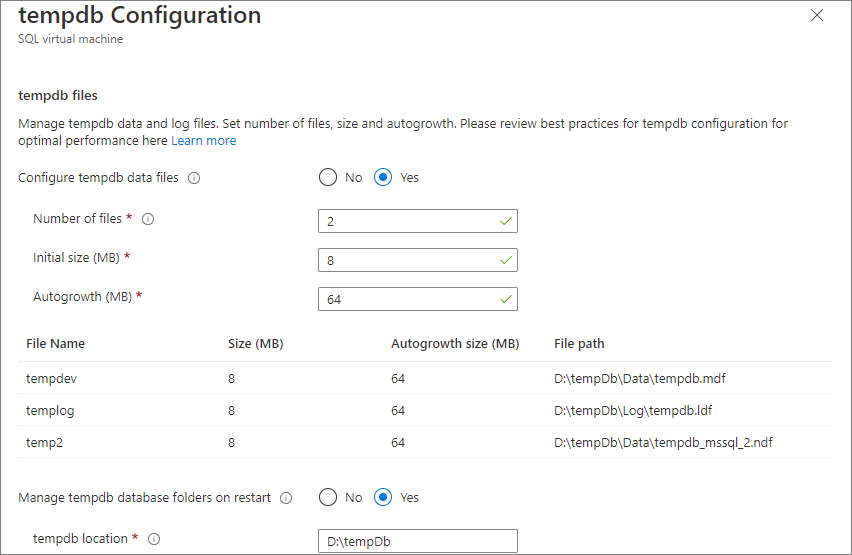
It's also possible to modify your tempdb settings using the Storage configuration page, such as the number of tempdb files, as well as the initial size, and the autogrowth ratio. Select Configure next to tempdb to open the tempdb Configuration page.
Choose Yes next to Configure tempdb data files to modify your settings, and then choose Yes next to Manage tempdb database folders on restart to allow Azure to manage your tempdb configuration, folder, and permissions the next time your SQL Server service starts. This doesn't require that you created the SQL virtual machine with an image from the Azure Marketplace.
Restart your SQL Server service to apply your changes.
Increasing temporary disk size
To increase the temporary disk size, resize the VM to a SKU that supports a higher disk size for temporary storage.
Automated changes
This section provides a reference for the storage configuration changes that Azure automatically performs during SQL Server VM provisioning or configuration in the Azure portal.
- Azure configures a storage pool from storage selected from your VM. The next section of this article provides details about storage pool configuration.
- Automatic storage configuration always uses premium SSDs P30 data disks. So, there's a 1:1 mapping between your selected number of Terabytes and the number of data disks attached to your VM.
For pricing information, see the Storage pricing page on the Disk Storage tab.
Creation of the storage pool
Azure uses the following settings to create the storage pool on SQL Server VMs.
| Setting | Value |
|---|---|
| Stripe size | 64 KB |
| Disk sizes | 1 TB each |
| Cache | Read |
| Allocation size | 64-KB NTFS allocation unit size |
| Recovery | Simple recovery (no resiliency) |
| Number of columns | Number of data disks up to 81 |
1 After the storage pool is created, you can't alter the number of columns in the storage pool.
Note
Use Optimize-StoragePoo and Optimize-Volume to rebalance space allocation in a pool and optimize performance for workload types that have random deeply queued I/O patterns.
Enable caching
For Premium SSD, you can change the caching policy at the disk level. You can do so using the Azure portal, PowerShell, or the Azure CLI.
To change your caching policy in the Azure portal, follow these steps:
Stop your SQL Server service.
Sign into the Azure portal.
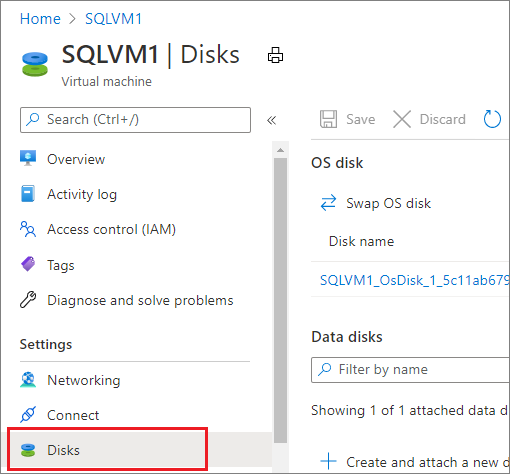
Navigate to your virtual machine, select Disks under Settings.
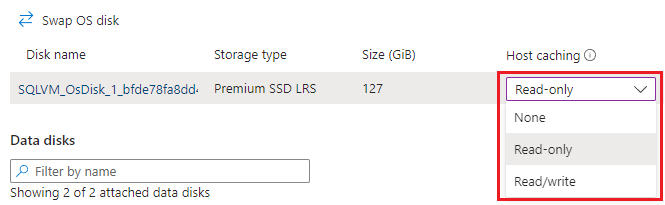
Choose the appropriate caching policy for your disk from the dropdown list - either Read-only, or None.
After the change takes effect, restart the SQL Server VM and start the SQL Server service.
Enable Write Accelerator
Write Accelerator is a disk feature that is only available for the M-Series Virtual Machines (VMs). The purpose of write acceleration is to improve the I/O latency of writes against Azure Premium Storage when you need single digit I/O latency due to high volume mission critical OLTP workloads or data warehouse environments.
Before enabling Write Accelerator, review some of the restrictions to confirm they're acceptable for your business.
Stop all SQL Server activity and shut down the SQL Server service before making changes to your write acceleration policy.
If your disks are striped, enable Write Acceleration for each disk individually, and your Azure VM should be shut down before making any changes.
To enable Write Acceleration using the Azure portal, follow these steps:
Stop your SQL Server service. If your disks are striped, shut down the virtual machine.
Sign into the Azure portal.
Navigate to your virtual machine, select Disks under Settings.
Choose the cache option with Write Accelerator for your disk from the dropdown list.
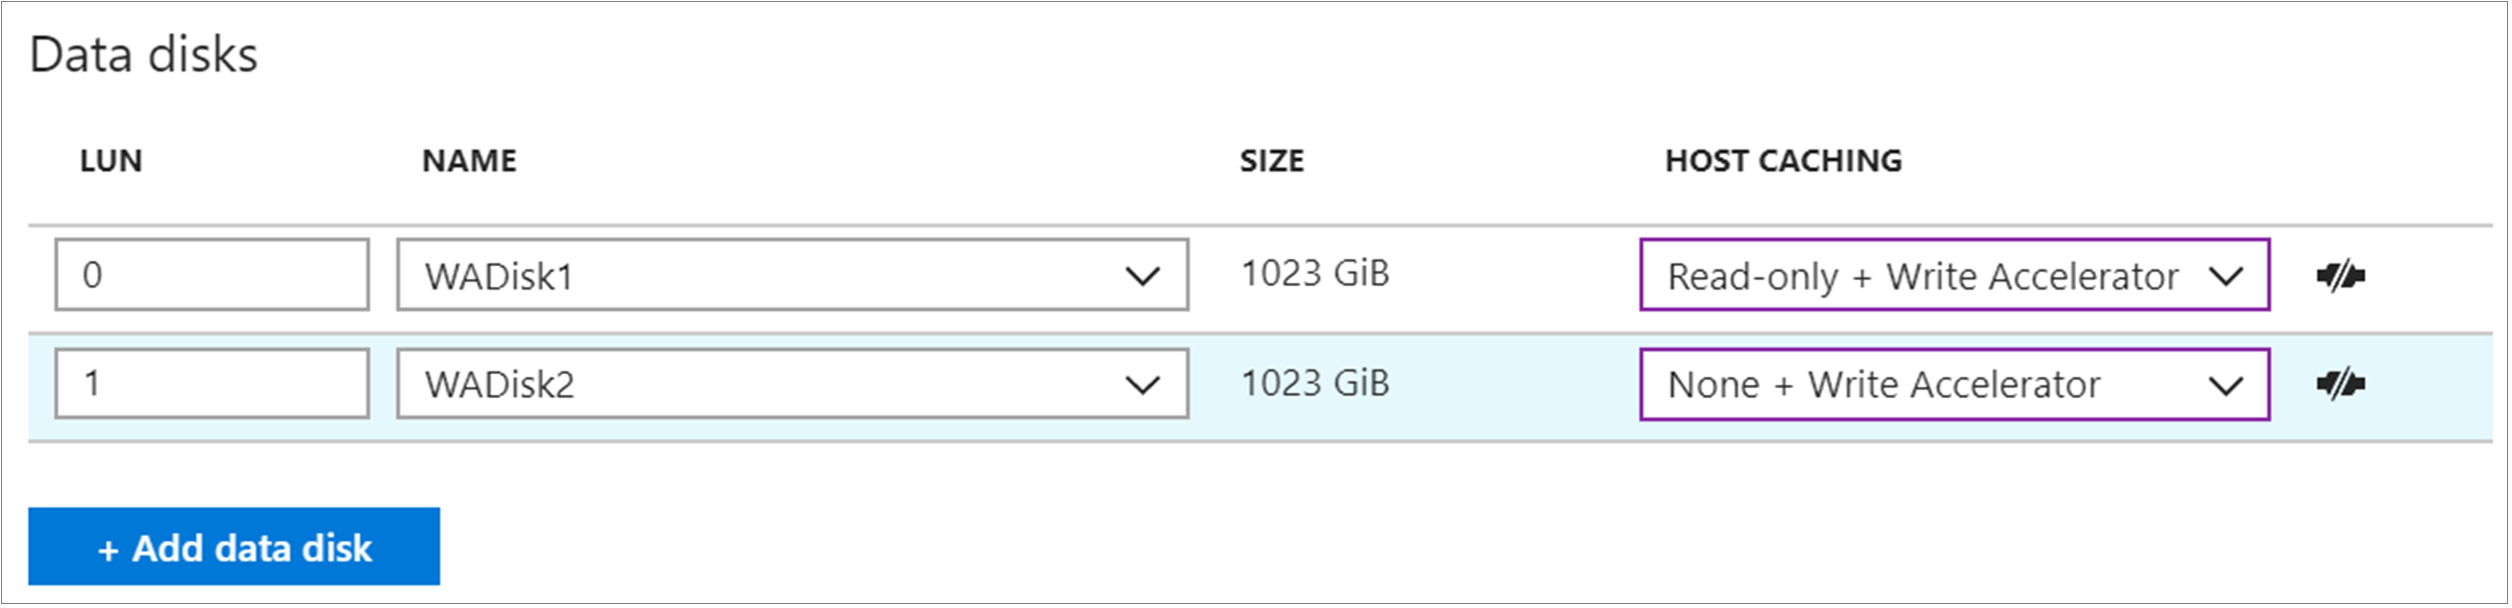
After the change takes effect, start the virtual machine and SQL Server service.
Disk striping
For more throughput, you can add additional data disks and use disk striping. To determine the number of data disks, analyze the throughput and bandwidth required for your SQL Server data files, including the log and tempdb. Throughput and bandwidth limits vary by VM size. To learn more, see VM Size.
For Windows 8/Windows Server 2012 or later, use Storage Spaces with the following guidelines:
Set the interleave (stripe size) to 64 KB (65,536 bytes) to avoid performance impact due to partition misalignment. This must be set with PowerShell.
Set column count = number of physical disks. Use PowerShell when configuring more than 8 disks (not Server Manager UI).
For example, the following PowerShell creates a new storage pool with the interleave size to 64 KB and the number of columns equal to the amount of physical disk in the storage pool:
$PhysicalDisks = Get-PhysicalDisk | Where-Object {$_.FriendlyName -like "*2" -or $_.FriendlyName -like "*3"}

New-StoragePool -FriendlyName "DataFiles" -StorageSubsystemFriendlyName "Windows Storage on <VM Name>" `
    -PhysicalDisks $PhysicalDisks | New-VirtualDisk -FriendlyName "DataFiles" `
    -Interleave 65536 -NumberOfColumns $PhysicalDisks.Count -ResiliencySettingName simple `
    -UseMaximumSize |Initialize-Disk -PartitionStyle GPT -PassThru |New-Partition -AssignDriveLetter `
    -UseMaximumSize |Format-Volume -FileSystem NTFS -NewFileSystemLabel "DataDisks" `
    -AllocationUnitSize 65536 -Confirm:$false
In Windows Server 2016 and later, the default value for -StorageSubsystemFriendlyName is Windows Storage on <VM Name>
For Windows 2008 R2 or earlier, you can use dynamic disks (OS striped volumes) and the stripe size is always 64 KB. This option is deprecated as of Windows 8/Windows Server 2012. For information, see the support statement at Virtual Disk Service is transitioning to Windows Storage Management API.
If you're using Storage Spaces Direct (S2D) with SQL Server Failover Cluster Instances, you must configure a single pool. Although different volumes can be created on that single pool, they'll all share the same characteristics, such as the same caching policy.
Determine the number of disks associated with your storage pool based on your load expectations. Keep in mind that different VM sizes allow different numbers of attached data disks. For more information, see Sizes for virtual machines.
Known issues
Configure Disk option or Storage Configuration pane on SQL virtual machine resource is grayed out
The Storage page can be grayed out in the SQL virtual machines resource pane in the Azure portal for the following reasons:
- Your SQL IaaS Agent extension is in a failed state. Delete and then register your SQL Server VM with the extension once more.
- You've customized your storage pool.
- You're using a non-Marketplace image.
- You've created your virtual machine with unmanaged disks. Only managed disks are supported.
Extend Disk option is grayed out
The Extend Disk option can be grayed out for the following reasons:
- You've customized your Storage Pool. If you need to extend your disk, add disks to the storage pool to enlarge the virtual disk.
- You changed the virtual disk or volume names from their default values:
- Storage pool naming: SQLVMStoragePool1, SQLVMStoragePool2, SQLVMStoragePool3
- Virtual disk: SQLVMVirtualDisk1, SQLVMVirtualDisk2, SQLVMVirtualDisk3
- Volumes: SQLVMDATA1, SQLVMLOG and SQLVMTEMPDB
- You've installed a Windows Cluster to your SQL Server VM, so extending disks is not supported.
I have a disk with 1 TB of unallocated space that I can't remove from storage pool
There's no option to remove the unallocated space from a disk that belongs to a storage pool.
My transaction log is full
Review Troubleshoot a full transaction log if your log becomes full.
Unable to configure storage with the SQL virtual machines resource
The Storage configuration pane for the SQL virtual machines resource in the Azure portal may be unavailable, grayed out, or selecting Extend disks does nothing, in the following scenarios:
- Virtual machines with self-installed SQL Server instances. Currently, only SQL Server VM images from Azure Marketplace are supported.
- SQL Server VMs using Premium SSDv2. Currently, only SQL Server VMs with Premium SSD are supported.
- When TCP/IP is disabled in SQL Server Configuration Manager.