Note
Access to this page requires authorization. You can try signing in or changing directories.
Access to this page requires authorization. You can try changing directories.
Azure Communication Services enables you to send and receive WhatsApp messages. This article describes how to download the media payload received in a WhatsApp message.
Use case: A business receives a WhatsApp message from their customer that contains an image. The business needs to download the image from WhatsApp in order to view the image.
Incoming messages to the business are published as Microsoft.Communication.AdvancedMessageReceived Event Grid events. This example uses the media ID and media MIME type in the AdvancedMessageReceived event to download the media payload.
An example of an AdvancedMessageReceived event with media content:
[{
  "id": "00000000-0000-0000-0000-000000000000",
  "topic": "/subscriptions/{subscription-id}/resourcegroups/{resourcegroup-name}/providers/microsoft.communication/communicationservices/{communication-services-resource-name}",
  "subject": "advancedMessage/sender/{sender@id}/recipient/11111111-1111-1111-1111-111111111111",
  "data": {
    "channelType": "whatsapp",
    "media": {
      "mimeType": "image/jpeg",
      "id": "22222222-2222-2222-2222-222222222222"
    },
    "from": "{sender@id}",
    "to": "11111111-1111-1111-1111-111111111111",
    "receivedTimestamp": "2023-07-06T18:30:19+00:00"
  },
  "eventType": "Microsoft.Communication.AdvancedMessageReceived",
  "dataVersion": "1.0",
  "metadataVersion": "1",
  "eventTime": "2023-07-06T18:30:22.1921716Z"
}]
Prerequisites
- WhatsApp Business Account registered with your Azure Communication Services resource.
- .NET development environment, such as Visual Studio, Visual Studio Code, or .NET CLI.
- Event subscription and handling of Advanced Message Received events.
Set up environment
Create the .NET project
To create your project, follow the tutorial at Create a .NET console application using Visual Studio.
To compile your code, press Ctrl+F7.
Install the package
Install the Azure.Communication.Messages NuGet package to your C# project.
- Open the NuGet Package Manager at
Project>Manage NuGet Packages.... - Search for the package
Azure.Communication.Messages. - Install the latest release.
Set up the app framework
Open the Program.cs file in a text editor.
Replace the contents of your Program.cs with the following code:
using System;
using System.Collections.Generic;
using System.Threading.Tasks;
using Azure;
using Azure.Communication.Messages;

namespace AdvancedMessagingQuickstart
{
    class Program
    {
        public static async Task Main(string[] args)
        {
            Console.WriteLine("Azure Communication Services - Advanced Messages quickstart samples.");

            // Quickstart code goes here
        }
    }
}
To use the Advanced Messaging features, add a using directive to include the Azure.Communication.Messages namespace.
using Azure.Communication.Messages;
Object model
The following classes and interfaces handle some of the major features of the Azure Communication Services Advance Messaging SDK for .NET.
| Name | Description |
|---|---|
| NotificationMessagesClient | This class connects to your Azure Communication Services resource. It sends the messages. |
| DownloadMediaAsync | Download the media payload from a User to Business message asynchronously, writing the content to a stream. |
| DownloadMediaToAsync | Download the media payload from a User to Business message asynchronously, writing the content to a file. |
| Microsoft.Communication.AdvancedMessageReceived | Event Grid event that is published when Advanced Messaging receives a message. |
Common configuration
Follow these steps to add required code snippets to the messages-quickstart.py python program.
- Start sending messages between a business and a WhatsApp user.
- Authenticate the client
- Set channel registration ID
- Set recipient list
Authenticate the client
The Messages SDK uses the NotificationMessagesClient to send messages. The NotificationMessagesClient method authenticates using your connection string acquired from Azure Communication Services resource in the Azure portal. For more information about connection strings, see access-your-connection-strings-and-service-endpoints.
For simplicity, this article uses a connection string to authenticate. In production environments, we recommend using service principals.
Get the connection string from your Azure Communication Services resource in the Azure portal. On the left, navigate to the Keys tab. Copy the Connection string field for the primary key. The connection string is in the format endpoint=https://{your Azure Communication Services resource name}.communication.azure.com/;accesskey={secret key}.

Set the environment variable COMMUNICATION_SERVICES_CONNECTION_STRING to the value of your connection string.
Open a console window and enter the following command:
setx COMMUNICATION_SERVICES_CONNECTION_STRING "<your connection string>"
After you add the environment variable, you might need to restart any running programs that will need to read the environment variable, including the console window. For example, if you're using Visual Studio as your editor, restart Visual Studio before running the example.
For more information on how to set an environment variable for your system, follow the steps at Store your connection string in an environment variable.
To instantiate a NotificationMessagesClient, add the following code to the Main method:
// Retrieve connection string from environment variable
string connectionString =
    Environment.GetEnvironmentVariable("COMMUNICATION_SERVICES_CONNECTION_STRING");

// Instantiate the client
var notificationMessagesClient = new NotificationMessagesClient(connectionString);

Set channel registration ID
You created the Channel Registration ID GUID during channel registration. Find it in the portal on the Channels tab of your Azure Communication Services resource.

Assign it to a variable called channelRegistrationId.
var channelRegistrationId = new Guid("<your channel registration ID GUID>");
Set recipient list
You need to supply an active phone number associated with a WhatsApp account. This WhatsApp account receives the template, text, and media messages sent in this quickstart.
For this example, you can use your personal phone number.
The recipient phone number can't be the business phone number (Sender ID) associated with the WhatsApp channel registration. The Sender ID appears as the sender of the text and media messages sent to the recipient.
The phone number must include the country code. For more information about phone number formatting, see WhatsApp documentation for Phone Number Formats.
Note
Only one phone number is currently supported in the recipient list.
Create the recipient list like this:
var recipientList = new List<string> { "<to WhatsApp phone number>" };
Example:
// Example only
var recipientList = new List<string> { "+14255550199" };
Start sending messages between a business and a WhatsApp user
Conversations between a WhatsApp Business Account and a WhatsApp user can be initiated in one of two ways:
- The business sends a template message to the WhatsApp user.
- The WhatsApp user sends any message to the business number.
A business can't initiate an interactive conversation. A business can only send an interactive message after receiving a message from the user. The business can only send interactive messages to the user during the active conversation. Once the 24 hour conversation window expires, only the user can restart the interactive conversation. For more information about conversations, see the definition at WhatsApp Business Platform.
To initiate an interactive conversation from your personal WhatsApp account, send a message to your business number (Sender ID).

Code examples
Follow these steps to add required code snippets to the Main function of your Program.cs file.
Download the media payload to a stream
The Messages SDK enables Contoso to download the media in received WhatsApp media messages from WhatsApp users. To download the media payload to a stream, you need:
- Authenticated NotificationMessagesClient.
- The media ID GUID of the media, received from an incoming message in an AdvancedMessageReceived event.
Define the media ID of the media you want to fetch.
// MediaId GUID of the media received in an incoming message.
// Ex. "00000000-0000-0000-0000-000000000000"
var mediaId = "<MediaId>";
Download the media to the destination stream.
// Download media to stream
Response<Stream> fileResponse = await notificationMessagesClient.DownloadMediaAsync(mediaId);
The media payload is now available in the response stream.
Continue with this example to write the stream to a file.
The media ID and MIME type of the payload are available in the media content of the AdvancedMessageReceived event. However, when downloading media to a stream, the MIME type is again available to you in the response headers in the Response<Stream>.
In either case, you need to convert the MIME type into a file type. Define this helper for the conversion.
private static string GetFileExtension(string contentType)
{
    return MimeTypes.TryGetValue(contentType, out var extension) ? extension : string.Empty;
}

private static readonly Dictionary<string, string> MimeTypes = new Dictionary<string, string>
{
    { "application/pdf", ".pdf" },
    { "image/jpeg", ".jpg" },
    { "image/png", ".png" },
    { "video/mp4", ".mp4" },
    // Add more mappings as needed
};
Define the file location where you want to write the media. This example uses the MIME type returned in the response headers from DownloadMediaAsync.
// File extension derived from the MIME type in the response headers.
// Ex. A MIME type of "image/jpeg" would mean the fileExtension should be ".jpg"
var contentType = fileResponse.GetRawResponse().Headers.ContentType;
string fileExtension = GetFileExtension(contentType);

// File location to write the media.
// Ex. @"c:\temp\media.jpg"
string filePath = @"<FilePath>" + "<FileName>" + fileExtension;
Write the stream to the file.
 // Write the media stream to the file
using (Stream outStream = File.OpenWrite(filePath))
{
    fileResponse.Value.CopyTo(outStream);
}
Download the media payload to a file
The Messages SDK enables Contoso to download the media in WhatsApp media messages received from WhatsApp users. To download the media payload to a file, you need:
- Authenticated NotificationMessagesClient.
- The media ID GUID of the media, received from an incoming message in an AdvancedMessageReceived event.
- The media file extension, derived from the MIME type received in an incoming message with media content.
- The destination file name of your choosing.
- The destination file path of your choosing.
Define the media ID of the media you want to fetch and the file location of where you want to write the media.
// MediaId GUID of the media received in an incoming message.
// Ex. "00000000-0000-0000-0000-000000000000"
var mediaId = "<MediaId>";

// File extension derived from the MIME type received in an incoming message
// Ex. A MIME type of "image/jpeg" would mean the fileExtension should be ".jpg"
string fileExtension = "<FileExtension>";
// File location to write the media.
// Ex. @"c:\temp\media.jpg"
string filePath = @"<FilePath>" + "<FileName>" + fileExtension;
Download the media to the destination path.
// Download media to file
Response response = await notificationMessagesClient.DownloadMediaToAsync(mediaId, filePath);
Run the code
Build and run your program.
- To compile your code, press Ctrl+F7.
- To run the program without debugging, press Ctrl+F5.
Full sample code
using System;
using System.Collections.Generic;
using System.IO;
using System.Threading.Tasks;
using Azure;
using Azure.Communication.Messages;

namespace AdvancedMessagingDownloadMediaQuickstart
{
    class Program
    {
        public static async Task Main(string[] args)
        {
            Console.WriteLine("Azure Communication Services - Download WhatsApp message media");

            // Authenticate the client
            string connectionString = Environment.GetEnvironmentVariable("COMMUNICATION_SERVICES_CONNECTION_STRING");
            NotificationMessagesClient notificationMessagesClient =
                new NotificationMessagesClient(connectionString);

            await DownloadMediaWithStreamAsync(notificationMessagesClient);
            await DownloadMediaToFileAsync(notificationMessagesClient);

            Console.WriteLine("\n\nPress any key to exit.");
            Console.ReadKey();
        }

        public static async Task DownloadMediaWithStreamAsync(NotificationMessagesClient notificationMessagesClient)
        {
            // MediaId GUID of the media received in an incoming message.
            // Ex. "00000000-0000-0000-0000-000000000000"
            var mediaId = "<MediaId>";

            Response<Stream> fileResponse;
            try
            {
                // Download media to stream
                fileResponse = await notificationMessagesClient.DownloadMediaAsync(mediaId);

                Console.WriteLine(fileResponse.ToString());
            }
            catch (RequestFailedException e)
            {
                Console.WriteLine(e);
                return;
            }

            // File extension derived from the MIME type in the response headers.
            // Ex. A MIME type of "image/jpeg" would mean the fileExtension should be ".jpg"
            var contentType = fileResponse.GetRawResponse().Headers.ContentType;
            string fileExtension = GetFileExtension(contentType);

            // File location to write the media.
            // Ex. @"c:\temp\media.jpg"
            string filePath = @"<FilePath>" + "<FileName>" + fileExtension;
            Console.WriteLine(filePath);

            // Write the media stream to the file
            using (Stream outStream = File.OpenWrite(filePath))
            {
                fileResponse.Value.CopyTo(outStream);
            }
        }

        private static string GetFileExtension(string contentType)
        {
            return MimeTypes.TryGetValue(contentType, out var extension) ? extension : string.Empty;
        }

        private static readonly Dictionary<string, string> MimeTypes = new Dictionary<string, string>
        {
            { "application/pdf", ".pdf" },
            { "image/jpeg", ".jpg" },
            { "image/png", ".png" },
            { "video/mp4", ".mp4" },
            // Add more mappings as needed
        };

        public static async Task DownloadMediaToFileAsync(NotificationMessagesClient notificationMessagesClient)
        {
            // MediaId GUID of the media received in an incoming message.
            // Ex. "00000000-0000-0000-0000-000000000000"
            var mediaId = "<MediaId>";

            // File extension derived from the MIME type received in an incoming message
            // Ex. A MIME type of "image/jpeg" would mean the fileExtension should be ".jpg"
            string fileExtension = "<FileExtension>";

            // File location to write the media.
            // Ex. @"c:\temp\media.jpg"
            string filePath = @"<FilePath>" + "<FileName>" + fileExtension;
            Console.WriteLine(filePath);

            try
            {
                // Download media to file
                Response response = await notificationMessagesClient.DownloadMediaToAsync(mediaId, filePath);

                Console.WriteLine(response.ToString());
            }
            catch (RequestFailedException e)
            {
                Console.WriteLine(e);
                return;
            }
        }
    }
}
Prerequisites
- WhatsApp Business Account registered with your Azure Communication Services resource.
- Event subscription and handling of Advanced Message Received events.
- Java Development Kit (JDK) version 8 or later.
- Apache Maven.
Set up environment
To set up an environment for sending messages, complete the following steps.
Create a new Java application
Open a terminal or command window and navigate to the directory where you want to create your Java application. Run the following command to generate the Java project from the maven-archetype-quickstart template.
mvn archetype:generate -DgroupId="com.communication.quickstart" -DartifactId="communication-quickstart" -DarchetypeArtifactId="maven-archetype-quickstart" -DarchetypeVersion="1.4" -DinteractiveMode="false"
The generate goal creates a directory with the same name as the artifactId value. Under this directory, the src/main/java directory contains the project source code, the src/test/java directory contains the test source, and the pom.xml file is the project's Project Object Model (POM).
Install the package
Open the pom.xml file in your text editor. Add the following dependency element to the group of dependencies.
<dependency>
    <groupId>com.azure</groupId>
    <artifactId>azure-communication-messages</artifactId>
</dependency>
Set up the app framework
Open /src/main/java/com/communication/quickstart/App.java in a text editor, add import directives, and remove the System.out.println("Hello world!"); statement:
package com.communication.quickstart;

import com.azure.communication.messages.*;
import com.azure.communication.messages.models.*;

import java.util.ArrayList;
import java.util.List;
public class App
{
    public static void main( String[] args )
    {
        // Quickstart code goes here.
    }
}
Object model
The following classes and interfaces handle some of the major features of the Azure Communication Services Advance Messaging SDK for Java.
| Name | Description |
|---|---|
| NotificationMessagesClient | This class connects to your Azure Communication Services resource. It sends the messages. |
| DownloadMediaAsync | Download the media payload from a User to Business message asynchronously, writing the content to a stream. |
| Microsoft.Communication.AdvancedMessageReceived | Event Grid event that is published when Advanced Messaging receives a message. |
Note
For more information, see the Azure SDK for Java reference at com.azure.communication.messages Package.
Common configuration
Follow these steps to add the necessary code snippets to the main function of your App.java file.
- Start sending messages between a business and a WhatsApp user.
- Authenticate the client
- Set channel registration ID
- Set recipient list
Start sending messages between a business and a WhatsApp user
Conversations between a WhatsApp Business Account and a WhatsApp user can be initiated in one of two ways:
- The business sends a template message to the WhatsApp user.
- The WhatsApp user sends any message to the business number.
Regardless of how the conversation was started, a business can only send template messages until the user sends a message to the business. Only after the user sends a message to the business, the business is allowed to send text or media messages to the user during the active conversation. Once the 24 hour conversation window expires, the conversation must be reinitiated. To learn more about conversations, see the definition at WhatsApp Business Platform.
Authenticate the client
There are a few different options available for authenticating a Message client:
To authenticate a client, you instantiate an NotificationMessagesClient or MessageTemplateClient with your connection string. You can also initialize the client with any custom HTTP client that implements the com.azure.core.http.HttpClient interface.
For simplicity, this article uses a connection string to authenticate. In production environments, we recommend using service principals.
Get the connection string from your Azure Communication Services resource in the Azure portal. On the left, navigate to the Keys tab. Copy the Connection string field for the Primary key. The connection string is in the format endpoint=https://{your Azure Communication Services resource name}.communication.azure.com/;accesskey={secret key}.
Set the environment variable COMMUNICATION_SERVICES_CONNECTION_STRING to the value of your connection string.
Open a console window and enter the following command:
setx COMMUNICATION_SERVICES_CONNECTION_STRING "<your connection string>"
For more information on how to set an environment variable for your system, follow the steps at Store your connection string in an environment variable.
To instantiate a NotificationMessagesClient, add the following code to the main method:
// You can get your connection string from your resource in the Azure portal.
String connectionString = System.getenv("COMMUNICATION_SERVICES_CONNECTION_STRING");

NotificationMessagesClient notificationClient = new NotificationMessagesClientBuilder()
    .connectionString(connectionString)
    .buildClient();
Set channel registration ID
The Channel Registration ID GUID was created during channel registration. You can look it up in the portal on the Channels tab of your Azure Communication Services resource.
Assign it to a variable called channelRegistrationId.
String channelRegistrationId = "<your channel registration id GUID>";
Set recipient list
You need to supply a real phone number that has a WhatsApp account associated with it. This WhatsApp account receives the text and media messages sent in this article. For this article, this phone number can be your personal phone number.
The recipient phone number can't be the business phone number (Sender ID) associated with the WhatsApp channel registration. The Sender ID appears as the sender of the text and media messages sent to the recipient.
The phone number should include the country code. For more information on phone number formatting, see WhatsApp documentation for Phone Number Formats.
Note
Only one phone number is currently supported in the recipient list.
Create the recipient list like this:
List<String> recipientList = new ArrayList<>();
recipientList.add("<to WhatsApp phone number>");
Example:
// Example only
List<String> recipientList = new ArrayList<>();
recipientList.add("+14255550199");
Code examples
Follow these steps to add required code snippets to the main function of App.java.
Download the media payload to a stream
The Messages SDK enables Contoso to download the media in received WhatsApp media messages from WhatsApp users. To download the media payload to a stream, you need:
- Authenticated NotificationMessagesClient.
- The media ID GUID of the media (Received from an incoming message in an AdvancedMessageReceived event).
    public static void main(String[] args) throws IOException {

        NotificationMessagesClient messagesClient = new NotificationMessagesClientBuilder()
            .connectionString(connectionString)
            .buildClient();

        BinaryData data = messagesClient.downloadMedia("<MEDIA_ID>");
        BufferedImage image = ImageIO.read(data.toStream());
        ImageIcon icon = new ImageIcon(image);
        JLabel label  = new JLabel(icon);
        JFrame frame = new JFrame();
        frame.add(label);
        frame.setDefaultCloseOperation(JFrame.EXIT_ON_CLOSE);
        frame.pack();
        frame.setVisible(true);
    }
Run the code
Open the directory that contains the
pom.xmlfile and compile the project using themvncommand.mvn compileRun the app by executing the following
mvncommand.mvn exec:java -D"exec.mainClass"="com.communication.quickstart.App" -D"exec.cleanupDaemonThreads"="false"
Full sample code
Find the finalized code on GitHub at Java Messages SDK.
Prerequisites
WhatsApp Business Account registered with your Azure Communication Services resource.
Active WhatsApp phone number to receive messages.
Node.js Active LTS and Maintenance LTS versions (recommended versions: 8.11.1 and 10.14.1).
In a terminal or command window, verify that Node.js is installed by running:
node --version
Set up environment
To set up an environment for sending messages, complete the following steps.
Create a new Node.js application
Create a new directory for your app and open it in a terminal or command window.
Run the following command.
mkdir advance-messages-quickstart && cd advance-messages-quickstartRun the following command to create a
package.jsonfile with default settings.npm init -yUse a text editor to create a file called
send-messages.jsin the project root directory.Add the following code snippet to the file
send-messages.js.async function main() { // Quickstart code goes here. } main().catch((error) => { console.error("Encountered an error while sending message: ", error); process.exit(1); });
Complete the following section to add your source code for this example to the send-messages.js file that you created.
Install the package
Use the npm install command to install the Azure Communication Services Advance Messaging SDK for JavaScript.
npm install @azure-rest/communication-messages --save
The --save option lists the library as a dependency in your package.json file.
Object model
The following classes and interfaces handle some of the major features of the Azure Communication Services Advance Messaging SDK for JavaScript.
| Name | Description |
|---|---|
| NotificationClient | This class connects to your Azure Communication Services resource. It sends the messages. |
| DownloadMediaAsync | Download the media payload from a User to Business message asynchronously, writing the content to a stream. |
| Microsoft.Communication.AdvancedMessageReceived | Event Grid event that is published when Advanced Messaging receives a message. |
Note
For more information, see the Azure SDK for JavaScript reference @Azure-rest/communication-messages package
Common configuration
Follow these steps to add required code snippets to the main function of your DownloadMedia.js file.
- Start sending messages between a business and a WhatsApp user.
- Authenticate the client.
- Set channel registration ID.
- Set recipient list.
Start sending messages between a business and a WhatsApp user
Conversations between a WhatsApp Business Account and a WhatsApp user can be initiated in one of two ways:
- The business sends a template message to the WhatsApp user.
- The WhatsApp user sends any message to the business number.
Regardless of how the conversation was started, a business can only send template messages until the user sends a message to the business. Only after the user sends a message to the business, the business is allowed to send text or media messages to the user during the active conversation. Once the 24 hour conversation window expires, the conversation must be reinitiated. To learn more about conversations, see the definition at WhatsApp Business Platform.
Authenticate the client
The following code retrieves the connection string for the resource from an environment variable named COMMUNICATION_SERVICES_CONNECTION_STRING using the dotenv package.
For simplicity, this article uses a connection string to authenticate. In production environments, we recommend using service principals.
Get the connection string from your Azure Communication Services resource in the Azure portal. On the left, navigate to the Keys tab. Copy the Connection string field for the Primary key. The connection string is in the format endpoint=https://{your Azure Communication Services resource name}.communication.azure.com/;accesskey={secret key}.
Set the environment variable COMMUNICATION_SERVICES_CONNECTION_STRING to the value of your connection string.
Open a console window and enter the following command:
setx COMMUNICATION_SERVICES_CONNECTION_STRING "<your connection string>"
For more information on how to set an environment variable for your system, follow the steps at Store your connection string in an environment variable.
To instantiate a NotificationClient, add the following code to the Main method:
const NotificationClient = require("@azure-rest/communication-messages").default;

// Set Connection string
const connectionString = process.env["COMMUNICATION_SERVICES_CONNECTION_STRING"];

// Instantiate the client
const client = NotificationClient(connectionString);
Set channel registration ID
The Channel Registration ID GUID was created during channel registration. You can look it up in the portal on the Channels tab of your Azure Communication Services resource.
Assign it to a variable called channelRegistrationId.
const channelRegistrationId = "<your channel registration id GUID>";
Set recipient list
You need to supply a real phone number that has a WhatsApp account associated with it. This WhatsApp account receives the template, text, and media messages sent in this article. For this article, this phone number can be your personal phone number.
The recipient phone number can't be the business phone number (Sender ID) associated with the WhatsApp channel registration. The Sender ID appears as the sender of the text and media messages sent to the recipient.
The phone number should include the country code. For more information on phone number formatting, see WhatsApp documentation for Phone Number Formats.
Note
Only one phone number is currently supported in the recipient list.
Create the recipient list like this:
const recipientList = ["<to WhatsApp phone number>"];
Example:
// Example only
const recipientList = ["+14255550199"];
Code examples
Follow these steps to add required code snippets to the main function of your DownloadMedia.js file.
Download the media payload to a stream
The Messages SDK enables Contoso to respond with WhatsApp text messages when initiated by a WhatsApp users. To send text messages, complete the following steps:
- Authenticated NotificationMessagesClient
- The media ID GUID of the media (Received from an incoming message in an AdvancedMessageReceived event)
In this example, we reply to the WhatsApp user with the text: "Thanks for your feedback.\n From Notification Messaging SDK."
Assemble and send the media message:
const credential = new AzureKeyCredential(process.env.ACS_ACCESS_KEY || "");
const endpoint = process.env.ACS_URL || "";
const client = NotificationClient(endpoint, credential);
console.log("Downloading...");
await client
.path("/messages/streams/{id}", "<MEDIA_ID>")
.get()
.asNodeStream()
.then((resp) => {
    resp.body?.pipe(fs.createWriteStream("downloadedMedia.jpeg"));
    return;
});
Run the code
Use the node command to run the code you added to the send-messages.js file.
node ./send-messages.js
Full sample code
Download media received by advanced messaging events.
/**
 * @summary Download a media file
 */

const NotificationClient = require("@azure-rest/communication-messages").default;
const { AzureKeyCredential } = require("@azure/core-auth");
const fs = require("fs");

// Load the .env file if it exists
require("dotenv").config();

async function main() {
  const credential = new AzureKeyCredential(process.env.ACS_ACCESS_KEY || "");
  const endpoint = process.env.ACS_URL || "";
  const client = NotificationClient(endpoint, credential);
  console.log("Downloading...");
  await client
    .path("/messages/streams/{id}", "<MEDIA_ID>")
    .get()
    .asNodeStream()
    .then((resp) => {
      resp.body?.pipe(fs.createWriteStream("downloadedMedia.jpeg"));
      return;
    });
}

main().catch((error) => {
  console.error("Encountered an error while sending message: ", error);
  throw error;
});
Prerequisites
- WhatsApp Business Account registered with your Azure Communication Services resource.
- .NET development environment, such as Visual Studio, Visual Studio Code, or .NET CLI.
- Event subscription and handling of Advanced Message Received events.
Setting up
Create a new Python application
In a terminal or console window, create a new folder for your application and open it.
mkdir messages-quickstart && cd messages-quickstart
Install the package
Use the Azure Communication Messages client library for Python 1.1.0 or above.
From a console prompt, run the following command:
pip install azure-communication-messages
For InteractiveMessages, Reactions and Stickers, please use below Beta version:
pip install azure-communication-messages==1.2.0b1
Set up the app framework
Create a new file called messages-quickstart.py and add the basic program structure.
type nul > messages-quickstart.py
Basic program structure
import os

class MessagesQuickstart(object):
    print("Azure Communication Services - Advanced Messages SDK Quickstart")

if __name__ == '__main__':
    messages = MessagesQuickstart()
Object model
The following classes and interfaces handle some of the major features of the Azure Communication Services Messages SDK for Python.
| Name | Description |
|---|---|
| NotificationMessagesClient | This class connects to your Azure Communication Services resource. It sends the messages. |
| DownloadMediaAsync | Download the media payload from a User to Business message asynchronously, writing the content to a stream. |
| Microsoft.Communication.AdvancedMessageReceived | Event Grid event that is published when Advanced Messaging receives a message. |
Note
For more information, see the Azure SDK for Python reference messages Package.
Common configuration
Follow these steps to add required code snippets to the messages-quickstart.py python program.
- Start sending messages between a business and a WhatsApp user.
- Authenticate the client.
- Set channel registration ID.
- Set recipient list.
Authenticate the client
Messages sending uses NotificationMessagesClient. NotificationMessagesClient authenticates using your connection string acquired from Azure Communication Services resource in the Azure portal.F
For more information on connection strings, see access-your-connection-strings-and-service-endpoints.
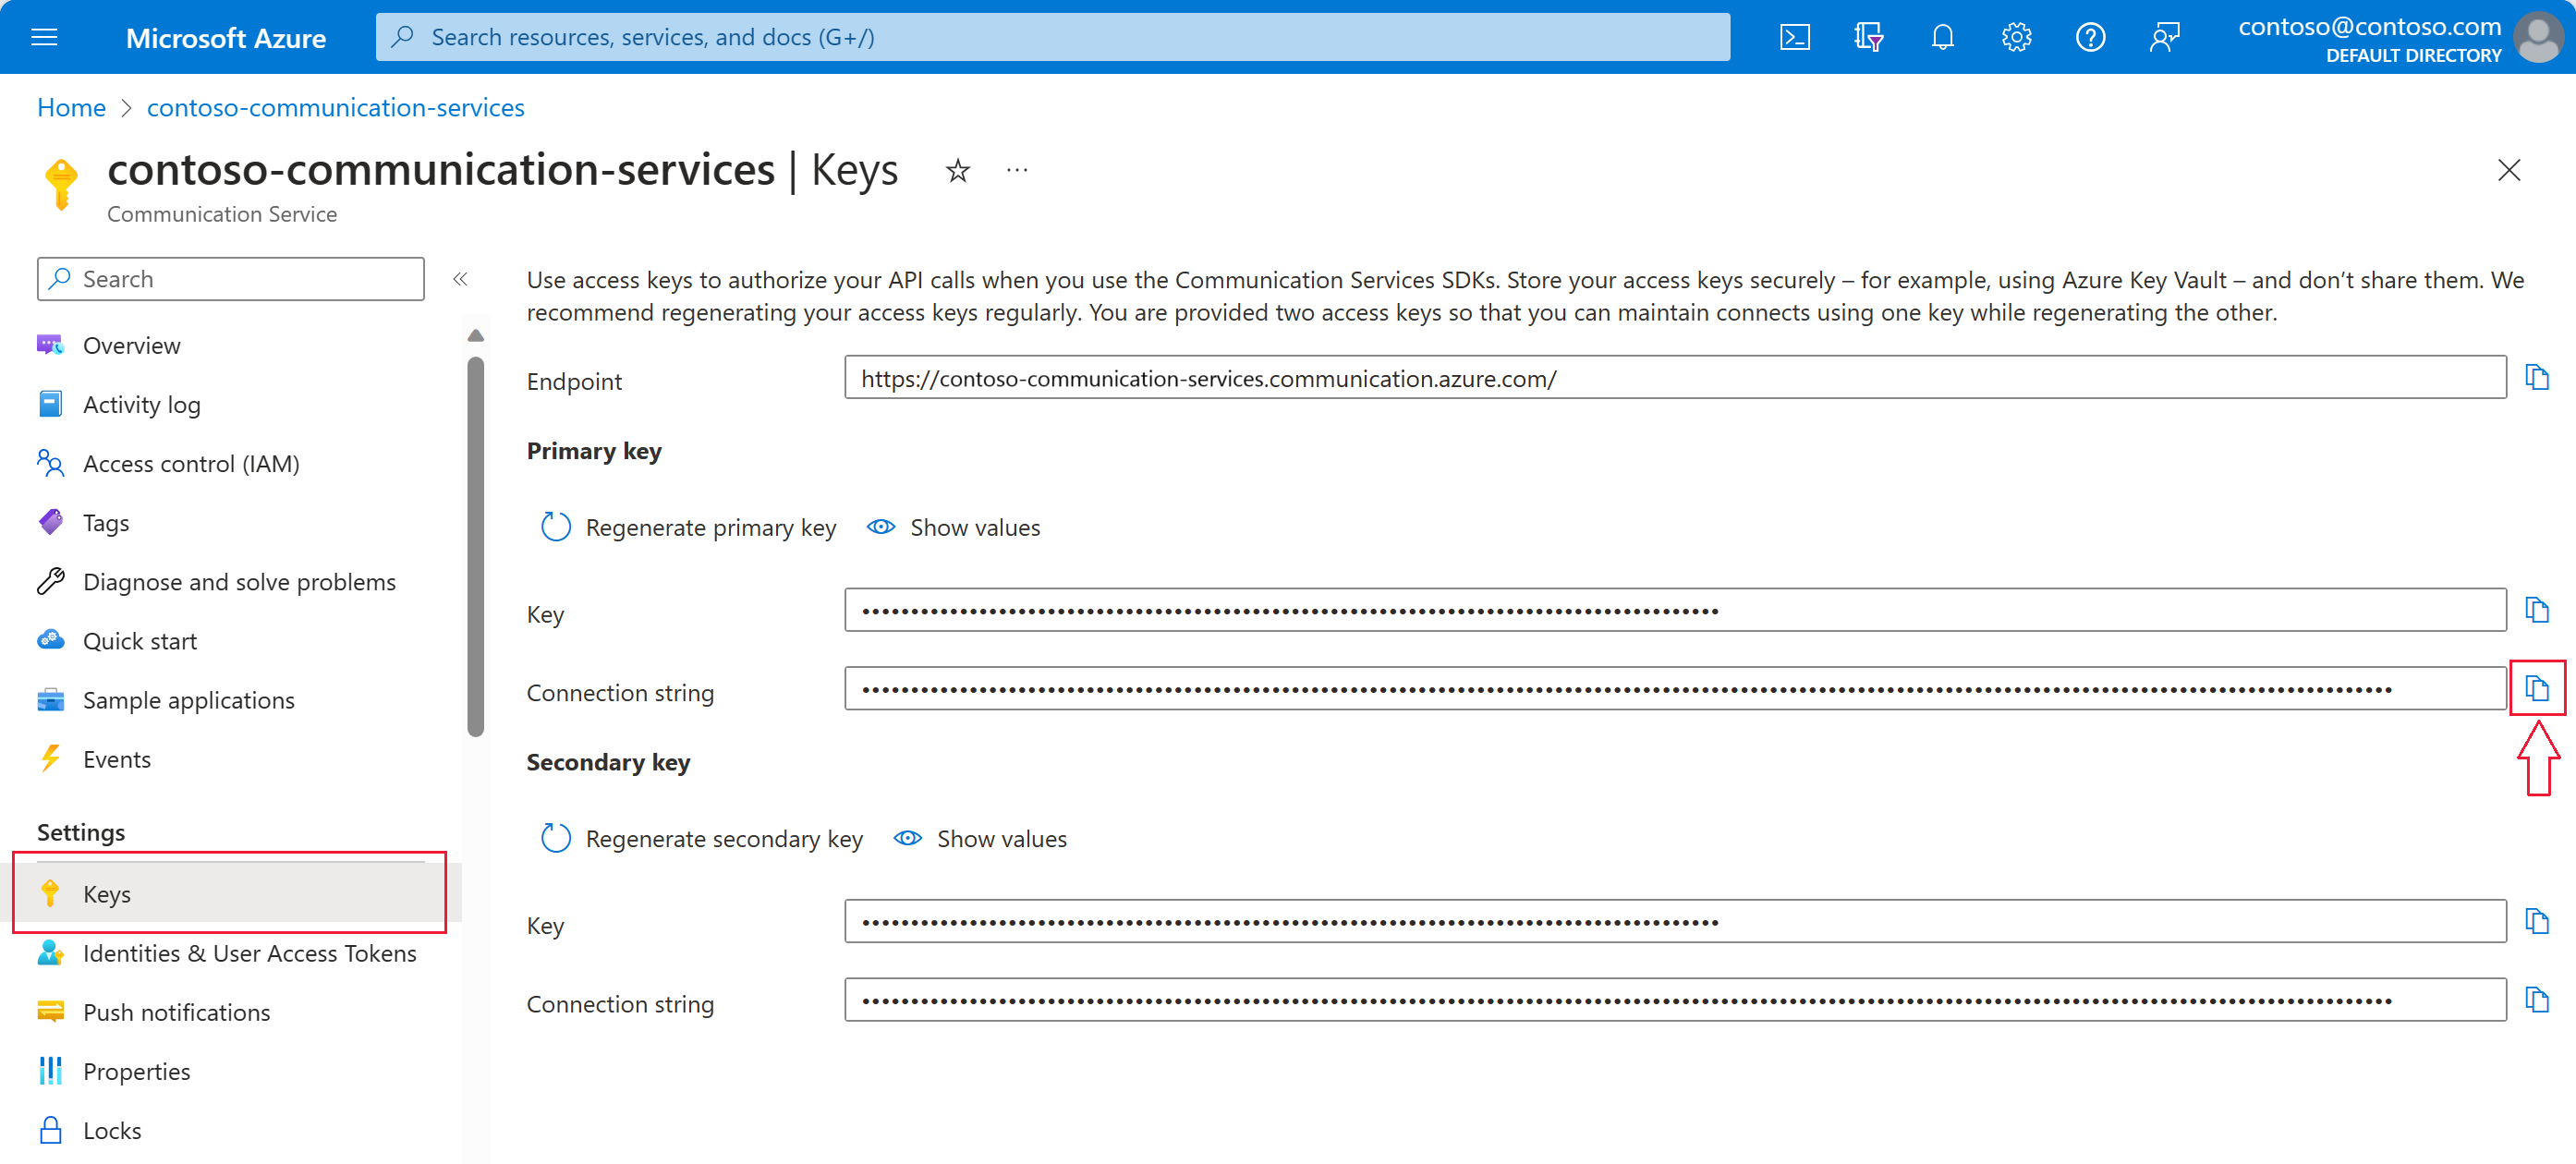
Get Azure Communication Resource connection string from Azure portal as given in screenshot. On the left, navigate to the Keys tab. Copy the Connection string field for the primary key. The connection string is in the format endpoint=https://{your Azure Communication Services resource name}.communication.azure.com/;accesskey={secret key}.
Set the environment variable COMMUNICATION_SERVICES_CONNECTION_STRING to the value of your connection string.
Open a console window and enter the following command:
setx COMMUNICATION_SERVICES_CONNECTION_STRING "<your connection string>"
After you add the environment variable, you might need to restart any running programs that will need to read the environment variable, including the console window. For example, if you're using Visual Studio as your editor, restart Visual Studio before running the example.
For more information on how to set an environment variable for your system, follow the steps at Store your connection string in an environment variable.
    # Get a connection string to our Azure Communication Services resource.
    connection_string = os.getenv("COMMUNICATION_SERVICES_CONNECTION_STRING")

    def send_template_message(self):
        from azure.communication.messages import NotificationMessagesClient

        # Create NotificationMessagesClient Client
        messaging_client = NotificationMessagesClient.from_connection_string(self.connection_string)
Set channel registration ID
You created the Channel Registration ID GUID during channel registration. Find it in the portal on the Channels tab of your Azure Communication Services resource.
Assign it to a variable called channelRegistrationId.
channelRegistrationId = os.getenv("WHATSAPP_CHANNEL_ID_GUID")
Set recipient list
You need to supply an active phone number associated with a WhatsApp account. This WhatsApp account receives the template, text, and media messages sent in this article.
For this example, you can use your personal phone number.
The recipient phone number can't be the business phone number (Sender ID) associated with the WhatsApp channel registration. The Sender ID appears as the sender of the text and media messages sent to the recipient.
The phone number must include the country code. For more information about phone number formatting, see WhatsApp documentation for Phone Number Formats.
Note
Only one phone number is currently supported in the recipient list.
Set the recipient list like this:
phone_number = os.getenv("RECIPIENT_WHATSAPP_PHONE_NUMBER")
Usage Example:
    # Example only
    to=[self.phone_number],
Start sending messages between a business and a WhatsApp user
Conversations between a WhatsApp Business Account and a WhatsApp user can be initiated in one of two ways:
- The business sends a template message to the WhatsApp user.
- The WhatsApp user sends any message to the business number.
A business can't initiate an interactive conversation. A business can only send an interactive message after receiving a message from the user. The business can only send interactive messages to the user during the active conversation. Once the 24 hour conversation window expires, only the user can restart the interactive conversation. For more information about conversations, see the definition at WhatsApp Business Platform.
To initiate an interactive conversation from your personal WhatsApp account, send a message to your business number (Sender ID).
Code examples
Follow these steps to add required code snippets to the messages-quickstart.py python program.
Download the media payload to a stream
The Messages SDK enables Contoso to receive or download media from a WhatsApp user, when initiated by the WhatsApp users. To download the media payload to a stream, you need:
- WhatsApp Channel ID.
- Recipient Phone Number in E16 format.
- Download media ID as Guid.
Important
To send a text message to a WhatsApp user, the WhatsApp user must first send a message to the WhatsApp Business Account. For more information, see Start sending messages between business and WhatsApp user.
In this example, the business sends a reaction to the user message.
      def download_media(self):

        from azure.communication.messages import NotificationMessagesClient

        messaging_client = NotificationMessagesClient.from_connection_string(self.connection_string)
        input_media_id: str = "de7558b5-e169-4d47-9ba4-37a95c28f390"

        # calling send() with whatsapp message details
        media_stream = messaging_client.download_media(input_media_id)
        length : int = 0
        for byte in media_stream:
            length = length + 1
        print("WhatsApp Media stream downloaded.It's length is {}".format(length))
To run download_media(), update the main method.
    #Calling download_media()
    messages.download_media()
Run the code
To run the code, make sure you are on the same directory where your download-media-quickstart.py file is located.
python download-media-quickstart.py
Azure Communication Services - Advanced Messages Quickstart
WhatsApp Media stream downloaded.
Full sample code
Note
Change all placeholder variables in the following code so they match your values.
import os
from io import BytesIO

class MessagesQuickstart(object):
    print("Azure Communication Services - Advanced Messages SDK Quickstart using connection string.")
    # Advanced Messages SDK implementations goes in this section.

    connection_string = os.getenv("COMMUNICATION_SERVICES_CONNECTION_STRING")

     def download_media(self):

        from azure.communication.messages import NotificationMessagesClient

        messaging_client = NotificationMessagesClient.from_connection_string(self.connection_string)
        input_media_id: str = "de7558b5-e169-4d47-9ba4-37a95c28f390"

        # calling send() with whatsapp message details
        media_stream = messaging_client.download_media(input_media_id)
        length : int = 0
        for byte in media_stream:
            length = length + 1
        print("WhatsApp Media stream downloaded.It's length is {}".format(length))

if __name__ == '__main__':
    messages = MessagesQuickstart()
    messages.download_media()
Sample code
Review and download other sample code on GitHub at Python Messages SDK.