Quickstart: Join your calling app to a Teams call queue
Article
In this quickstart you are going to learn how to start a call from Azure Communication Services user to Teams Call Queue. You are going to achieve it with the following steps:
Enable federation of Azure Communication Services resource with Teams Tenant.
Select or create Teams Call Queue via Teams Admin Center.
Get email address of Call Queue via Teams Admin Center.
Get Object ID of the Call Queue via Graph API.
Start a call with Azure Communication Services Calling SDK.
If you'd like to skip ahead to the end, you can download this quickstart as a sample on GitHub.
Enable interoperability in your Teams tenant
Microsoft Entra user with Teams administrator role can run PowerShell cmdlet with MicrosoftTeams module to enable the Communication Services resource in the tenant.
1. Prepare the Microsoft Teams module
First, open the PowerShell and validate the existence of the Teams module with the following command:
script
Get-module *teams*
If you don't see the MicrosoftTeams module, install it first. To install the module, you need to run PowerShell as an administrator. Then run the following command:
script
Install-Module -Name MicrosoftTeams
You'll be informed about the modules that will be installed, which you can confirm with a Y or A answer. If the module is installed but is outdated, you can run the following command to update the module:
script
Update-Module MicrosoftTeams
2. Connect to Microsoft Teams module
When the module is installed and ready, you can connect to the MicrosftTeams module with the following command. You'll be prompted with an interactive window to log in. The user account that you're going to use needs to have Teams administrator permissions. Otherwise, you might get an access denied response in the next steps.
script
Connect-MicrosoftTeams
3. Enable tenant configuration
Interoperability with Communication Services resources is controlled via tenant configuration and assigned policy. Teams tenant has a single tenant configuration, and Teams users have assigned global policy or custom policy. For more information, see Assign Policies in Teams.
After successful login, you can run the cmdlet Set-CsTeamsAcsFederationConfiguration to enable Communication Services resource in your tenant. Replace the text IMMUTABLE_RESOURCE_ID with an immutable resource ID in your communication resource. You can find more details on how to get this information here.
Each Teams user has assigned an External Access Policy that determines whether Communication Services users can call this Teams user. Use cmdlet
Set-CsExternalAccessPolicy to ensure that the policy assigned to the Teams user has set EnableAcsFederationAccess to $true
script
Set-CsExternalAccessPolicy -Identity Global -EnableAcsFederationAccess $true
Create or select Teams Call Queue
Teams Call Queue is a feature in Microsoft Teams that efficiently distributes incoming calls among a group of designated users or agents. It's useful for customer support or call center scenarios. Calls are placed in a queue and assigned to the next available agent based on a predetermined routing method. Agents receive notifications and can handle calls using Teams' call controls. The feature offers reporting and analytics for performance tracking. It simplifies call handling, ensures a consistent customer experience, and optimizes agent productivity. You can select existing or create new Call Queue via Teams Admin Center.
Learn more about how to create Call Queue using Teams Admin Center here.
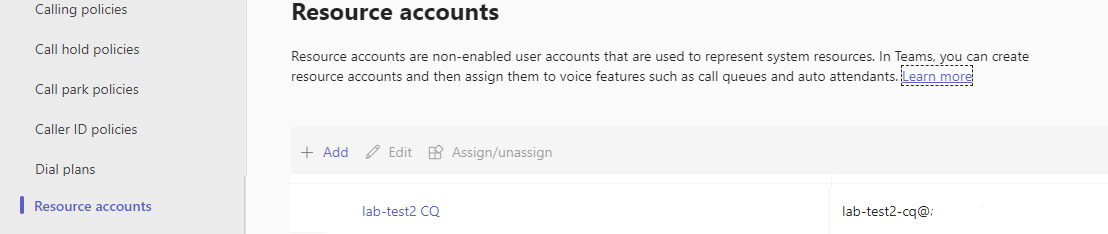
Find Object ID for Call Queue
After Call queue is created, we need to find correlated Object ID to use it later for calls. Object ID is connected to Resource Account that was attached to call queue - open Resource Accounts tab in Teams Admin and find email.
All required information for Resource Account can be found in Microsoft Graph Explorer using this email in the search.
This quickstart uses webpack to bundle the application assets. Run the following command to install the webpack, webpack-cli and webpack-dev-server npm packages and list them as development dependencies in your package.json:
Create an index.html file in the root directory of your project. We'll use this file to configure a basic layout that will allow the user to place a 1:1 video call.
Here's the code:
HTML
<!-- index.html --><!DOCTYPE html><html><head><title>Azure Communication Services - Calling Web SDK</title></head><body><h4>Azure Communication Services - Calling Web SDK</h4><inputid="user-access-token"type="text"placeholder="User access token"style="margin-bottom:1em; width: 500px;"/><buttonid="initialize-teams-call-agent"type="button">Initialize Call Agent</button><br><br><inputid="application-object-id"type="text"placeholder="Enter callee's Teams user identity in format: 'APP_GUID'"style="margin-bottom:1em; width: 500px; display: block;"/><buttonid="start-call-button"type="button"disabled="true">Start Call</button><buttonid="hangup-call-button"type="button"disabled="true">Hang up Call</button><buttonid="accept-call-button"type="button"disabled="true">Accept Call</button><buttonid="start-video-button"type="button"disabled="true">Start Video</button><buttonid="stop-video-button"type="button"disabled="true">Stop Video</button><br><br><divid="connectedLabel"style="color: #13bb13;"hidden>Call is connected!</div><br><divid="remoteVideoContainer"style="width: 40%;"hidden>Remote participants' video streams:</div><br><divid="localVideoContainer"style="width: 30%;"hidden>Local video stream:</div><!-- points to the bundle generated from client.js --><scriptsrc="./main.js"></script></body></html>
Azure Communication Services Calling Web SDK Object model
The following classes and interfaces handle some of the main features of the Azure Communication Services Calling SDK:
Name
Description
CallClient
The main entry point to the Calling SDK.
CallAgent
Used to start and manage calls.
DeviceManager
Used to manage media devices.
Call
Used for representing a Call.
LocalVideoStream
Used for creating a local video stream for a camera device on the local system.
RemoteParticipant
Used for representing a remote participant in the Call.
RemoteVideoStream
Used for representing a remote video stream from a Remote Participant.
Create a file in the root directory of your project called client.js to contain the application logic for this quickstart. Add the following code to client.js:
JavaScript
// Make sure to install the necessary dependenciesconst { CallClient, VideoStreamRenderer, LocalVideoStream } = require('@azure/communication-calling');
const { AzureCommunicationTokenCredential } = require('@azure/communication-common');
const { AzureLogger, setLogLevel } = require("@azure/logger");
// Set the log level and output
setLogLevel('verbose');
AzureLogger.log = (...args) => {
console.log(...args);
};
// Calling web sdk objectslet callAgent;
let deviceManager;
let call;
let incomingCall;
let localVideoStream;
let localVideoStreamRenderer;
// UI widgetslet userAccessToken = document.getElementById('user-access-token');
let callQueueId = document.getElementById('application-object-id');
let initializeCallAgentButton = document.getElementById('initialize-teams-call-agent');
let startCallButton = document.getElementById('start-call-button');
let hangUpCallButton = document.getElementById('hangup-call-button');
let acceptCallButton = document.getElementById('accept-call-button');
let startVideoButton = document.getElementById('start-video-button');
let stopVideoButton = document.getElementById('stop-video-button');
let connectedLabel = document.getElementById('connectedLabel');
let remoteVideoContainer = document.getElementById('remoteVideoContainer');
let localVideoContainer = document.getElementById('localVideoContainer');
/**
* Create an instance of CallClient. Initialize a CallAgent instance with a AzureCommunicationTokenCredential via created CallClient. CallAgent enables us to make outgoing calls and receive incoming calls.
* You can then use the CallClient.getDeviceManager() API instance to get the DeviceManager.
*/
initializeCallAgentButton.onclick = async () => {
try {
const callClient = new CallClient();
tokenCredential = new AzureCommunicationTokenCredential(userAccessToken.value.trim());
callAgent = await callClient.createCallAgent(tokenCredential)
// Set up a camera device to use.
deviceManager = await callClient.getDeviceManager();
await deviceManager.askDevicePermission({ video: true });
await deviceManager.askDevicePermission({ audio: true });
// Listen for an incoming call to accept.
callAgent.on('incomingCall', async (args) => {
try {
incomingCall = args.incomingCall;
acceptCallButton.disabled = false;
startCallButton.disabled = true;
} catch (error) {
console.error(error);
}
});
startCallButton.disabled = false;
initializeCallAgentButton.disabled = true;
} catch(error) {
console.error(error);
}
}
/**
* Place a 1:1 outgoing video call to a Teams Call Queue
* Add an event listener to initiate a call when the `startCallButton` is selected.
* Enumerate local cameras using the deviceManager `getCameraList` API.
* In this quickstart, we're using the first camera in the collection. Once the desired camera is selected, a
* LocalVideoStream instance will be constructed and passed within `videoOptions` as an item within the
* localVideoStream array to the call method. When the call connects, your application will be sending a video stream to the other participant.
*/
startCallButton.onclick = async () => {
try {
const localVideoStream = await createLocalVideoStream();
const videoOptions = localVideoStream ? { localVideoStreams: [localVideoStream] } : undefined;
call = callAgent.startCall([{ teamsAppId: callQueueId.value.trim(), cloud:"public" }], { videoOptions: videoOptions });
// Subscribe to the call's properties and events.
subscribeToCall(call);
} catch (error) {
console.error(error);
}
}
/**
* Accepting an incoming call with a video
* Add an event listener to accept a call when the `acceptCallButton` is selected.
* You can accept incoming calls after subscribing to the `CallAgent.on('incomingCall')` event.
* You can pass the local video stream to accept the call with the following code.
*/
acceptCallButton.onclick = async () => {
try {
const localVideoStream = await createLocalVideoStream();
const videoOptions = localVideoStream ? { localVideoStreams: [localVideoStream] } : undefined;
call = await incomingCall.accept({ videoOptions });
// Subscribe to the call's properties and events.
subscribeToCall(call);
} catch (error) {
console.error(error);
}
}
// Subscribe to a call obj.// Listen for property changes and collection udpates.
subscribeToCall = (call) => {
try {
// Inspect the initial call.id value.console.log(`Call Id: ${call.id}`);
//Subsribe to call's 'idChanged' event for value changes.
call.on('idChanged', () => {
console.log(`Call ID changed: ${call.id}`);
});
// Inspect the initial call.state value.console.log(`Call state: ${call.state}`);
// Subscribe to call's 'stateChanged' event for value changes.
call.on('stateChanged', async () => {
console.log(`Call state changed: ${call.state}`);
if(call.state === 'Connected') {
connectedLabel.hidden = false;
acceptCallButton.disabled = true;
startCallButton.disabled = true;
hangUpCallButton.disabled = false;
startVideoButton.disabled = false;
stopVideoButton.disabled = false;
} elseif (call.state === 'Disconnected') {
connectedLabel.hidden = true;
startCallButton.disabled = false;
hangUpCallButton.disabled = true;
startVideoButton.disabled = true;
stopVideoButton.disabled = true;
console.log(`Call ended, call end reason={code=${call.callEndReason.code}, subCode=${call.callEndReason.subCode}}`);
}
});
call.localVideoStreams.forEach(async (lvs) => {
localVideoStream = lvs;
await displayLocalVideoStream();
});
call.on('localVideoStreamsUpdated', e => {
e.added.forEach(async (lvs) => {
localVideoStream = lvs;
await displayLocalVideoStream();
});
e.removed.forEach(lvs => {
removeLocalVideoStream();
});
});
call.on('isLocalVideoStartedChanged', () => {
console.log(`isLocalVideoStarted changed: ${call.isLocalVideoStarted}`);
});
console.log(`isLocalVideoStarted: ${call.isLocalVideoStarted}`);
// Inspect the call's current remote participants and subscribe to them.
call.remoteParticipants.forEach(remoteParticipant => {
subscribeToRemoteParticipant(remoteParticipant);
});
// Subscribe to the call's 'remoteParticipantsUpdated' event to be// notified when new participants are added to the call or removed from the call.
call.on('remoteParticipantsUpdated', e => {
// Subscribe to new remote participants that are added to the call.
e.added.forEach(remoteParticipant => {
subscribeToRemoteParticipant(remoteParticipant)
});
// Unsubscribe from participants that are removed from the call
e.removed.forEach(remoteParticipant => {
console.log('Remote participant removed from the call.');
});
});
} catch (error) {
console.error(error);
}
}
// Subscribe to a remote participant obj.// Listen for property changes and collection udpates.
subscribeToRemoteParticipant = (remoteParticipant) => {
try {
// Inspect the initial remoteParticipant.state value.console.log(`Remote participant state: ${remoteParticipant.state}`);
// Subscribe to remoteParticipant's 'stateChanged' event for value changes.
remoteParticipant.on('stateChanged', () => {
console.log(`Remote participant state changed: ${remoteParticipant.state}`);
});
// Inspect the remoteParticipants's current videoStreams and subscribe to them.
remoteParticipant.videoStreams.forEach(remoteVideoStream => {
subscribeToRemoteVideoStream(remoteVideoStream)
});
// Subscribe to the remoteParticipant's 'videoStreamsUpdated' event to be// notified when the remoteParticiapant adds new videoStreams and removes video streams.
remoteParticipant.on('videoStreamsUpdated', e => {
// Subscribe to newly added remote participant's video streams.
e.added.forEach(remoteVideoStream => {
subscribeToRemoteVideoStream(remoteVideoStream)
});
// Unsubscribe from newly removed remote participants' video streams.
e.removed.forEach(remoteVideoStream => {
console.log('Remote participant video stream was removed.');
})
});
} catch (error) {
console.error(error);
}
}
/**
* Subscribe to a remote participant's remote video stream obj.
* You have to subscribe to the 'isAvailableChanged' event to render the remoteVideoStream. If the 'isAvailable' property
* changes to 'true' a remote participant is sending a stream. Whenever the availability of a remote stream changes
* you can choose to destroy the whole 'Renderer' a specific 'RendererView' or keep them. Displaying RendererView without a video stream will result in a blank video frame.
*/
subscribeToRemoteVideoStream = async (remoteVideoStream) => {
// Create a video stream renderer for the remote video stream.let videoStreamRenderer = new VideoStreamRenderer(remoteVideoStream);
let view;
const renderVideo = async () => {
try {
// Create a renderer view for the remote video stream.
view = await videoStreamRenderer.createView();
// Attach the renderer view to the UI.
remoteVideoContainer.hidden = false;
remoteVideoContainer.appendChild(view.target);
} catch (e) {
console.warn(`Failed to createView, reason=${e.message}, code=${e.code}`);
}
}
remoteVideoStream.on('isAvailableChanged', async () => {
// Participant has switched video on.if (remoteVideoStream.isAvailable) {
await renderVideo();
// Participant has switched video off.
} else {
if (view) {
view.dispose();
view = undefined;
}
}
});
// Participant has video on initially.if (remoteVideoStream.isAvailable) {
await renderVideo();
}
}
// Start your local video stream.// This will send your local video stream to remote participants so they can view it.
startVideoButton.onclick = async () => {
try {
const localVideoStream = await createLocalVideoStream();
await call.startVideo(localVideoStream);
} catch (error) {
console.error(error);
}
}
// Stop your local video stream.// This will stop your local video stream from being sent to remote participants.
stopVideoButton.onclick = async () => {
try {
await call.stopVideo(localVideoStream);
} catch (error) {
console.error(error);
}
}
/**
* To render a LocalVideoStream, you need to create a new instance of VideoStreamRenderer, and then
* create a new VideoStreamRendererView instance using the asynchronous createView() method.
* You may then attach view.target to any UI element.
*/// Create a local video stream for your camera device
createLocalVideoStream = async () => {
const camera = (await deviceManager.getCameras())[0];
if (camera) {
returnnew LocalVideoStream(camera);
} else {
console.error(`No camera device found on the system`);
}
}
// Display your local video stream preview in your UI
displayLocalVideoStream = async () => {
try {
localVideoStreamRenderer = new VideoStreamRenderer(localVideoStream);
const view = await localVideoStreamRenderer.createView();
localVideoContainer.hidden = false;
localVideoContainer.appendChild(view.target);
} catch (error) {
console.error(error);
}
}
// Remove your local video stream preview from your UI
removeLocalVideoStream = async() => {
try {
localVideoStreamRenderer.dispose();
localVideoContainer.hidden = true;
} catch (error) {
console.error(error);
}
}
// End the current call
hangUpCallButton.addEventListener("click", async () => {
// end the current callawait call.hangUp();
});
Add the webpack local server code
Create a file in the root directory of your project called webpack.config.js to contain the local server logic for this quickstart. Add the following code to webpack.config.js:
Use the webpack-dev-server to build and run your app. Run the following command to bundle the application host in a local webserver:
Console
npx webpack serve --config webpack.config.js
Manual steps to setup the call:
Open your browser and navigate to http://localhost:8080/.
Enter a valid user access token. Refer to the user access token documentation if you don't already have access tokens available to use.
Click on the "Initialize Call Agent" buttons.
Enter the Call Queue Object ID, and select the "Start Call" button. Application will start the outgoing call to the call queue with given object ID.
Call is connected to the Call Queue.
Communication Services user is routed through Call Queue based on it's configuration.
Clean up resources
If you want to clean up and remove a Communication Services subscription, you can delete the resource or resource group. Deleting the resource group also deletes any other resources associated with it. Learn more about cleaning up resources.