Get started with the calling hero sample
The Azure Communication Services Group Calling Hero Sample demonstrates how the Communication Services Calling Web SDK can be used to build a group calling experience.
In this Sample quickstart, we learn how the sample works before we run the sample on your local machine and then deploy the sample to Azure using your own Azure Communication Services resources.
Download code
Find the project for this sample on GitHub. A version of the sample that includes features currently in public preview such as Teams Interop and Call Recording can be found on a separate branch.
Overview
The sample has both a client-side application and a server-side application. The client-side application is a React/Redux web application that uses Microsoft's Fluent UI framework. This application sends requests to an ASP.NET Core server-side application that helps the client-side application connect to Azure.
Here's what the sample looks like:
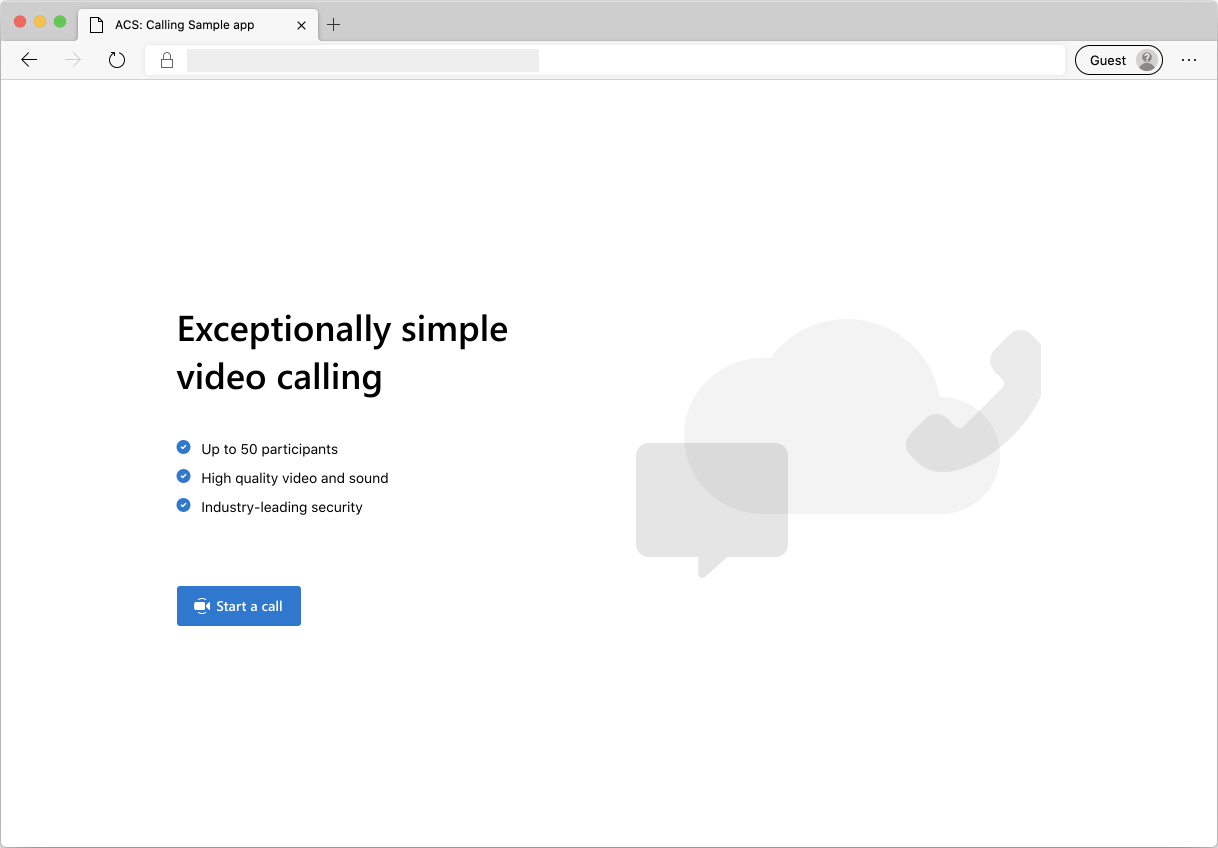
When you press the "Start a call" button, the web application fetches a user access token from the server-side application. This token is then used to connect the client app to Azure Communication Services. Once the token is retrieved, you are prompted to specify the camera and microphone that you want to use. You are able to disable/enable your devices with toggle controls:
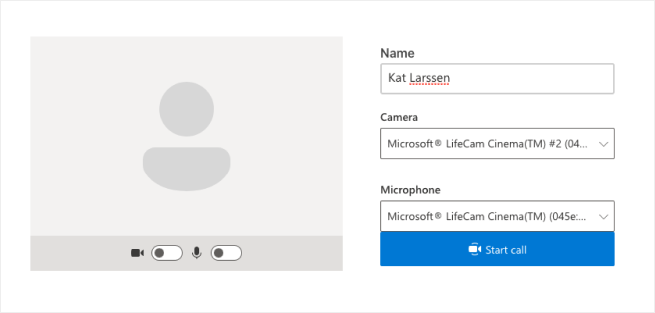
Once you configure your display name and devices, you can join the call session. You will see the main call canvas where the core calling experience lives.
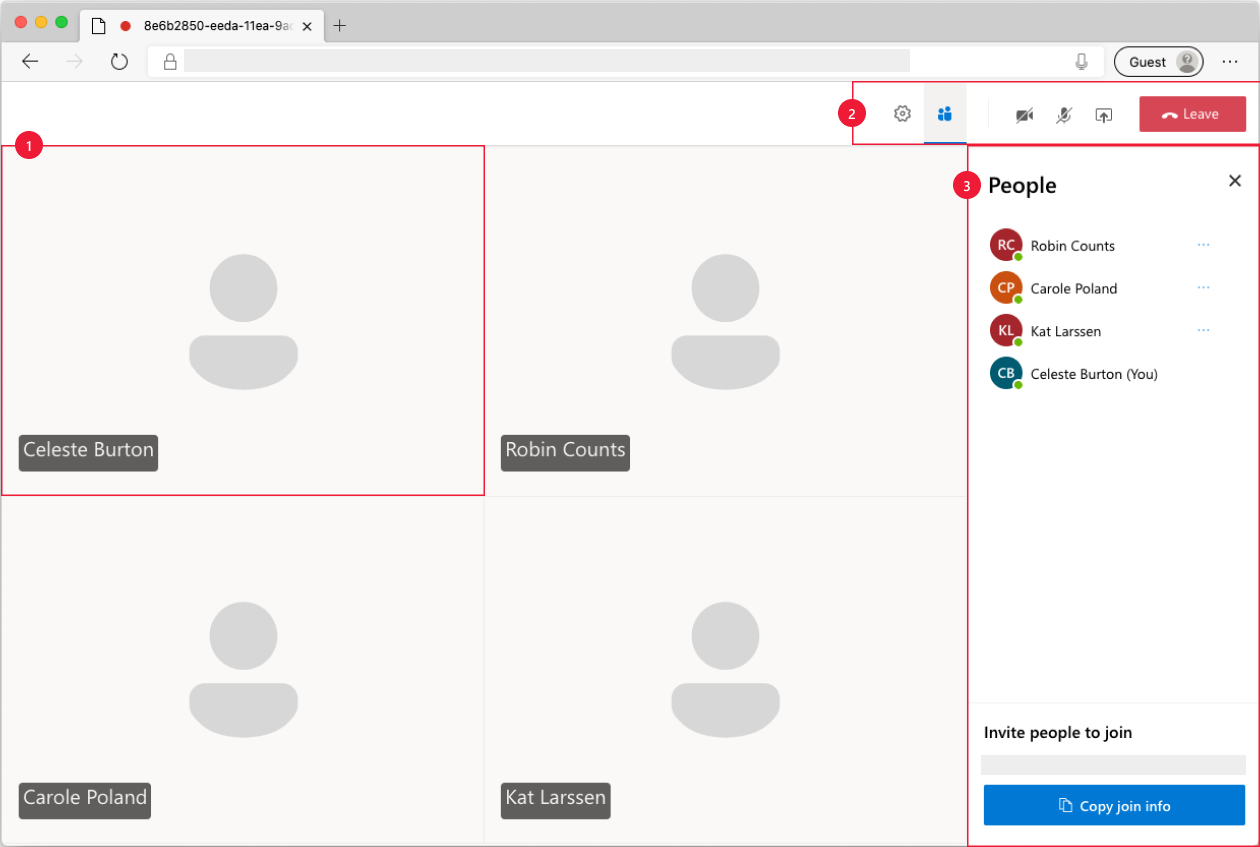
Components of the main calling screen:
- Media Gallery: The main stage where participants are shown. If a participant has their camera enabled, their video feed is shown here. Each participant has an individual tile which shows their display name and video stream (when there is one)
- Header: This is where the primary call controls are located to toggle settings and participant side bar, turn video and mix on/off, share screen and leave the call.
- Side Bar: This is where participants and settings information are shown when toggled using the controls on the header. The component can be dismissed using the 'X' on the top right corner. Participants side bar shows a list of participants and a link to invite more users to chat. Settings side bar allows you to configure microphone and camera settings.
Below you can find more information on prerequisites and steps to set up the sample.
Prerequisites
- An Azure account with an active subscription. For details, see Create an account for free
- Node.js (12.18.4 and above)
- Visual Studio Code (Stable Build)
- An Azure Communication Services resource. For details, see Create an Azure Communication Services resource. You need to record your resource connection string for this quickstart.
Before running the sample for the first time
Open an instance of PowerShell, Windows Terminal, Command Prompt or equivalent and navigate to the directory that you'd like to clone the sample to.
git clone https://github.com/Azure-Samples/communication-services-web-calling-hero.gitGet the
Connection Stringfrom the Azure portal or by using the Azure CLI.az communication list-key --name "<acsResourceName>" --resource-group "<resourceGroup>"For more information on connection strings, see Create an Azure Communication Resources
Once you get the
Connection String, add the connection string to the samples/Server/appsetting.json file. Input your connection string in the variable:ResourceConnectionString.Get the
Endpoint stringfrom the Azure portal or by using the Azure CLI.az communication list-key --name "<acsResourceName>" --resource-group "<resourceGroup>"For more information on Endpoint strings, see Create an Azure Communication Resources
Once you get the
Endpoint String, add the endpoint string to the samples/Server/appsetting.json file. Input your endpoint string in the variableEndpointUrl
Local run
Install dependencies
npm run setupStart the calling app
npm run startThis opens a client server on port 3000 that serves the website files, and an api server on port 8080 that performs functionality like minting tokens for call participants.
Troubleshooting
The app shows an "Unsupported browser" screen but I am on a supported browser.
If your app is being served over a hostname other than localhost, you must serve traffic over https and not http.
Publish to Azure
npm run setupnpm run buildnpm run package- Use the Azure extension and deploy the Calling/dist directory to your app service
Clean up resources
If you want to clean up and remove a Communication Services subscription, you can delete the resource or resource group. Deleting the resource group also deletes any other resources associated with it. Learn more about cleaning up resources.
Next steps
For more information, see the following articles:
- Familiarize yourself with using the Calling SDK
- Learn more about how calling works
Additional reading
- Samples - Find more samples and examples on our samples overview page.
- Redux - Client-side state management
- FluentUI - Microsoft powered UI library
- React - Library for building user interfaces
- ASP.NET Core - Framework for building web applications
The Azure Communication Services Group Calling Hero Sample for iOS demonstrates how the Communication Services Calling iOS SDK can be used to build a group calling experience that includes voice and video. In this sample quickstart, you will learn how to set up and run the sample. An overview of the sample is provided for context.
Download code
Find the project for this sample on GitHub.
Overview
The sample is a native iOS application that uses the Azure Communication Services iOS SDKs to build a calling experience that features both voice and video calling. The application uses a server-side component to provision access tokens that are then used to initialize the Azure Communication Services SDK. To configure this server-side component, feel free to follow the Trusted Service with Azure Functions tutorial.
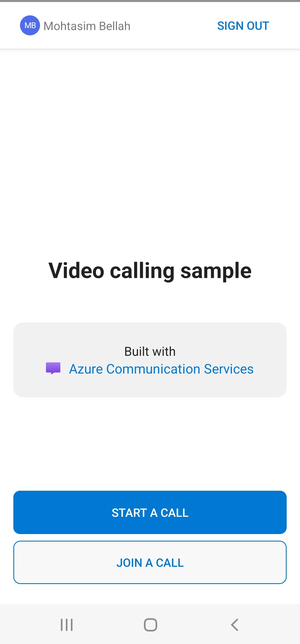
Here's what the sample looks like:
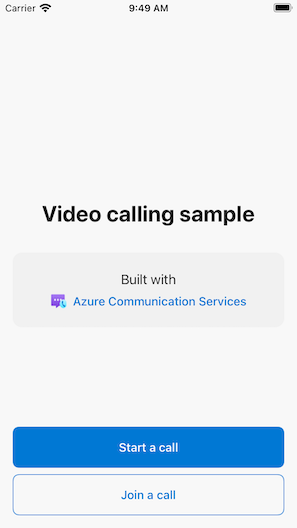
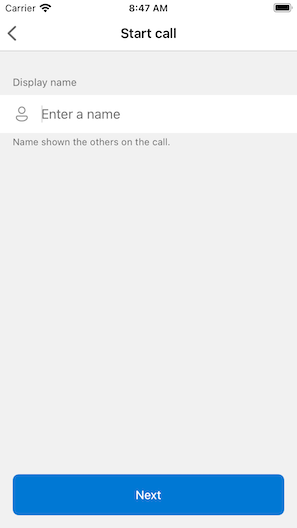
When you press the "Start new call" button, the iOS application prompts you to enter your display name to use for the call.
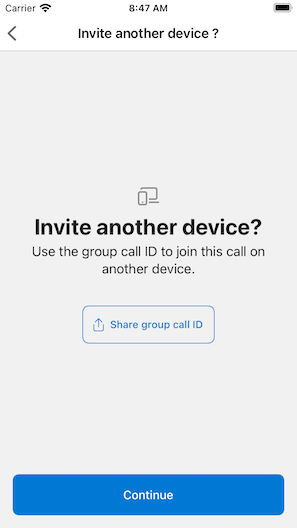
After tapping "Next" on the "Start Call" screen, you have the opportunity to share the group ID of the call via the iOS share sheet.
The application also allows you to join an existing Azure Communication Services call by specifying the existing call's ID or teams ID link.

After joining a call, you'll be prompted to give the application permission to access your camera and microphone, if not already authorized. Keep in mind that, like all AVFoundation-based apps, true audio and video functionality is only available on real hardware.
Once you configure your display name and join the call, you'll see the main call canvas where the core calling experience lives.
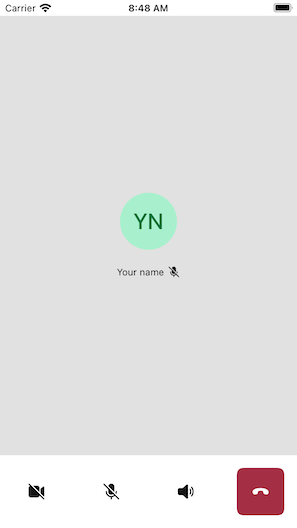
Components of the main calling screen:
- Media Gallery: The main stage where participants are shown. If a participant has their camera enabled, their video feed is shown here. Each participant has an individual tile which shows their display name and video stream (when there is one). The gallery supports multiple participants and is updated when participants are added or removed to the call.
- Action Bar: This is where the primary call controls are located. These controls let you turn your video and microphone on/off, share your screen, and leave the call.
Below you'll find more information on prerequisites and steps to set up the sample.
Prerequisites
- An Azure account with an active subscription. For details, see Create an account for free.
- A Mac running Xcode, along with a valid developer certificate installed into your Keychain.
- An Azure Communication Services resource. For details, see Create an Azure Communication Services resource.
- An Azure Function running the Authentication Endpoint to fetch access tokens.
Running sample locally
The group calling sample can be run locally using XCode. Developers can either use their physical device or an emulator to test the application.
Before running the sample for the first time
- Install dependencies by running
pod install. - Open
AzureCalling.xcworkspacein XCode. - Create a text file at the root, called
AppSettings.xcconfigand set the value:communicationTokenFetchUrl = <your authentication endpoint, without the https:// component>
Run sample
Build and run the sample in XCode, using the AzureCalling target on the simulator or device of your choice.
(Optional) Securing an authentication endpoint
For demonstration purposes, this sample uses a publicly accessible endpoint by default to fetch an Azure Communication Services access token. For production scenarios, we recommend using your own secured endpoint to provision your own tokens.
With additional configuration, this sample supports connecting to an Microsoft Entra ID (Microsoft Entra ID) protected endpoint so that user login is required for the app to fetch an Azure Communication Services access token. See steps below:
- Enable Microsoft Entra authentication in your app.
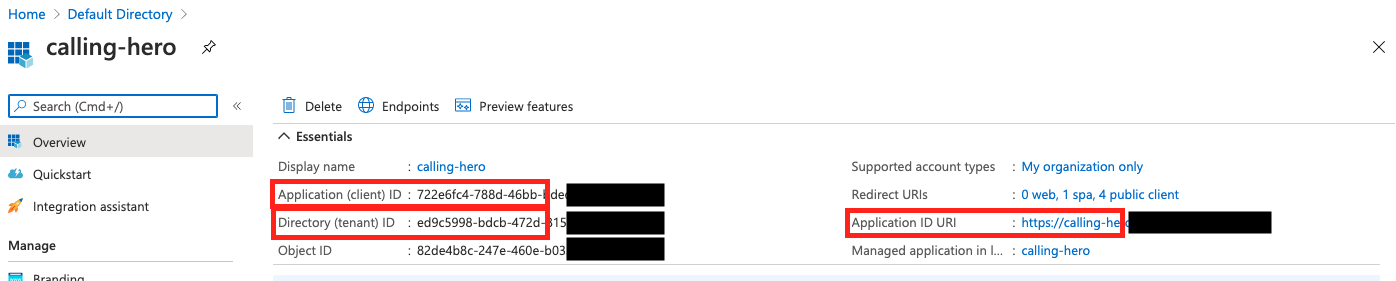
- Go to your registered app overview page under Microsoft Entra App Registrations. Take note of the
Application (client) ID,Directory (tenant) ID,Application ID URI
- Create a
AppSettings.xcconfigfile at the root if not already present and add the values:communicationTokenFetchUrl = <Application ID URI, without the https:// component> aadClientId = <Application (client) ID> aadTenantId = <Directory (tenant) ID>
Clean up resources
If you want to clean up and remove a Communication Services subscription, you can delete the resource or resource group. Deleting the resource group also deletes any other resources associated with it. Learn more about cleaning up resources.
Next steps
For more information, see the following articles:
- Familiarize yourself with using the Calling SDK
- Learn more about how calling works
Additional reading
- Azure Communication GitHub - Find more examples and information on the official GitHub page
- Samples - Find more samples and examples on our samples overview page.
- Azure Communication Calling Features - To learn more about the calling iOS sdk -Azure Communication iOS Calling SDK
The Azure Communication Services Group Calling Hero Sample for Android demonstrates how the Communication Services Calling Android SDK can be used to build a group calling experience that includes voice and video. In this sample quickstart, you will learn how to set up and run the sample. An overview of the sample is provided for context.
Download code
Find the project for this sample on GitHub.
Overview
The sample is a native Android application that uses the Azure Communication Services Android UI client library to build a calling experience that features both voice and video calling. The application uses a server-side component to provision access tokens that are then used to initialize the Azure Communication Services SDK. To configure this server-side component, feel free to follow the Trusted Service with Azure Functions tutorial.
Here's what the sample looks like:
When you press the "Start new call" button, the Android application prompts you to enter your display name to use for the call.
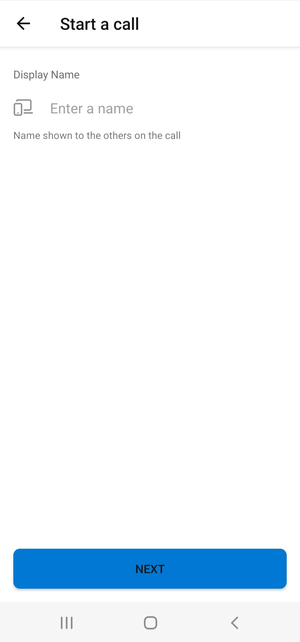
After tapping "Next" on the "Start A call" page, you have the opportunity to share the "Group Call ID".
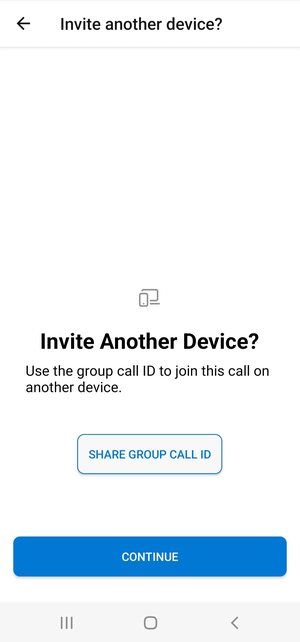
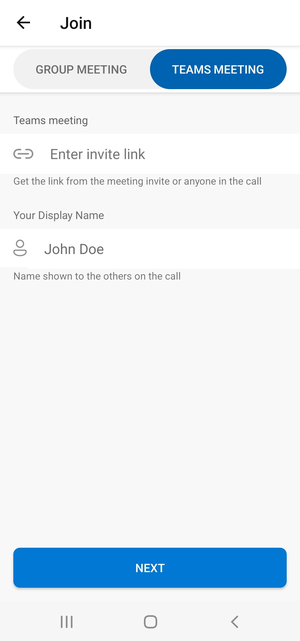
The application allows you to join an existing Azure Communication Services call by specifying the existing call's ID or teams meeting ID link and display name.
After joining a call, you'll be prompted to give the application permission to access your camera and microphone, if not already authorized. You'll see the main call canvas where the core calling experience lives.
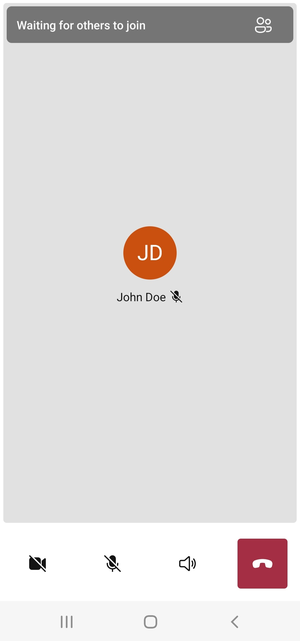
Components of the main calling screen:
- Media Gallery: The main stage where participants are shown. If a participant has their camera enabled, their video feed is shown here. Each participant has an individual tile which shows their display name and video stream (when there is one). The gallery supports multiple participants and is updated when participants are added or removed to the call.
- Action Bar: This is where the primary call controls are located. These controls let you turn your video and microphone on/off, share your screen, and leave the call.
Below you'll find more information on prerequisites and steps to set up the sample.
Prerequisites
- An Azure account with an active subscription. For details, see Create an account for free.
- Android Studio running on your computer
- An Azure Communication Services resource. For details, see Create an Azure Communication Services resource.
- An Azure Function running the Authentication Endpoint to fetch access tokens.
Running sample locally
The group calling sample can be run locally using Android Studio. Developers can either use their physical device or an emulator to test the application.
Before running the sample for the first time
- Open Android Studio and select
Open an Existing Project - Open the
AzureCallingfolder inside downloaded release for the sample. - Expand app/assets to update
appSettings.properties. Set the value for the keycommunicationTokenFetchUrlto be the URL for your Authentication Endpoint set up as a prerequisite.
Run sample
Build and run the sample in Android Studio.
(Optional) Securing an authentication endpoint
For demonstration purposes, this sample uses a publicly accessible endpoint by default to fetch an Azure Communication Services token. For production scenarios, we recommend using your own secured endpoint to provision your own tokens.
With additional configuration, this sample supports connecting to an Microsoft Entra ID (Microsoft Entra ID) protected endpoint so that user login is required for the app to fetch an Azure Communication Services token. See steps below:
Enable Microsoft Entra authentication in your app.
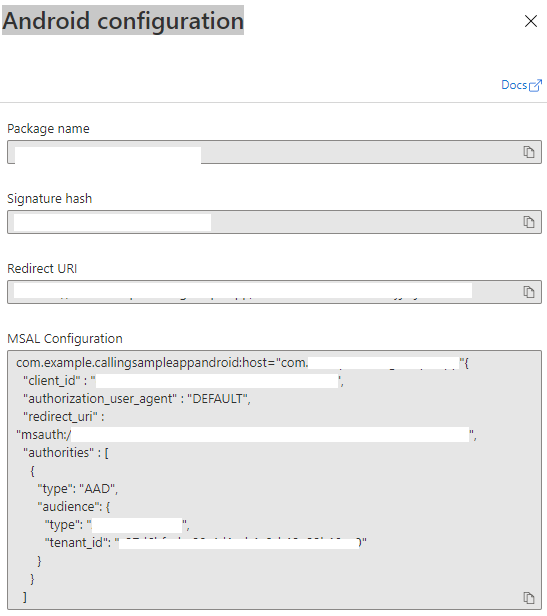
Go to your registered app overview page under Microsoft Entra App Registrations. Take note of the
Package name,Signature hash,MSAL Configutaion.
Edit
AzureCalling/app/src/main/res/raw/auth_config_single_account.jsonand setisAADAuthEnabledto enable Microsoft Entra ID.Edit
AndroidManifest.xmland setandroid:pathto keystore signature hash. (Optional. The current value uses hash from bundled debug.keystore. If different keystore is used, this must be updated.)<activity android:name="com.microsoft.identity.client.BrowserTabActivity"> <intent-filter> <action android:name="android.intent.action.VIEW" /> <category android:name="android.intent.category.DEFAULT" /> <category android:name="android.intent.category.BROWSABLE" /> <data android:host="com.azure.samples.communication.calling" android:path="/Signature hash" <!-- do not remove /. The current hash in AndroidManifest.xml is for debug.keystore. --> android:scheme="msauth" /> </intent-filter> </activity>Copy MSAL Android configuration from Azure portal and paste to
AzureCalling/app/src/main/res/raw/auth_config_single_account.json. Include "account_mode": "SINGLE"{ "client_id": "", "authorization_user_agent": "DEFAULT", "redirect_uri": "", "account_mode" : "SINGLE", "authorities": [ { "type": "AAD", "audience": { "type": "AzureADMyOrg", "tenant_id": "" } } ] }Edit
AzureCalling/app/src/main/res/raw/auth_config_single_account.jsonand set the value for the keycommunicationTokenFetchUrlto be the URL for your secure Authentication Endpoint.Edit
AzureCalling/app/src/main/res/raw/auth_config_single_account.jsonand set the value for the keyaadScopesfromAzure Active DirectoryExpose an APIscopesSet value for
graphURLinAzureCalling/app/assets/appSettings.propertiesas the Graph API endpoint to fetch user information.Edit
AzureCalling/app/src/main/assets/appSettings.propertiesand set the value for the keytenantto enable silent login so that the user does not have to be authenticated again and again while restarting the application.
Clean up resources
If you want to clean up and remove a Communication Services subscription, you can delete the resource or resource group. Deleting the resource group also deletes any other resources associated with it. Learn more about cleaning up resources.
Next steps
For more information, see the following articles:
- Familiarize yourself with using the Calling SDK
- Learn more about how calling works
Additional reading
- Azure Communication GitHub - Find more examples and information on the official GitHub page
- Samples - Find more samples and examples on our samples overview page.
- Azure Communication Calling Features - To learn more about the calling Android sdk -Azure Communication Android Calling SDK
The Azure Communication Services Group Calling Hero Sample for Windows demonstrates how the Communication Services Calling Windows SDK can be used to build a group calling experience that includes voice and video. In this sample, you learn how to set up and run the sample. An overview of the sample is provided for context.
In this quickstart, you learn how to start a 1:1 video call using the Azure Communication Services Calling SDK for Windows.
UWP sample code
Prerequisites
To complete this tutorial, you need the following prerequisites:
An Azure account with an active subscription. Create an account for free.
Install Visual Studio 2022 with Universal Windows Platform development workload.
A deployed Communication Services resource. Create a Communication Services resource. You need to record your connection string for this quickstart.
A User Access Token for your Azure Communication Service. You can also use the Azure CLI and run the command with your connection string to create a user and an access token.
az communication identity token issue --scope voip --connection-string "yourConnectionString"For details, see Use Azure CLI to Create and Manage Access Tokens.
Setting up
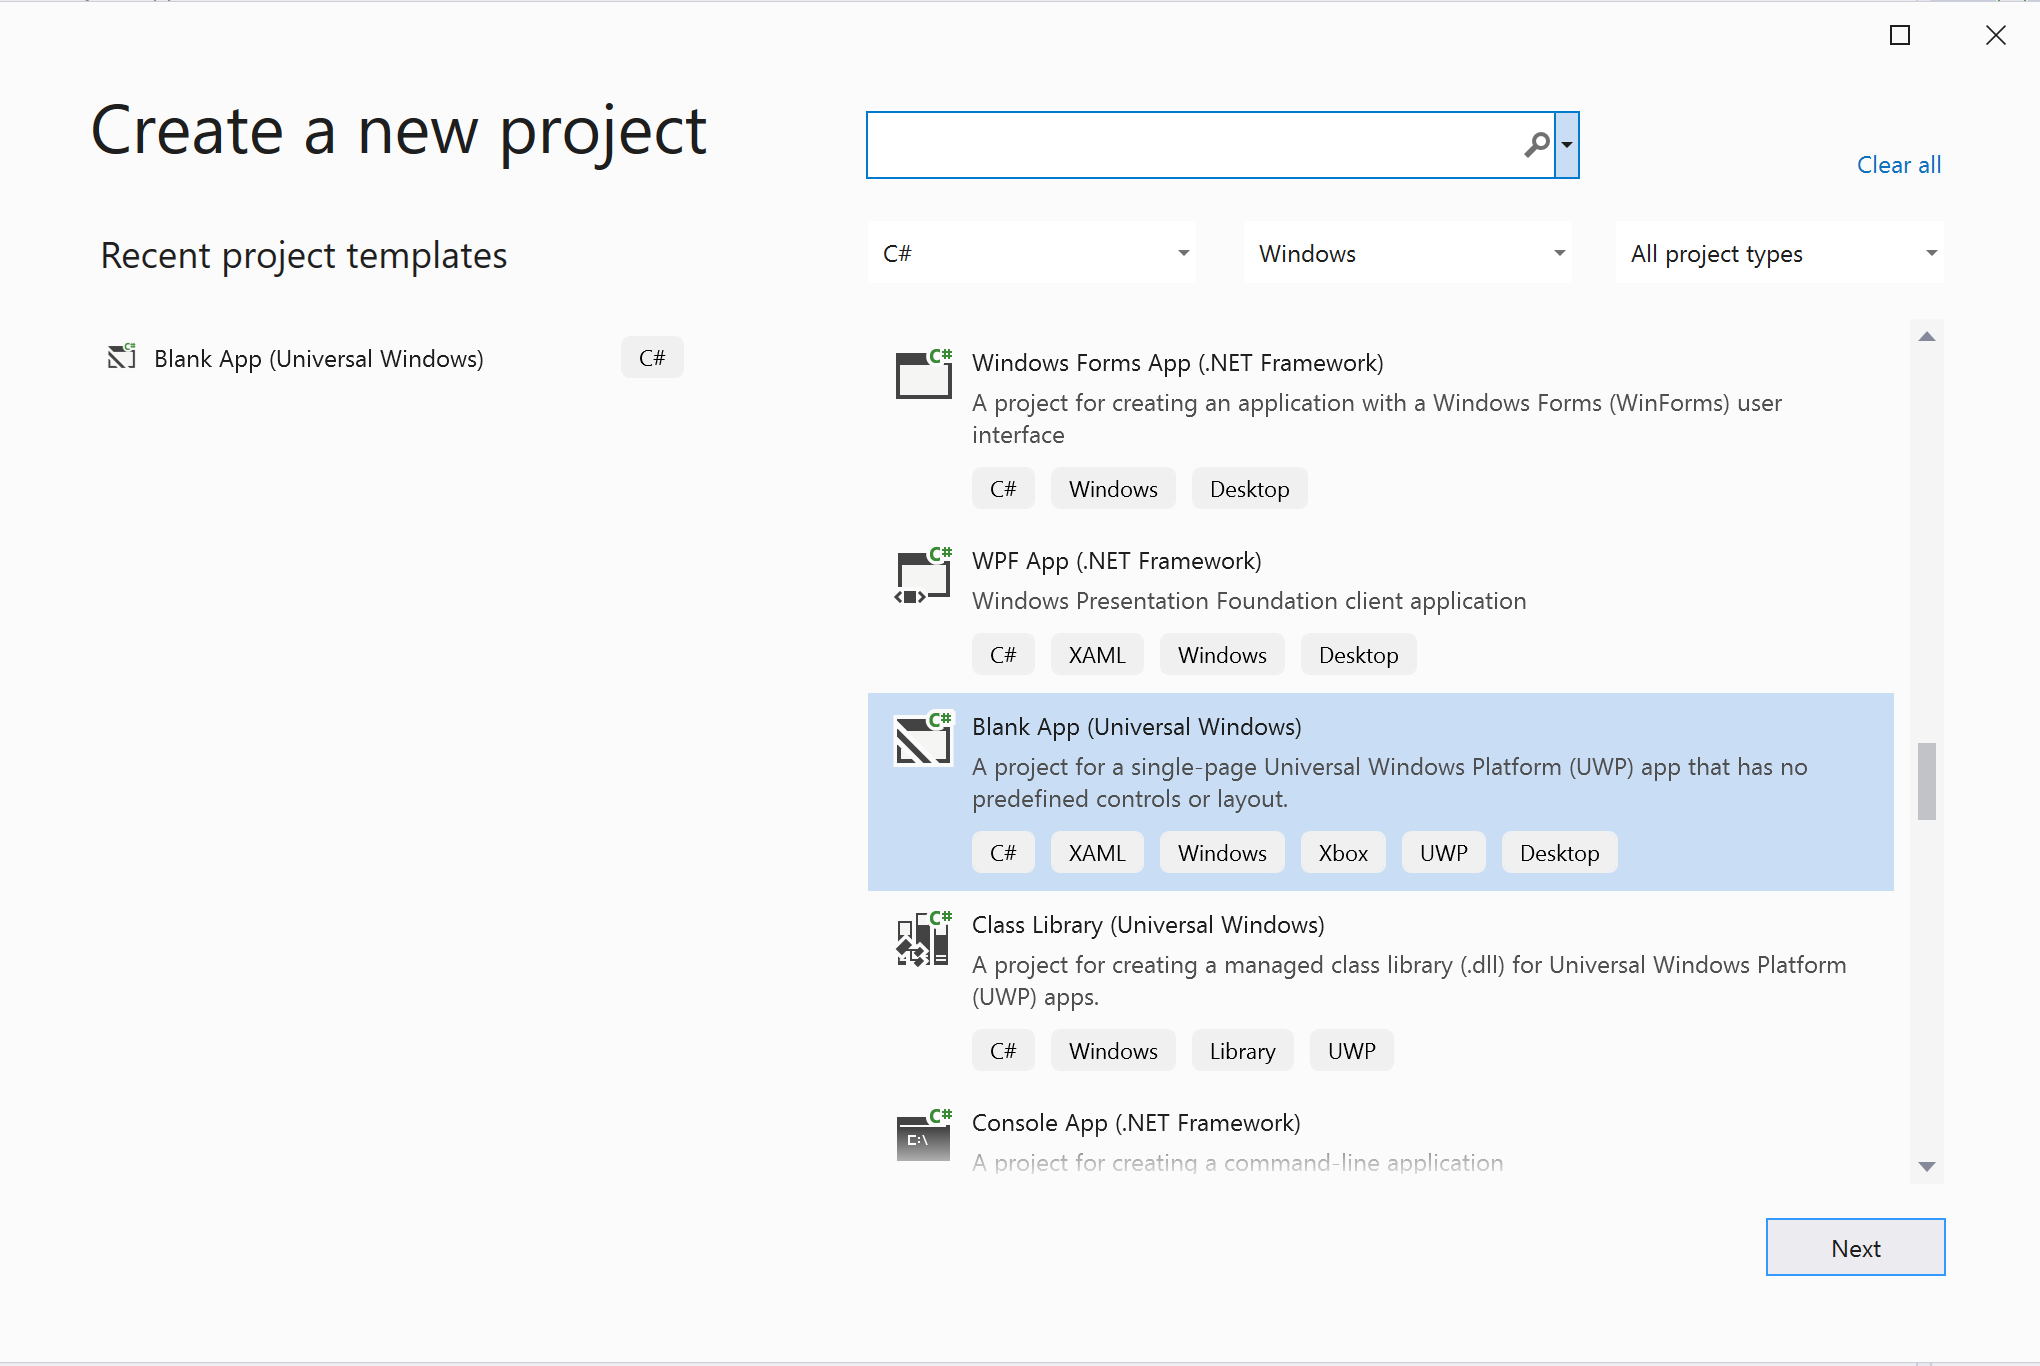
Creating the project
In Visual Studio, create a new project with the Blank App (Universal Windows) template to set up a single-page Universal Windows Platform (UWP) app.
Install the package
Right click your project and go to Manage Nuget Packages to install Azure.Communication.Calling.WindowsClient 1.2.0-beta.1 or superior version. Make sure Include Preleased is checked.
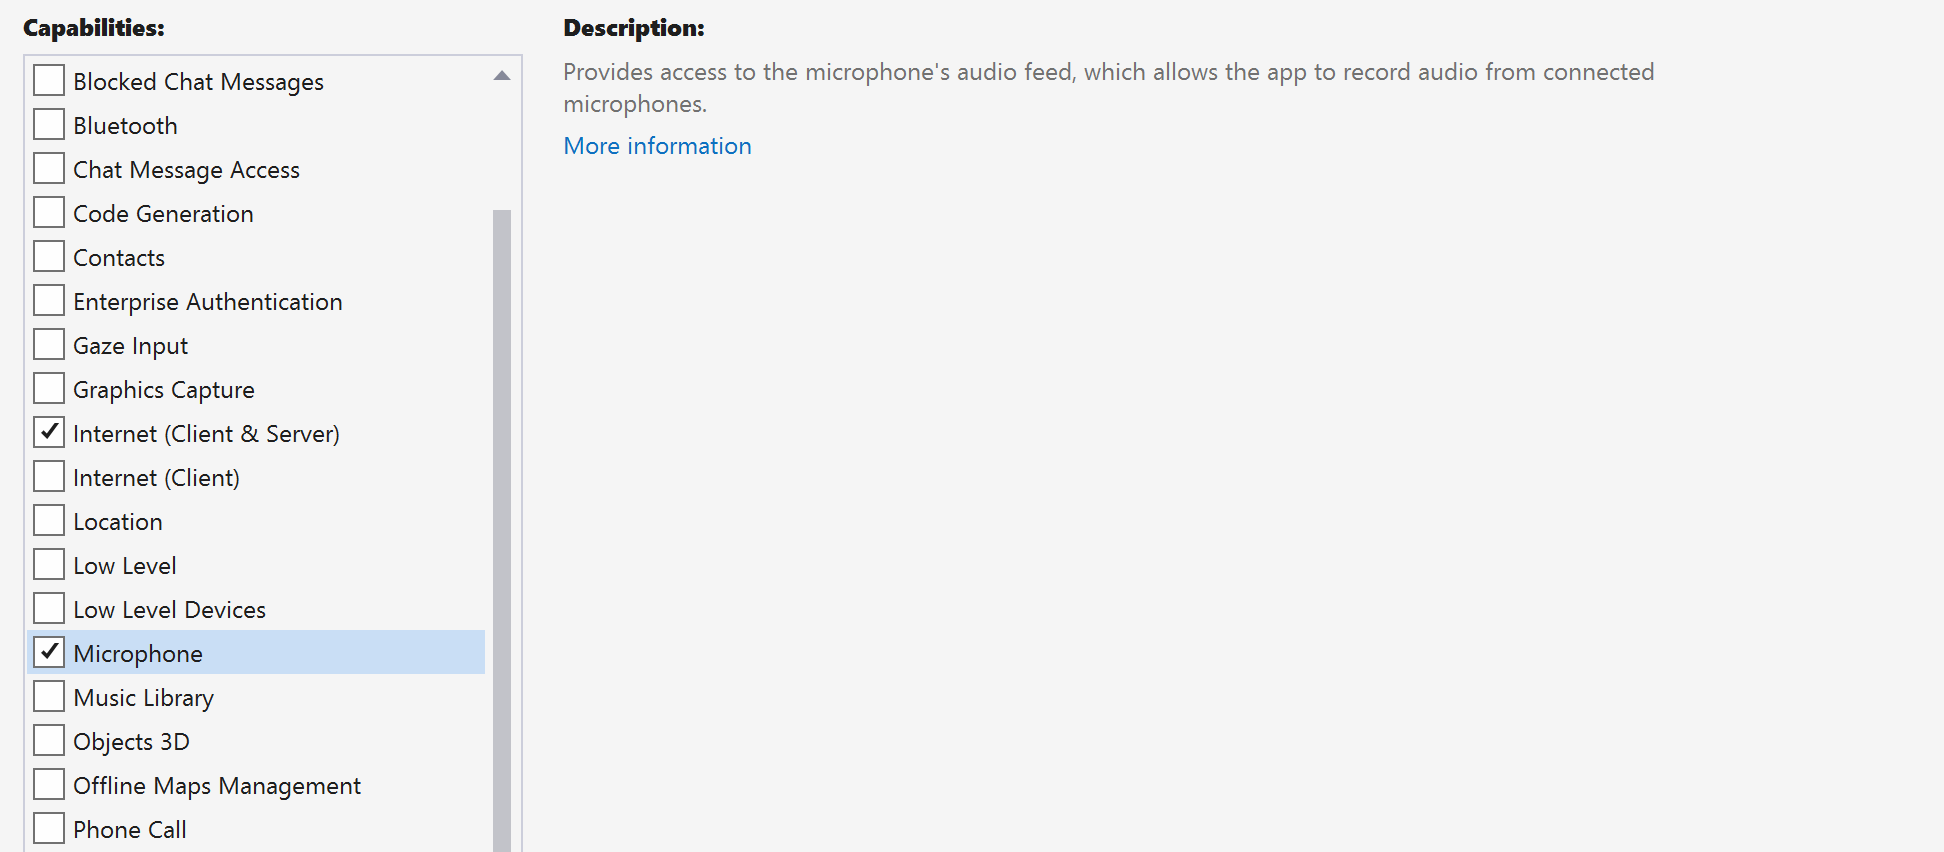
Request access
Go to Package.appxmanifest and click Capabilities.
Check Internet (Client & Server) to gain inbound and outbound access to the Internet.
Check Microphone to access the audio feed of the microphone.
Check WebCam to access the camera of the device.
Add the following code to your Package.appxmanifest by right-clicking and choosing View Code.
<Extensions>
<Extension Category="windows.activatableClass.inProcessServer">
<InProcessServer>
<Path>RtmMvrUap.dll</Path>
<ActivatableClass ActivatableClassId="VideoN.VideoSchemeHandler" ThreadingModel="both" />
</InProcessServer>
</Extension>
</Extensions>
Set up the app framework
We need to configure a basic layout to attach our logic. In order to place an outbound call, we need a TextBox to provide the User ID of the callee. We also need a Start Call button and a Hang Up button.
We also need to preview the local video and render the remote video of the other participant. So we need two elements to display the video streams.
Open the MainPage.xaml of your project and replace the content with following implementation.
<Page
    x:Class="CallingQuickstart.MainPage"
    xmlns="http://schemas.microsoft.com/winfx/2006/xaml/presentation"
    xmlns:x="http://schemas.microsoft.com/winfx/2006/xaml"
    xmlns:local="using:CallingQuickstart"
    xmlns:d="http://schemas.microsoft.com/expression/blend/2008"
    xmlns:mc="http://schemas.openxmlformats.org/markup-compatibility/2006"
    mc:Ignorable="d"
    Background="{ThemeResource ApplicationPageBackgroundThemeBrush}">

    <Grid x:Name="MainGrid" HorizontalAlignment="Stretch">
        <Grid.RowDefinitions>
            <RowDefinition Height="*"/>
            <RowDefinition Height="Auto"/>
            <RowDefinition Height="200*"/>
            <RowDefinition Height="60*"/>
            <RowDefinition Height="Auto"/>
        </Grid.RowDefinitions>

        <Grid Grid.Row="0" x:Name="AppTitleBar" Background="LightSeaGreen">
            <!-- Width of the padding columns is set in LayoutMetricsChanged handler. -->
            <!-- Using padding columns instead of Margin ensures that the background paints the area under the caption control buttons (for transparent buttons). -->
            <TextBlock x:Name="QuickstartTitle" Text="Calling Quickstart sample title bar" Style="{StaticResource CaptionTextBlockStyle}" Padding="4,4,0,0"/>
        </Grid>

        <TextBox Grid.Row="1" x:Name="CalleeTextBox" PlaceholderText="Who would you like to call?" TextWrapping="Wrap" VerticalAlignment="Center" />

        <Grid Grid.Row="2" Background="LightGray">
            <Grid.RowDefinitions>
                <RowDefinition/>
            </Grid.RowDefinitions>
            <Grid.ColumnDefinitions>
                <ColumnDefinition Width="*"/>
                <ColumnDefinition Width="*"/>
            </Grid.ColumnDefinitions>
            <MediaPlayerElement x:Name="LocalVideo" HorizontalAlignment="Center" Stretch="UniformToFill" Grid.Column="0" VerticalAlignment="Center" AutoPlay="True" />
            <MediaPlayerElement x:Name="RemoteVideo" HorizontalAlignment="Center" Stretch="UniformToFill" Grid.Column="1" VerticalAlignment="Center" AutoPlay="True" />
        </Grid>
        <StackPanel Grid.Row="3" Orientation="Vertical" Grid.RowSpan="2">
            <StackPanel Orientation="Horizontal" Margin="10">
                <TextBlock VerticalAlignment="Center">Cameras:</TextBlock>
                <ComboBox x:Name="CameraList" HorizontalAlignment="Left" Grid.Column="0" DisplayMemberPath="Name" SelectionChanged="CameraList_SelectionChanged" Margin="10"/>
            </StackPanel>
            <StackPanel Orientation="Horizontal">
                <Button x:Name="CallButton" Content="Start/Join call" Click="CallButton_Click" VerticalAlignment="Center" Margin="10,0,0,0" Height="40" Width="123"/>
                <Button x:Name="HangupButton" Content="Hang up" Click="HangupButton_Click" VerticalAlignment="Center" Margin="10,0,0,0" Height="40" Width="123"/>
                <CheckBox x:Name="MuteLocal" Content="Mute" Margin="10,0,0,0" Click="MuteLocal_Click" Width="74"/>
                <CheckBox x:Name="BackgroundBlur" Content="Background blur" Width="142" Margin="10,0,0,0" Click="BackgroundBlur_Click"/>
            </StackPanel>
        </StackPanel>
        <TextBox Grid.Row="4" x:Name="Stats" Text="" TextWrapping="Wrap" VerticalAlignment="Center" Height="30" Margin="0,2,0,0" BorderThickness="2" IsReadOnly="True" Foreground="LightSlateGray" />
    </Grid>
</Page>
Open to App.xaml.cs (right click and choose View Code) and add this line to the top:
using CallingQuickstart;
Open the MainPage.xaml.cs (right click and choose View Code) and replace the content with following implementation:
using Azure.Communication.Calling.WindowsClient;
using System;
using System.Collections.Generic;
using System.Linq;
using System.Threading.Tasks;
using Windows.ApplicationModel;
using Windows.ApplicationModel.Core;
using Windows.Media.Core;
using Windows.Networking.PushNotifications;
using Windows.UI;
using Windows.UI.ViewManagement;
using Windows.UI.Xaml;
using Windows.UI.Xaml.Controls;
using Windows.UI.Xaml.Media;
using Windows.UI.Xaml.Navigation;

namespace CallingQuickstart
{
    public sealed partial class MainPage : Page
    {
        private const string authToken = "<Azure Communication Services auth token>";

        private CallClient callClient;
        private CallTokenRefreshOptions callTokenRefreshOptions;
        private CallAgent callAgent;
        private CommunicationCall call = null;

        private LocalOutgoingAudioStream micStream;
        private LocalOutgoingVideoStream cameraStream;

        #region Page initialization
        public MainPage()
        {
            this.InitializeComponent();

            // Hide default title bar.
            var coreTitleBar = CoreApplication.GetCurrentView().TitleBar;
            coreTitleBar.ExtendViewIntoTitleBar = true;

            QuickstartTitle.Text = $"{Package.Current.DisplayName} - Ready";
            Window.Current.SetTitleBar(AppTitleBar);

            CallButton.IsEnabled = true;
            HangupButton.IsEnabled = !CallButton.IsEnabled;
            MuteLocal.IsChecked = MuteLocal.IsEnabled = !CallButton.IsEnabled;

            ApplicationView.PreferredLaunchViewSize = new Windows.Foundation.Size(800, 600);
            ApplicationView.PreferredLaunchWindowingMode = ApplicationViewWindowingMode.PreferredLaunchViewSize;
        }

        protected override async void OnNavigatedTo(NavigationEventArgs e)
        {
            await InitCallAgentAndDeviceManagerAsync();

            base.OnNavigatedTo(e);
        }
#endregion

        private async Task InitCallAgentAndDeviceManagerAsync()
        {
            // Initialize call agent and Device Manager
        }

        private async void Agent_OnIncomingCallAsync(object sender, IncomingCall incomingCall)
        {
            // Accept an incoming call
        }

        private async void CallButton_Click(object sender, RoutedEventArgs e)
        {
            // Start a call with video
        }

        private async void HangupButton_Click(object sender, RoutedEventArgs e)
        {
            // End the current call
        }

        private async void Call_OnStateChangedAsync(object sender, PropertyChangedEventArgs args)
        {
            var call = sender as CommunicationCall;

            if (call != null)
            {
                var state = call.State;

                await Dispatcher.RunAsync(Windows.UI.Core.CoreDispatcherPriority.Normal, () =>
                {
                    QuickstartTitle.Text = $"{Package.Current.DisplayName} - {state.ToString()}";
                    Window.Current.SetTitleBar(AppTitleBar);

                    HangupButton.IsEnabled = state == CallState.Connected || state == CallState.Ringing;
                    CallButton.IsEnabled = !HangupButton.IsEnabled;
                    MuteLocal.IsEnabled = !CallButton.IsEnabled;
                });

                switch (state)
                {
                    case CallState.Connected:
                        {
                            break;
                        }
                    case CallState.Disconnected:
                        {
                            break;
                        }
                    default: break;
                }
            }
        }

        private async void CameraList_SelectionChanged(object sender, SelectionChangedEventArgs e)
        {
            // Handle camera selection
        }
    }
}
Object model
The following classes and interfaces handle some of the major features of the Azure Communication Services Calling SDK:
| Name | Description |
|---|---|
CallClient |
The CallClient is the main entry point to the Calling client library. |
CallAgent |
The CallAgent is used to start and join calls. |
CommunicationCall |
The CommunicationCall is used to manage placed or joined calls. |
CallTokenCredential |
The CallTokenCredential is used as the token credential to instantiate the CallAgent. |
CommunicationUserIdentifier |
The CommunicationUserIdentifier is used to represent the identity of the user, which can be one of the following options: CommunicationUserIdentifier, PhoneNumberIdentifier or CallingApplication. |
Authenticate the client
To initialize a CallAgent, you need a User Access Token. Generally this token is generated from a service with authentication specific to the application. For more information on user access tokens, check the User Access Tokens guide.
For the quickstart, replace <AUTHENTICATION_TOKEN> with a user access token generated for your Azure Communication Service resource.
Once you have a token, initialize a CallAgent instance with it, which enable us to make and receive calls. In order to access the cameras on the device, we also need to get Device Manager instance.
Add the following code to the InitCallAgentAndDeviceManagerAsync function.
this.callClient = new CallClient(new CallClientOptions() {
    Diagnostics = new CallDiagnosticsOptions() {
        AppName = "CallingQuickstart",
        AppVersion="1.0",
        Tags = new[] { "Calling", "ACS", "Windows" }
        }
    });

// Set up local video stream using the first camera enumerated
var deviceManager = await this.callClient.GetDeviceManagerAsync();
var camera = deviceManager?.Cameras?.FirstOrDefault();
var mic = deviceManager?.Microphones?.FirstOrDefault();
micStream = new LocalOutgoingAudioStream();

CameraList.ItemsSource = deviceManager.Cameras.ToList();

if (camera != null)
{
    CameraList.SelectedIndex = 0;
}

callTokenRefreshOptions = new CallTokenRefreshOptions(false);
callTokenRefreshOptions.TokenRefreshRequested += OnTokenRefreshRequestedAsync;

var tokenCredential = new CallTokenCredential(authToken, callTokenRefreshOptions);

var callAgentOptions = new CallAgentOptions()
{
    DisplayName = "Contoso",
    //https://github.com/lukes/ISO-3166-Countries-with-Regional-Codes/blob/master/all/all.csv
    EmergencyCallOptions = new EmergencyCallOptions() { CountryCode = "840" }
};


try
{
    this.callAgent = await this.callClient.CreateCallAgentAsync(tokenCredential, callAgentOptions);
    //await this.callAgent.RegisterForPushNotificationAsync(await this.RegisterWNS());
    this.callAgent.CallsUpdated += OnCallsUpdatedAsync;
    this.callAgent.IncomingCallReceived += OnIncomingCallAsync;

}
catch(Exception ex)
{
    if (ex.HResult == -2147024809)
    {
        // E_INVALIDARG
        // Handle possible invalid token
    }
}
Start a call with video
Add the implementation to the CallButton_Click to start a call with video. We need to enumerate the cameras with device manager instance and construct LocalOutgoingVideoStream. We need to set the VideoOptions with LocalVideoStream and pass it with startCallOptions to set initial options for the call. By attaching LocalOutgoingVideoStream to a MediaElement, we can see the preview of the local video.
var callString = CalleeTextBox.Text.Trim();

if (!string.IsNullOrEmpty(callString))
{
    if (callString.StartsWith("8:")) // 1:1 Azure Communication Services call
    {
        call = await StartAcsCallAsync(callString);
    }
    else if (callString.StartsWith("+")) // 1:1 phone call
    {
        call = await StartPhoneCallAsync(callString, "+12133947338");
    }
    else if (Guid.TryParse(callString, out Guid groupId))// Join group call by group guid
    {
        call = await JoinGroupCallByIdAsync(groupId);
    }
    else if (Uri.TryCreate(callString, UriKind.Absolute, out Uri teamsMeetinglink)) //Teams meeting link
    {
        call = await JoinTeamsMeetingByLinkAsync(teamsMeetinglink);
    }
}

if (call != null)
{
    call.RemoteParticipantsUpdated += OnRemoteParticipantsUpdatedAsync;
    call.StateChanged += OnStateChangedAsync;
}
Add the methods to start or join the different types of Call (1:1 Azure Communication Services call, 1:1 phone call, Azure Communication Services Group call, Teams meeting join, etc.).
private async Task<CommunicationCall> StartAcsCallAsync(string acsCallee)
{
    var options = await GetStartCallOptionsAsynnc();
    var call = await this.callAgent.StartCallAsync( new [] { new UserCallIdentifier(acsCallee) }, options);
    return call;
}

private async Task<CommunicationCall> StartPhoneCallAsync(string acsCallee, string alternateCallerId)
{
    var options = await GetStartCallOptionsAsynnc();
    options.AlternateCallerId = new PhoneNumberCallIdentifier(alternateCallerId);

    var call = await this.callAgent.StartCallAsync( new [] { new PhoneNumberCallIdentifier(acsCallee) }, options);
    return call;
}

private async Task<CommunicationCall> JoinGroupCallByIdAsync(Guid groupId)
{
    var joinCallOptions = await GetJoinCallOptionsAsync();

    var groupCallLocator = new GroupCallLocator(groupId);
    var call = await this.callAgent.JoinAsync(groupCallLocator, joinCallOptions);
    return call;
}

private async Task<CommunicationCall> JoinTeamsMeetingByLinkAsync(Uri teamsCallLink)
{
    var joinCallOptions = await GetJoinCallOptionsAsync();

    var teamsMeetingLinkLocator = new TeamsMeetingLinkLocator(teamsCallLink.AbsoluteUri);
    var call = await callAgent.JoinAsync(teamsMeetingLinkLocator, joinCallOptions);
    return call;
}

private async Task<StartCallOptions> GetStartCallOptionsAsynnc()
{
    return new StartCallOptions() {
        OutgoingAudioOptions = new OutgoingAudioOptions() { IsOutgoingAudioMuted = true, OutgoingAudioStream = micStream  },
        OutgoingVideoOptions = new OutgoingVideoOptions() { OutgoingVideoStreams = new OutgoingVideoStream[] { cameraStream } }
    };
}

private async Task<JoinCallOptions> GetJoinCallOptionsAsync()
{
    return new JoinCallOptions() {
        OutgoingAudioOptions = new OutgoingAudioOptions() { IsOutgoingAudioMuted = true },
        OutgoingVideoOptions = new OutgoingVideoOptions() { OutgoingVideoStreams = new OutgoingVideoStream[] { cameraStream } }
    };
}
Add the code to create the LocalVideoStream depending on the selected camera on the CameraList_SelectionChanged method.
var selectedCamerea = CameraList.SelectedItem as VideoDeviceDetails;
cameraStream = new LocalOutgoingVideoStream(selectedCamerea);

 var localUri = await cameraStream.StartPreviewAsync();
await Dispatcher.RunAsync(Windows.UI.Core.CoreDispatcherPriority.Normal, () =>
{
    LocalVideo.Source = MediaSource.CreateFromUri(localUri);
});

if (call != null)
{
    await call?.StartVideoAsync(cameraStream);
}
Accept an incoming call
Add the implementation to the OnIncomingCallAsync to answer an incoming call with video, pass the LocalVideoStream to acceptCallOptions.
var incomingCall = args.IncomingCall;

var acceptCallOptions = new AcceptCallOptions() {
    IncomingVideoOptions = new IncomingVideoOptions()
    {
        IncomingVideoStreamKind = VideoStreamKind.RemoteIncoming
    }
};

_ = await incomingCall.AcceptAsync(acceptCallOptions);
Remote participant and remote video streams
All remote participants are available through the RemoteParticipants collection on a call instance. Once the call is connected, we can access the remote participants of the call and handle the remote video streams.
private async void Call_OnVideoStreamsUpdatedAsync(object sender, RemoteVideoStreamsEventArgs args)
{
    foreach (var remoteVideoStream in args.AddedRemoteVideoStreams)
    {
        await Dispatcher.RunAsync(Windows.UI.Core.CoreDispatcherPriority.Normal, async () =>
        {
            RemoteVideo.Source = await remoteVideoStream.Start();
        });
    }

    foreach (var remoteVideoStream in args.RemovedRemoteVideoStreams)
    {
        remoteVideoStream.Stop();
    }
}

private async void Agent_OnCallsUpdatedAsync(object sender, CallsUpdatedEventArgs args)
{
    var removedParticipants = new List<RemoteParticipant>();
    var addedParticipants = new List<RemoteParticipant>();

    foreach(var call in args.RemovedCalls)
    {
        removedParticipants.AddRange(call.RemoteParticipants.ToList<RemoteParticipant>());
    }

    foreach (var call in args.AddedCalls)
    {
        addedParticipants.AddRange(call.RemoteParticipants.ToList<RemoteParticipant>());
    }

    await OnParticipantChangedAsync(removedParticipants, addedParticipants);
}

private async Task OnParticipantChangedAsync(IEnumerable<RemoteParticipant> removedParticipants, IEnumerable<RemoteParticipant> addedParticipants)
{
    foreach (var participant in removedParticipants)
    {
        foreach(var incomingVideoStream in  participant.IncomingVideoStreams)
        {
            var remoteVideoStream = incomingVideoStream as RemoteIncomingVideoStream;
            if (remoteVideoStream != null)
            {
                await remoteVideoStream.StopPreviewAsync();
            }
        }
        participant.VideoStreamStateChanged -= OnVideoStreamStateChanged;
    }

    foreach (var participant in addedParticipants)
    {
        participant.VideoStreamStateChanged += OnVideoStreamStateChanged;
    }
}

private void OnVideoStreamStateChanged(object sender, VideoStreamStateChangedEventArgs e)
{
    CallVideoStream callVideoStream = e.CallVideoStream;

    switch (callVideoStream.StreamDirection)
    {
        case StreamDirection.Outgoing:
            OnOutgoingVideoStreamStateChanged(callVideoStream as OutgoingVideoStream);
            break;
        case StreamDirection.Incoming:
            OnIncomingVideoStreamStateChanged(callVideoStream as IncomingVideoStream);
            break;
    }
}

private async void OnIncomingVideoStreamStateChanged(IncomingVideoStream incomingVideoStream)
{
    switch (incomingVideoStream.State)
    {
        case VideoStreamState.Available:
        {
            switch (incomingVideoStream.Kind)
            {
                case VideoStreamKind.RemoteIncoming:
                    var remoteVideoStream = incomingVideoStream as RemoteIncomingVideoStream;
                    var uri = await remoteVideoStream.StartPreviewAsync();

                    await Dispatcher.RunAsync(Windows.UI.Core.CoreDispatcherPriority.Normal, () =>
                    {
                        RemoteVideo.Source = MediaSource.CreateFromUri(uri);
                    });
                    break;

                case VideoStreamKind.RawIncoming:
                    break;
            }
            break;
        }
        case VideoStreamState.Started:
            break;
        case VideoStreamState.Stopping:
            break;
        case VideoStreamState.Stopped:
            if (incomingVideoStream.Kind == VideoStreamKind.RemoteIncoming)
            {
                var remoteVideoStream = incomingVideoStream as RemoteIncomingVideoStream;
                await remoteVideoStream.StopPreviewAsync();
            }
            break;
        case VideoStreamState.NotAvailable:
            break;
    }

}
Render remote videos
For each remote video stream, attach it to the MediaElement.
private async Task AddVideoStreamsAsync(IReadOnlyList<RemoteVideoStream> remoteVideoStreams)
{
    foreach (var remoteVideoStream in remoteVideoStreams)
    {
        var remoteUri = await remoteVideoStream.Start();

        await Dispatcher.RunAsync(Windows.UI.Core.CoreDispatcherPriority.Normal, () =>
        {
            RemoteVideo.Source = remoteUri;
            RemoteVideo.Play();
        });
    }
}
Call state update
We need to clean the video renderers once the call is disconnected and handle the case when the remote participants initially join the call.
private async void Call_OnStateChanged(object sender, PropertyChangedEventArgs args)
{
    switch (((Call)sender).State)
    {
        case CallState.Disconnected:
            await Dispatcher.RunAsync(Windows.UI.Core.CoreDispatcherPriority.Normal, () =>
            {
                LocalVideo.Source = null;
                RemoteVideo.Source = null;
            });
            break;

        case CallState.Connected:
            foreach (var remoteParticipant in call.RemoteParticipants)
            {
                String remoteParticipantMRI = remoteParticipant.Identifier.ToString();
                remoteParticipantDictionary.TryAdd(remoteParticipantMRI, remoteParticipant);
                await AddVideoStreams(remoteParticipant.VideoStreams);
                remoteParticipant.OnVideoStreamsUpdated += Call_OnVideoStreamsUpdated;
            }
            break;

        default:
            break;
    }
}
End a call
End the current call when the Hang Up button is clicked. Add the implementation to the HangupButton_Click to end a call with the callAgent we created, and tear down the participant update and call state event handlers.
var call = this.callAgent?.Calls?.FirstOrDefault();
if (call != null)
{
    try
    {
        await call.HangUpAsync(new HangUpOptions() { ForEveryone = true });
    }
    catch(Exception ex)
    {
    }
}
Run the code
You can build and run the code on Visual Studio. For solution platforms, we support ARM64, x64 and x86.
You can make an outbound video call by providing a user ID in the text field and clicking the Start Call button.
Note: Calling 8:echo123 stops the video stream because echo bot doesn't support video streaming.
For more information on user IDs (identity) check the User Access Tokens guide.
WinUI 3 sample code
Prerequisites
To complete this tutorial, you need the following prerequisites:
An Azure account with an active subscription. Create an account for free.
Install Visual Studio 2022 and Windows App SDK version 1.2 preview 2.
Basic understanding of how to create a WinUI 3 app. Create your first WinUI 3 (Windows App SDK) project is a good resource to start with.
A deployed Communication Services resource. Create a Communication Services resource. You need to record your connection string for this quickstart.
A User Access Token for your Azure Communication Service. You can also use the Azure CLI and run the command with your connection string to create a user and an access token.
az communication identity token issue --scope voip --connection-string "yourConnectionString"For details, see Use Azure CLI to Create and Manage Access Tokens.
Setting up
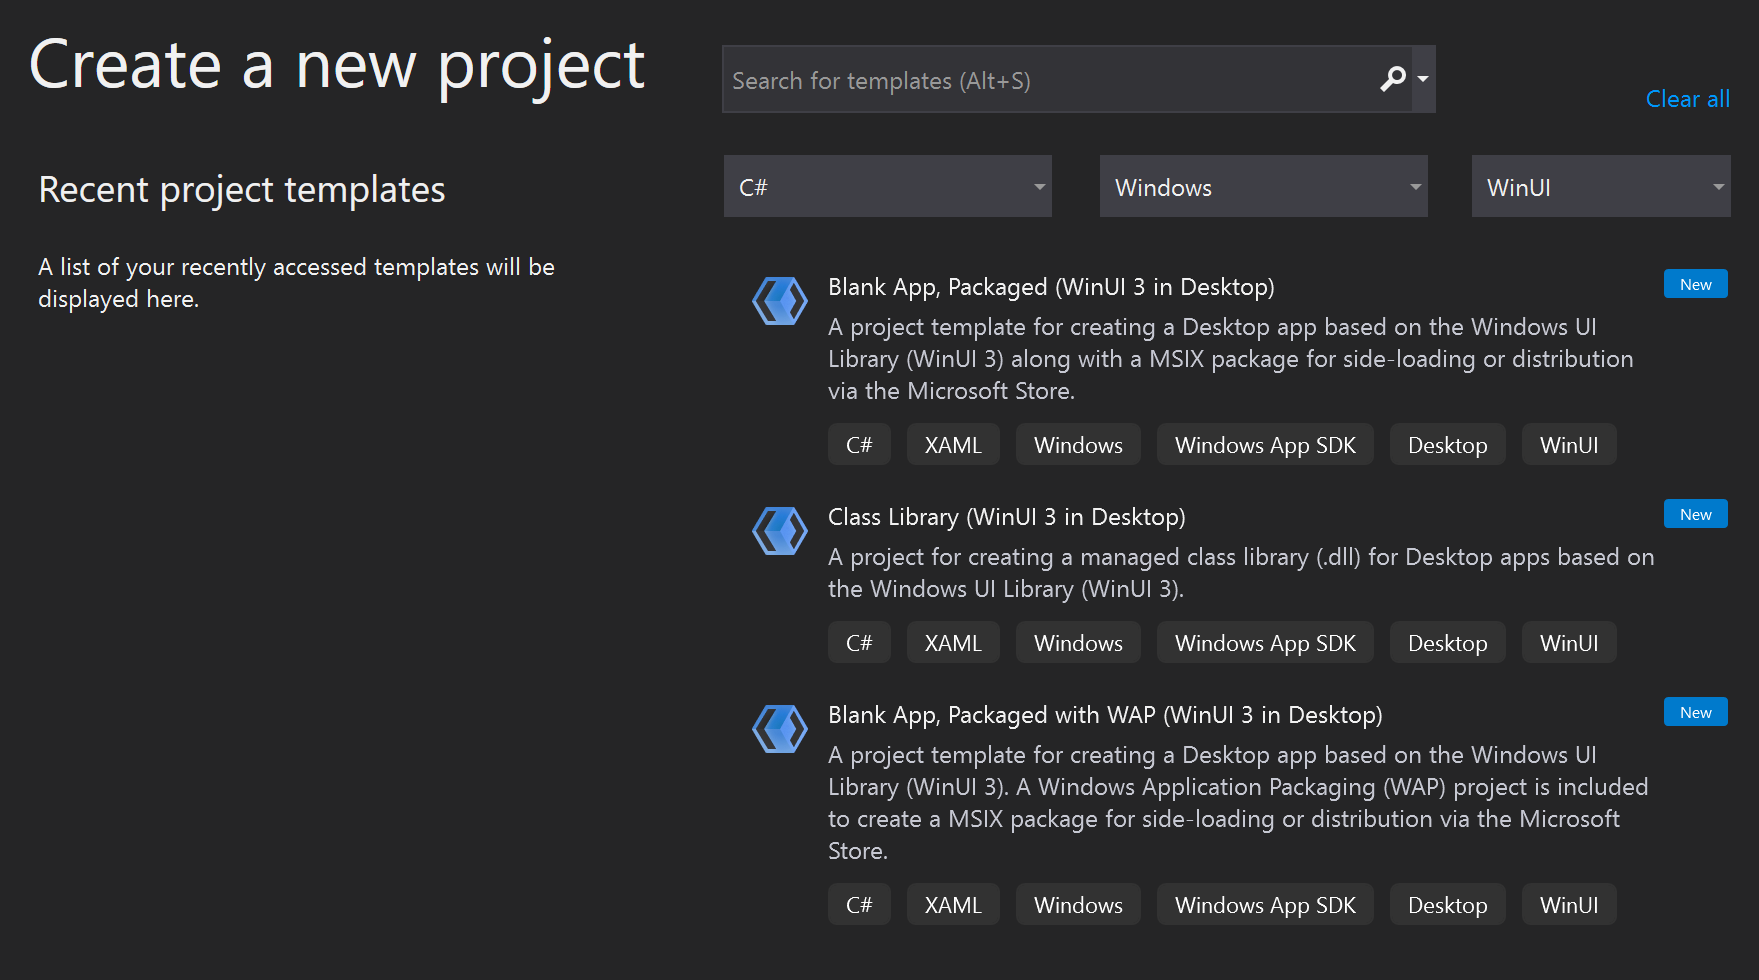
Creating the project
In Visual Studio, create a new project with the Blank App, Packaged (WinUI 3 in Desktop) template to set up a single-page WinUI 3 app.
Install the package
Right click your project and go to Manage Nuget Packages to install Azure.Communication.Calling.WindowsClient 1.0.0 or superior version. Make sure Include Preleased is checked.
Request access
Add the following code to your app.manifest:
<file name="RtmMvrMf.dll">
    <activatableClass name="VideoN.VideoSchemeHandler" threadingModel="both" xmlns="urn:schemas-microsoft-com:winrt.v1" />
</file>
Set up the app framework
We need to configure a basic layout to attach our logic. In order to place an outbound call, we need a TextBox to provide the User ID of the callee. We also need a Start Call button and a Hang Up button.
We also need to preview the local video and render the remote video of the other participant. So we need two elements to display the video streams.
Open the MainWindow.xaml of your project and replace the content with following implementation.
<Page
    x:Class="CallingQuickstart.MainPage"
    xmlns="http://schemas.microsoft.com/winfx/2006/xaml/presentation"
    xmlns:x="http://schemas.microsoft.com/winfx/2006/xaml"
    xmlns:local="using:CallingQuickstart"
    xmlns:d="http://schemas.microsoft.com/expression/blend/2008"
    xmlns:mc="http://schemas.openxmlformats.org/markup-compatibility/2006"
    mc:Ignorable="d">

    <Grid x:Name="MainGrid">
        <Grid.RowDefinitions>
            <RowDefinition Height="32"/>
            <RowDefinition Height="Auto"/>
            <RowDefinition Height="200*"/>
            <RowDefinition Height="60*"/>
            <RowDefinition Height="Auto"/>
        </Grid.RowDefinitions>

        <Grid Grid.Row="0" x:Name="AppTitleBar" Background="LightSeaGreen">
            <!-- Width of the padding columns is set in LayoutMetricsChanged handler. -->
            <!-- Using padding columns instead of Margin ensures that the background paints the area under the caption control buttons (for transparent buttons). -->
            <TextBlock x:Name="QuickstartTitle" Text="Calling Quickstart sample title bar" Style="{StaticResource CaptionTextBlockStyle}" Padding="4,4,0,0"/>
        </Grid>

        <TextBox Grid.Row="1" x:Name="CalleeTextBox" PlaceholderText="Who would you like to call?" TextWrapping="Wrap" VerticalAlignment="Center" />

        <Grid Grid.Row="2" Background="LightGray">
            <Grid.RowDefinitions>
                <RowDefinition/>
            </Grid.RowDefinitions>
            <Grid.ColumnDefinitions>
                <ColumnDefinition Width="*"/>
                <ColumnDefinition Width="*"/>
            </Grid.ColumnDefinitions>
            <MediaPlayerElement x:Name="LocalVideo" HorizontalAlignment="Center" Stretch="UniformToFill" Grid.Column="0" VerticalAlignment="Center" AutoPlay="True" />
            <MediaPlayerElement x:Name="RemoteVideo" HorizontalAlignment="Center" Stretch="UniformToFill" Grid.Column="1" VerticalAlignment="Center" AutoPlay="True" />
        </Grid>
        <StackPanel Grid.Row="3" Orientation="Vertical" Grid.RowSpan="2">
            <StackPanel Orientation="Horizontal" Margin="10">
                <TextBlock VerticalAlignment="Center">Cameras:</TextBlock>
                <ComboBox x:Name="CameraList" HorizontalAlignment="Left" Grid.Column="0" DisplayMemberPath="Name" SelectionChanged="CameraList_SelectionChanged" Margin="10"/>
            </StackPanel>
            <StackPanel Orientation="Horizontal">
                <Button x:Name="CallButton" Content="Start/Join call" Click="CallButton_Click" VerticalAlignment="Center" Margin="10,0,0,0" Height="40" Width="123"/>
                <Button x:Name="HangupButton" Content="Hang up" Click="HangupButton_Click" VerticalAlignment="Center" Margin="10,0,0,0" Height="40" Width="123"/>
                <CheckBox x:Name="MuteLocal" Content="Mute" Margin="10,0,0,0" Click="MuteLocal_Click" Width="74"/>
                <CheckBox x:Name="BackgroundBlur" Content="Background blur" Width="142" Margin="10,0,0,0" Click="BackgroundBlur_Click"/>
            </StackPanel>
        </StackPanel>
        <TextBox Grid.Row="4" x:Name="Stats" Text="" TextWrapping="Wrap" VerticalAlignment="Center" Height="30" Margin="0,2,0,0" BorderThickness="2" IsReadOnly="True" Foreground="LightSlateGray" />
    </Grid>
</Page>
Open to App.xaml.cs (right click and choose View Code) and add this line to the top:
using CallingQuickstart;
Open the MainWindow.xaml.cs (right click and choose View Code) and replace the content with following implementation:
using Azure.Communication.Calling.WindowsClient;
using Azure.WinRT.Communication;
using Microsoft.UI.Xaml;
using System;
using System.Collections.Generic;
using System.Linq;
using System.Threading.Tasks;
using Windows.Media.Core;

namespace CallingQuickstart
{
    public sealed partial class MainWindow : Window
    {
        CallAgent callAgent;
        Call call;
        DeviceManager deviceManager;
        Dictionary<string, RemoteParticipant> remoteParticipantDictionary = new Dictionary<string, RemoteParticipant>();

        public MainWindow()
        {
            this.InitializeComponent();
            Task.Run(() => this.InitCallAgentAndDeviceManagerAsync()).Wait();
        }

        private async Task InitCallAgentAndDeviceManagerAsync()
        {
            // Initialize call agent and Device Manager
        }

        private async void Agent_OnIncomingCallAsync(object sender, IncomingCall incomingCall)
        {
            // Accept an incoming call
        }

        private async void CallButton_Click(object sender, RoutedEventArgs e)
        {
            // Start a call with video
        }

        private async void HangupButton_Click(object sender, RoutedEventArgs e)
        {
            // End the current call
        }

        private async void Call_OnStateChangedAsync(object sender, PropertyChangedEventArgs args)
        {
            var state = (sender as Call)?.State;
            this.DispatcherQueue.TryEnqueue(() => {
                State.Text = state.ToString();
            });
        }
    }
}
Object model
The following classes and interfaces handle some of the major features of the Azure Communication Services Calling SDK:
| Name | Description |
|---|---|
CallClient |
The CallClient is the main entry point to the Calling client library. |
CallAgent |
The CallAgent is used to start and join calls. |
CommunicationCall |
The CommunicationCall is used to manage placed or joined calls. |
CallTokenCredential |
The CallTokenCredential is used as the token credential to instantiate the CallAgent. |
CommunicationUserIdentifier |
The CommunicationUserIdentifier is used to represent the identity of the user, which can be one of the following options: CommunicationUserIdentifier, PhoneNumberIdentifier or CallingApplication. |
Authenticate the client
To initialize a CallAgent, you need a User Access Token. Generally this token is generated from a service with authentication specific to the application. For more information on user access tokens, check the User Access Tokens guide.
For the quickstart, replace <AUTHENTICATION_TOKEN> with a user access token generated for your Azure Communication Service resource.
Once you have a token initialize a CallAgent instance with it, which enable us to make and receive calls. In order to access the cameras on the device, we also need to get Device Manager instance.
Add the following code to the InitCallAgentAndDeviceManagerAsync function.
var callClient = new CallClient();
this.deviceManager = await callClient.GetDeviceManagerAsync();

var tokenCredential = new CallTokenCredential("<AUTHENTICATION_TOKEN>");
var callAgentOptions = new CallAgentOptions()
{
    DisplayName = "<DISPLAY_NAME>"
};

this.callAgent = await callClient.CreateCallAgentAsync(tokenCredential, callAgentOptions);
this.callAgent.OnCallsUpdated += Agent_OnCallsUpdatedAsync;
this.callAgent.OnIncomingCall += Agent_OnIncomingCallAsync;
Start a call with video
Add the implementation to the CallButton_Click to start a call with video. We need to enumerate the cameras with device manager instance and construct LocalVideoStream. We need to set the VideoOptions with LocalVideoStream and pass it with startCallOptions to set initial options for the call. By attaching LocalVideoStream to a MediaPlayerElement, we can see the preview of the local video.
var startCallOptions = new StartCallOptions();

if (this.deviceManager.Cameras?.Count > 0)
{
    var videoDeviceInfo = this.deviceManager.Cameras?.FirstOrDefault();
    if (videoDeviceInfo != null)
    {
        var selectedCamerea = CameraList.SelectedItem as VideoDeviceDetails;
        cameraStream = new LocalOutgoingVideoStream(selectedCamerea);

        var localUri = await cameraStream.StartPreviewAsync();
        await Dispatcher.RunAsync(Windows.UI.Core.CoreDispatcherPriority.Normal, () =>
        {
            LocalVideo.Source = MediaSource.CreateFromUri(localUri);
        });

        startCallOptions.VideoOptions = new OutgoingVideoOptions(new[] { cameraStream });
    }
}

var callees = new ICommunicationIdentifier[1]
{
    new CommunicationUserIdentifier(CalleeTextBox.Text.Trim())
};

this.call = await this.callAgent.StartCallAsync(callees, startCallOptions);
this.call.OnRemoteParticipantsUpdated += Call_OnRemoteParticipantsUpdatedAsync;
this.call.OnStateChanged += Call_OnStateChangedAsync;
Accept an incoming call
Add the implementation to the Agent_OnIncomingCallAsync to answer an incoming call with video, pass the LocalVideoStream to acceptCallOptions.
var acceptCallOptions = new AcceptCallOptions();

if (this.deviceManager.Cameras?.Count > 0)
{
    var videoDeviceInfo = this.deviceManager.Cameras?.FirstOrDefault();
    if (videoDeviceInfo != null)
    {
        var selectedCamerea = CameraList.SelectedItem as VideoDeviceDetails;
        cameraStream = new LocalOutgoingVideoStream(selectedCamerea);

        var localUri = await cameraStream.StartPreviewAsync();
        await Dispatcher.RunAsync(Windows.UI.Core.CoreDispatcherPriority.Normal, () =>
        {
            LocalVideo.Source = MediaSource.CreateFromUri(localUri);
        });

        acceptCallOptions.VideoOptions = new OutgoingVideoOptions(new[] { localVideoStream });
    }
}

call = await incomingCall.AcceptAsync(acceptCallOptions);
Remote participant and remote video streams
All remote participants are available through the RemoteParticipants collection on a call instance. Once the call is connected, we can access the remote participants of the call and handle the remote video streams.
Note
When a user joins a call, they can access the current remote participants through the RemoteParticipants collection. The OnRemoteParticipantsUpdated event will not trigger for these existing participants. This event will only trigger when a remote participant joins or leaves the call while the user is already in the call.
private async void Call_OnVideoStreamsUpdatedAsync(object sender, RemoteVideoStreamsEventArgs args)
{
    foreach (var remoteVideoStream in args.AddedRemoteVideoStreams)
    {
        this.DispatcherQueue.TryEnqueue(async () => {
            RemoteVideo.Source = MediaSource.CreateFromUri(await remoteVideoStream.Start());
            RemoteVideo.MediaPlayer.Play();
        });
    }

    foreach (var remoteVideoStream in args.RemovedRemoteVideoStreams)
    {
        remoteVideoStream.Stop();
    }
}

private async void Agent_OnCallsUpdatedAsync(object sender, CallsUpdatedEventArgs args)
{
    foreach (var call in args.AddedCalls)
    {
        foreach (var remoteParticipant in call.RemoteParticipants)
        {
            var remoteParticipantMRI = remoteParticipant.Identifier.ToString();
            this.remoteParticipantDictionary.TryAdd(remoteParticipantMRI, remoteParticipant);
            await AddVideoStreamsAsync(remoteParticipant.VideoStreams);
            remoteParticipant.OnVideoStreamsUpdated += Call_OnVideoStreamsUpdatedAsync;
        }
    }
}

private async void Call_OnRemoteParticipantsUpdatedAsync(object sender, ParticipantsUpdatedEventArgs args)
{
    foreach (var remoteParticipant in args.AddedParticipants)
    {
        String remoteParticipantMRI = remoteParticipant.Identifier.ToString();
        this.remoteParticipantDictionary.TryAdd(remoteParticipantMRI, remoteParticipant);
        await AddVideoStreamsAsync(remoteParticipant.VideoStreams);
        remoteParticipant.OnVideoStreamsUpdated += Call_OnVideoStreamsUpdatedAsync;
    }

    foreach (var remoteParticipant in args.RemovedParticipants)
    {
        String remoteParticipantMRI = remoteParticipant.Identifier.ToString();
        this.remoteParticipantDictionary.Remove(remoteParticipantMRI);
    }
}
Render remote videos
For each remote video stream, attach it to the MediaPlayerElement.
private async Task AddVideoStreamsAsync(IReadOnlyList<RemoteVideoStream> remoteVideoStreams)
{
    foreach (var remoteVideoStream in remoteVideoStreams)
    {
        var remoteUri = await remoteVideoStream.Start();

        this.DispatcherQueue.TryEnqueue(() => {
            RemoteVideo.Source = MediaSource.CreateFromUri(remoteUri);
            RemoteVideo.MediaPlayer.Play();
        });
    }
}
Call state update
We need to clean the video renderers once the call is disconnected and handle the case when the remote participants initially join the call.
private async void Call_OnStateChanged(object sender, PropertyChangedEventArgs args)
{
    switch (((Call)sender).State)
    {
        case CallState.Disconnected:
            this.DispatcherQueue.TryEnqueue(() => { =>
            {
                LocalVideo.Source = null;
                RemoteVideo.Source = null;
            });
            break;

        case CallState.Connected:
            foreach (var remoteParticipant in call.RemoteParticipants)
            {
                String remoteParticipantMRI = remoteParticipant.Identifier.ToString();
                remoteParticipantDictionary.TryAdd(remoteParticipantMRI, remoteParticipant);
                await AddVideoStreams(remoteParticipant.VideoStreams);
                remoteParticipant.OnVideoStreamsUpdated += Call_OnVideoStreamsUpdated;
            }
            break;

        default:
            break;
    }
}
End a call
End the current call when the Hang Up button is clicked. Add the implementation to the HangupButton_Click to end a call with the callAgent we created, and tear down the participant update and call state event handlers.
this.call.OnRemoteParticipantsUpdated -= Call_OnRemoteParticipantsUpdatedAsync;
this.call.OnStateChanged -= Call_OnStateChangedAsync;
await this.call.HangUpAsync(new HangUpOptions());
Run the code
You can build and run the code on Visual Studio. For solution platforms, we support ARM64, x64 and x86.
You can make an outbound video call by providing a user ID in the text field and clicking the Start Call button.
Note: Calling 8:echo123 stops the video stream because echo bot doesn't support video streaming.
For more information on user IDs (identity) check the User Access Tokens guide.
Feedback
Coming soon: Throughout 2024 we will be phasing out GitHub Issues as the feedback mechanism for content and replacing it with a new feedback system. For more information see: https://aka.ms/ContentUserFeedback.
Submit and view feedback for