Note
Access to this page requires authorization. You can try signing in or changing directories.
Access to this page requires authorization. You can try changing directories.
APPLIES TO:  Azure Stack Edge Pro - GPUAzure Stack Edge Pro 2Azure Stack Edge Pro R
This article describes how to install GPU driver extension to install appropriate NVIDIA drivers on the GPU VMs running on your Azure Stack Edge device. The article covers installation steps for installing a GPU extension using Azure Resource Manager templates on both Windows and Linux VMs.
Note
- In the Azure portal, you can install a GPU extension during VM creation or after the VM is deployed. For steps and requirements, see Deploy GPU virtual machines.
- If you're running a Windows 2016 VHD, you must enable TLS 1.2 inside the VM before you install the GPU extension on 2205 and higher. For detailed steps, see Troubleshoot GPU extension issues for GPU VMs on Azure Stack Edge Pro GPU.
Prerequisites
Before you install GPU extension on the GPU VMs running on your device, make sure that:
You have access to an Azure Stack Edge device on which you deploy one or more GPU VMs. See how to Deploy a GPU VM on your device.
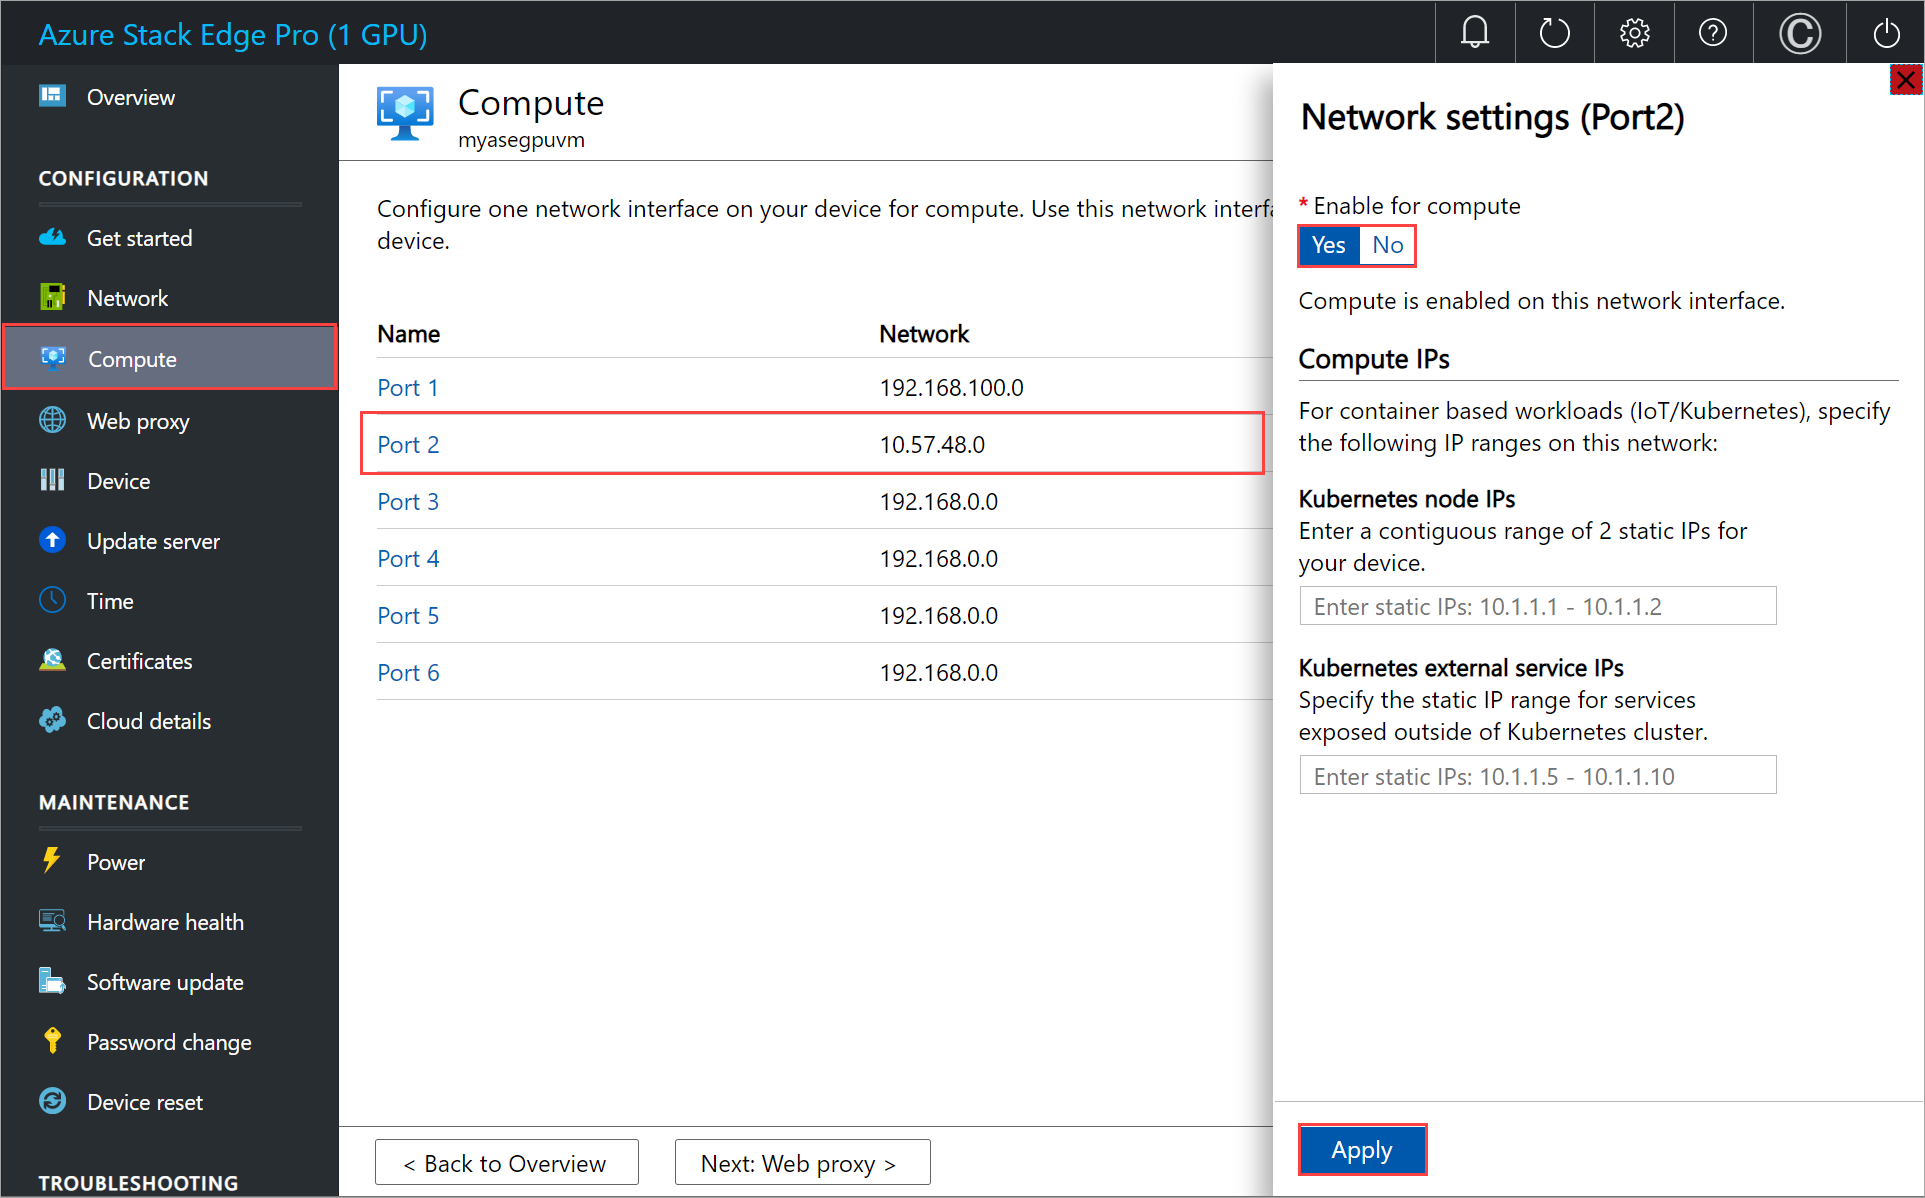
Make sure that the port enabled for compute network on your device is connected to Internet and has access. The GPU drivers are downloaded through the internet access.
Here's an example where Port 2 was connected to the internet and was used to enable the compute network. If Kubernetes isn't deployed on your environment, you can skip the Kubernetes node IP and external service IP assignment.
Download the GPU extension templates and parameters files to your client machine. Unzip it into a directory you use as a working directory.
Verify that the client you'll use to access your device is still connected to the Azure Resource Manager over Azure PowerShell. The connection to Azure Resource Manager expires every 1.5 hours or if your Azure Stack Edge device restarts. If this happens, any cmdlets that you execute will return error messages to the effect that you aren't connected to Azure anymore. You must sign in again. For detailed instructions, see Connect to Azure Resource Manager on your Azure Stack Edge device.
Edit parameters file
Depending on the operating system for your VM, you could install GPU extension for Windows or for Linux.
To deploy NVIDIA GPU drivers for an existing VM, edit the addGPUExtWindowsVM.parameters.json parameters file and then deploy the template addGPUextensiontoVM.json.
Version 2205 and higher
The file addGPUExtWindowsVM.parameters.json takes the following parameters:
"parameters": {
	"vmName": {
	"value": "<name of the VM>"
	},
	"extensionName": {
	"value": "<name for the extension. Example: windowsGpu>"
	},
	"publisher": {
	"value": "Microsoft.HpcCompute"
	},
	"type": {
	"value": "NvidiaGpuDriverWindows"
	},
	"typeHandlerVersion": {
	"value": "1.5"
	},
	"settings": {
	"value": {
	"DriverURL" : "http://us.download.nvidia.com/tesla/511.65/511.65-data-center-tesla-desktop-winserver-2016-2019-2022-dch-international.exe",
	"DriverCertificateUrl" : "https://go.microsoft.com/fwlink/?linkid=871664",
	"DriverType":"CUDA"
	}
	}
	}
Versions lower than 2205
The file addGPUExtWindowsVM.parameters.json takes the following parameters:
"parameters": {
	"vmName": {
	"value": "<name of the VM>"
	},
	"extensionName": {
	"value": "<name for the extension. Example: windowsGpu>"
	},
	"publisher": {
	"value": "Microsoft.HpcCompute"
	},
	"type": {
	"value": "NvidiaGpuDriverWindows"
	},
	"typeHandlerVersion": {
	"value": "1.3"
	},
	"settings": {
	"value": {
	"DriverURL" : "http://us.download.nvidia.com/tesla/442.50/442.50-tesla-desktop-winserver-2019-2016-international.exe",
	"DriverCertificateUrl" : "https://go.microsoft.com/fwlink/?linkid=871664",
	"DriverType":"CUDA"
	}
	}
	}
Deploy template
Deploy the template addGPUextensiontoVM.json to install the extension on an existing VM.
Run the following command:
$templateFile = "<Path to addGPUextensiontoVM.json>"
$templateParameterFile = "<Path to addGPUExtWindowsVM.parameters.json>"
RGName = "<Name of your resource group>"
New-AzureRmResourceGroupDeployment -ResourceGroupName $RGName -TemplateFile $templateFile -TemplateParameterFile $templateParameterFile -Name "<Name for your deployment>"
Note
The extension deployment is a long running job and takes about 10 minutes to complete.
Here's a sample output:
PS C:\WINDOWS\system32> "C:\12-09-2020\ExtensionTemplates\addGPUextensiontoVM.json"
C:\12-09-2020\ExtensionTemplates\addGPUextensiontoVM.json
PS C:\WINDOWS\system32> $templateFile = "C:\12-09-2020\ExtensionTemplates\addGPUextensiontoVM.json"
PS C:\WINDOWS\system32> $templateParameterFile = "C:\12-09-2020\ExtensionTemplates\addGPUExtWindowsVM.parameters.json"
PS C:\WINDOWS\system32> $RGName = "myasegpuvm1"
PS C:\WINDOWS\system32> New-AzureRmResourceGroupDeployment -ResourceGroupName $RGName -TemplateFile $templateFile -TemplateParameterFile $templateParameterFile -Name "deployment3"

DeploymentName          : deployment3
ResourceGroupName       : myasegpuvm1
ProvisioningState       : Succeeded
Timestamp               : 12/16/2020 12:18:50 AM
Mode                    : Incremental
TemplateLink            :
Parameters              :
                       Name             Type                       Value
                       ===============  =========================  ==========
                       vmName           String                     VM2
                       extensionName    String                     windowsgpuext
                       publisher        String                     Microsoft.HpcCompute
                       type             String                     NvidiaGpuDriverWindows
                       typeHandlerVersion  String                     1.3
                       settings         Object                     {
                         "DriverURL": "http://us.download.nvidia.com/tesla/442.50/442.50-tesla-desktop-winserver-2019-2016-international.exe",
                         "DriverCertificateUrl": "https://go.microsoft.com/fwlink/?linkid=871664",
                         "DriverType": "CUDA"
                       }

Outputs                 :
DeploymentDebugLogLevel :
PS C:\WINDOWS\system32>
Track deployment
To check the deployment state of extensions for a given VM, open another PowerShell session (run as administrator), and then run the following command:
Get-AzureRmVMExtension -ResourceGroupName <Name of resource group> -VMName <Name of VM> -Name <Name of the extension>
Here's a sample output:
PS C:\WINDOWS\system32> Get-AzureRmVMExtension -ResourceGroupName myasegpuvm1 -VMName VM2 -Name windowsgpuext

ResourceGroupName       : myasegpuvm1
VMName                  : VM2
Name                    : windowsgpuext
Location                : dbelocal
Etag                    : null
Publisher               : Microsoft.HpcCompute
ExtensionType           : NvidiaGpuDriverWindows
TypeHandlerVersion      : 1.3
Id                      : /subscriptions/aaaa0a0a-bb1b-cc2c-dd3d-eeeeee4e4e4e/resourceGroups/myasegpuvm1/providers/Microsoft.Compute/virtualMachines/VM2/extensions/windowsgpuext
PublicSettings          : {
                            "DriverURL": "http://us.download.nvidia.com/tesla/442.50/442.50-tesla-desktop-winserver-2019-2016-international.exe",
                            "DriverCertificateUrl": "https://go.microsoft.com/fwlink/?linkid=871664",
                            "DriverType": "CUDA"
                          }
ProtectedSettings       :
ProvisioningState       : Creating
Statuses                :
SubStatuses             :
AutoUpgradeMinorVersion : True
ForceUpdateTag          :

PS C:\WINDOWS\system32>
Extension execution output is logged to the following file. Refer to this file C:\Packages\Plugins\Microsoft.HpcCompute.NvidiaGpuDriverWindows\1.3.0.0\Status to track the status of installation.
A successful install displays a message with Enable Extension and status of success.
"status":  {
                       "formattedMessage":  {
                                                "message":  "Enable Extension",
                                                "lang":  "en"
                                            },
                       "name":  "NvidiaGpuDriverWindows",
                       "status":  "success",
Verify driver installation
Sign in to the VM and run the nvidia-smi command-line utility installed with the driver.
Version 2205 and higher
The nvidia-smi.exe is located at C:\Windows\System32\nvidia-smi.exe. If you don't see the file, it's possible that the driver installation is still running in the background. Wait for 10 minutes and check again.
Versions lower than 2205
The nvidia-smi.exe is located at C:\Program Files\NVIDIA Corporation\NVSMI\nvidia-smi.exe. If you don't see the file, it's possible that the driver installation is still running in the background. Wait for 10 minutes and check again.
If the driver is installed, you see an output similar to the following sample:
PS C:\Users\Administrator> cd "C:\Program Files\NVIDIA Corporation\NVSMI"
PS C:\Program Files\NVIDIA Corporation\NVSMI> ls

    Directory: C:\Program Files\NVIDIA Corporation\NVSMI

Mode                LastWriteTime         Length Name
----                -------------         ------ ----
-a----        2/26/2020  12:00 PM         849640 MCU.exe
-a----        2/26/2020  12:00 PM         443104 nvdebugdump.exe
-a----        2/25/2020   2:06 AM          81823 nvidia-smi.1.pdf
-a----        2/26/2020  12:01 PM         566880 nvidia-smi.exe
-a----        2/26/2020  12:01 PM         991344 nvml.dll

PS C:\Program Files\NVIDIA Corporation\NVSMI> .\nvidia-smi.exe
Wed Dec 16 00:35:51 2020
+-----------------------------------------------------------------------------+
| NVIDIA-SMI 442.50       Driver Version: 442.50       CUDA Version: 10.2     |
|-------------------------------+----------------------+----------------------+
| GPU  Name            TCC/WDDM | Bus-Id        Disp.A | Volatile Uncorr. ECC |
| Fan  Temp  Perf  Pwr:Usage/Cap|         Memory-Usage | GPU-Util  Compute M. |
|===============================+======================+======================|
|   0  Tesla T4            TCC  | 0000503C:00:00.0 Off |                    0 |
| N/A   35C    P8    11W /  70W |      8MiB / 15205MiB |      0%      Default |
+-------------------------------+----------------------+----------------------+

+-----------------------------------------------------------------------------+
| Processes:                                                       GPU Memory |
|  GPU       PID   Type   Process name                             Usage      |
|=============================================================================|
|  No running processes found                                                 |
+-----------------------------------------------------------------------------+
PS C:\Program Files\NVIDIA Corporation\NVSMI>
For more information, see NVIDIA GPU driver extension for Windows.
Note
After you finish installing the GPU driver and GPU extension, you no longer need to use a port with Internet access for compute.
Remove GPU extension
To remove the GPU extension, use the following command:
Remove-AzureRmVMExtension -ResourceGroupName <Resource group name> -VMName <VM name> -Name <Extension name>
Here's a sample output:
PS C:\azure-stack-edge-deploy-vms> Remove-AzureRmVMExtension -ResourceGroupName rgl -VMName WindowsVM -Name windowsgpuext
Virtual machine extension removal operation
This cmdlet will remove the specified virtual machine extension. Do you want to continue? [Y] Yes [N] No [S] Suspend [?] Help (default is "Y"): y
Requestld IsSuccessStatusCode StatusCode ReasonPhrase
--------- ------------------- ---------- ------------
          True                OK         OK
Next steps
Learn how to: