Configure proxy settings on an OT sensor
This article is one in a series of articles describing the deployment path for OT monitoring with Microsoft Defender for IoT, and describes how to configure proxy settings on your OT sensor to connect to Azure.

You can skip this step in the following cases:
If you're working in air-gapped environment and locally managed sensors
If you're using a direct connection between your OT sensor and Azure. In this case, you've already performed all required steps when you provisioned your sensor for cloud management
Prerequisites
To perform the steps described in this article, you'll need:
An OT network sensor installed, configured, and activated.
An understanding of the supported connection methods for cloud-connected Defender for IoT sensors, and a plan for your OT site deployment that includes the connection method you want to use for each sensor.
Access to the OT sensor as an Admin user. For more information, see On-premises users and roles for OT monitoring with Defender for IoT.
This step is performed by your deployment and connectivity teams.
Configure proxy settings on your OT sensor
This section describes how to configure settings for an existing proxy on your OT sensor console. If you don't yet have a proxy, configure one using the following procedures:
To define proxy settings on your OT sensor:
Sign into your OT sensor and select System settings > Sensor Network Settings.
Toggle on the Enable Proxy option and then enter the following details for your proxy server:
- Proxy Host
- Proxy Port
- Proxy Username (optional)
- Proxy Password (optional)
For example:

If relevant, select Client certificate to upload a proxy authentication certificate for access to an SSL/TLS proxy server.
Note
A client SSL/TLS certificate is required for proxy servers that inspect SSL/TLS traffic, such as when using services like Zscaler and Palo Alto Prisma.
Select Save.

Set up an Azure proxy
You might use an Azure proxy to connect your sensor to Defender for IoT in the following situations:
- You require private connectivity between your sensor and Azure
- Your site is connected to Azure via ExpressRoute
- Your site is connected to Azure over a VPN
If you already have a proxy configured, continue directly with defining the proxy settings on your sensor console.
If you don't yet have a proxy configured, use the procedures in this section to set one up in your Azure VNET.
Prerequisites
Before you start, make sure that you have:
A Log Analytics workspace for monitoring logs
Remote site connectivity to the Azure VNET
Outbound HTTPS traffic on port 443 allowed to from your sensor to the required endpoints for Defender for IoT. For more information, see Provision OT sensors for cloud management.
A proxy server resource, with firewall permissions to access Microsoft cloud services. The procedure described in this article uses a Squid server hosted in Azure.
Important
Microsoft Defender for IoT does not offer support for Squid or any other proxy services. It is the customer's responsibility to set up and maintain the proxy service.
Configure sensor proxy settings
This section describes how to configure a proxy in your Azure VNET for use with an OT sensor, and includes the following steps:
- Define a storage account for NSG logs
- Define virtual networks and subnets
- Define a virtual or local network gateway
- Define network security groups
- Define an Azure virtual machine scale set
- Create an Azure load balancer
- Configure a NAT gateway
Step 1: Define a storage account for NSG logs
In the Azure portal, create a new storage account with the following settings:
| Area | Settings |
|---|---|
| Basics | Performance: Standard Account kind: Blob storage Replication: LRS |
| Network | Connectivity method: Public endpoint (selected network) In Virtual Networks: None Routing Preference: Microsoft network routing |
| Data Protection | Keep all options cleared |
| Advanced | Keep all default values |
Step 2: Define virtual networks and subnets
Create the following VNET and contained subnets:
| Name | Recommended size |
|---|---|
MD4IoT-VNET |
/26 or /25 with Bastion |
| Subnets: | |
- GatewaySubnet |
/27 |
- ProxyserverSubnet |
/27 |
- AzureBastionSubnet (optional) |
/26 |
Step 3: Define a virtual or local network gateway
Create a VPN or ExpressRoute Gateway for virtual gateways, or create a local gateway, depending on how you connect your on-premises network to Azure.
Attach the gateway to the GatewaySubnet subnet you created earlier.
For more information, see:
- About VPN gateways
- Connect a virtual network to an ExpressRoute circuit using the portal
- Modify local network gateway settings using the Azure portal
Step 4: Define network security groups
Create an NSG and define the following inbound rules:
Create rule
100to allow traffic from your sensors (the sources) to the load balancer's private IP address (the destination). Use porttcp3128.Create rule
4095as a duplicate of the65001system rule. This is because rule65001will get overwritten by rule4096.Create rule
4096to deny all traffic for micro-segmentation.Optional. If you're using Bastion, create rule
4094to allow Bastion SSH to the servers. Use the Bastion subnet as the source.
Assign the NSG to the
ProxyserverSubnetyou created earlier.Define your NSG logging:
Select your new NSG and then select Diagnostic setting > Add diagnostic setting.
Enter a name for your diagnostic setting. Under Category ,select allLogs.
Select Sent to Log Analytics workspace, and then select the Log Analytics workspace you want to use.
Select to send NSG flow logs and then define the following values:
On the Basics tab:
- Enter a meaningful name
- Select the storage account you'd created earlier
- Define your required retention days
On the Configuration tab:
- Select Version 2
- Select Enable Traffic Analytics
- Select your Log Analytics workspace
Step 5: Define an Azure virtual machine scale set
Define an Azure virtual machine scale set to create and manage a group of load-balanced virtual machine, where you can automatically increase or decrease the number of virtual machines as needed.
For more information, see What are virtual machine scale sets?
To create a scale set to use with your sensor connection:
Create a scale set with the following parameter definitions:
- Orchestration Mode: Uniform
- Security Type: standard
- Image: Ubuntu server 18.04 LTS – Gen1
- Size: Standard_DS1_V2
- Authentication: Based on your corporate standard
Keep the default value for Disks settings.
Create a network interface in the
Proxyserversubnet you created earlier, but don't yet define a load balancer.Define your scaling settings as follows:
- Define the initial instance count as 1
- Define the scaling policy as Manual
Define the following management settings:
- For the upgrade mode, select Automatic - instance will start upgrading
- Disable boot diagnostics
- Clear the settings for Identity and Microsoft Entra ID
- Select Overprovisioning
- Select Enabled automatic OS upgrades
Define the following health settings:
- Select Enable application health monitoring
- Select the TCP protocol and port 3128
Under advanced settings, define the Spreading algorithm as Max Spreading.
For the custom data script, do the following:
Create the following configuration script, depending on the port and services you're using:
# Recommended minimum configuration:
# Squid listening port
http_port 3128
# Do not allow caching
cache deny all
# allowlist sites allowed
acl allowed_http_sites dstdomain .azure-devices.net
acl allowed_http_sites dstdomain .blob.core.windows.net
acl allowed_http_sites dstdomain .servicebus.windows.net
acl allowed_http_sites dstdomain .download.microsoft.com
http_access allow allowed_http_sites
# allowlisting
acl SSL_ports port 443
acl CONNECT method CONNECT
# Deny CONNECT to other unsecure ports
http_access deny CONNECT !SSL_ports
# default network rules
http_access allow localhost
http_access deny all
Encode the contents of your script file in base-64.
Copy the contents of the encoded file, and then create the following configuration script:
#cloud-config
# updates packages
apt_upgrade: true
# Install squid packages
packages:
 - squid
run cmd:
 - systemctl stop squid
 - mv /etc/squid/squid.conf /etc/squid/squid.conf.factory
write_files:
- encoding: b64
  content: <replace with base64 encoded text>
  path: /etc/squid/squid.conf
  permissions: '0644'
run cmd:
 - systemctl start squid
 - apt-get -y upgrade; [ -e /var/run/reboot-required ] && reboot
Step 6: Create an Azure load balancer
Azure Load Balancer is a layer-4 load balancer that distributes incoming traffic among healthy virtual machine instances using a hash-based distribution algorithm.
For more information, see the Azure Load Balancer documentation.
To create an Azure load balancer for your sensor connection:
Create a load balancer with a standard SKU and an Internal type to ensure that the load balancer is closed to the internet.
Define a dynamic frontend IP address in the
proxysrvsubnet you created earlier, setting the availability to zone-redundant.For a backend, choose the virtual machine scale set you created in the earlier.
On the port defined in the sensor, create a TCP load balancing rule connecting the frontend IP address with the backend pool. The default port is 3128.
Create a new health probe, and define a TCP health probe on port 3128.
Define your load balancer logging:
In the Azure portal, go to the load balancer you've created.
Select Diagnostic setting > Add diagnostic setting.
Enter a meaningful name, and define the category as allMetrics.
Select Sent to Log Analytics workspace, and then select your Log Analytics workspace.
Step 7: Configure a NAT gateway
To configure a NAT gateway for your sensor connection:
Create a new NAT Gateway.
In the Outbound IP tab, select Create a new public IP address.
In the Subnet tab, select the
ProxyserverSubnetsubnet you created earlier.
Your proxy is now fully configured. Continue by defining the proxy settings on your OT sensor.
Connect via proxy chaining
You might connect your sensor to Defender for IoT in Azure using proxy chaining in the following situations:
- Your sensor needs a proxy to reach from the OT network to the cloud
- You want multiple sensors to connect to Azure through a single point
If you already have a proxy configured, continue directly with defining the proxy settings on your sensor console.
If you don't yet have a proxy configured, use the procedures in this section to configure your proxy chaining.
For more information, see Proxy connections with proxy chaining.
Prerequisites
Before you start, make sure that you have a host server running a proxy process within the site network. The proxy process must be accessible to both the sensor and the next proxy in the chain.
We've validated this procedure using the open-source Squid proxy. This proxy uses HTTP tunneling and the HTTP CONNECT command for connectivity. Any other proxy chaining connection that supports the CONNECT command can be used for this connection method.
Important
Microsoft Defender for IoT does not offer support for Squid or any other proxy services. It is the customer's responsibility to set up and maintain the proxy service.
Configuration a proxy chaining connection
This procedure describes how to install and configure a connection between your sensors and Defender for IoT using the latest version of Squid on an Ubuntu server.
Define your proxy settings on each sensor:
Sign into your OT sensor and select System settings > Sensor Network Settings.
Toggle on the Enable Proxy option and define your proxy host, port, username, and password.
Install the Squid proxy:
Sign into your proxy Ubuntu machine and launch a terminal window.
Update your system and install Squid. For example:
sudo apt-get update
sudo apt-get install squid
Locate the Squid configuration file. For example, at
/etc/squid/squid.confor/etc/squid/conf.d/, and open the file in a text editor.In the Squid configuration file, search for the following text:
# INSERT YOUR OWN RULE(S) HERE TO ALLOW ACCESS FROM YOUR CLIENTS.Add
acl <sensor-name> src <sensor-ip>, andhttp_access allow <sensor-name>into the file. For example:# INSERT YOUR OWN RULE(S) HERE TO ALLOW ACCESS FROM YOUR CLIENTS acl sensor1 src 10.100.100.1 http_access allow sensor1Add more sensors as needed by adding extra lines for sensor.
Configure the Squid service to start at launch. Run:
sudo systemctl enable squid
Connect your proxy to Defender for IoT. Ensure that outbound HTTPS traffic on port 443 is allowed to from your sensor to the required endpoints for Defender for IoT.
For more information, see Provision OT sensors for cloud management.
Your proxy is now fully configured. Continue by defining the proxy settings on your OT sensor.
Set up connectivity for multicloud environments
This section describes how to connect your sensor to Defender for IoT in Azure from sensors deployed in one or more public clouds. For more information, see Multicloud connections.
Prerequisites
Before you start, make sure that you have a sensor deployed in a public cloud, such as AWS or Google Cloud, and configured to monitor SPAN traffic.
Select a multicloud connectivity method
Use the following flow chart to determine which connectivity method to use:
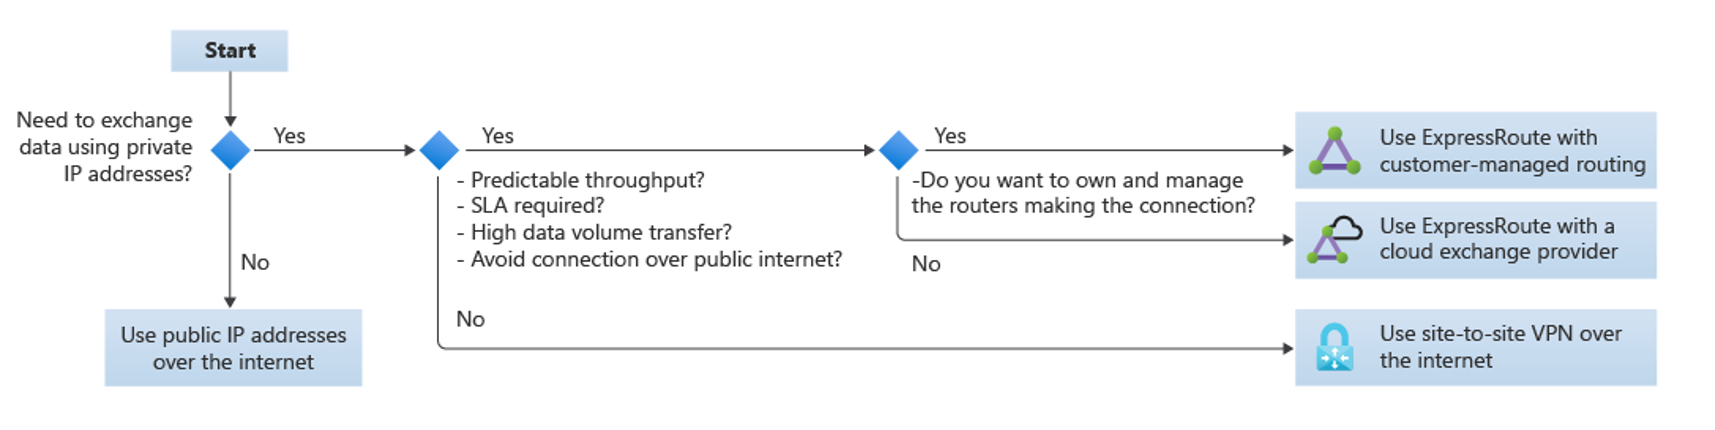
Use public IP addresses over the internet if you don't need to exchange data using private IP addresses
Use site-to-site VPN over the internet only if you don't* require any of the following:
- Predictable throughput
- SLA
- High data volume transfers
- Avoid connections over the public internet
Use ExpressRoute if you require predictable throughput, SLA, high data volume transfers, or to avoid connections over the public internet.
In this case:
- If you want to own and manage the routers making the connection, use ExpressRoute with customer-managed routing.
- If you don't need to own and manage the routers making the connection, use ExpressRoute with a cloud exchange provider.
Configuration
Configure your sensor to connect to the cloud using one of the Azure Cloud Adoption Framework recommended methods. For more information, see Connectivity to other cloud providers.
To enable private connectivity between your VPCs and Defender for IoT, connect your VPC to an Azure VNET over a VPN connection. For example if you're connecting from an AWS VPC, see our TechCommunity blog: How to create a VPN between Azure and AWS using only managed solutions.
After your VPC and VNET are configured, define the proxy settings on your OT sensor.
Next steps
We recommend that you configure an Active Directory connection for managing on-premises users on your OT sensor, and also setting up sensor health monitoring via SNMP.
If you don't configure these settings during deployment, you can also return and configure them later on. For more information, see: