Create and manage users on an OT network sensor
Microsoft Defender for IoT provides tools for managing on-premises user access in the OT network sensor, and the legacy on-premises management console. Azure users are managed at the Azure subscription level using Azure RBAC.
This article describes how to manage on-premises users directly on an OT network sensor.
Default privileged users
By default, each OT network sensor is installed with the privileged admin user, which has access to advanced tools for troubleshooting and setup.
When setting up a sensor for the first time, sign in the admin user, create an initial user with an Admin role, and then create extra users for security analysts and read-only users.
For more information, see Install and set up your OT sensor and Default privileged on-premises users.
Sensor versions earlier than 23.1.x also include the cyberx and cyberx_host privileged users. In versions 23.1.x and higher, these users are installed, but not enabled by default.
To enable the cyberx and cyberx_host users in versions 23.1.x and higher, such as to use them with the Defender for IoT CLI, reset the password. For more information, see Change a sensor user's password.
Configure an Active Directory connection
We recommend configuring on-premises users on your OT sensor with Active Directory, in order to allow Active Directory users to sign in to your sensor and use Active Directory groups, with collective permissions assigned to all users in the group.
For example, use Active Directory when you have a large number of users that you want to assign Read Only access to, and you want to manage those permissions at the group level.
Tip
When you're ready to start managing your OT sensor settings at scale, define Active Directory settings from the Azure portal. Once you apply settings from the Azure portal, settings on the sensor console are read-only. For more information, see Configure OT sensor settings from the Azure portal (Public preview).
To integrate with Active Directory:
Sign in to your OT sensor and select System Settings > Integrations > Active Directory.
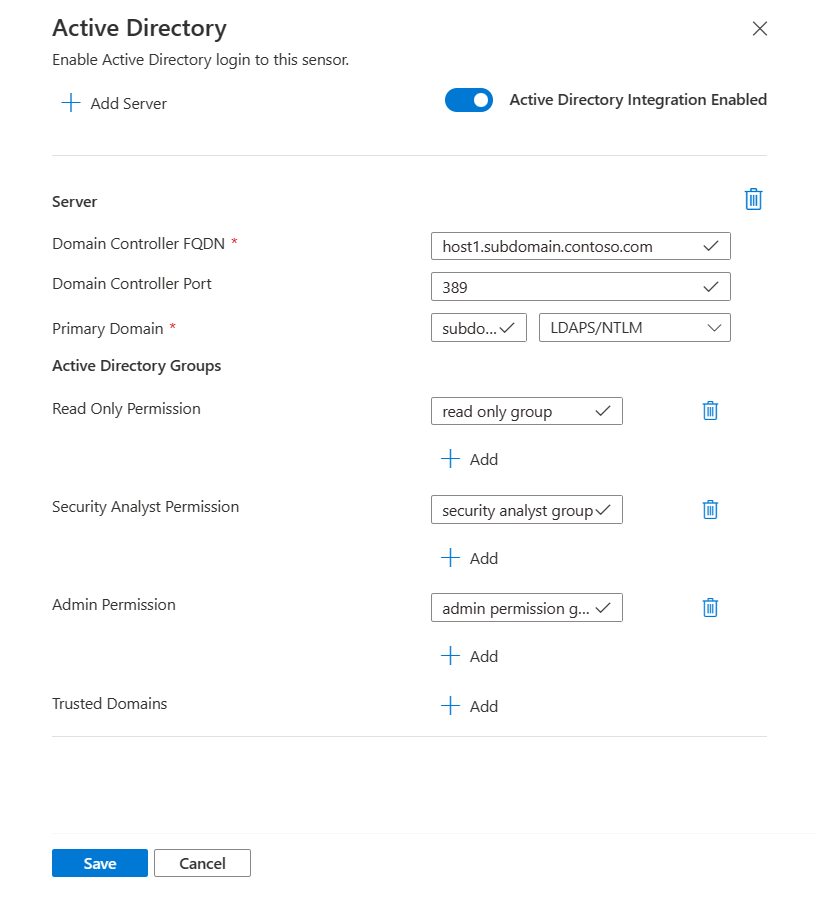
Toggle on the Active Directory Integration Enabled option.
Enter the following values for your Active Directory server:
Name Description Domain Controller FQDN The fully qualified domain name (FQDN), exactly as it appears on your LDAP server. For example, enter host1.subdomain.contoso.com.
If you encounter an issue with the integration using the FQDN, check your DNS configuration. You can also enter the explicit IP of the LDAP server instead of the FQDN when setting up the integration.Domain Controller Port The port where your LDAP is configured. For example, use port 636 for LDAPS (SSL) connections. Primary Domain The domain name, such as subdomain.contoso.com, and then select the connection type for your LDAP configuration.
Supported connection types include: LDAPS/NTLMv3 (recommended), LDAP/NTLMv3, or LDAP/SASL-MD5Active Directory Groups Select + Add to add an Active Directory group to each permission level listed, as needed.
When you enter a group name, make sure that you enter the group name exactly as it's defined in your Active Directory configuration on the LDAP server. Use these group names when adding new sensor users with Active Directory.
Supported permission levels include Read-only, Security Analyst, Admin, and Trusted Domains.Important
When entering LDAP parameters:
- Define values exactly as they appear in Active Directory, except for the case.
- User lowercase characters only, even if the configuration in Active Directory uses uppercase.
- LDAP and LDAPS can't be configured for the same domain. However, you can configure each in different domains and then use them at the same time.
To add another Active Directory server, select + Add Server at the top of the page and define those server values.
When you've added all your Active Directory servers, select Save.
For example:
Add new OT sensor users
This procedure describes how to create new users for a specific OT network sensor.
Prerequisites: This procedure is available for the admin, cyberx, and cyberx_host users, and any user with the Admin role.
To add a user:
Sign in to the sensor console and select Users > + Add user.
On the Create a user | Users page, enter the following details:
Name Description User name Enter a meaningful username for the user. Email Enter the user's email address. First Name Enter the user's first name. Last Name Enter the user's last name. Role Select one of the following user roles: Admin, Security Analyst, or Read Only. For more information, see On-premises user roles. Password Select the user type, either Local or Active Directory User.
For local users, enter a password for the user. Password requirements include:
- At least eight characters
- Both lowercase and uppercase alphabetic characters
- At least one number
- At least one symbol
Local user passwords can only be modified by Admin users.Tip
Integrating with Active Directory lets you associate groups of users with specific permission levels. If you want to create users using Active Directory, first configure an Active Directory connection and then return to this procedure.
Select Save when you're done.
Your new user is added and is listed on the sensor Users page.
To edit a user, select the Edit ![]() icon for the user you want to edit, and change any values as needed.
icon for the user you want to edit, and change any values as needed.
To delete a user, select the Delete button for the user you want to delete.
Change a sensor user's password
This procedure describes how Admin users can change local user passwords. Admin users can change passwords for themselves or for other Security Analyst or Read Only users. Privileged users can change their own passwords, and the passwords for Admin users.
Tip
If you need to recover access to a privileged user account, see Recover privileged access to a sensor.
Prerequisites: This procedure is available only for the cyberx, admin, or cyberx_host users, or for users with the Admin role.
To change a user's password on a sensor:
Sign into the sensor and select Users.
On the sensor's Users page, locate the user whose password needs to be changed.
At the right of that user row, select the options (...) menu > Edit to open the user pane.
In the user pane on the right, in the Change password area, enter and confirm the new password. If you're changing your own password, you'll also need to enter your current password.
Password requirements include:
- At least eight characters
- Both lowercase and uppercase alphabetic characters
- At least one number
- At least one symbol
Select Save when you're done.
Recover privileged access to a sensor
This procedure descries how to recover privileged access to a sensor, for the cyberx, admin, or cyberx_host users. For more information, see Default privileged on-premises users.
Prerequisites: This procedure is available only for the cyberx, admin, or cyberx_host users.
To recover privileged access to a sensor:
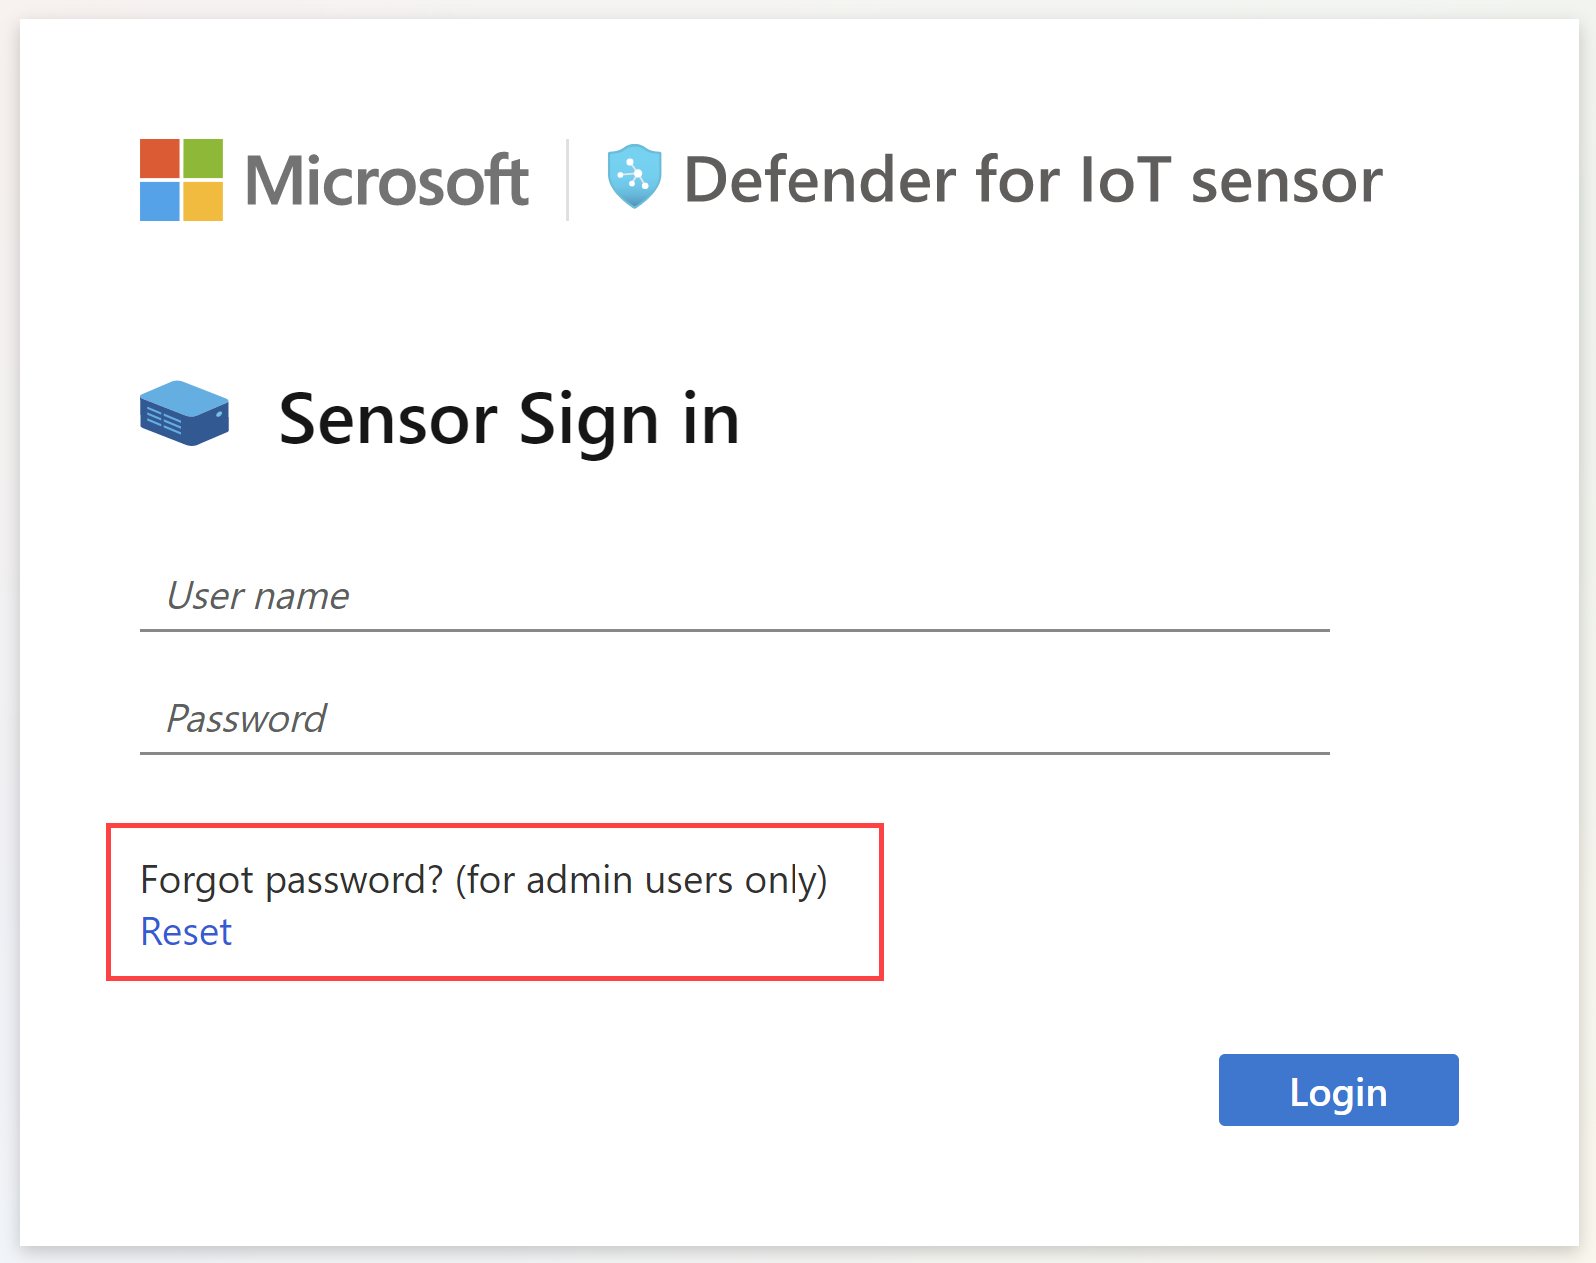
Start signing in to the OT network sensor. On the sign-in screen, select the Reset link. For example:
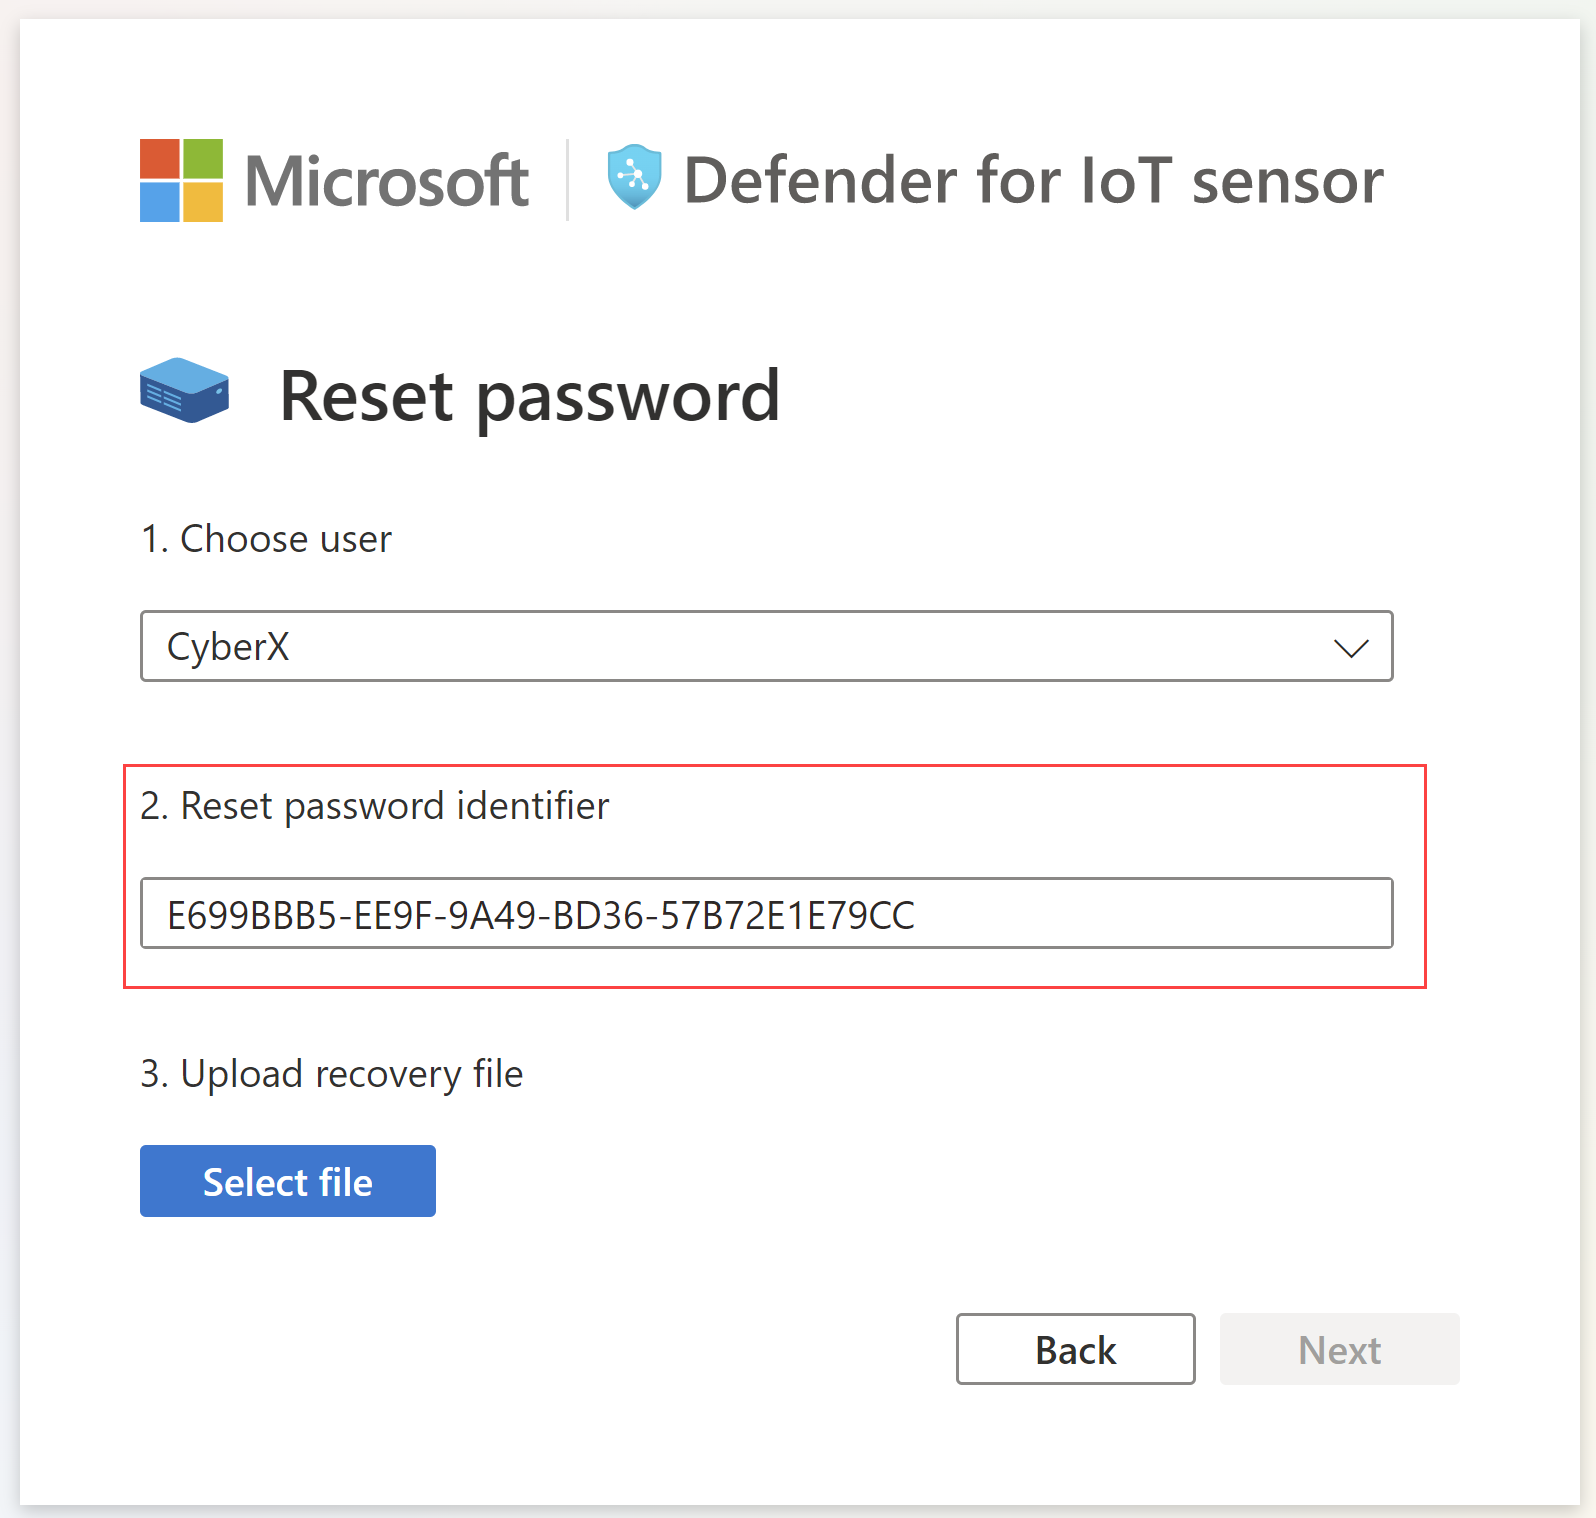
In the Reset password dialog, from the Choose user menu, select the user whose password you're recovering, either Cyberx, Admin, or CyberX_host.
Copy the unique identifier code that's shown in the Reset password identifier to the clipboard. For example:
Go the Defender for IoT Sites and sensors page in the Azure portal. You may want to open the Azure portal in a new browser tab or window, keeping your sensor tab open.
In your Azure portal settings > Directories + subscriptions, make sure that you've selected the subscription where your sensor was onboarded to Defender for IoT.
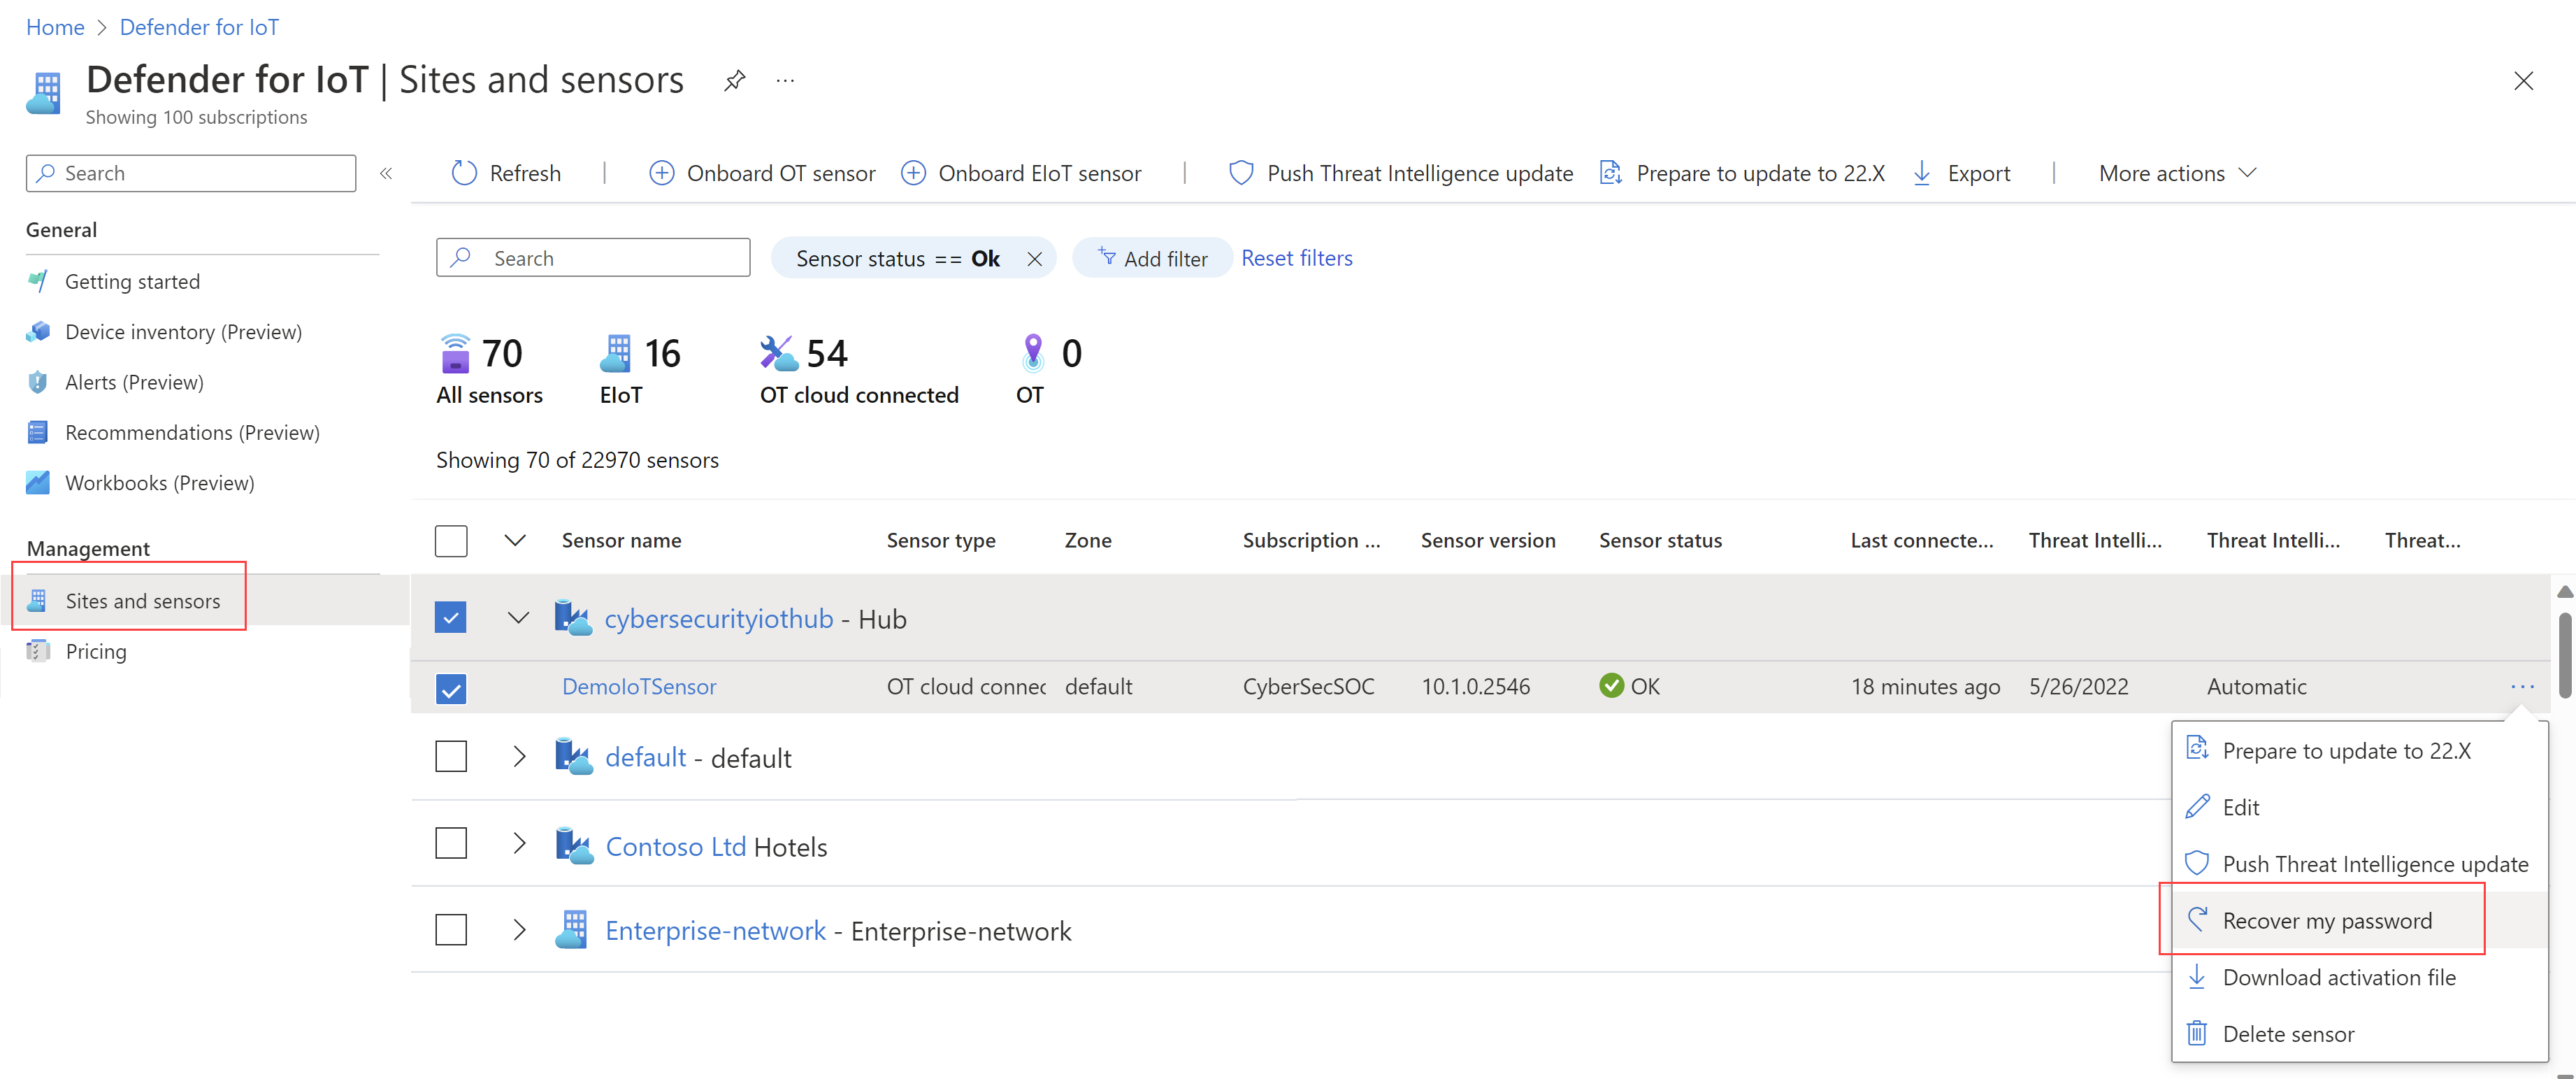
On the Sites and sensors page, locate the sensor that you're working with, and select the options menu (...) on the right > Recover my password. For example:
In the Recover dialog that opens, enter the unique identifier that you've copied to the clipboard from your sensor and select Recover. A password_recovery.zip file is automatically downloaded.
All files downloaded from the Azure portal are signed by root of trust so that your machines use signed assets only.
Back on the sensor tab, on the Password recovery screen, select Select file. Navigate to and upload the password_recovery.zip file you'd downloaded earlier from the Azure portal.
Note
If an error message appears, indicating that the file is invalid, you may have had an incorrect subscription selected in your Azure portal settings.
Return to Azure, and select the settings icon in the top toolbar. On the Directories + subscriptions page, make sure that you've selected the subscription where your sensor was onboarded to Defender for IoT. Then repeat the steps in Azure to download the password_recovery.zip file and upload it on the sensor again.
Select Next. A system-generated password for your sensor appears for you to use for the selected user. Make sure to write down the password as it won't be shown again.
Select Next again to sign into your sensor with the new password.

Define maximum number of failed sign-ins
Use the OT sensor's CLI access to define the number of maximum failed sign-ins before an OT sensor prevents the user from signing in again from the same IP address.
For more information, see Defender for IoT CLI users and access.
Prerequisites: This procedure is available for the cyberx user only.
Sign into your OT sensor via SSH and run:
nano /var/cyberx/components/xsense-web/cyberx_web/settings.pyIn the settings.py file, set the
"MAX_FAILED_LOGINS"value to the maximum number of failed sign ins you want to define. Make sure that you consider the number of concurrent users in your system.Exit the file and run
sudo monit restart allto apply your changes.
Control user session timeouts
By default, on-premises users are signed out of their sessions after 30 minutes of inactivity. Admin users can use the local CLI access to either turn this feature on or off, or to adjust the inactivity thresholds. For more information, see Defender for IoT CLI users and access and CLI command reference from OT network sensors.
Note
Any changes made to user session timeouts are reset to defaults when you update the OT monitoring software.
Prerequisites: This procedure is available for the admin, cyberx, and cyberx_host users only.
To control sensor user session timeouts:
Sign in to your sensor via a terminal and run:
sudo nano /var/cyberx/properties/authentication.propertiesThe following output appears:
infinity_session_expiration=true
session_expiration_default_seconds=0
session_expiration_admin_seconds=1800
session_expiration_security_analyst_seconds=1800
session_expiration_read_only_users_seconds=1800
certifcate_validation=false
crl_timeout_secounds=3
crl_retries=1
cm_auth_token=
Do one of the following:
To turn off user session timeouts entirely, change
infinity_session_expiration=truetoinfinity_session_expiration=false. Change it back to turn it back on again.To adjust an inactivity timeout period, adjust one of the following values to the required time, in seconds:
session_expiration_default_secondsfor all userssession_expiration_admin_secondsfor Admin users onlysession_expiration_security_analyst_secondsfor Security Analyst users onlysession_expiration_read_only_users_secondsfor Read Only users only
Next steps
For more information, see Audit user activity.
Feedback
Coming soon: Throughout 2024 we will be phasing out GitHub Issues as the feedback mechanism for content and replacing it with a new feedback system. For more information see: https://aka.ms/ContentUserFeedback.
Submit and view feedback for