Note
Access to this page requires authorization. You can try signing in or changing directories.
Access to this page requires authorization. You can try changing directories.
Azure DevOps Services | Azure DevOps Server | Azure DevOps Server 2022
Azure Pipelines enables developers to deploy their applications across multiple environments using both YAML and Classic pipelines. This article walks you through creating a multi-stage Classic release pipeline to deploy your ASP.NET Core web app to multiple stages.
In this tutorial, you'll learn how to:
- Set up continuous deployment triggers
- Add stages
- Add pre-deployment approvals
- Create releases and monitor deployments
Prerequisites
An Azure DevOps organization. Create one for free.
An Azure DevOps project. Create a new project if you don't have one already.
A Classic release pipeline that contains at least one stage. If you don't already have one, Create a Classic release.
Set up continuous deployment triggers
Enabling the continuous deployment trigger will configure the pipeline to automatically create a new release whenever a new pipeline artifact becomes available.
Sign in to your Azure DevOps organization, and then navigate to your project.
Select Azure Pipelines > Releases, select your release pipeline, and then select Edit.
In the Artifacts section, select the Continuous deployment trigger icon to open the trigger panel, then toggle it to enable.
Under the first stage, select the Pre-deployment conditions icon and ensure the deployment trigger is set to After release. This triggers deployments to this stage automatically when a new release is created.
Add stages
Sign in to your Azure DevOps organization, and then navigate to your project.
Select Azure Pipelines > Releases, select your release pipeline, and then select Edit.
Select + Add > New stage to create a new stage.
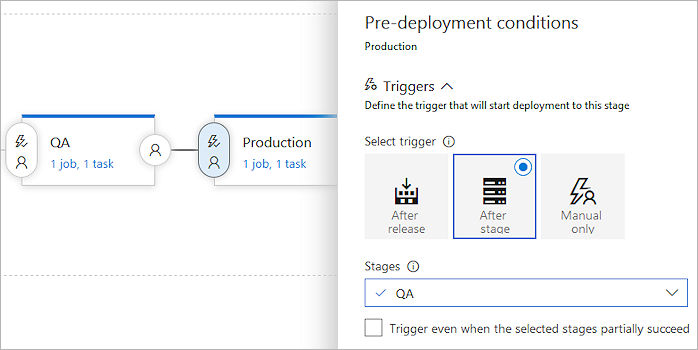
In your newly added stage, select the Pre-deployment conditions icon. Set the trigger to After stage, and then select your original stage from the drop-down menu.
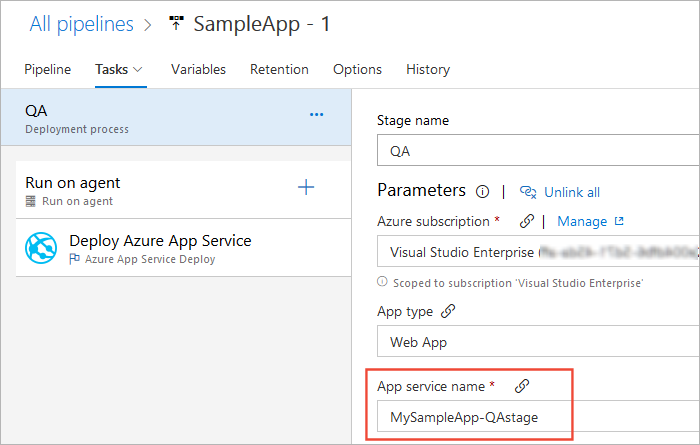
Select the Tasks drop-down menu and select your desired stage. Depending on the tasks that you're using, change the settings so that this stage deploys to your desired target. In this example, we're using Deploy Azure App Service task to deploy to an Azure App Service as shown below.
Add Pre-deployment approvals
Adding approvals ensures that all criteria are met before deploying to the next stage.
Sign in to your Azure DevOps organization, and then navigate to your project.
Select Azure Pipelines > Releases, select your release pipeline, and then select Edit.
From Stages, select the Pre-deployment conditions icon in the desired stage, and then select the Pre-deployment approvals toggle button to enable it.
In the Approvers text box, enter the user(s) responsible for approving the deployment. It's also recommended to uncheck the The user requesting a release or deployment should not approve it checkbox.
Select Save when you're done.

Create a release
In this example we'll manually create a new release. Usually a release is created automatically when a new build artifact is available. However, in this scenario we'll create it manually.
Sign in to your Azure DevOps organization, and then navigate to your project.
Select Azure Pipelines > Releases, select your release pipeline, and then select Edit.
Select the Release drop-down menu and choose Create release.
Enter a description for the release, verify that the correct artifacts are selected, and then select Create.
A banner will appear indicating that a new release has been created. Select the release link to see more details. The release summary page will display the deployment status for each stage.
The user(s) you added as approvers will receive an approval request. To approve, they can add a brief comment and select Approve.

Note
Release administrators can access and override all approval decisions.
Monitor and track deployments
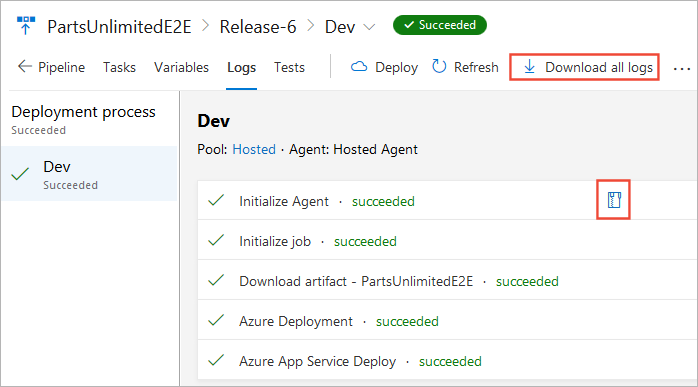
Deployment logs allow you to monitor and troubleshoot the release of your application. Follow the steps below to check the logs for your deployment:
In the release summary, hover over a stage and select Logs. You can also access the logs page during deployment to see the live logs of each task.
Select any task to view its specific logs. You can also download individual task logs or a zip of all the log files.
If you need additional information to debug your deployment, you can run the release in debug mode.