Note
Access to this page requires authorization. You can try signing in or changing directories.
Access to this page requires authorization. You can try changing directories.
Azure DevOps Services | Azure DevOps Server 2022 - Azure DevOps Server 2019
After you create an organization or project collection, add contributors and configure policies, settings, and other options available to you. This article provides an overview of tasks to ensure you set up your organization or collection to get maximal use of your services.
Each organization is associated with one and only one collection. If you need to create another organization, see Plan your organizational structure and Create an organization.
When you install Azure DevOps Server, you automatically create a default collection. If you need to create another project collection, see Manage project collections.
Prerequisites
| Category | Requirements |
|---|---|
| Permissions | Member of the Project Collection Administrators group. Organization owners are automatically members of this group. |
Note
This article provides an overview of tasks that require membership in the Project Collection Administrators group. For information on tasks performed by members of a Project Administrators group, see Manage your project.
Add users to your organization
For large enterprises, connect Azure DevOps to Microsoft Entra ID and use its security groups to control user access. This way, you can sync users and groups between Microsoft Entra ID and Azure DevOps, and reduce the overhead of managing permissions and user access.
You can add users and security groups to your organization through the web portal Organization settings > Users interface, regardless of the size of your enterprise. You can also assign these users and groups to one or more projects within your organization.
For large enterprises, the recommended method to manage Azure DevOps users, is to connect Azure DevOps to Active Directory (AD) and manage user access through security groups defined in AD. That way, when you add and remove users or groups from AD, you automatically add and remove these same users and groups from Azure DevOps. Typically, you should install Active Directory before installing Azure DevOps. You limit the maintenance of managing permissions and user access.
For small and large enterprises, you add users to a server instance through the web portal Access levels interface. All users added to the server instance can be added to one or more projects defined within the project collection defined in the server instance.
When you add users, you specify their access level, which determines the features they can use through the web portal. For more information, review these resources:
- Get started with permissions, access, and security groups
- About access levels
- Add organization users and manage access
- Connect your organization to Microsoft Entra ID
Note
If the Limit user visibility and collaboration to specific projects preview feature is turned on the organization, users added to the Project-Scoped Users group can't access projects that they aren't added to. For more information including important security-related call-outs, see Limit user visibility for projects and more, later in this article.
- Get started with permissions, access, and security groups
- About access levels
- Add users or groups to an access level
- Install Active Directory Domain Services (Level 100)
Note
Even if you add a user or group to an access level, you must also add them to a project for them to connect to a project and access features available through a supported client or the web portal.
Set up billing
Azure DevOps charges for the following services as described in Pricing for Azure DevOps.
- Individual services:
- Microsoft-hosted CI/CD parallel jobs
- Self-hosted CI/CD parallel jobs
- Storage of Azure Artifacts feeds
- User licenses for Basic or Basic + Test Plans.
All organizations are granted five free Basic licenses and unlimited users with Stakeholder access. For information on each access level, see About access levels.
If your organization requires more than five contributors, then you need to set up billing. Users that have a Visual Studio subscription can be added without incurring any further billing charges. Billing is based on the access level, Basic or Basic + Test Plans, that you assign to the user. For more information, see Set up billing.
Manage security and permissions
Permissions and security groups control access to specific tasks.
The following table lists the permissions assigned at the organization or collection level. All permissions, except for Make requests on behalf of others, are granted to members of the Project Collection Administrators group. For more information, see Permissions and groups reference, Groups.
General
- Alter trace settings
- Create new projects
- Delete team project
- Edit instance-level information
- View instance-level information
Service Account
- Make requests on behalf of others
- Trigger events
- View system synchronization information
Boards
- Administer process permissions
- Create process
- Delete field from organization or account
- Delete process
- Edit process
Repos (TFVC)
- Administer shelved changes
- Administer workspaces
- Create a workspace
Pipelines
- Administer build resource permissions
- Manage build resources
- Manage pipeline policies
- Use build resources
- View build resources
Test Plans
- Manage test controllers
Auditing
- Delete audit streams
- Manage audit streams
- View audit log
Policies
- Manage enterprise policies
For more information about security and setting permissions at the collection-level, review the following articles:
- Get started with permissions, access, and security groups
- Change permissions at the organization or collection-level.
Add members to the Project Collection Administrators group
When you create an organization, you become a member of the Project Collection Administrators group. This group has the authority to manage the organization’s settings, policies, and processes. It can also create and manage all the projects and extensions in the organization.
The person who creates a project collection is automatically added as a member to the Project Collection Administrators group. Members of this group have permissions to manage the settings, policies, and processes for the organization. Members can also create and manage all projects defined in the organization, and install and manage extensions.
It's always a good idea to have more than one person who has administrative privileges. Look up a Project Collection Administrator and then ask them to add you to the group.
Set security policies
Configure the security policies for your organization through the Organization settings > Policies page. These policies let you grant or restrict the following features:
- Non-microsoft application access via OAuth
- SSH authentication
- Creation of public projects
- Invitation of GitHub user accounts
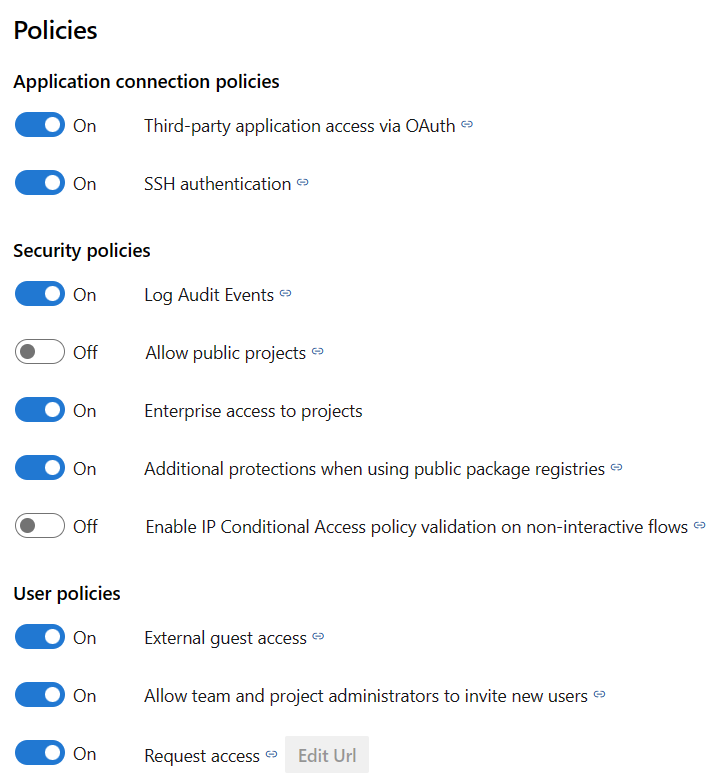
For more information, see Change application connection & security policies for your organization.
Limit user visibility
Warning
Consider the following limitations when using this preview feature:
- The limited visibility features described in this section apply only to interactions through the web portal. With the REST APIs or
azure devopsCLI commands, project members can access the restricted data. - Users in the limited group can only select users who are explicitly added to Azure DevOps and not users who have access through Microsoft Entra group membership.
- Guest users who are members in the limited group with default access in Microsoft Entra ID, can't search for users with the people picker.
Organizations and projects
By default, users added to an organization can view all organization and project information and settings. You can restrict specific users, such as Stakeholders, Microsoft Entra users, or member sof a particular security group, with the Limit user visibility and collaboration to specific projects preview feature for the organization. Once the feature gets turned on, any user or group that gets added to the Project-Scoped Users group is restricted in the following ways:
- Access is confined to only the projects to which they're explicitly added.
- Views displaying lists of users, projects, billing details, usage data, and more accessed through Organization settings are restricted.
- The set of people or groups that appear in people-picker search selections and the ability to @mention people is limited.
Identity search and selection
With Microsoft Entra ID, you can use people pickers to search for any user or group in your organization, not just the ones in your current project. People pickers support the following Azure DevOps functions:
- Selection of a user identity from a work tracking identity field such as Assigned To
- Selection of a user or group using @mention in a work item discussion or rich-text field, a pull request discussion, commit comments, or changeset or shelveset comments
- Selection of a user or group using @mention from a wiki page
As shown in the following image, start entering a user or security group name into a people picker box until you find a match.
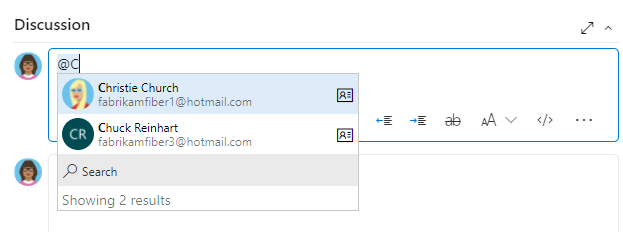
Users and groups who get added to the Project-Scoped Users group can only see and select users and groups in the project they're connected to from a people picker.
Turn on the preview feature and add users to the security group
Do the following steps to turn on the preview feature and add users and group to the Project-Scoped Users group:
Turn on the Limit user visibility and collaboration to specific projects preview feature for the organization.
Add the users to your project as described in Add users to a project or team. Users added to a team are automatically added to the project and team group.
Open Organizations settings > Security > Permissions and choose Project-Scoped Users. Select the Members tab.
Add all users and groups that you want to scope to the project they're added to. For more information, see Set permissions at the project- or collection-level.
The Project-Scoped Users group only appears under the Permissions > Groups when the Limit user visibility and collaboration to specific projects preview feature is turned on.
All security groups in Azure DevOps are considered organization-level entities, even if they only have permissions for a specific project. This means that security groups get managed at the organization level.
From the web portal, the visibility of some security groups might be restricted based on the user's permissions. However, you can still discover the names of all security groups within an organization by using the azure devops CLI tool or the REST APIs. For more information, see Add and manage security groups.
Manage extensions
An extension is an installable unit that adds new capabilities to your projects. Azure DevOps extensions support the following functions:
- Planning and tracking of work items, sprints, scrums, and so on
- Build and release flows
- Code testing and tracking
- Collaboration among team members
For example, to support code search, install the Code Search extension.
You want to tell your users about extensions and that they can request an extension. To install and manage extensions, be an organization Owner, a member of the Project Collection Administrators group. Or, you can get added to the Manager role for extensions.
Install Code Search
Code Search is a free Marketplace extension that lets you search across all your source repositories. For more information, see Install and configure Search.
Turn on Analytics
The Analytics service is the reporting platform for Azure DevOps, replacing the previous platform based on SQL Server Reporting Services. Analytics is built for reporting and optimized for fast read-access and server-based aggregations. Use it to answer quantitative questions about the past or present state of your projects.
For more information, see What is the Analytics service? and Turn on the Analytics service.
Adjust time zone and other organization settings
When you create an organization, you specify the name of your organization and select the region where your organization is hosted. The default Time zone is set to UTC. You can update the Time zone and specify a Privacy URL from the Organization settings>Overview page. For more information about these settings, see the following articles:
Configure DevOps settings
Use the following settings, which get defined at the organization-level, to support your work.
- Add agent pools
- Define pipeline retention settings
- Define repository settings:
Customize work-tracking processes
All work-tracking tools are available immediately after you create a project. Often, one or more users might want to customize the experience to meet one or more business needs. Processes are easily customized through the user interface. However, you might want to establish a methodology for who manages the updates and evaluates requests.
For more information, see the following articles:
Alert users with information banners
Communicate with your Azure DevOps users quickly through information banners. Use banners to alert your Azure DevOps users to upcoming changes or events without sending mass emails. For more information, see Add and manage information banners.
Review and update notifications
Many notifications are predefined at the organization or collection level. You can manage subscriptions or add new subscriptions.
Configure an SMTP server
For team members to receive notifications, you must configure an SMTP server.
Scale your organization or collection
To learn about scaling your organization, see the following articles.