Integrate Azure Digital Twins with Azure SignalR Service
In this article, you'll learn how to integrate Azure Digital Twins with Azure SignalR Service.
The solution described in this article allows you to push digital twin telemetry data to connected clients, such as a single webpage or a mobile application. As a result, clients are updated with real-time metrics and status from IoT devices, without the need to poll the server or submit new HTTP requests for updates.
Prerequisites
Here are the prerequisites you should complete before proceeding:
Before integrating your solution with Azure SignalR Service in this article, you should complete the Azure Digital Twins Connect an end-to-end solution, because this how-to article builds on top of it. The tutorial walks you through setting up an Azure Digital Twins instance that works with a virtual IoT device to trigger digital twin updates. This how-to article will connect those updates to a sample web app using Azure SignalR Service.
You'll need the following values from the tutorial:
- Event Grid topic
- Resource group
- App service/function app name
You'll need Node.js installed on your machine.
Be sure to sign in to the Azure portal with your Azure account, as you'll need to use it in this guide.
Solution architecture
You'll be attaching Azure SignalR Service to Azure Digital Twins through the path below. Sections A, B, and C in the diagram are taken from the architecture diagram of the end-to-end tutorial prerequisite. In this how-to article, you'll build section D on the existing architecture, which includes two new Azure functions that communicate with SignalR and client apps.

Download the sample applications
First, download the required sample apps. You'll need both of the following samples:
Azure Digital Twins end-to-end samples: This sample contains an AdtSampleApp that holds two Azure functions for moving data around an Azure Digital Twins instance (you can learn about this scenario in more detail in Connect an end-to-end solution). It also contains a DeviceSimulator sample application that simulates an IoT device, generating a new temperature value every second.
If you haven't already downloaded the sample as part of the tutorial in Prerequisites, navigate to the sample and select the Browse code button underneath the title. Doing so will take you to the GitHub repo for the samples, which you can download as a .zip by selecting the Code button and Download ZIP.
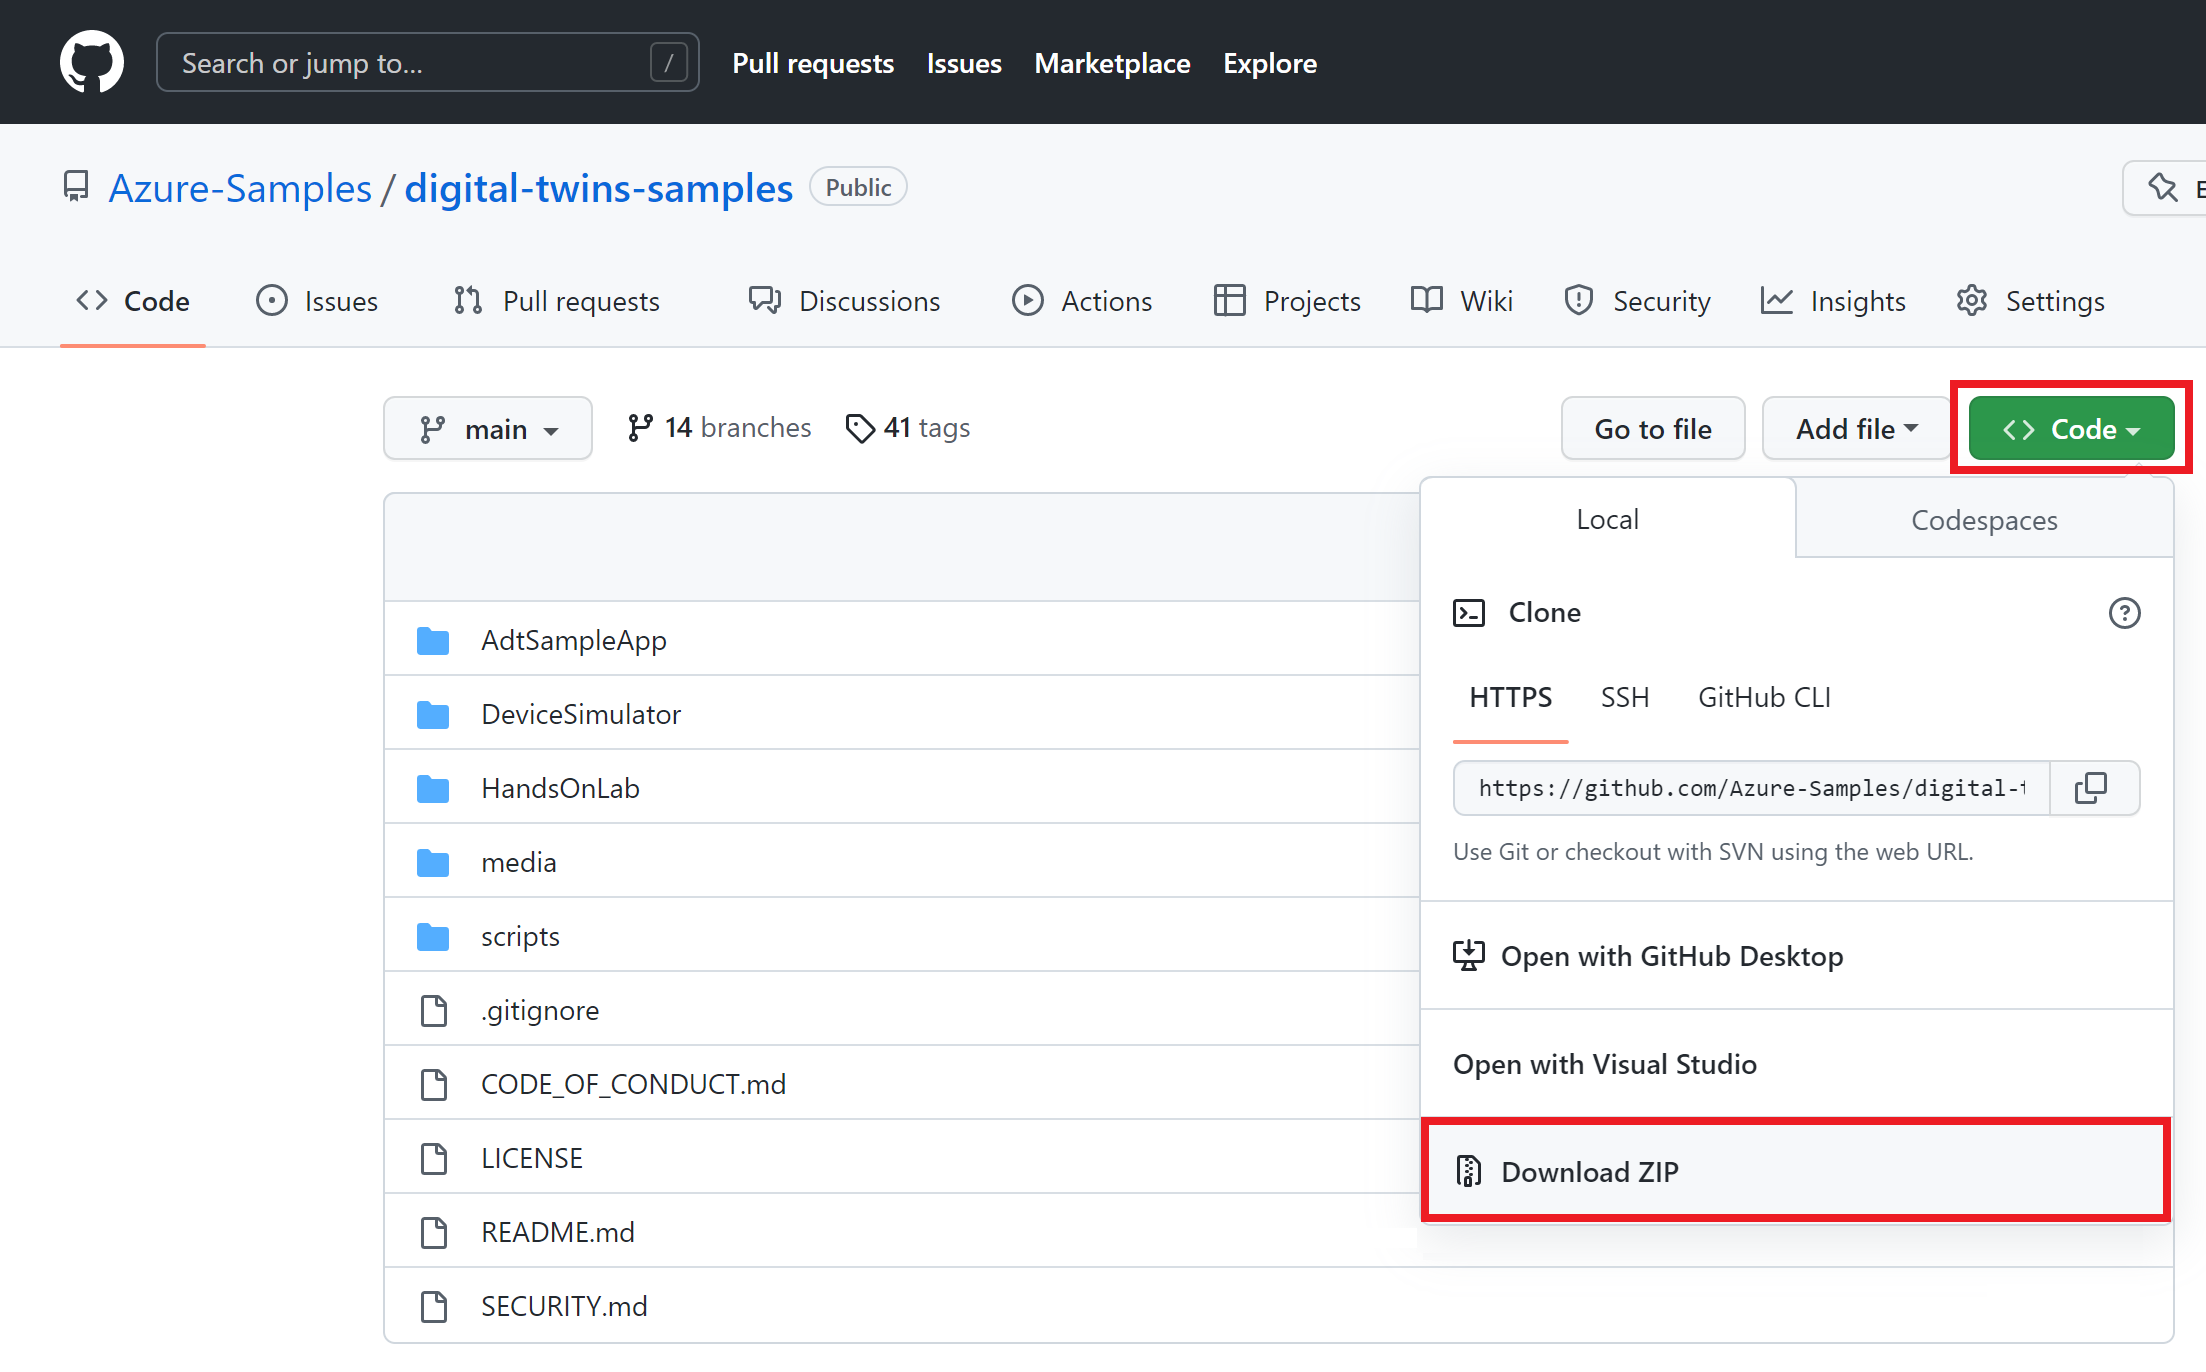
This button will download a copy of the sample repo in your machine, as digital-twins-samples-main.zip. Unzip the folder.
SignalR integration web app sample: This sample React web app will consume Azure Digital Twins telemetry data from an Azure SignalR Service.
- Navigate to the sample link and use the same download process to download a copy of the sample to your machine, as digitaltwins-signalr-webapp-sample-main.zip. Unzip the folder.

In this section, you create a basic Azure SignalR instance to use for your app. The following steps use the Azure portal to create a new instance, but you can also use the Azure CLI. For more information, see the az signalr create command in the Azure SignalR Service CLI Reference.
- Sign in to the Azure portal.
- In the upper-left side of the page, select + Create a resource.
- On the Create a resource page, in the Search services and marketplace text box, enter signalr and then select SignalR Service from the list.
- On the SignalR Service page, select Create.
- On the Basics tab, you enter the essential information for your new SignalR Service instance. Enter the following values:
| Field | Suggested Value | Description |
|---|---|---|
| Subscription | Choose your subscription | Select the subscription you want to use to create a new SignalR Service instance. |
| Resource group | Create a resource group named SignalRTestResources | Select or create a resource group for your SignalR resource. It's useful to create a new resource group for this tutorial instead of using an existing resource group. To free resources after completing the tutorial, delete the resource group. Deleting a resource group also deletes all of the resources that belong to the group. This action can't be undone. Before you delete a resource group, make certain that it doesn't contain resources you want to keep. For more information, see Using resource groups to manage your Azure resources. |
| Resource name | testsignalr | Enter a unique resource name to use for the SignalR resource. If testsignalr is already taken in your region, add a digit or character until the name is unique. The name must be a string of 1 to 63 characters and contain only numbers, letters, and the hyphen ( -) character. The name can't start or end with the hyphen character, and consecutive hyphen characters aren't valid. |
| Region | Choose your region | Select the appropriate region for your new SignalR Service instance. Azure SignalR Service isn't currently available in all regions. For more information, see Azure SignalR Service region availability |
| Pricing tier | Select Change and then choose Free (Dev/Test Only). Choose Select to confirm your choice of pricing tier. | Azure SignalR Service has three pricing tiers: Free, Standard, and Premium. Tutorials use the Free tier, unless noted otherwise in the prerequisites. For more information about the functionality differences between tiers and pricing, see Azure SignalR Service pricing |
| Service mode | Choose the appropriate service mode | Use Default when you host the SignalR hub logic in your web apps and use SignalR service as a proxy. Use Serverless when you use Serverless technologies such as Azure Functions to host the SignalR hub logic. Classic mode is only for backward compatibility and isn't recommended to use. For more information, see Service mode in Azure SignalR Service. |
You don't need to change the settings on the Networking and Tags tabs for the SignalR tutorials.
- Select the Review + create button at the bottom of the Basics tab.
- On the Review + create tab, review the values and then select Create. It takes a few moments for deployment to complete.
- When the deployment is complete, select the Go to resource button.
- On the SignalR resource page, select Keys from the menu on the left, under Settings.
- Copy the Connection string for the primary key. You need this connection string to configure your app later in this tutorial.
Leave the browser window open to the Azure portal, as you'll use it again in the next section.
Publish and configure the Azure Functions app
In this section, you'll set up two Azure functions:
- negotiate - A HTTP trigger function. It uses the SignalRConnectionInfo input binding to generate and return valid connection information.
- broadcast - An Event Grid trigger function. It receives Azure Digital Twins telemetry data through the event grid, and uses the output binding of the SignalR instance you created in the previous step to broadcast the message to all connected client applications.
Start Visual Studio or another code editor of your choice, and open the code solution in the digital-twins-samples-main\ADTSampleApp folder. Then do the following steps to create the functions:
In the SampleFunctionsApp project, create a new C# class called SignalRFunctions.cs.
Replace the contents of the class file with the following code:
using System;
using System.Collections.Generic;
using System.Threading.Tasks;
using Microsoft.AspNetCore.Http;
using Microsoft.Azure.WebJobs;
using Microsoft.Azure.WebJobs.Extensions.Http;
using Microsoft.Azure.WebJobs.Extensions.EventGrid;
using Microsoft.Azure.WebJobs.Extensions.SignalRService;
using Microsoft.Extensions.Logging;
using Newtonsoft.Json;
using Newtonsoft.Json.Linq;
using Azure.Messaging.EventGrid;

namespace SignalRFunction
{
    public static class SignalRFunctions
    {
        public static double temperature;

        [FunctionName("negotiate")]
        public static SignalRConnectionInfo GetSignalRInfo(
            [HttpTrigger(AuthorizationLevel.Anonymous, "post")] HttpRequest req,
            [SignalRConnectionInfo(HubName = "dttelemetry")] SignalRConnectionInfo connectionInfo)
        {
            return connectionInfo;
        }

        [FunctionName("broadcast")]
        public static Task SendMessage(
            [EventGridTrigger] EventGridEvent eventGridEvent,
            [SignalR(HubName = "dttelemetry")] IAsyncCollector<SignalRMessage> signalRMessages,
            ILogger log)
        {
            JObject eventGridData = (JObject)JsonConvert.DeserializeObject(eventGridEvent.Data.ToString());

            log.LogInformation($"Event grid message: {eventGridData}");

            var patch = (JObject)eventGridData["data"]["patch"][0];
            if (patch["path"].ToString().Contains("/Temperature"))
            {
                temperature = Math.Round(patch["value"].ToObject<double>(), 2);
            }

            var message = new Dictionary<object, object>
            {
                { "temperatureInFahrenheit", temperature},
            };

            return signalRMessages.AddAsync(
                new SignalRMessage
                {
                    Target = "newMessage",
                    Arguments = new[] { message }
                });
        }
    }
}
In Visual Studio's Package Manager Console window, or any command window on your machine, navigate to the folder digital-twins-samples-main\AdtSampleApp\SampleFunctionsApp, and run the following command to install the
SignalRServiceNuGet package to the project:dotnet add package Microsoft.Azure.WebJobs.Extensions.SignalRService --version 1.2.0Running this command should resolve any dependency issues in the class.
Publish the function to Azure, using your preferred method.
For instructions on how to publish the function using Visual Studio, see Develop Azure Functions using Visual Studio. For instructions on how to publish the function using Visual Studio Code, see Create a C# function in Azure using Visual Studio Code. For instructions on how to publish the function using the Azure CLI, see Create a C# function in Azure from the command line.
Configure the function
Next, configure the function to communicate with your Azure SignalR instance. You'll start by gathering the SignalR instance's connection string, and then add it to the functions app's settings.
Go to the Azure portal and search for the name of your SignalR instance in the search bar at the top of the portal. Select the instance to open it.
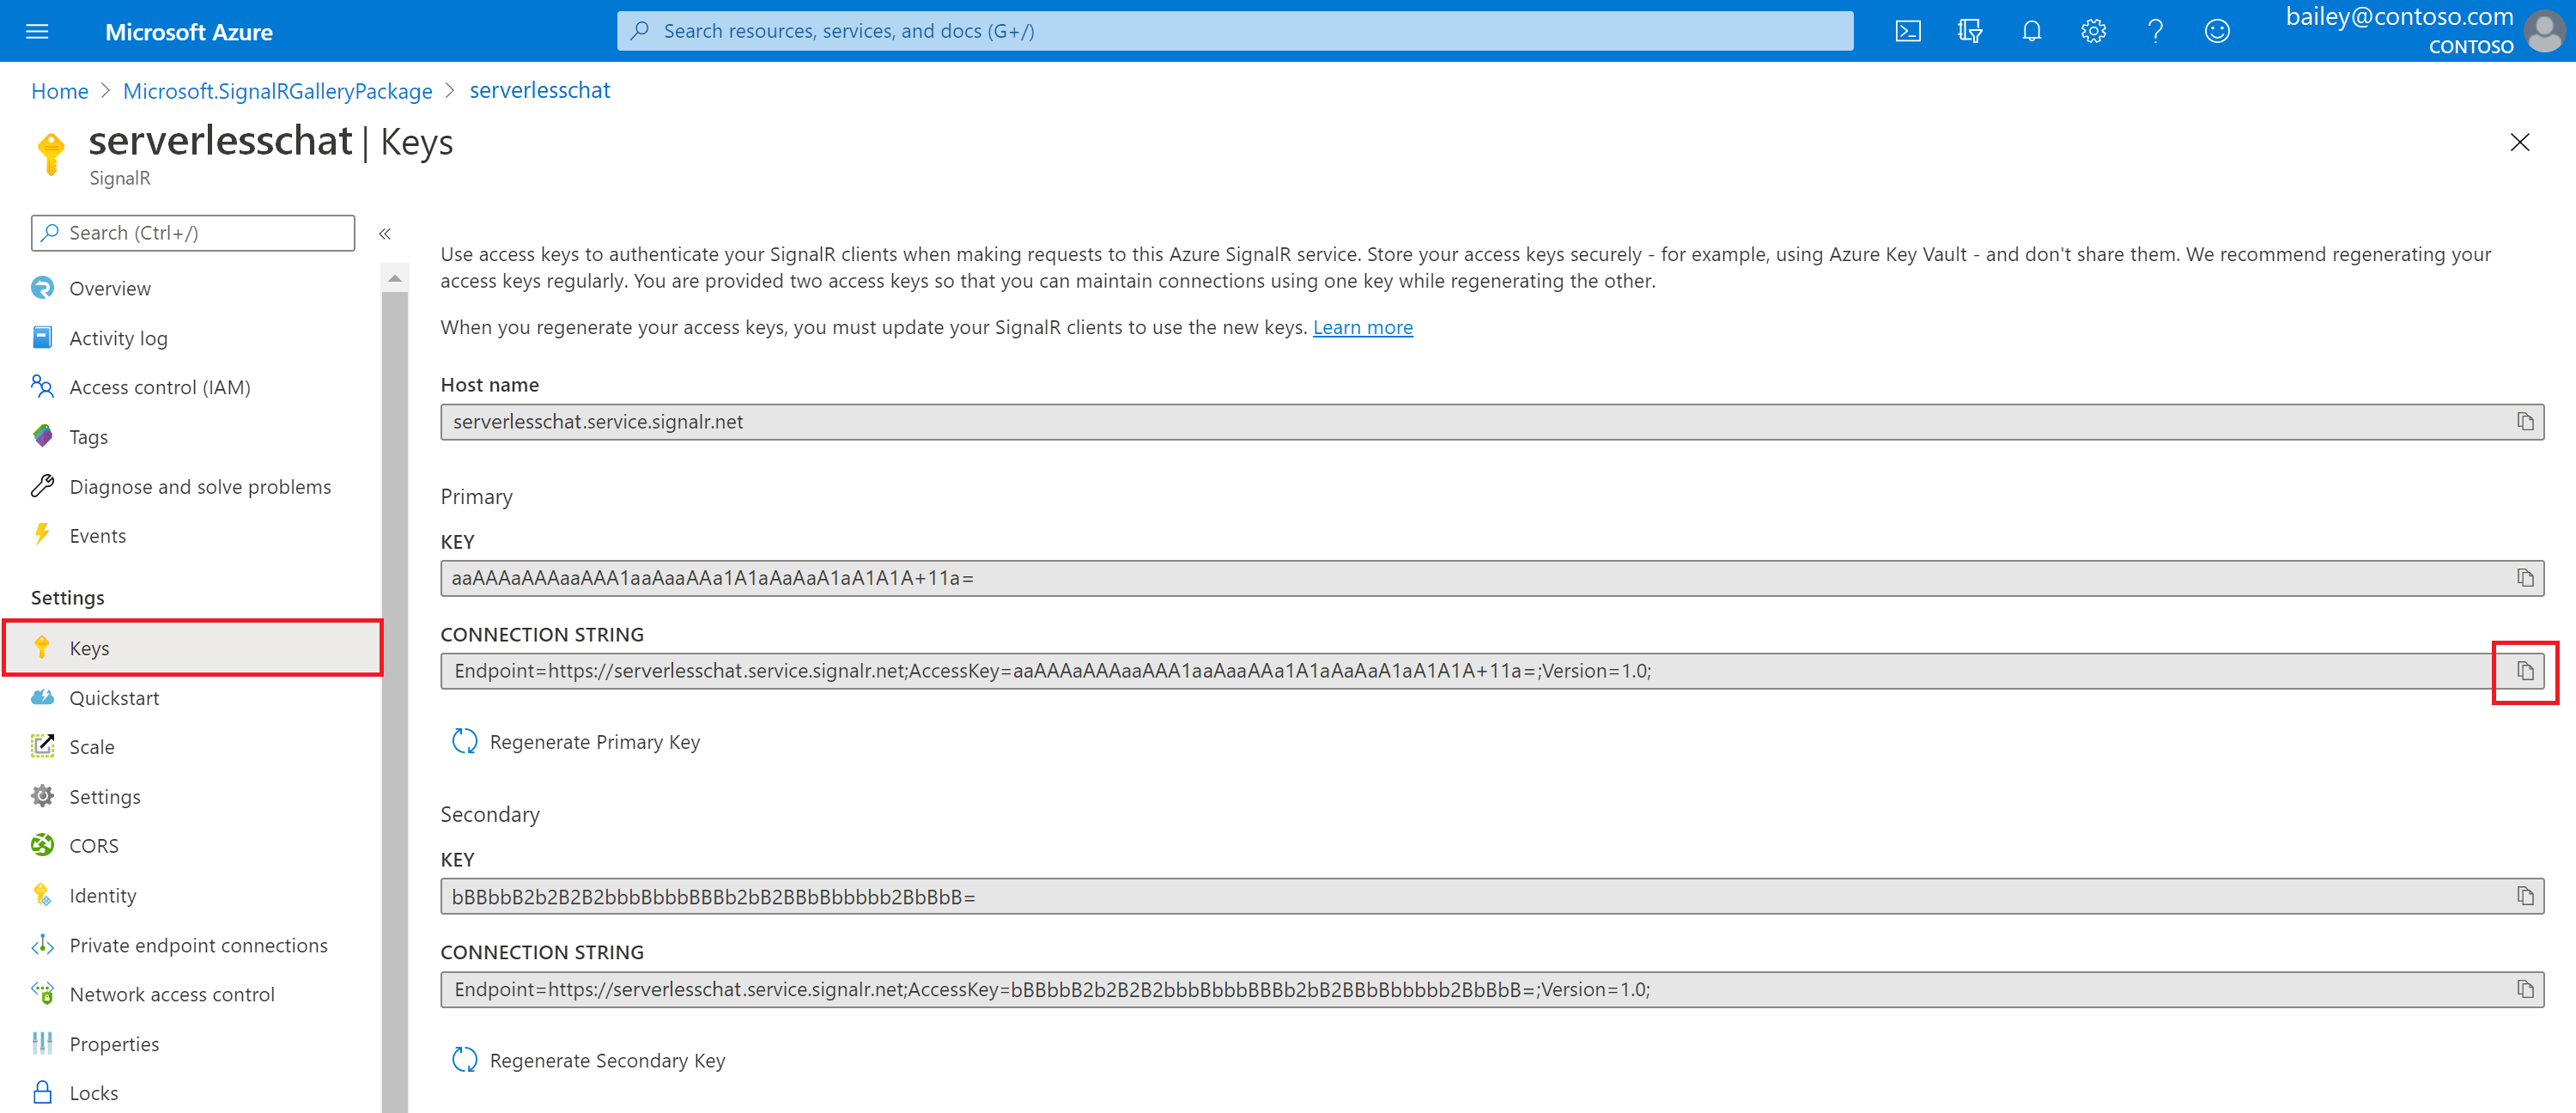
Select Keys from the instance menu to view the connection strings for the SignalR service instance.
Select the Copy icon to copy the Primary CONNECTION STRING.
Finally, add your Azure SignalR connection string to the function's app settings, using the following Azure CLI command. Also, replace the placeholders with your resource group and app service/function app name from the tutorial prerequisite. The command can be run in Azure Cloud Shell, or locally if you have the Azure CLI installed on your machine:
az functionapp config appsettings set --resource-group <your-resource-group> --name <your-function-app-name> --settings "AzureSignalRConnectionString=<your-Azure-SignalR-ConnectionString>"The output of this command prints all the app settings set up for your Azure function. Look for
AzureSignalRConnectionStringat the bottom of the list to verify it's been added.

Connect the function to Event Grid
Next, subscribe the broadcast Azure function to the Event Grid topic you created during the tutorial prerequisite. This action will allow telemetry data to flow from the thermostat67 twin through the Event Grid topic and to the function. From here, the function can broadcast the data to all the clients.
To broadcast the data, you'll create an Event subscription from your Event Grid topic to your broadcast Azure function as an endpoint.
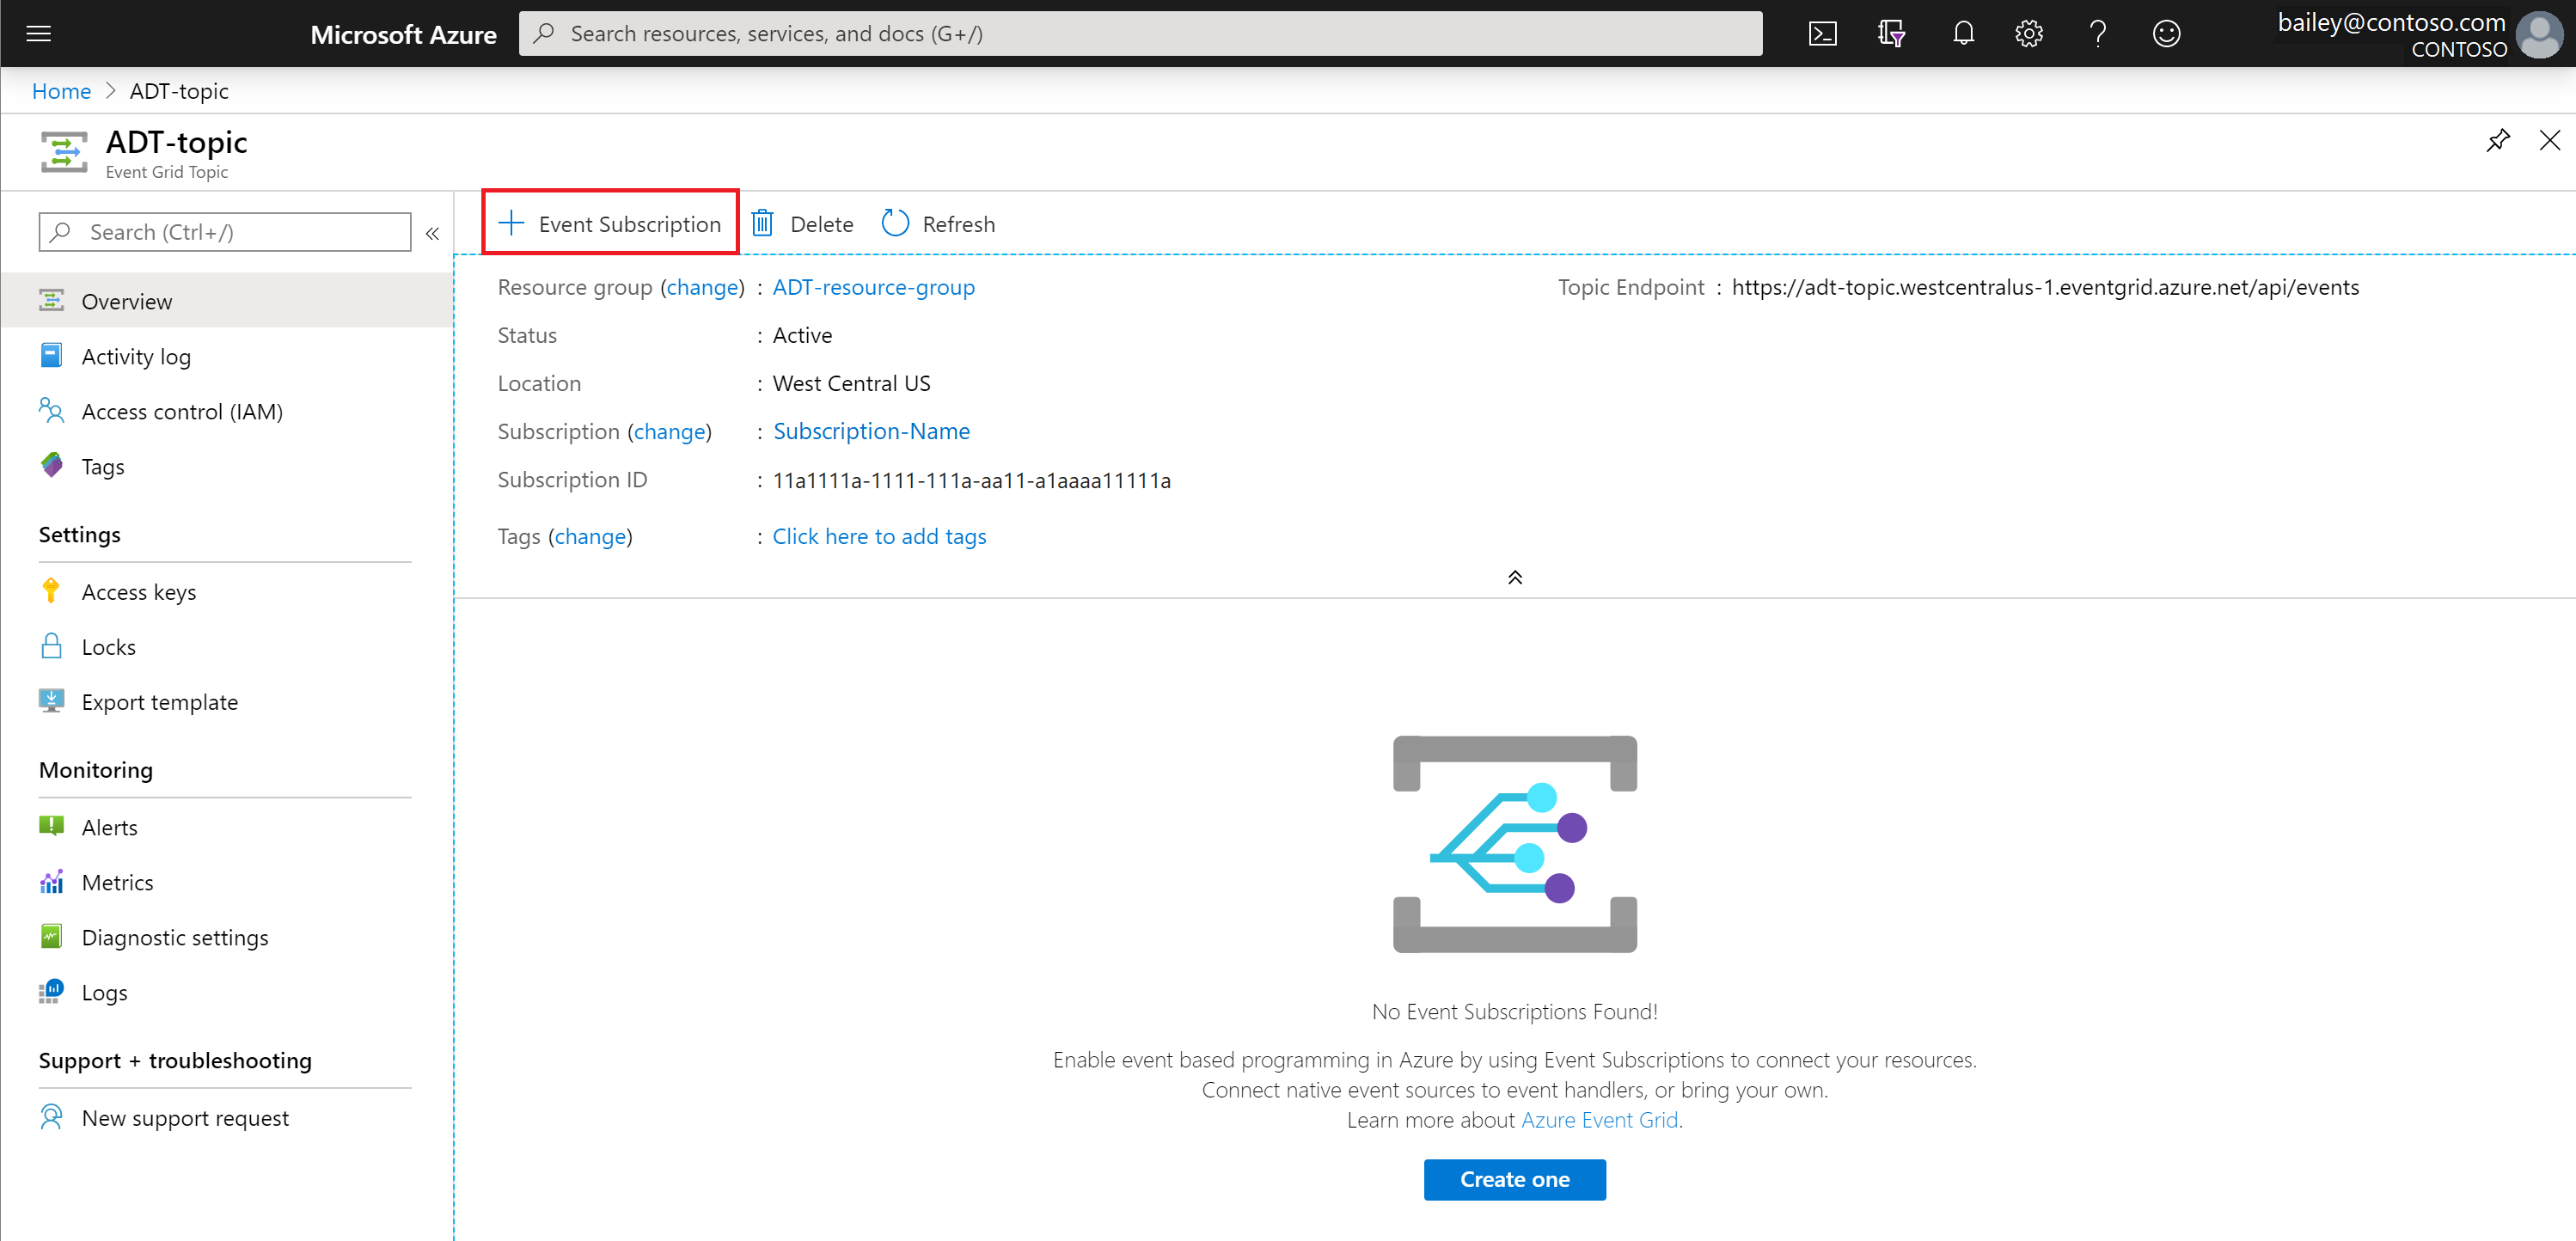
In the Azure portal, navigate to your Event Grid topic by searching for its name in the top search bar. Select + Event Subscription.
On the Create Event Subscription page, fill in the fields as follows (fields filled by default aren't mentioned):
- EVENT SUBSCRIPTION DETAILS > Name: Give a name to your event subscription.
- ENDPOINT DETAILS > Endpoint Type: Select Azure Function from the menu options.
- ENDPOINT DETAILS > Endpoint: Select the Select an endpoint link, which will open a Select Azure Function window:
- Fill in your Subscription, Resource group, Function app, and Function (broadcast). Some of these fields may autopopulate after selecting the subscription.
- Select Confirm Selection.
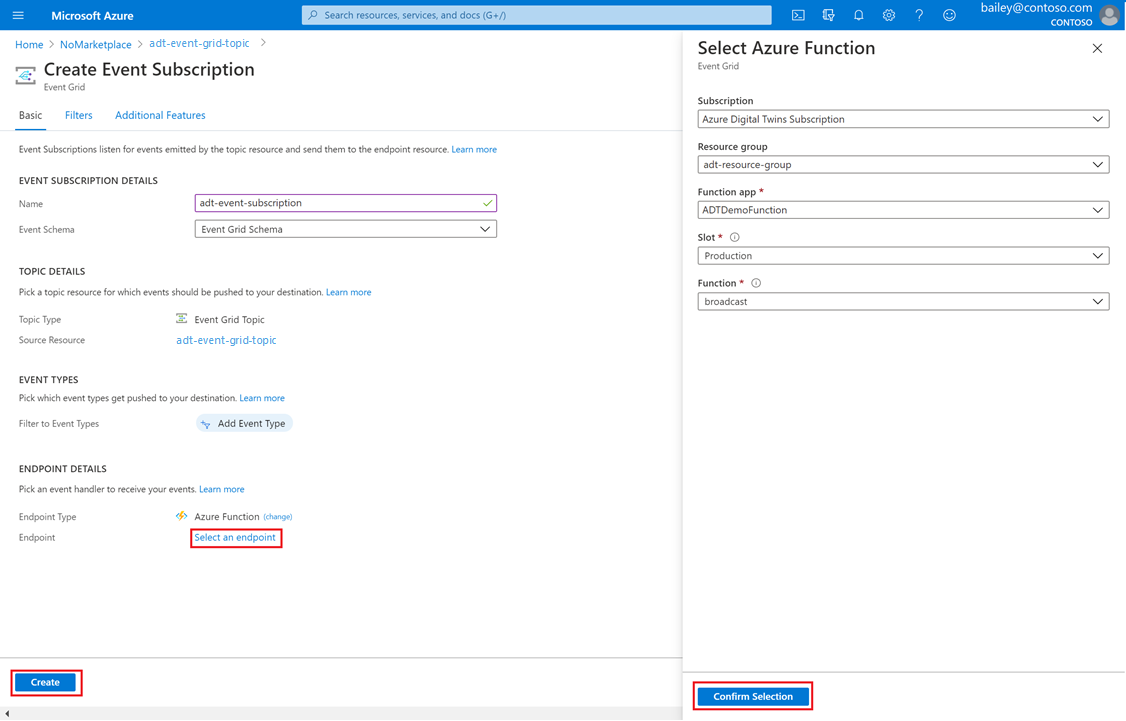
Back on the Create Event Subscription page, select Create.
At this point, you should see two event subscriptions in the Event Grid Topic page.

Configure and run the web app
In this section, you'll see the result in action. First, configure the sample client web app to connect to the Azure SignalR flow you've set up. Next, you'll start up the simulated device sample app that sends device telemetry data through your Azure Digital Twins instance. After that, you'll view the sample web app to see the simulated device data updating the sample web app in real time.
Configure the sample client web app
Next, you'll configure the sample client web app. Start by gathering the HTTP endpoint URL of the negotiate function, and then use it to configure the app code on your machine.
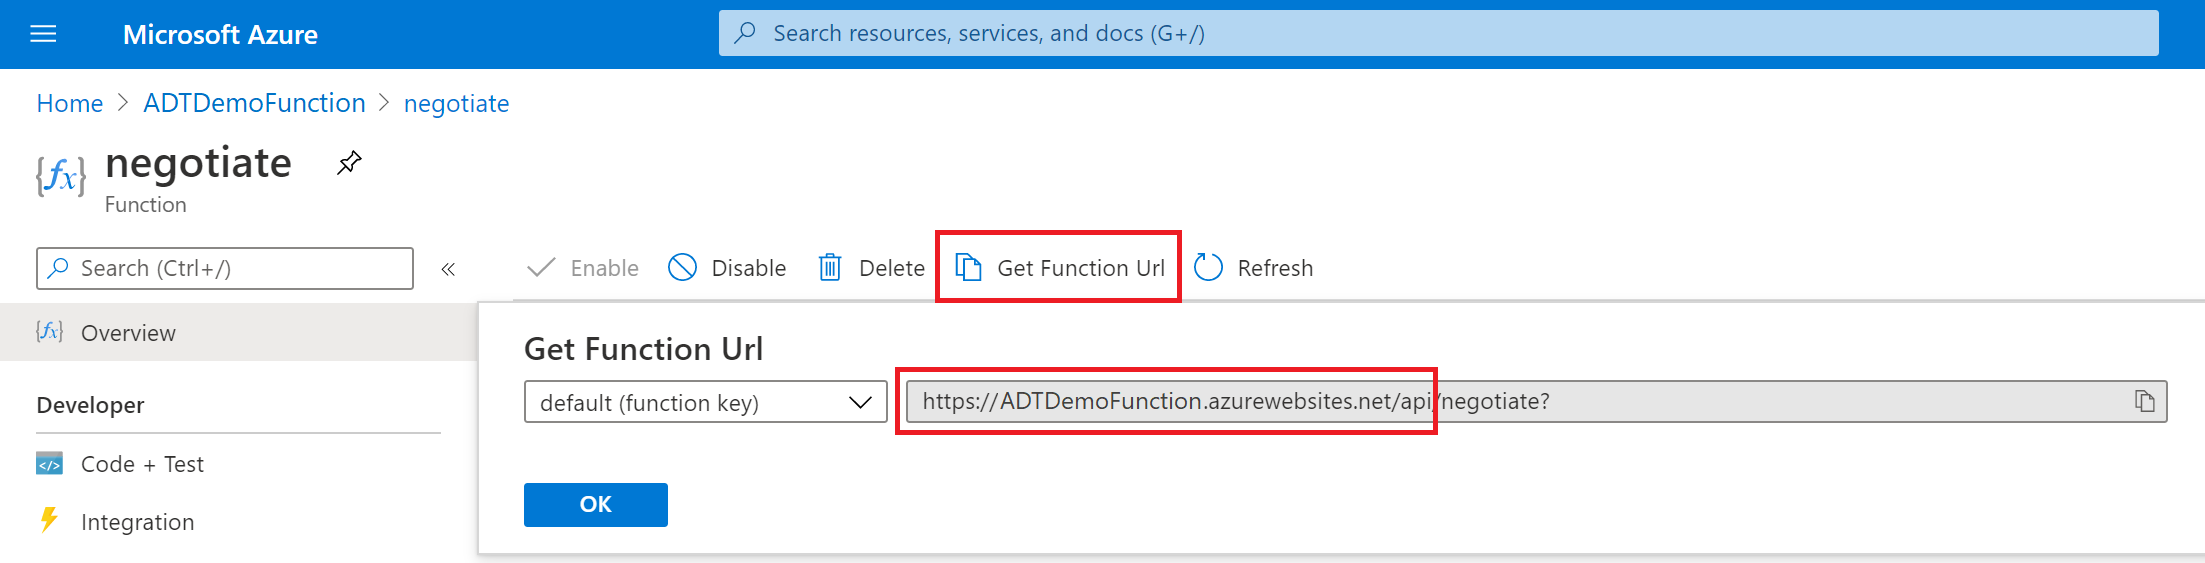
Go to the Azure portal's Function apps page and select your function app from the list. In the app menu, select Functions and choose the negotiate function.

Select Get function URL and copy the value up through /api (don't include the last /negotiate?). You'll use this value in the next step.
Using Visual Studio or any code editor of your choice, open the unzipped digitaltwins-signalr-webapp-sample-main folder that you downloaded in the Download the sample applications section.
Open the src/App.js file, and replace the function URL in
HubConnectionBuilderwith the HTTP endpoint URL of the negotiate function that you saved in the previous step:const hubConnection = new HubConnectionBuilder() .withUrl('<Function-URL>') .build();In Visual Studio's Developer command prompt or any command window on your machine, navigate to the digitaltwins-signalr-webapp-sample-main\src folder. Run the following command to install the dependent node packages:
npm install
Next, set permissions in your function app in the Azure portal:
In the Azure portal's Function apps page, select your function app instance.
Scroll down in the instance menu and select CORS. On the CORS page, add
http://localhost:3000as an allowed origin by entering it into the empty box. Check the box for Enable Access-Control-Allow-Credentials and select Save.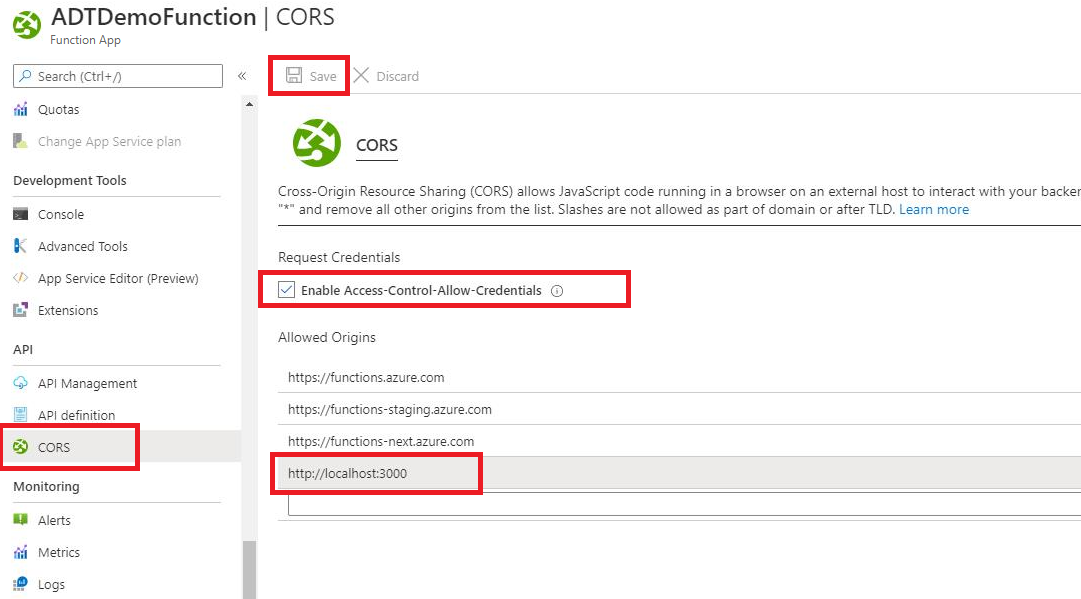
Run the device simulator
During the end-to-end tutorial prerequisite, you configured the device simulator to send data through an IoT Hub and to your Azure Digital Twins instance.
Now, start the simulator project located in digital-twins-samples-main\DeviceSimulator\DeviceSimulator.sln. If you're using Visual Studio, you can open the project and then run it with this button in the toolbar:

A console window will open and display simulated device temperature telemetry messages. These messages are being sent through your Azure Digital Twins instance, where they're then picked up by the Azure functions and SignalR.
You don't need to do anything else in this console, but leave it running while you complete the next step.
See the results
To see the results in action, start the SignalR integration web app sample. You can do so from any console window at the digitaltwins-signalr-webapp-sample-main\src location, by running this command:
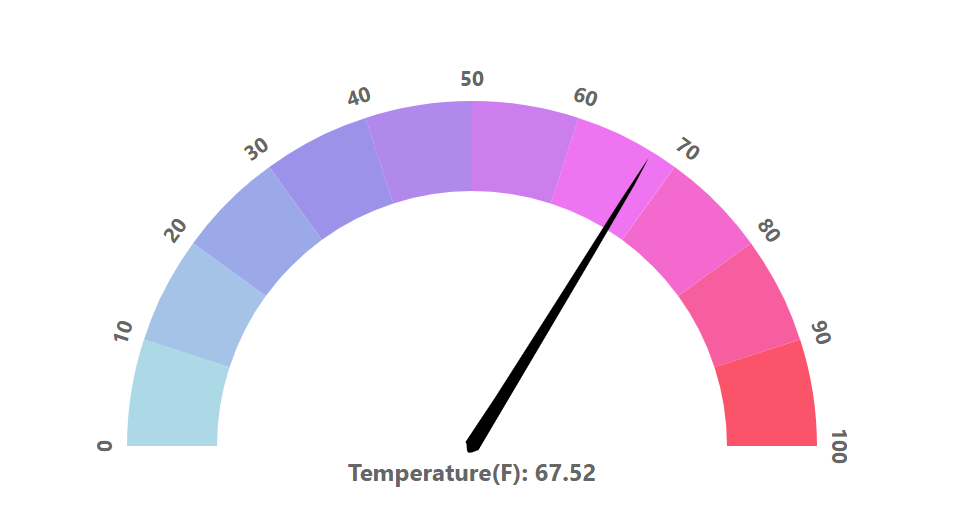
npm start
Running this command will open a browser window running the sample app, which displays a visual temperature gauge. Once the app is running, you should start seeing the temperature telemetry values from the device simulator that propagate through Azure Digital Twins being reflected by the web app in real time.
Clean up resources
If you no longer need the resources created in this article, follow these steps to delete them.
Using the Azure Cloud Shell or local Azure CLI, you can delete all Azure resources in a resource group with the az group delete command. Removing the resource group will also remove:
- The Azure Digital Twins instance (from the end-to-end tutorial)
- The IoT hub and the hub device registration (from the end-to-end tutorial)
- The Event Grid topic and associated subscriptions
- The Azure Functions app, including all three functions and associated resources like storage
- The Azure SignalR instance
Important
Deleting a resource group is irreversible. The resource group and all the resources contained in it are permanently deleted. Make sure that you do not accidentally delete the wrong resource group or resources.
az group delete --name <your-resource-group>
Finally, delete the project sample folders that you downloaded to your local machine (digital-twins-samples-main.zip, digitaltwins-signalr-webapp-sample-main.zip, and their unzipped counterparts).
Next steps
In this article, you set up Azure functions with SignalR to broadcast Azure Digital Twins telemetry events to a sample client application.
Next, learn more about Azure SignalR Service:
Or read more about Azure SignalR Service Authentication with Azure Functions:
Feedback
Coming soon: Throughout 2024 we will be phasing out GitHub Issues as the feedback mechanism for content and replacing it with a new feedback system. For more information see: https://aka.ms/ContentUserFeedback.
Submit and view feedback for