Map a business process to a Standard logic app workflow (preview)
Important
This capability is in public preview and isn't ready yet for production use. For more information, see the Supplemental Terms of Use for Microsoft Azure Previews.
After you create a business process for an application group in an integration environment, you can capture key business data for each stage in your business process. For this task, you specify the properties that your organization wants to track for each stage. You then map that stage to an actual operation and the corresponding data in a Standard logic app workflow created with Azure Logic Apps.
Prerequisites
An Azure account and subscription. If you don't have an Azure subscription, sign up for a free Azure account.
An integration environment that contains an application group, which has at least the Standard logic app resources, workflows, and operations for mapping to your business process stages
A business process with the stages where you want to define the key business data to capture, and then map to actual operations and property values in a Standard logic app workflow
Note
You can't start mapping if your application group doesn't contain any Standard logic app resources, workflows, and operations.
Define a key business property to capture
In the Azure portal, find and open your integration environment.
On your integration environment menu, under Environment, select Applications.
On the Applications page, select the application group that has the business process that you want.
On the application group menu, under Business process tracking, select Business processes.
From the Business processes list, select the business process that you want.
On the process designer, select the stage where you want to define the business properties to capture.
On the Edit stage pane, under Properties, on each row, provide the following information about each business property value to capture:
Property Type Name for the business property String or Integer If you need to add another property, select Add property.
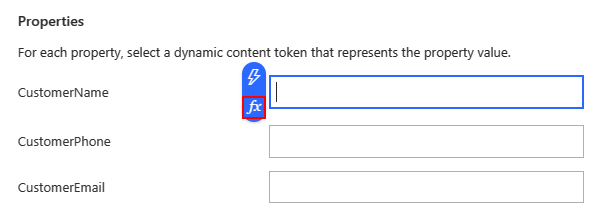
This example specifies to track the business properties named CustomerName, CustomerPhone, and CustomerEmail:

When you're done, continue on to map the current stage to an actual Standard logic app workflow operation and the data that you want.
Map a business process stage
After you define the business properties to capture, map the stage to an operation and the data that you want to capture in a Standard logic app workflow.
Note
You can't start mapping if your application group doesn't contain any Standard logic app resources, workflows, and operations.
Map stage to logic app workflow operation
On the Edit stage pane, select Show data source.
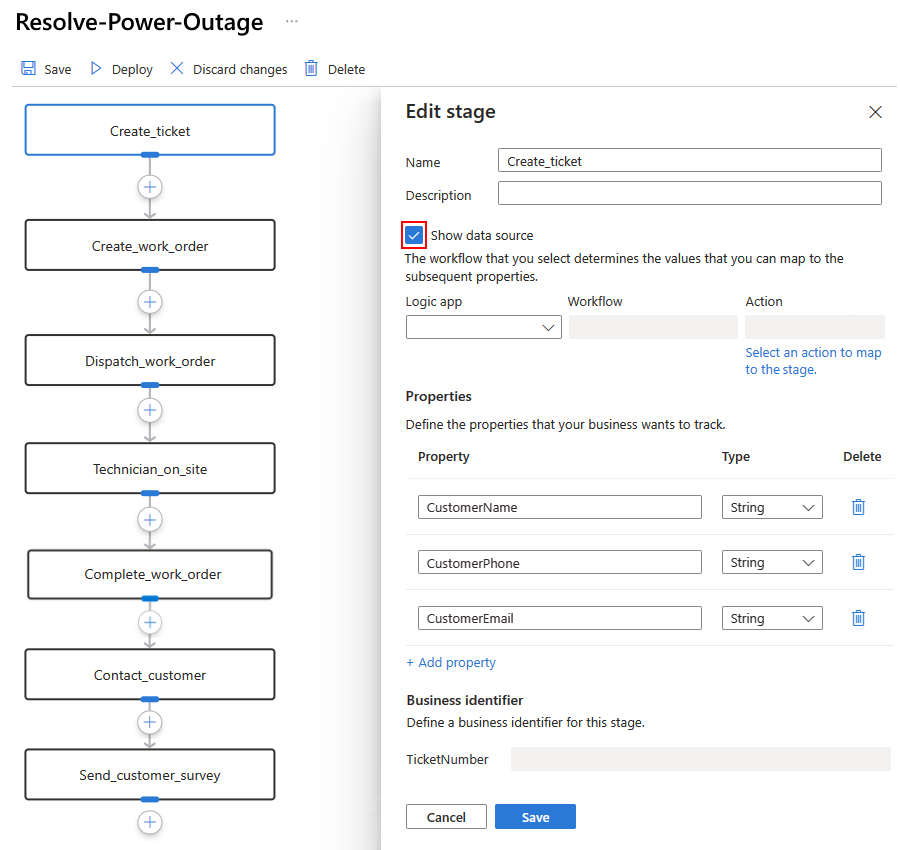
From the Logic app list, select the Standard logic app resource.
From the Workflow list, select the workflow.
Under the Action box, select Select an action to map to the stage.
On the read-only workflow designer, select the operation that you want to map.
The Standard logic app workflow designer in Azure Logic Apps opens in read-only mode. To the designer's right side, a pane shows the following items:
Item Description Workflow position Shows the currently selected operation in the Standard logic app workflow. Properties Shows the business properties that you previously specified. Business ID Specifies the actual value for mapping to the business identifier that you previously specified. This identifier represents a unique value for a specific transaction such as an order number, case number, or ticket number that exists across all your business stages.
This example uses the identifier named TicketNumber to correlate events across the different systems in the example business process, which include CRM, Work Order Management, and Marketing.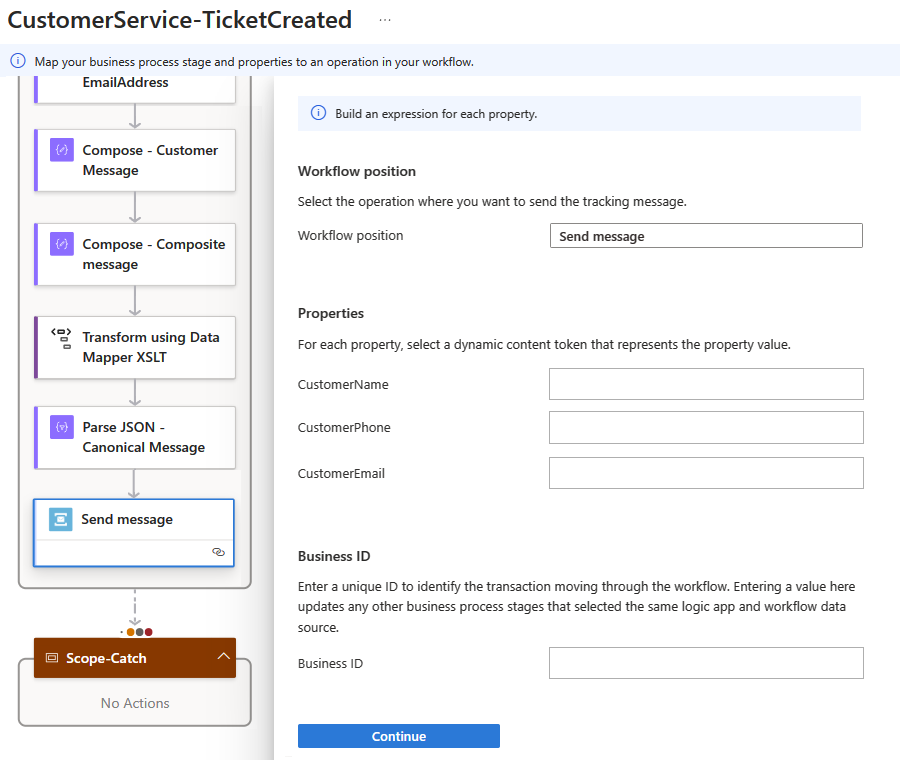
Continue on to map your business properties to operation outputs.


Map business properties to operation outputs
In the Properties section, follow these steps to map each property's value to the output from an operation in the workflow.
For each property to map, select inside the property value box, and then select the dynamic content option (lightning icon):
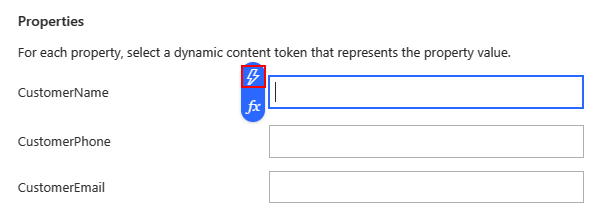
The dynamic content list opens and shows the available operations and their outputs. This list shows only those operations and the outputs that precede the currently selected operation.
Choose one of the following options:
If you can use the output as provided, select that output.
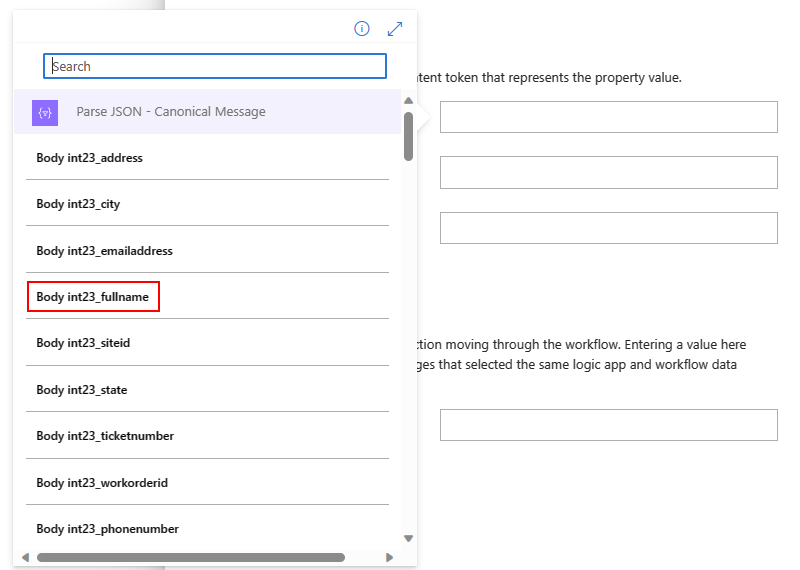
If you have to convert the output into another format or value, you can build an expression that uses the provided functions to produce the necessary result.
To close the dynamic content list, select inside the property value box.
Now select the expression editor option (formula icon):
The expression editor opens and shows the functions that you can use to build an expression:
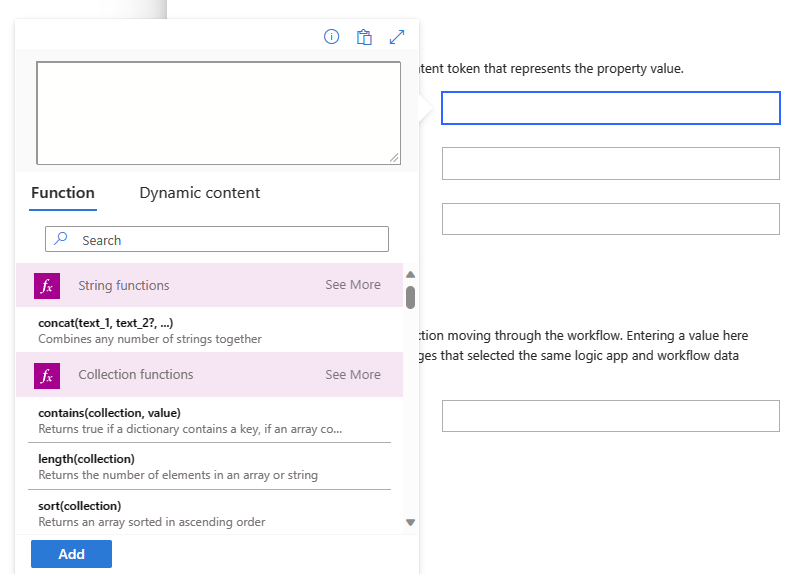
From the Function list, select the function to start your expression.
To include the operation's output in your expression, next the Function list label, select Dynamic content, and select the output that you want.
When you're done with your expression, select Add.
Your expression resolves to a token and appears in the property value box.
For each property, repeat the preceding steps as necessary.
Continue on to map the business identifier to an operation output.


Map business identifier to an operation output
In the Business identifier section, follow these steps to map the previously defined business identifier to an operation output.
Select inside the Business ID box, and then select the dynamic content option (lightning icon).
Choose one of the following options:
If you can use the output as provided, select that output.
Note
Make sure to select a value that exists in each business process stage, which means in each workflow that you map to each business stage.
If you have to convert the output into another format or value, you can build an expression that uses the provided functions to produce the necessary result. Follow the earlier steps for building such an expression.
When you're done, select Continue, which returns you to the Edit stage pane.
After you finish mapping an operation to a business stage, the platform sends the selected information to your database in Azure Data Explorer.
On the Edit stage pane, select Save.
The following example shows a completely mapped business process stage:

Finish mapping your business process
Repeat the steps to map a business process stage as necessary.
Save the changes to your business process often. On the process designer toolbar, select Save.
When you finish, save your business process one more time.
Now, deploy your business process and tracking profile.
Next steps
Feedback
Coming soon: Throughout 2024 we will be phasing out GitHub Issues as the feedback mechanism for content and replacing it with a new feedback system. For more information see: https://aka.ms/ContentUserFeedback.
Submit and view feedback for