Send new, approved coefficients to a running predictor through MQTT. The predictor
uses them for subsequent readings. Receiving the update itself doesn't produce a prediction.
This example starts with an approved model from your application, called the
supervisor. The custom predictor keeps its coefficients in memory.
How the feedback loop works
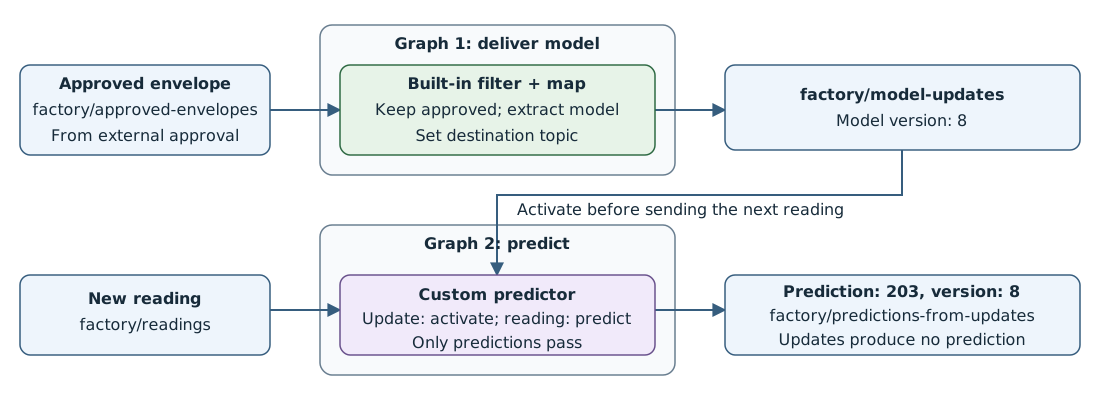
Two DataflowGraph resources route approved models and generate predictions.
A reading uses v8 after that predictor instance activates it.
- Approve externally. The supervisor publishes an approved envelope on
factory/approved-envelopes.
- Republish with built-in transforms.
republish-approved-model filters approval, extracts approvedModel, and changes the destination topic to factory/model-updates.
- Activate, then predict.
predict-from-approved-updates delivers updates and factory/readings to the customer-built predictor. An update changes its model without a prediction; a later reading produces a prediction on factory/predictions-from-updates. Update acknowledgments are suppressed.
The map sets $metadata.topic to "model-updates"; the destination resolves
factory/${outputTopic} to factory/model-updates. A fixed
dataDestination: factory/model-updates also works.
For an optional next cycle, an external application
matches predictions with measured weights,
fits and reviews a candidate,
and sends it to the supervisor on factory/model-proposals.
For state-store delivery, store approved coefficients
and read them for prediction.
Prerequisites
Complete the shared example prerequisites, including the default profile and factory-mqtt endpoint. Use YAML for debugging and Azure CLI or Bicep for production management.
Use the existing default registry endpoint for built-in transforms and factory-artifacts for the custom artifact. Complete the shared single-instance profile setup before deploying these graphs so readings and updates reach the same predictor instance. The deployment tabs don't create or change profiles or registry endpoints.
For CLI deployments, set AIO_INSTANCE_NAME and RESOURCE_GROUP to your existing instance and resource group. For Bicep deployments, also set CUSTOM_LOCATION_NAME to the instance's existing custom location.
These topics connect the supervisor, republishing graph, and prediction graph:
| Topic |
Publisher → consumer |
Purpose |
factory/readings |
Sensors → prediction graph |
Trigger predictions |
factory/approved-envelopes |
Supervisor → republishing graph |
Approved model plus review information |
factory/model-updates |
Republishing graph → prediction graph |
Extracted, approved model payload |
factory/predictions-from-updates |
Prediction graph → downstream correlator |
Predictions, never model updates |
The supervisor publishes this synthetic envelope after approval under your
application's policy. Broker authorization must restrict publication on
factory/approved-envelopes and factory/model-updates to trusted writers;
approval depends on that trust as well as the approved: true field.
The sample selects messages by kind, not by topic. Only trusted publishers may
publish to either predictor input topic, including factory/readings. For untrusted
sensor publishers, validate the topic and message kind before the predictor.
Deploy both graphs by using the deployment tabs in the following section.
Subscribe to factory/predictions-from-updates, then publish this envelope to
factory/approved-envelopes. Check predictor diagnostics for activation before
publishing the example reading. Use your broker's authentication and TLS settings.
{
  "approval": {"approved": true, "reviewId": "review-42"},
  "approvedModel": {
    "kind": "model",
    "assetId": "line-1",
    "updateId": "update-42",
    "expectedModelVersion": 7,
    "modelVersion": 8,
    "speedCoefficient": 2,
    "temperatureCoefficient": 0.5,
    "intercept": 173
  }
}
Republishing graph:
In the operations experience, open your instance and select Data flow graph > Create data flow graph.
Name the graph republish-approved-model and select the default profile.
Add source source with endpoint factory-mqtt and topic factory/approved-envelopes.
Add filter transform approved-only, using azureiotoperations/graph-dataflow-filter:1.1.0 from registry endpoint default. Set input approval.approved ?? false and expression $1 != true. This rule drops unapproved envelopes.
Add map transform extract-and-route, using azureiotoperations/graph-dataflow-map:1.0.0 from registry endpoint default. Configure these rules in order:
| Input |
Output |
Expression |
approvedModel.kind |
kind |
Leave empty |
approvedModel.assetId |
assetId |
Leave empty |
approvedModel.updateId |
updateId |
Leave empty |
approvedModel.expectedModelVersion |
expectedModelVersion |
Leave empty |
approvedModel.modelVersion |
modelVersion |
Leave empty |
approvedModel.speedCoefficient |
speedCoefficient |
Leave empty |
approvedModel.temperatureCoefficient |
temperatureCoefficient |
Leave empty |
approvedModel.intercept |
intercept |
Leave empty |
approvedModel.assetId |
$metadata.topic |
"model-updates" |
Add destination destination with endpoint factory-mqtt and topic factory/${outputTopic}.
Connect source → approved-only → extract-and-route → destination and select Save.
Save the complete graph properties as graph.json. Transform rules are escaped JSON strings in configuration.value.
{
  "mode": "Enabled",
  "nodes": [
    {
      "name": "source",
      "nodeType": "Source",
      "sourceSettings": {
        "endpointRef": "factory-mqtt",
        "dataSources": ["factory/approved-envelopes"]
      }
    },
    {
      "name": "approved-only",
      "nodeType": "Graph",
      "graphSettings": {
        "registryEndpointRef": "default",
        "artifact": "azureiotoperations/graph-dataflow-filter:1.1.0",
        "configuration": [
          {
            "key": "rules",
            "value": "{\"filter\":[{\"inputs\":[\"approval.approved ?? false\"],\"expression\":\"$1 != true\"}]}"
          }
        ]
      }
    },
    {
      "name": "extract-and-route",
      "nodeType": "Graph",
      "graphSettings": {
        "registryEndpointRef": "default",
        "artifact": "azureiotoperations/graph-dataflow-map:1.0.0",
        "configuration": [
          {
            "key": "rules",
            "value": "{\"map\":[{\"inputs\":[\"approvedModel.kind\"],\"output\":\"kind\"},{\"inputs\":[\"approvedModel.assetId\"],\"output\":\"assetId\"},{\"inputs\":[\"approvedModel.updateId\"],\"output\":\"updateId\"},{\"inputs\":[\"approvedModel.expectedModelVersion\"],\"output\":\"expectedModelVersion\"},{\"inputs\":[\"approvedModel.modelVersion\"],\"output\":\"modelVersion\"},{\"inputs\":[\"approvedModel.speedCoefficient\"],\"output\":\"speedCoefficient\"},{\"inputs\":[\"approvedModel.temperatureCoefficient\"],\"output\":\"temperatureCoefficient\"},{\"inputs\":[\"approvedModel.intercept\"],\"output\":\"intercept\"},{\"inputs\":[\"approvedModel.assetId\"],\"output\":\"$metadata.topic\",\"expression\":\"\\\"model-updates\\\"\"}]}"
          }
        ]
      }
    },
    {
      "name": "destination",
      "nodeType": "Destination",
      "destinationSettings": {
        "endpointRef": "factory-mqtt",
        "dataDestination": "factory/${outputTopic}"
      }
    }
  ],
  "nodeConnections": [
    {"from": {"name": "source"}, "to": {"name": "approved-only"}},
    {"from": {"name": "approved-only"}, "to": {"name": "extract-and-route"}},
    {"from": {"name": "extract-and-route"}, "to": {"name": "destination"}}
  ]
}
az iot ops dataflowgraph apply \
  --name republish-approved-model \
  --instance $AIO_INSTANCE_NAME \
  --resource-group $RESOURCE_GROUP \
  --config-file graph.json
Save as main.bicep. All parent resources already exist in the resource group. The backslash in factory/\${outputTopic} preserves the MQTT topic template instead of evaluating it as Bicep interpolation.
param aioInstanceName string
param customLocationName string

resource aioInstance 'Microsoft.IoTOperations/instances@2026-07-01' existing = {
  name: aioInstanceName
}

resource customLocation 'Microsoft.ExtendedLocation/customLocations@2021-08-31-preview' existing = {
  name: customLocationName
}

resource defaultDataflowProfile 'Microsoft.IoTOperations/instances/dataflowProfiles@2026-07-01' existing = {
  parent: aioInstance
  name: 'default'
}

resource dataflowGraph 'Microsoft.IoTOperations/instances/dataflowProfiles/dataflowGraphs@2026-07-01' = {
  parent: defaultDataflowProfile
  name: 'republish-approved-model'
  extendedLocation: {
    name: customLocation.id
    type: 'CustomLocation'
  }
  properties: {
    mode: 'Enabled'
    nodes: [
      {
        name: 'source'
        nodeType: 'Source'
        sourceSettings: {
          endpointRef: 'factory-mqtt'
          dataSources: ['factory/approved-envelopes']
        }
      }
      {
        name: 'approved-only'
        nodeType: 'Graph'
        graphSettings: {
          registryEndpointRef: 'default'
          artifact: 'azureiotoperations/graph-dataflow-filter:1.1.0'
          configuration: [
            {
              key: 'rules'
              value: '{"filter":[{"inputs":["approval.approved ?? false"],"expression":"$1 != true"}]}'
            }
          ]
        }
      }
      {
        name: 'extract-and-route'
        nodeType: 'Graph'
        graphSettings: {
          registryEndpointRef: 'default'
          artifact: 'azureiotoperations/graph-dataflow-map:1.0.0'
          configuration: [
            {
              key: 'rules'
              value: '{"map":[{"inputs":["approvedModel.kind"],"output":"kind"},{"inputs":["approvedModel.assetId"],"output":"assetId"},{"inputs":["approvedModel.updateId"],"output":"updateId"},{"inputs":["approvedModel.expectedModelVersion"],"output":"expectedModelVersion"},{"inputs":["approvedModel.modelVersion"],"output":"modelVersion"},{"inputs":["approvedModel.speedCoefficient"],"output":"speedCoefficient"},{"inputs":["approvedModel.temperatureCoefficient"],"output":"temperatureCoefficient"},{"inputs":["approvedModel.intercept"],"output":"intercept"},{"inputs":["approvedModel.assetId"],"output":"$metadata.topic","expression":"\\"model-updates\\""}]}'
            }
          ]
        }
      }
      {
        name: 'destination'
        nodeType: 'Destination'
        destinationSettings: {
          endpointRef: 'factory-mqtt'
          dataDestination: 'factory/\${outputTopic}'
        }
      }
    ]
    nodeConnections: [
      { from: { name: 'source' }, to: { name: 'approved-only' } }
      { from: { name: 'approved-only' }, to: { name: 'extract-and-route' } }
      { from: { name: 'extract-and-route' }, to: { name: 'destination' } }
    ]
  }
}
az deployment group create \
  --resource-group $RESOURCE_GROUP \
  --template-file main.bicep \
  --parameters aioInstanceName="$AIO_INSTANCE_NAME" customLocationName="$CUSTOM_LOCATION_NAME"
Important
The use of Kubernetes deployment manifests isn't supported in production environments and should only be used for debugging and testing.
Save as republish-approved-model.yaml.
apiVersion: connectivity.iotoperations.azure.com/v1
kind: DataflowGraph
metadata:
  name: republish-approved-model
  namespace: azure-iot-operations
spec:
  profileRef: default
  mode: Enabled
  nodes:
    - name: source
      nodeType: Source
      sourceSettings:
        endpointRef: factory-mqtt
        dataSources: [factory/approved-envelopes]
    - name: approved-only
      nodeType: Graph
      graphSettings:
        registryEndpointRef: default
        artifact: azureiotoperations/graph-dataflow-filter:1.1.0
        configuration:
          - key: rules
            value: |
              {"filter":[{"inputs":["approval.approved ?? false"],"expression":"$1 != true"}]}
    - name: extract-and-route
      nodeType: Graph
      graphSettings:
        registryEndpointRef: default
        artifact: azureiotoperations/graph-dataflow-map:1.0.0
        configuration:
          - key: rules
            value: |
              {
                "map": [
                  {"inputs":["approvedModel.kind"],"output":"kind"},
                  {"inputs":["approvedModel.assetId"],"output":"assetId"},
                  {"inputs":["approvedModel.updateId"],"output":"updateId"},
                  {"inputs":["approvedModel.expectedModelVersion"],"output":"expectedModelVersion"},
                  {"inputs":["approvedModel.modelVersion"],"output":"modelVersion"},
                  {"inputs":["approvedModel.speedCoefficient"],"output":"speedCoefficient"},
                  {"inputs":["approvedModel.temperatureCoefficient"],"output":"temperatureCoefficient"},
                  {"inputs":["approvedModel.intercept"],"output":"intercept"},
                  {"inputs":["approvedModel.assetId"],"output":"$metadata.topic","expression":"\"model-updates\""}
                ]
              }
    - name: destination
      nodeType: Destination
      destinationSettings:
        endpointRef: factory-mqtt
        dataDestination: "factory/${outputTopic}"
  nodeConnections:
    - from: { name: source }
      to: { name: approved-only }
    - from: { name: approved-only }
      to: { name: extract-and-route }
    - from: { name: extract-and-route }
      to: { name: destination }
kubectl apply -f republish-approved-model.yaml
The graph publishes the extracted model below on factory/model-updates.
An envelope with false or missing approval produces no output.
{"kind":"model","assetId":"line-1","updateId":"update-42","expectedModelVersion":7,"modelVersion":8,"speedCoefficient":2,"temperatureCoefficient":0.5,"intercept":173}
For dynamic topic routing, keep
destinations within an operator-approved set.
Prediction graph: use the custom graph-versioned-predictor sample
from the factory-artifacts registry endpoint for ghcr.io, as described in
the sample prerequisites.
The sample starts asset line-1 with model v7 and coefficients 2, 0.5,
and 175, ready to accept the approved v8 message.
This sample uses a custom artifact from ghcr.io. The operations experience supports custom artifacts from Azure Container Registry (ACR), not GHCR. Use the Azure CLI or Bicep tab to deploy this example unchanged, including the filter after the custom predictor.
For the supported custom-artifact UI workflow, see Use WASM transforms. The operations experience generates connections from the selected artifact; it doesn't support editing those connections. Republishing the predictor alone to ACR doesn't create this example's complete predictor-and-filter pipeline.
Save the complete graph properties as graph.json, replacing the file used for the republishing graph after you apply it.
{
  "mode": "Enabled",
  "nodes": [
    {
      "name": "source",
      "nodeType": "Source",
      "sourceSettings": {
        "endpointRef": "factory-mqtt",
        "dataSources": ["factory/readings", "factory/model-updates"]
      }
    },
    {
      "name": "predictor",
      "nodeType": "Graph",
      "graphSettings": {
        "registryEndpointRef": "factory-artifacts",
        "artifact": "azure-samples/explore-iot-operations/dataflow-patterns/graph-versioned-predictor:1.0.0-rc.4"
      }
    },
    {
      "name": "remove-acknowledgments",
      "nodeType": "Graph",
      "graphSettings": {
        "registryEndpointRef": "default",
        "artifact": "azureiotoperations/graph-dataflow-filter:1.1.0",
        "configuration": [
          {
            "key": "rules",
            "value": "{\"filter\":[{\"inputs\":[\"kind ?? \\\"unknown\\\"\"],\"expression\":\"$1 != \\\"prediction\\\"\"}]}"
          }
        ]
      }
    },
    {
      "name": "destination",
      "nodeType": "Destination",
      "destinationSettings": {
        "endpointRef": "factory-mqtt",
        "dataDestination": "factory/predictions-from-updates"
      }
    }
  ],
  "nodeConnections": [
    {"from": {"name": "source"}, "to": {"name": "predictor"}},
    {"from": {"name": "predictor"}, "to": {"name": "remove-acknowledgments"}},
    {"from": {"name": "remove-acknowledgments"}, "to": {"name": "destination"}}
  ]
}
az iot ops dataflowgraph apply \
  --name predict-from-approved-updates \
  --instance $AIO_INSTANCE_NAME \
  --resource-group $RESOURCE_GROUP \
  --config-file graph.json
Save as main.bicep, replacing the file used for the republishing graph after you deploy it. Deploying this graph doesn't remove the republishing graph.
param aioInstanceName string
param customLocationName string

resource aioInstance 'Microsoft.IoTOperations/instances@2026-07-01' existing = {
  name: aioInstanceName
}

resource customLocation 'Microsoft.ExtendedLocation/customLocations@2021-08-31-preview' existing = {
  name: customLocationName
}

resource defaultDataflowProfile 'Microsoft.IoTOperations/instances/dataflowProfiles@2026-07-01' existing = {
  parent: aioInstance
  name: 'default'
}

resource dataflowGraph 'Microsoft.IoTOperations/instances/dataflowProfiles/dataflowGraphs@2026-07-01' = {
  parent: defaultDataflowProfile
  name: 'predict-from-approved-updates'
  extendedLocation: {
    name: customLocation.id
    type: 'CustomLocation'
  }
  properties: {
    mode: 'Enabled'
    nodes: [
      {
        name: 'source'
        nodeType: 'Source'
        sourceSettings: {
          endpointRef: 'factory-mqtt'
          dataSources: ['factory/readings', 'factory/model-updates']
        }
      }
      {
        name: 'predictor'
        nodeType: 'Graph'
        graphSettings: {
          registryEndpointRef: 'factory-artifacts'
          artifact: 'azure-samples/explore-iot-operations/dataflow-patterns/graph-versioned-predictor:1.0.0-rc.4'
        }
      }
      {
        name: 'remove-acknowledgments'
        nodeType: 'Graph'
        graphSettings: {
          registryEndpointRef: 'default'
          artifact: 'azureiotoperations/graph-dataflow-filter:1.1.0'
          configuration: [
            {
              key: 'rules'
              value: '{"filter":[{"inputs":["kind ?? \\"unknown\\""],"expression":"$1 != \\"prediction\\""}]}'
            }
          ]
        }
      }
      {
        name: 'destination'
        nodeType: 'Destination'
        destinationSettings: {
          endpointRef: 'factory-mqtt'
          dataDestination: 'factory/predictions-from-updates'
        }
      }
    ]
    nodeConnections: [
      { from: { name: 'source' }, to: { name: 'predictor' } }
      { from: { name: 'predictor' }, to: { name: 'remove-acknowledgments' } }
      { from: { name: 'remove-acknowledgments' }, to: { name: 'destination' } }
    ]
  }
}
az deployment group create \
  --resource-group $RESOURCE_GROUP \
  --template-file main.bicep \
  --parameters aioInstanceName="$AIO_INSTANCE_NAME" customLocationName="$CUSTOM_LOCATION_NAME"
Important
The use of Kubernetes deployment manifests isn't supported in production environments and should only be used for debugging and testing.
Save as predict-from-approved-updates.yaml.
apiVersion: connectivity.iotoperations.azure.com/v1
kind: DataflowGraph
metadata:
  name: predict-from-approved-updates
  namespace: azure-iot-operations
spec:
  profileRef: default
  mode: Enabled
  nodes:
    - name: source
      nodeType: Source
      sourceSettings:
        endpointRef: factory-mqtt
        dataSources: [factory/readings, factory/model-updates]
    - name: predictor
      nodeType: Graph
      graphSettings:
        registryEndpointRef: factory-artifacts
        artifact: azure-samples/explore-iot-operations/dataflow-patterns/graph-versioned-predictor:1.0.0-rc.4
    - name: remove-acknowledgments
      nodeType: Graph
      graphSettings:
        registryEndpointRef: default
        artifact: azureiotoperations/graph-dataflow-filter:1.1.0
        configuration:
          - key: rules
            value: |
              {"filter":[{"inputs":["kind ?? \"unknown\""],"expression":"$1 != \"prediction\""}]}
    - name: destination
      nodeType: Destination
      destinationSettings:
        endpointRef: factory-mqtt
        dataDestination: factory/predictions-from-updates
  nodeConnections:
    - from: { name: source }
      to: { name: predictor }
    - from: { name: predictor }
      to: { name: remove-acknowledgments }
    - from: { name: remove-acknowledgments }
      to: { name: destination }
kubectl apply -f predict-from-approved-updates.yaml
Reading to publish on factory/readings after v8 activation:
{"kind":"reading","assetId":"line-1","pieceId":"part-44","speed":10,"temperature":20}
Output on factory/predictions-from-updates:
{"kind":"prediction","assetId":"line-1","pieceId":"part-44","modelVersion":8,"speed":10,"temperature":20,"speedCoefficient":2,"temperatureCoefficient":0.5,"intercept":173,"predictedWeight":203}
The sample predictor owns bounded per-asset state and expected-version checks
in memory. Its graph suppresses model-update acknowledgments internally; the
additional prediction-only filter above also protects the destination.
For an asset with a missing initial model, it logs a diagnostic and skips prediction.
Run one processing instance for this demo so readings and updates share the same
state. By default, each asset can accept 512 updates; at capacity, coordinate a
restart with the latest approved model rather than discarding update history.
The external supervisor owns durable approvals, update IDs, and recovery.
Before allowing readings after a restart, set the graph's settings configuration
to a complete JSON object containing "role":"versioned-predictor" and the latest
approved initialModels. Alternatively, hold readings while replaying approved
updates in version order from a known initial model. Reusing the demo default
would restore v7.
Prevent updates from becoming new triggers
Treat an approved model update as a state change:
| Input to the custom predictor |
State change |
Prediction output |
| Reading with a valid active model |
None |
One prediction with its model version |
| Approved next-version update with matching expected version |
Replace coefficients for that asset |
None |
| Duplicate or older model update |
None; record the reason |
None |
Updates must advance exactly one version: this example accepts version 8 only while version 7
is active. Missing versions or conflicting reuse of an update ID leave state
unchanged. Check predictor diagnostics and the emitted modelVersion; successful
MQTT delivery alone doesn't confirm activation.
The application must bound update frequency, reject stale observations, and
deduplicate proposals. Use matched observations as training samples; keep
acknowledgments and state-store writes on separate paths.
Keep graph connections acyclic and source and destination topics on the same
MQTT endpoint disjoint. See Naming rules and limits.
Related content