Calculate a prediction by applying a known formula to each reading. For example,
weight = 2 * speed + 0.5 * temperature + 173 predicts a weight of 203
when speed is 10 and temperature is 20. A built-in map transform performs the calculation.
The example uses a predefined formula and synthetic values.
Related independent patterns cover fitting and approving an update
and delivering approved coefficients through MQTT.
Prerequisites
Complete the shared example prerequisites, including the default profile and factory-mqtt endpoint. Use YAML for debugging and Azure CLI or Bicep for production management.
Use the existing default registry endpoint for built-in transforms. For CLI deployments, set AIO_INSTANCE_NAME and RESOURCE_GROUP to your existing instance and resource group. For Bicep deployments, also set CUSTOM_LOCATION_NAME to the instance's existing custom location. The deployment tabs reference these shared resources; they don't create them.
Choose where the coefficients come from
| Coefficient source |
Processing path |
Use when |
| Included in each message |
Reading with coefficients → map → prediction |
The producer already supplies the model and its version |
| Stored separately by asset |
Reading → enrichment → map → prediction |
An application maintains approved coefficients independently of sensor messages |
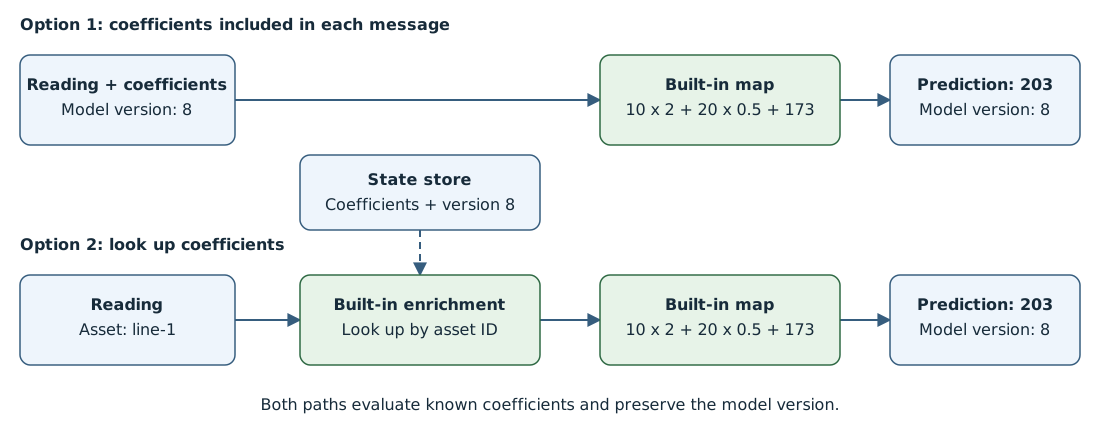
Choose either complete graph. Enrichment supplies stored parameters;
map evaluates the formula. Both paths preserve the piece ID, features, and model version.
Evaluate coefficients supplied in the message
When one record contains the inputs and coefficients, a map transform
evaluates speed * speedCoefficient + temperature * temperatureCoefficient + intercept.
The wildcard rule in the following example preserves the original fields. If inputs arrive separately,
use context lookup or
correlation to assemble the record.
Models that need a runtime or an algorithm beyond the expression language require
custom WASM or an external service.
Deploy this graph by using one of the following methods. Subscribe to
factory/predicted-values, then publish the following input to factory/features-with-model.
In the operations experience, open your instance and select Data flow graph > Create data flow graph.
Name the graph predict-with-coefficients and select the default profile.
Add source source with endpoint factory-mqtt and topic factory/features-with-model.
Add map transform predict, using azureiotoperations/graph-dataflow-map:1.0.0 from registry endpoint default. Configure these rules in order:
| Inputs (in order) |
Output |
Expression |
* |
* |
Leave empty |
speed, temperature, speedCoefficient, temperatureCoefficient, intercept |
predictedWeight |
$1 * $3 + $2 * $4 + $5 |
Add destination destination with endpoint factory-mqtt and topic factory/predicted-values.
Connect source → predict → destination and select Save.
Save the complete graph properties as graph.json. Transform rules are escaped JSON strings in configuration.value.
{
  "mode": "Enabled",
  "nodes": [
    {
      "name": "source",
      "nodeType": "Source",
      "sourceSettings": {
        "endpointRef": "factory-mqtt",
        "dataSources": ["factory/features-with-model"]
      }
    },
    {
      "name": "predict",
      "nodeType": "Graph",
      "graphSettings": {
        "registryEndpointRef": "default",
        "artifact": "azureiotoperations/graph-dataflow-map:1.0.0",
        "configuration": [
          {
            "key": "rules",
            "value": "{\"map\":[{\"inputs\":[\"*\"],\"output\":\"*\"},{\"inputs\":[\"speed\",\"temperature\",\"speedCoefficient\",\"temperatureCoefficient\",\"intercept\"],\"output\":\"predictedWeight\",\"expression\":\"$1 * $3 + $2 * $4 + $5\"}]}"
          }
        ]
      }
    },
    {
      "name": "destination",
      "nodeType": "Destination",
      "destinationSettings": {
        "endpointRef": "factory-mqtt",
        "dataDestination": "factory/predicted-values"
      }
    }
  ],
  "nodeConnections": [
    {"from": {"name": "source"}, "to": {"name": "predict"}},
    {"from": {"name": "predict"}, "to": {"name": "destination"}}
  ]
}
Apply the graph to the existing instance's default profile:
az iot ops dataflowgraph apply \
  --name predict-with-coefficients \
  --instance $AIO_INSTANCE_NAME \
  --resource-group $RESOURCE_GROUP \
  --config-file graph.json
Save as main.bicep. All parent resources already exist in the resource group.
param aioInstanceName string
param customLocationName string

resource aioInstance 'Microsoft.IoTOperations/instances@2026-07-01' existing = {
  name: aioInstanceName
}

resource customLocation 'Microsoft.ExtendedLocation/customLocations@2021-08-31-preview' existing = {
  name: customLocationName
}

resource defaultDataflowProfile 'Microsoft.IoTOperations/instances/dataflowProfiles@2026-07-01' existing = {
  parent: aioInstance
  name: 'default'
}

resource dataflowGraph 'Microsoft.IoTOperations/instances/dataflowProfiles/dataflowGraphs@2026-07-01' = {
  parent: defaultDataflowProfile
  name: 'predict-with-coefficients'
  extendedLocation: {
    name: customLocation.id
    type: 'CustomLocation'
  }
  properties: {
    mode: 'Enabled'
    nodes: [
      {
        name: 'source'
        nodeType: 'Source'
        sourceSettings: {
          endpointRef: 'factory-mqtt'
          dataSources: ['factory/features-with-model']
        }
      }
      {
        name: 'predict'
        nodeType: 'Graph'
        graphSettings: {
          registryEndpointRef: 'default'
          artifact: 'azureiotoperations/graph-dataflow-map:1.0.0'
          configuration: [
            {
              key: 'rules'
              value: '{"map":[{"inputs":["*"],"output":"*"},{"inputs":["speed","temperature","speedCoefficient","temperatureCoefficient","intercept"],"output":"predictedWeight","expression":"$1 * $3 + $2 * $4 + $5"}]}'
            }
          ]
        }
      }
      {
        name: 'destination'
        nodeType: 'Destination'
        destinationSettings: {
          endpointRef: 'factory-mqtt'
          dataDestination: 'factory/predicted-values'
        }
      }
    ]
    nodeConnections: [
      { from: { name: 'source' }, to: { name: 'predict' } }
      { from: { name: 'predict' }, to: { name: 'destination' } }
    ]
  }
}
az deployment group create \
  --resource-group $RESOURCE_GROUP \
  --template-file main.bicep \
  --parameters aioInstanceName="$AIO_INSTANCE_NAME" customLocationName="$CUSTOM_LOCATION_NAME"
Important
The use of Kubernetes deployment manifests isn't supported in production environments and should only be used for debugging and testing.
Save as predict-with-coefficients.yaml.
apiVersion: connectivity.iotoperations.azure.com/v1
kind: DataflowGraph
metadata:
  name: predict-with-coefficients
  namespace: azure-iot-operations
spec:
  profileRef: default
  mode: Enabled
  nodes:
    - name: source
      nodeType: Source
      sourceSettings:
        endpointRef: factory-mqtt
        dataSources: [factory/features-with-model]
    - name: predict
      nodeType: Graph
      graphSettings:
        registryEndpointRef: default
        artifact: azureiotoperations/graph-dataflow-map:1.0.0
        configuration:
          - key: rules
            value: |
              {
                "map": [
                  {"inputs":["*"],"output":"*"},
                  {
                    "inputs":["speed","temperature","speedCoefficient","temperatureCoefficient","intercept"],
                    "output":"predictedWeight",
                    "expression":"$1 * $3 + $2 * $4 + $5"
                  }
                ]
              }
    - name: destination
      nodeType: Destination
      destinationSettings:
        endpointRef: factory-mqtt
        dataDestination: factory/predicted-values
  nodeConnections:
    - from: { name: source }
      to: { name: predict }
    - from: { name: predict }
      to: { name: destination }
kubectl apply -f predict-with-coefficients.yaml
Input on factory/features-with-model:
{"assetId":"line-1","pieceId":"part-42","modelVersion":8,"speed":10,"temperature":20,"speedCoefficient":2,"temperatureCoefficient":0.5,"intercept":173}
The output on factory/predicted-values preserves the input fields and adds predictedWeight:
{"assetId":"line-1","pieceId":"part-42","modelVersion":8,"speed":10,"temperature":20,"speedCoefficient":2,"temperatureCoefficient":0.5,"intercept":173,"predictedWeight":203}
Read coefficients from the state store
Use enrichment to read the complete active-model record under key
factory-active-models, then evaluate the formula with a map transform.
For a standalone demo, use the state-store writer
to seed the v8 record; no fitting step is required. The writer and broker clocks
must be synchronized. Wait for the matching +OK response before publishing readings.
Deploy this graph by using one of the following methods. Subscribe to
factory/predictions, then publish this input to factory/features:
{"assetId":"line-1","pieceId":"part-43","speed":10,"temperature":20}
With the seeded v8 model, the output has predictedWeight: 203 and modelVersion: 8.
The graph reads the approved record for each prediction.
In the operations experience, open your instance and select Data flow graph > Create data flow graph.
Name the graph predict-with-approved-model and select the default profile.
Add source source with endpoint factory-mqtt and topic factory/features.
Add map transform read-model, using azureiotoperations/graph-dataflow-map:1.0.0 from registry endpoint default. In its dataset configuration, set state store key factory-active-models as model, match inputs $source.assetId, $context.assetId, and match expression $1 == $2. Configure these map rules in order, leaving expressions empty:
| Input |
Output |
* |
* |
$context(model).modelVersion |
modelVersion |
$context(model).speedCoefficient |
speedCoefficient |
$context(model).temperatureCoefficient |
temperatureCoefficient |
$context(model).intercept |
intercept |
Add map transform predict, using the same artifact and registry endpoint. Configure these rules in order:
| Inputs (in order) |
Output |
Expression |
* |
* |
Leave empty |
assetId |
kind |
"prediction" |
speed, temperature, speedCoefficient, temperatureCoefficient, intercept |
predictedWeight |
$1 * $3 + $2 * $4 + $5 |
Add destination destination with endpoint factory-mqtt and topic factory/predictions.
Connect source → read-model → predict → destination and select Save.
Save the complete graph properties as graph.json.
{
  "mode": "Enabled",
  "nodes": [
    {
      "name": "source",
      "nodeType": "Source",
      "sourceSettings": {
        "endpointRef": "factory-mqtt",
        "dataSources": ["factory/features"]
      }
    },
    {
      "name": "read-model",
      "nodeType": "Graph",
      "graphSettings": {
        "registryEndpointRef": "default",
        "artifact": "azureiotoperations/graph-dataflow-map:1.0.0",
        "configuration": [
          {
            "key": "rules",
            "value": "{\"datasets\":[{\"key\":\"factory-active-models as model\",\"inputs\":[\"$source.assetId\",\"$context.assetId\"],\"expression\":\"$1 == $2\"}],\"map\":[{\"inputs\":[\"*\"],\"output\":\"*\"},{\"inputs\":[\"$context(model).modelVersion\"],\"output\":\"modelVersion\"},{\"inputs\":[\"$context(model).speedCoefficient\"],\"output\":\"speedCoefficient\"},{\"inputs\":[\"$context(model).temperatureCoefficient\"],\"output\":\"temperatureCoefficient\"},{\"inputs\":[\"$context(model).intercept\"],\"output\":\"intercept\"}]}"
          }
        ]
      }
    },
    {
      "name": "predict",
      "nodeType": "Graph",
      "graphSettings": {
        "registryEndpointRef": "default",
        "artifact": "azureiotoperations/graph-dataflow-map:1.0.0",
        "configuration": [
          {
            "key": "rules",
            "value": "{\"map\":[{\"inputs\":[\"*\"],\"output\":\"*\"},{\"inputs\":[\"assetId\"],\"output\":\"kind\",\"expression\":\"\\\"prediction\\\"\"},{\"inputs\":[\"speed\",\"temperature\",\"speedCoefficient\",\"temperatureCoefficient\",\"intercept\"],\"output\":\"predictedWeight\",\"expression\":\"$1 * $3 + $2 * $4 + $5\"}]}"
          }
        ]
      }
    },
    {
      "name": "destination",
      "nodeType": "Destination",
      "destinationSettings": {
        "endpointRef": "factory-mqtt",
        "dataDestination": "factory/predictions"
      }
    }
  ],
  "nodeConnections": [
    {"from": {"name": "source"}, "to": {"name": "read-model"}},
    {"from": {"name": "read-model"}, "to": {"name": "predict"}},
    {"from": {"name": "predict"}, "to": {"name": "destination"}}
  ]
}
az iot ops dataflowgraph apply \
  --name predict-with-approved-model \
  --instance $AIO_INSTANCE_NAME \
  --resource-group $RESOURCE_GROUP \
  --config-file graph.json
Save as main.bicep.
param aioInstanceName string
param customLocationName string

resource aioInstance 'Microsoft.IoTOperations/instances@2026-07-01' existing = {
  name: aioInstanceName
}

resource customLocation 'Microsoft.ExtendedLocation/customLocations@2021-08-31-preview' existing = {
  name: customLocationName
}

resource defaultDataflowProfile 'Microsoft.IoTOperations/instances/dataflowProfiles@2026-07-01' existing = {
  parent: aioInstance
  name: 'default'
}

resource dataflowGraph 'Microsoft.IoTOperations/instances/dataflowProfiles/dataflowGraphs@2026-07-01' = {
  parent: defaultDataflowProfile
  name: 'predict-with-approved-model'
  extendedLocation: {
    name: customLocation.id
    type: 'CustomLocation'
  }
  properties: {
    mode: 'Enabled'
    nodes: [
      {
        name: 'source'
        nodeType: 'Source'
        sourceSettings: {
          endpointRef: 'factory-mqtt'
          dataSources: ['factory/features']
        }
      }
      {
        name: 'read-model'
        nodeType: 'Graph'
        graphSettings: {
          registryEndpointRef: 'default'
          artifact: 'azureiotoperations/graph-dataflow-map:1.0.0'
          configuration: [
            {
              key: 'rules'
              value: '{"datasets":[{"key":"factory-active-models as model","inputs":["$source.assetId","$context.assetId"],"expression":"$1 == $2"}],"map":[{"inputs":["*"],"output":"*"},{"inputs":["$context(model).modelVersion"],"output":"modelVersion"},{"inputs":["$context(model).speedCoefficient"],"output":"speedCoefficient"},{"inputs":["$context(model).temperatureCoefficient"],"output":"temperatureCoefficient"},{"inputs":["$context(model).intercept"],"output":"intercept"}]}'
            }
          ]
        }
      }
      {
        name: 'predict'
        nodeType: 'Graph'
        graphSettings: {
          registryEndpointRef: 'default'
          artifact: 'azureiotoperations/graph-dataflow-map:1.0.0'
          configuration: [
            {
              key: 'rules'
              value: '{"map":[{"inputs":["*"],"output":"*"},{"inputs":["assetId"],"output":"kind","expression":"\\"prediction\\""},{"inputs":["speed","temperature","speedCoefficient","temperatureCoefficient","intercept"],"output":"predictedWeight","expression":"$1 * $3 + $2 * $4 + $5"}]}'
            }
          ]
        }
      }
      {
        name: 'destination'
        nodeType: 'Destination'
        destinationSettings: {
          endpointRef: 'factory-mqtt'
          dataDestination: 'factory/predictions'
        }
      }
    ]
    nodeConnections: [
      { from: { name: 'source' }, to: { name: 'read-model' } }
      { from: { name: 'read-model' }, to: { name: 'predict' } }
      { from: { name: 'predict' }, to: { name: 'destination' } }
    ]
  }
}
az deployment group create \
  --resource-group $RESOURCE_GROUP \
  --template-file main.bicep \
  --parameters aioInstanceName="$AIO_INSTANCE_NAME" customLocationName="$CUSTOM_LOCATION_NAME"
Important
The use of Kubernetes deployment manifests isn't supported in production environments and should only be used for debugging and testing.
Save as predict-with-approved-model.yaml.
apiVersion: connectivity.iotoperations.azure.com/v1
kind: DataflowGraph
metadata:
  name: predict-with-approved-model
  namespace: azure-iot-operations
spec:
  profileRef: default
  mode: Enabled
  nodes:
    - name: source
      nodeType: Source
      sourceSettings:
        endpointRef: factory-mqtt
        dataSources: [factory/features]
    - name: read-model
      nodeType: Graph
      graphSettings:
        registryEndpointRef: default
        artifact: azureiotoperations/graph-dataflow-map:1.0.0
        configuration:
          - key: rules
            value: |
              {
                "datasets": [
                  {
                    "key":"factory-active-models as model",
                    "inputs":["$source.assetId","$context.assetId"],
                    "expression":"$1 == $2"
                  }
                ],
                "map": [
                  {"inputs":["*"],"output":"*"},
                  {"inputs":["$context(model).modelVersion"],"output":"modelVersion"},
                  {"inputs":["$context(model).speedCoefficient"],"output":"speedCoefficient"},
                  {"inputs":["$context(model).temperatureCoefficient"],"output":"temperatureCoefficient"},
                  {"inputs":["$context(model).intercept"],"output":"intercept"}
                ]
              }
    - name: predict
      nodeType: Graph
      graphSettings:
        registryEndpointRef: default
        artifact: azureiotoperations/graph-dataflow-map:1.0.0
        configuration:
          - key: rules
            value: |
              {
                "map": [
                  {"inputs":["*"],"output":"*"},
                  {"inputs":["assetId"],"output":"kind","expression":"\"prediction\""},
                  {
                    "inputs":["speed","temperature","speedCoefficient","temperatureCoefficient","intercept"],
                    "output":"predictedWeight",
                    "expression":"$1 * $3 + $2 * $4 + $5"
                  }
                ]
              }
    - name: destination
      nodeType: Destination
      destinationSettings:
        endpointRef: factory-mqtt
        dataDestination: factory/predictions
  nodeConnections:
    - from: { name: source }
      to: { name: read-model }
    - from: { name: read-model }
      to: { name: predict }
    - from: { name: predict }
      to: { name: destination }
kubectl apply -f predict-with-approved-model.yaml
The first map copies the selected model and version into the record.
The second calculates from those fields. Map rules read the transform's input.
To also compare predictions before and after an update, first seed v7 by changing
the writer's modelVersion to 7 and intercept to 175. Publish the reading,
write v8, and publish a reading for a new piece.
| Stored model |
Calculation for speed 10, temperature 20 |
Predicted weight |
| v7 |
10 * 2 + 20 * 0.5 + 175 |
205 |
| v8 |
10 * 2 + 20 * 0.5 + 173 |
203 |
After the instance observes v8, a reading for part-44 produces this output on factory/predictions:
{"assetId":"line-1","pieceId":"part-44","speed":10,"temperature":20,"modelVersion":8,"speedCoefficient":2,"temperatureCoefficient":0.5,"intercept":173,"kind":"prediction","predictedWeight":203}
State lookup caches can keep v7 active after the write succeeds. Check the emitted
modelVersion to see when the instance observes v8. The example assumes a matching
model exists; add a rejection or recovery path for missing or stale model context.
Lookup uses the model available during processing. For a model selected by the
reading's timestamp, use timestamp matching.
Related content