Note
Access to this page requires authorization. You can try signing in or changing directories.
Access to this page requires authorization. You can try changing directories.
Important
Azure Lab Services will be retired on June 28, 2027. For more information, see the retirement guide.
Note
This article references features available in lab plans, which replaced lab accounts.
In this article, you learn how to set up a class that uses Adobe Creative Cloud. Adobe Creative Cloud is a collection of desktop applications and web services used for photography, design, video, web, user experience (UX), and more. Universities and K-12 schools use Creative Cloud in digital arts and media classes. Some of Creative Cloud’s media processes might require more computational and visualization (GPU) power than a typical tablet, laptop, or workstation support. With Azure Lab Services, you have flexibility to choose from various virtual machine (VM) sizes, including GPU sizes.
Create Cloud licensing in a lab VM
To use Creative Cloud on a lab VM, you must use Named User Licensing, which is the only type of licensing that supports deployment on a virtual machine.
Each lab VM has internet access so that lab users can activate Creative Cloud apps by signing into the software. When a user signs in, their authentication token is cached in the user profile so that they don’t have to sign in again on their VM.
Read Adobe’s article on licensing for more details.
Lab configuration
To set up this lab, you need access to an Azure subscription. Discuss with your organization's administrator to see if you can get access to an existing Azure subscription. If you don't have an Azure subscription, create a free account before you begin.
Lab plan settings
Once you have an Azure subscription, you can create a new lab plan in Azure Lab Services. For more information about creating a new lab plan, see the quickstart on how to set up a lab plan. You can also use an existing lab plan.
This lab uses a Windows 10 Azure Marketplace images as the base VM image. You first need to enable this image in your lab plan. This lets lab creators then select the image as a base image for their lab.
Follow these steps to enable these Azure Marketplace images available to lab creators. Select one of the Windows 10 Azure Marketplace images.
Lab settings
Create a lab for your lab plan:
For instructions on how to create a lab, see Tutorial: Set up a lab. Specify the following lab settings:
Lab settings Value/instructions Virtual Machine Size Small GPU (Visualization). This VM is best suited for remote visualization, streaming, gaming, encoding using frameworks such as OpenGL and DirectX. Virtual Machine Image Windows 10 The size of VM that you need to use for your lab depends on the types of projects that users create. Most Creative Cloud apps support GPU-based acceleration and require a GPU for features to work properly. To ensure that you select the appropriate VM size, we recommend that you test the projects that users create, to ensure adequate performance. Learn more about which VM size is recommended for using Creative Cloud.
When you create a lab with the Small GPU (Visualization) size, follow these steps to set up a lab with GPUs.
Warning
The Small GPU (Visualization) virtual machine size is configured to enable a high-performing graphics experience and meets Adobe’s system requirements for each application. Make sure to choose Small GPU (Visualization) not Small GPU (Compute).
GPU drivers
When you create the lab, we recommend that you install the GPU drivers by selecting the Install GPU drivers option in the lab creation wizard. You should also validate that the correct installation of the GPU drivers. For more information, read the following sections:
Template machine configuration
Creative Cloud deployment package
Installing Creative Cloud requires the use of a deployment package. Typically, your IT department creates the deployment package department using Adobe’s Admin Console. When IT creates the deployment package, they can also enable self-service. There are a few ways to enable self-service for the deployment package:
- Create a self-service package.
- Create a managed package with self-service elevated privileges turned on.
With self-service enabled, you don’t install the entire Creative Cloud collection of apps. Instead, users can install apps themselves using the Creative Cloud desktop app. Here are some key benefits with this approach:
- The entire Creative Cloud install is about 25 GB. If users install only the apps they need on-demand, this helps optimize disk space. Lab VMs have a maximum disk size of 128 GB.
- You can choose to install a subset of the apps on the template VM before publishing. This way the lab VMs have some apps installed by default and users can add more apps on their own as needed.
- You can avoid republishing the template VM because users can install more apps on their VM at any point during the lifetime of the lab. Otherwise, either IT or the lab creator needs to install more apps on the template VM and republish. Republishing causes the users’ VMs to be reset and any work that isn’t saved externally is lost.
If you use a managed deployment package with self-service disabled, users don’t have the ability to install their own apps. In this case, IT must specify the Creative Cloud apps that are installed.
Read Adobe’s steps to create a package for more information.
Install Creative Cloud
After the creation of the lab template machine completes, follow the steps below to set up your lab’s template virtual machine (VM) with Creative Cloud.
Start the template VM and connect using RDP.
To install Creative Cloud, download the deployment package given to you by IT or directly from Adobe’s Admin Console.
Run the deployment package file. Depending on whether self-service is enabled or disabled, this installs Creative Cloud desktop app and\or the specified Creative Cloud apps. Read Adobe’s deployment steps for more information.
Once the template VM is set up, publish the template VM. All lab VMs use this template as their base image.
Storage
Lab virtual machines have a maximum disk size of 128 GB. If users need extra storage for saving large media assets or they need to access shared media assets, you should consider using external file storage. For more information, read the following articles:
Save template VM image
Consider saving your template VM for future use. To save the template VM, see Save an image to a compute gallery.
- When self-service is enabled, the template VM’s image has Creative Cloud desktop installed. Lab creators can then reuse this image to create labs and to choose which Creative Cloud apps to install. This helps reduce IT overhead since teachers can independently set up labs and have full control over installing the Creative Cloud apps required for their classes.
- When self-service is disabled, the template VM’s image will already have the specified Creative Cloud apps installed. Lab creators can reuse this image to create labs; however, they won’t be able to install additional Creative Cloud apps.
Troubleshooting
Adobe Creative Cloud may show the following error: Your graphics processor is incompatible when the GPU drivers or the GPU isn't configured correctly.
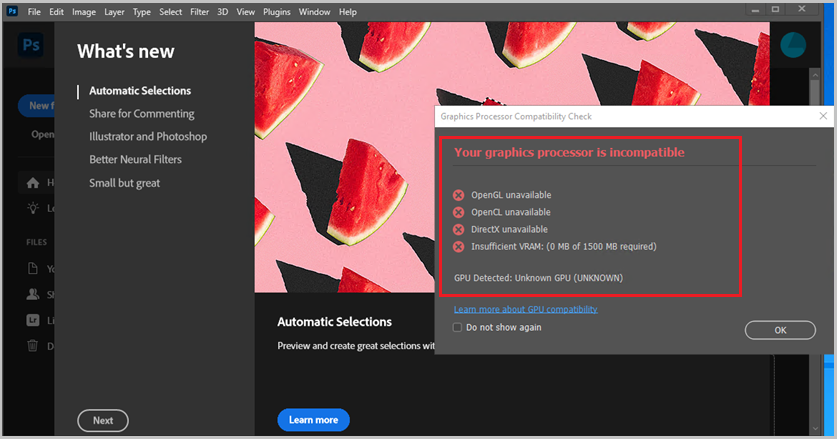
To fix this issue:
- Ensure that you selected the Small GPU (Visualization) VM size when you created your lab. You can see the VM size used by the lab on the lab's Template page.
- Try manually installing the Small GPU Visualization drivers.
Next steps
The template image can now be published to the lab. For more information, see Publish the template VM.
As you set up your lab, see the following articles: