Note
Access to this page requires authorization. You can try signing in or changing directories.
Access to this page requires authorization. You can try changing directories.
Applies to: Azure Logic Apps (Standard)
Note
This preview feature is subject to the Supplemental Terms of Use for Microsoft Azure Previews.
Large language models (LLMs) work with AI agents that handle and fulfill requests by calling prebuilt tools to complete tasks, like sending an email, querying a database, or triggering a workflow. In Azure Logic Apps, you can build these tools by setting up a Standard logic app as one or more remote Model Context Protocol (MCP) servers. This setup lets you expose workflows as tools that LLMs, AI agents, and MCP clients can use to interact with enterprise resources and assets. In this context, remote means that the MCP server runs outside the environment where the AI agent interface runs.
In this guide, you:
- Set up a Standard logic app resource with one or more MCP servers.
- Configure authentication with Easy Auth and generate API keys.
- Choose or create workflows as MCP tools.
- Test your MCP server with an MCP client in Visual Studio Code.
Why set up Standard logic apps as MCP servers
MCP is an open standard that lets LLMs, AI agents, and MCP clients work with external systems and tools in a secure, discoverable, and structured way. This standard defines how to describe, run, and authenticate access to tools so agents can interact with real-world systems like databases, APIs, and business workflows. Consider an MCP server as a bridge between an LLM, AI agent, or MCP client and the tools they use.
For example, suppose you have a Standard logic app-based MCP server that runs in Azure. On your local computer, Visual Studio Code has an MCP client that you use to remotely connect to your MCP server. This scenario differs from local MCP servers that run on your computer.
The following diagram shows how these components interact:

The diagram shows these key interactions:
MCP client + MCP server: Your MCP client connects to your MCP server, which provides logic app workflows as tools.
MCP client + agent or model: Your MCP client communicates with the agent or model to coordinate tool calls.
Inputs: User inputs flow through the MCP client to the agent or model.
Outputs: Responses from the agent or model flow back through the MCP client.
When you logically group multiple MCP servers in a single Standard logic app, this approach provides a more scalable, organized, and flexible way to expose workflows as tools. Each MCP server works as an independent workflow group that your MCP client can individually discover and call.
For more information, see:
- What is an AI Agent?
- About LLMs
- MCP server concepts
- MCP client concepts
- Introduction - Get started with the Model Context Protocol (MCP)
The following table describes the benefits from setting up Standard logic apps as remote MCP servers:
| Benefit | Description |
|---|---|
| Reusability | Call existing workflows, connectors, and codeful functions from an AI agent, which gives you extra return on your investments. |
| Flexibility | Choose from more than 1,400 connectors that provide access and actions to work with enterprise assets and resources in the cloud or on-premises. |
| Access points | Azure Logic Apps supports different connectivity models for running your MCP server. You can run your server in the cloud, expose your server as a private endpoint, or connect to virtual networks and on-premises resources. |
| Security | When you expose your logic app as an MCP server, you set up a strong security posture so you can meet your enterprise security requirements. By default, MCP endpoints use OAuth 2.0 for authentication and authorization. For more information, see What is OAuth? Important: To use OAuth authentication, you must set up Easy Auth to secure your MCP server and Standard workflows. Easy Auth is the native authentication and authorization feature in Azure App Service, Azure Functions, and Azure Container Apps. To set up Easy Auth for your MCP server, see Set up Easy Auth for your MCP server later in this guide. For more information, see Authentication and authorization in Azure App Service and Azure Functions. |
| Monitoring, governance, and compliance | Azure Logic Apps provides workflow run history and integration with Application Insights or Log Analytics so you get the data necessary to manage and monitor your MCP server tools and support diagnostics, troubleshooting, reporting, traceability, and auditing. |
| Scalability | Host multiple logical MCP servers in a single logic app. Each logical MCP server group contains related workflows. |
| Streamable HTTP and Server-Sent Events (SSE) transports for MCP | Standard logic app-based MCP servers support SSE. |
Prerequisites
An Azure account with an active subscription. Get a free Azure account.
The Standard logic app resource to set up as an MCP server with tools that agents or models can call.
One or more workflows in your logic app to use as tools for your MCP server. These workflows must meet the following requirements:
Requirement Description Hosting option Workflow Service Plan or App Service Environment v3 only Trigger Workflows must start with the Request trigger named When an HTTP request is received. Action Workflows must end with the Response action. State The logic app resource must be running, and the workflow must be enabled. You can select an existing workflow or create a new workflow in your logic app.
For more information, see:
An app registration to use in the Easy Auth setup for your logic app.
This app registration is an identity that your logic app resource uses to delegate identity and access management functions to Microsoft Entra ID.
For instructions, see Create an app registration.
An MCP client to test your MCP server setup.
This guide uses Visual Studio Code.
Note
Make sure to use the latest version of Visual Studio Code for MCP server testing. Visual Studio Code includes generally available MCP support in versions after 1.102. For more information, see MCP servers in Visual Studio Code.
For the testing example, you need the GitHub Copilot extension. For more information, see:
No other requirements exist to use the Streamable HTTP transport. However, to use the Server-Sent Events (SSE) transport, your logic app must meet the following requirements:
Your logic app requires virtual network integration. See Secure traffic between Standard logic apps and Azure virtual networks using private endpoints.
In your logic app resource, the host.json file requires that you add and set the
Runtime.Backend.EdgeWorkflowRuntimeTriggerListener.AllowCrossWorkerCommunicationsetting totrue.
Considerations for workflows as tools
When you build workflows to use as MCP tools, review these considerations and best practices:
To help agents or models find and run tools, add the following metadata to the Request trigger and request payloads. This metadata improves the agent's reliability and accuracy when using tools.
The steps in this section use the Azure portal, but you can alternatively use Visual Studio Code.
Trigger description
Your MCP server uses this metadata as the tool description to show end users and to route requests to the correct tool, for example:

To add this description, follow these steps:
In the Azure portal, open your Standard logic app resource and workflow.
In the workflow sidebar, under Tools, select the designer to open the workflow.
In the designer, select the Request trigger.
In the trigger information pane, under the trigger name, describe the purpose for the trigger and workflow.
Input parameter descriptions
This metadata improves the agent's accuracy in passing the correct inputs to tools at runtime, for example:

To add a description for each input parameter, follow these steps:
In the Azure portal, open your Standard logic app resource and workflow.
In the workflow sidebar, under Tools, select the designer to open the workflow.
Note
You can also use code view to add this information.
In the designer, select the Request trigger.
In the trigger information pane, under Request Body JSON Schema, enter a schema for the expected request content payload.
For each input parameter, add the
descriptionattribute and the corresponding description.If your tool requires specific parameters to run, include them as required parameters by adding the
requiredobject and an array with these parameters.
The following example shows sample input parameters, descriptions, and required parameters:
{
    "type": "object",
    "properties": {
        "TicketNumber": {
            "type": "string",
            "description": "The ticket number for the IT issue."
        },
        "OpenedBy_FirstName": {
            "type": "string",
            "description": "The first name for the person who reported the issue."
        },
        "OpenedBy_LastName": {
            "type": "string",
            "description": "The last name for the person who reported the issue."
        },
          "Notes": {
            "type": "string",
            "description": "Other information to include in the ticket about the issue."
        }
    },
    "required": [
        "TicketNumber",
        "OpenedBy_FirstName",
        "OpenedBy_LastName",
        "Notes"
    ]
}
If you get inconsistent results when an agent calls and runs your tool, check whether you can make the trigger and parameter descriptions more unique.
For example, try describing the format for parameter inputs.
If a parameter expects a base64 encoded string, include this detail in the parameter description.
You can set up error handling and use the
runAfterproperty to return the appropriate error message to the caller. For more information, see Manage the "run after" behavior.
Create an app registration
To create an app registration for your logic app to use in your Easy Auth setup, follow these steps:
In the Azure portal search box, enter app registrations.
On the App registrations page toolbar, select New registration.
On the Register an application page, provide the following information:
Property Required Description Name Yes The name for your app registration. Supported account types Yes The accounts that can use or access your logic app. Redirect URI No Skip this section. When you're done, select Register.
On the app registration page, copy and save the Application (client) ID to use for setting up Easy Auth.
On the app registration sidebar, under Manage, select Expose an API.
Next to Application ID URI, select Add. Keep the default value. Copy and save this value for later use to override the default value, and select Save.
Under Scopes defined by this API, select Add a scope to provide granular permissions to your app's users.
On the Add a scope pane, provide the following information:
Property Required Description Scope name Yes A relevant name for the permissions scope. As a recommendation, use the name user_impersonation, which is the default supported scope in the Azure Logic Apps protected resource data in the MCP server context.
If you use a different scope, you must override the default scope in your logic app's configuration file (host.json) and use the following format:
<resource>.<operation>.<constraint>
For more information, see Scopes and permissions in the Microsoft identity platform.Who can consent Yes Whether users can also consent to this scope or whether only admins can consent. Use Admins only for higher-privileged permissions. Based on your organization's policies, select the option that best aligns with your policies. This example selects Admins and users. Admin consent display name Yes A short description about the scope's purpose that only admins can see. Admin consent description Yes A more detailed description about the permission granted by the scope that only admins can see. User consent display name No A short description about the scope's purpose. Only shown to users if you set Who can consent to Admins and users. If relevant, provide this information. User consent description No A more detailed description about the permission granted by the scope. Only shown to users only if you set Who can consent to Admins and users. If relevant, provide this information. State Yes Whether the scope is enabled or disabled. Make sure to select Enabled. For more information, see Add a scope.
When you're done, select Add scope.
For more information, see Register an application in Microsoft Entra ID.
When you finish these steps, you have the following values to use later with your logic app:
- Directory (tenant) ID
- Application (client) ID
- Application ID URI
Set up Easy Auth for your MCP server
Set up Easy Auth authentication on the Standard logic app that you want to use as your MCP server.
In the Azure portal, open your Standard logic app resource.
On the resource sidebar, under Settings, select Authentication.
On the Authentication page, select Add identity provider.
On the Add an identity provider page, on the Basics tab, for Identity provider, select Microsoft.
In the App registration section, provide the following information:
Property Required Description Application (client) ID Yes The application (client) ID from your previously created app registration. Issuer URL Yes The following URL where you replace <tenant-ID> with the GUID for your directory (tenant):
https://login.microsoftonline.com/<tenant-ID>/v2.0Allowed token audiences Yes The application ID URI from your previously created app registration in the following format: api://<application-ID-URI>/
Important: Make sure that you include the trailing slash at the end of the URI, for example:api://aaaabbbb-0000-cccc-1111-dddd2222eeee/In the Additional checks section, select the following options or provide information to further control authentication and access:
Property Required Description Client application requirement Yes Choose an option:
- Allow requests only from this application itself: Not applicable to MCP server.
- Allow requests from specific client applications: If you know which client applications call your MCP server, select these applications from the Allowed client applications list. For example, if you use Visual Studio Code, you can add the ID for this client application by editing the Allowed client applications list. To find this value, follow these steps:
1. In the Azure portal search box, find and select Enterprise applications.
2. On the All applications page search box, find and select the application ID for Visual Studio Code.
- Allow requests from any application (Not recommended): Only when you're unsure what applications call your MCP server.Identity requirement Yes To restrict which users can call your MCP server, select Allow requests from specific identities, and then from Microsoft Entra ID, from the Allowed identities list, select the object IDs for those identities that you allow to call your MCP server. Otherwise, select Allow requests from any identity. Tenant requirement Yes To deny calls from outside tenants to your MCP server, select Allow requests from the issuer tenant. In the App Service authentication settings section, for Restrict access, select Allow unauthenticated access.
Important
Make sure that App Service authentication (Easy Auth) allows unauthenticated access or requests.
Select Add.
Continue with the steps to create an MCP server in your logic app.
Create an MCP server by using workflows
In the Azure portal, open your Standard logic app resource.
On the logic app sidebar, under Agents, select MCP servers to open the MCP servers page, for example:
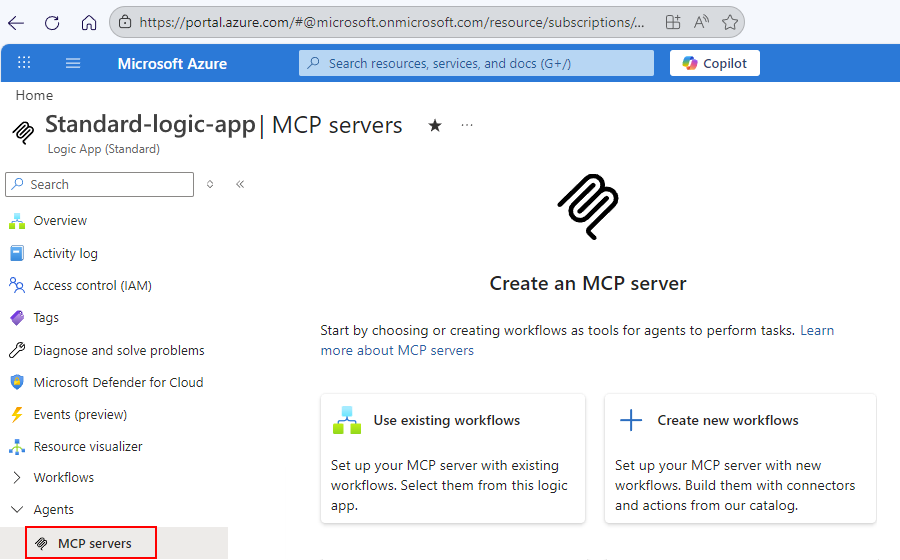
Select one of the following options:
Option Description Use existing workflows When you have one or more existing workflows to use for your MCP server. Continue to Choose existing workflows. Create new workflows When you want to create new workflows to use for your MCP server. Continue to Create new workflows.
Choose existing workflows
On the Create an MCP server pane, follow these steps:
Under MCP server details, enter a unique Name that uses only letters and numbers.
Make sure this name easily identifies your MCP server.
Enter a Description about the purpose for your MCP server.
This important information helps agents and other clients choose the server they need.
Under Workflows, select one or multiple workflows to use as tools for your MCP server.
Note
The list shows only workflows that start with the Request trigger and contains appro with the Response action.
When you finish, select Create.
Create new workflows
On the Register an MCP server with Azure Logic Apps page, under Project details, enter the following values:
A unique MCP server name that uses only letters and numbers.
Make sure this name easily identifies your MCP server.
A Description about the purpose for your MCP server.
This important information helps agents and other clients choose the server they need.
By default, the Logic app value is set to the current logic app name and is uneditable.
Under Tools, follow these steps to select a connector and the actions to create as workflows.
Each action that you select creates a workflow that works as a tool in your MCP server. This example uses the Office 365 Outlook connector. Based on your Azure subscription, you might need to use the Outlook.com connector instead.
In the Connectors section, select Add.
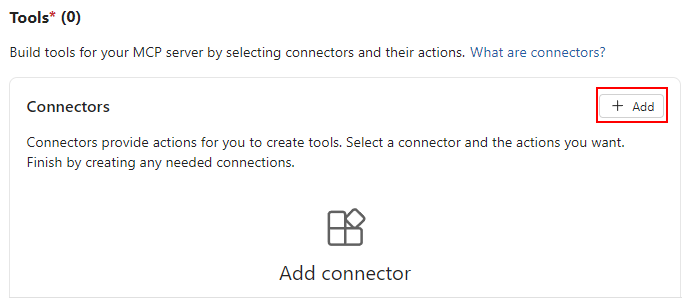
On the Add connector pane and the Choose connector tab, find and select the connector to use, for example:

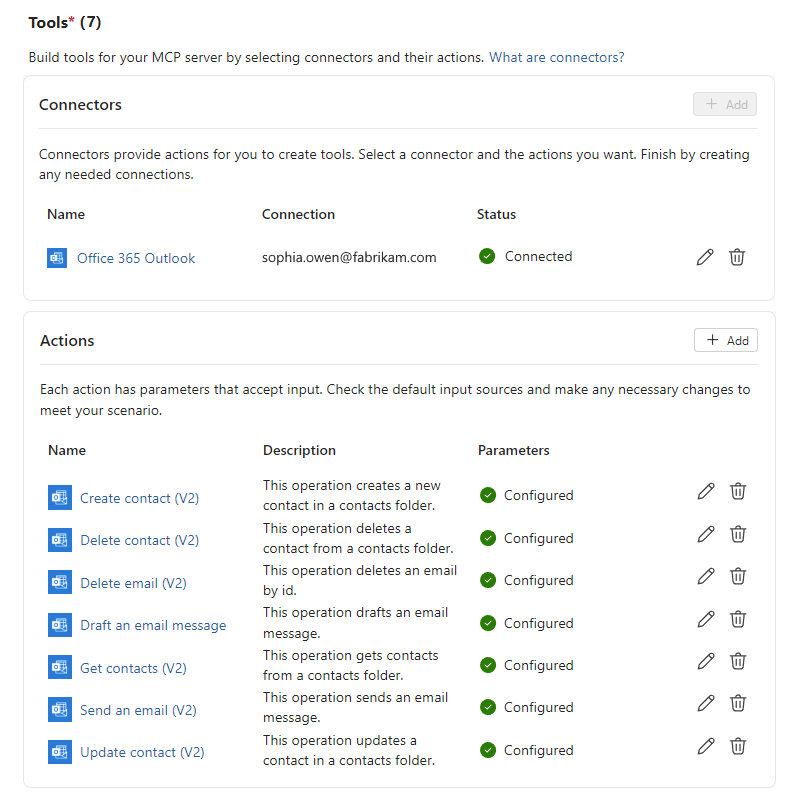
On the Select actions tab, select each action that you want to create as a tool, for example:

When you're done, select Next.
On the Create connection tab, provide the requested connection information or sign in to authenticate your credentials, if required.
If you have an existing connection that you want to change, select Add new.
Select Save to return the Register an MCP Server with Azure Logic Apps page.
The Connectors section now shows your selected connector. The Actions section shows the selected actions that power the tools that your MCP server provides. By default, any parameters for these actions use an LLM as the input source. You can change this input source to user-provided, based on your scenario's needs.
To help an agent or LLM choose the correct tool and pass correctly sourced inputs to tool parameters, review and update each tool's setup by following these steps:
In the Actions section, select either the tool name or the edit (pencil) button for that tool.
On the Edit: <tool-name> pane, provide the following information:
Section Description Description Describes the purpose for the action-backed tool to help an agent or LLM determine when to use the tool. A default description exists, but you can customize the text for your needs.
The default text comes from the connector's API Swagger description, for example, Actions - Office 365 Outlook.Default parameters Lists any parameters required to run the tool. For each parameter, the input source options are Model and User. By default, the model (LLM) provides the inputs. If you select User, the appropriate UX appears for you to provide the input source. For more information, see Learn how parameter values resolve at runtime. Optional parameters Select any other parameters that you want to include for the tool. The following example shows the description and parameters for the Send email (V2) tool:
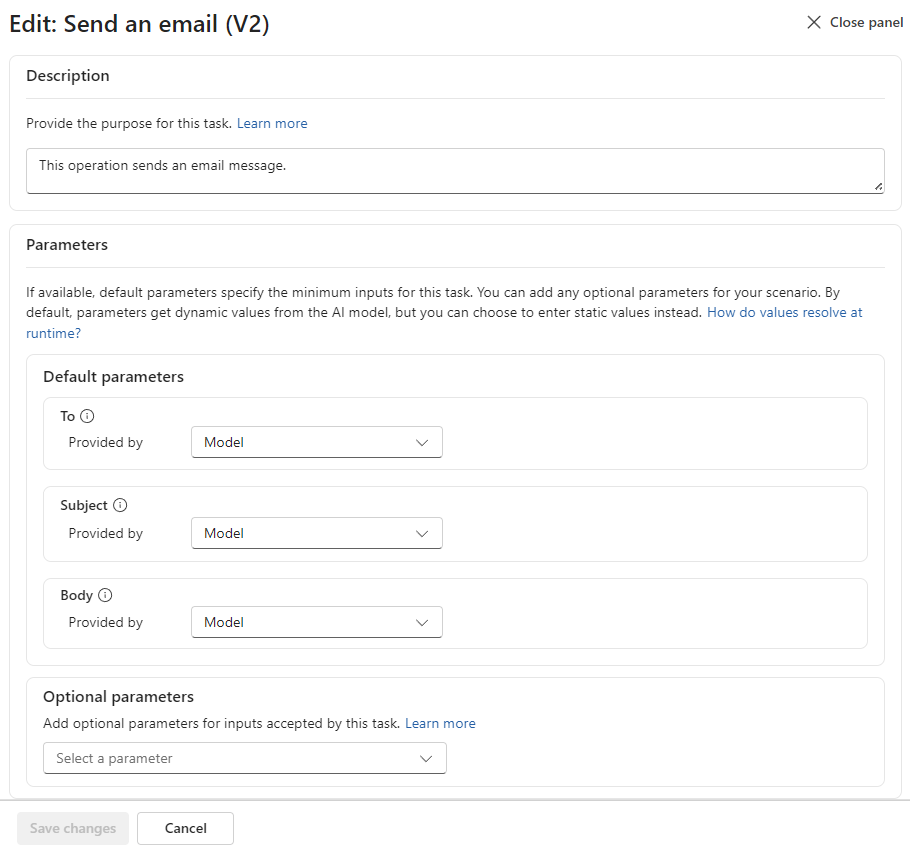
When you finish, select Save changes.
When you finish reviewing or updating each tool, select Register.
Continue to select authentication and review your MCP servers.


Select authentication and review MCP servers
The MCP servers page now shows the Authentication and Servers sections.
| Section | Description |
|---|---|
| Authentication | Select the authentication that your MCP server uses. |
| Servers | Shows the created MCP servers and workflows that the server provides as tools. You can also edit, copy the URL, or delete the server. |
To select the authentication for your MCP server, follow these steps:
Next to the Method box, select Edit.
Select the authentication method, and then select Save.
Based on your selection, follow the corresponding steps:
Key-based
Select Generate key to create an API key.
On the Generate MCP API key pane, select the Duration.
For Access key, select Primary key or Secondary key to generate the MCP API key.
Select Generate.
After the key generates, make sure to copy and save the key in a safe place. You can't access the key later.
When you finish, select Close.
OAuth
Select Manage authentication to view the logic app Authentication page.
Follow the steps in Set up Easy Auth for your MCP server.
Continue to test your MCP server.
Test your MCP server
You need the URL for your MCP server so you can send a request from Visual Studio Code.
On the logic app sidebar, under Agents, select MCP servers.
Under Servers, find your MCP server, and select Copy URL.
In Visual Studio Code, from the View menu, select Command Palette. Find and select MCP: Add Server.
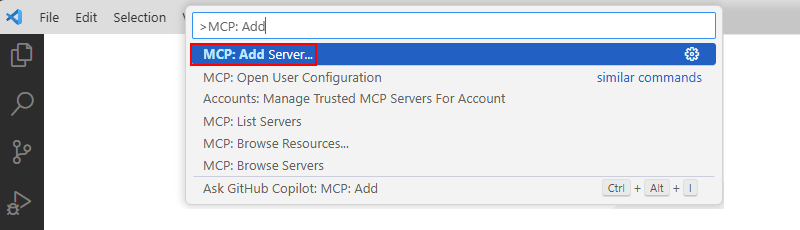
Select HTTP (HTTP or Server-Sent Events). For Enter Server URL, enter your MCP server URL.
For Enter Server ID, enter a meaningful name for your MCP server.
When you add an MCP server for the first time, you must choose where to store your MCP configuration. You get the following options, so choose the best option for your scenario:
Global: Your user configuration, which is the
c:\users\<your-username>\AppData\Roaming\Code\Userdirectory and available across all workspaces.Workspace: Your current workspace in Visual Studio Code.
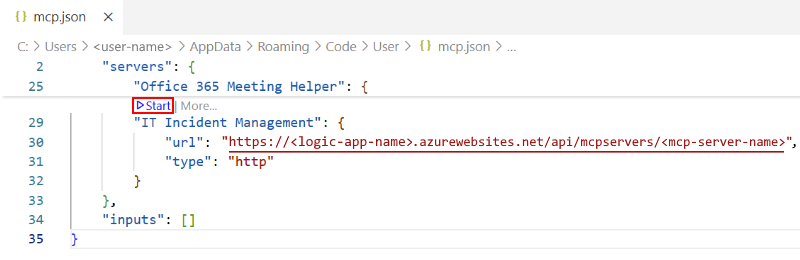
This guide selects Global to store the MCP server information in the user configuration. As a result, Visual Studio Code creates and opens an mcp.json file, which shows your MCP server information.
In the mcp.json file, select the Start or Restart link to establish connectivity for your MCP server, for example:
OAuth
Key-based
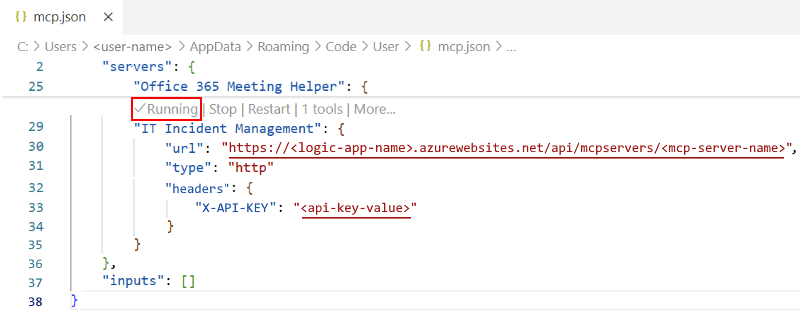
When the authentication prompt appears, select Allow, and then select the account to use for authentication.
Sign in and give consent to call your MCP server.
After authentication completes, the mcp.json file shows Running as the MCP server status.
OAuth

Key-based
As a test, try calling your MCP server from GitHub Copilot:
On the Visual Studio Code title bar, open the Copilot list, and select Open Chat.
Under the chat input box, from the Built-in modes list, select Agent.
From the LLM list, select the LLM to use.
To browse the tools available in your MCP server, select Configure Tools.
In the tools list, select or clear tools as appropriate, but make sure that your new MCP server is selected.


Now you can interact with your MCP server through the Copilot chat interface.
Learn how parameter values resolve at runtime
This section describes the options for how your MCP server sources input parameter values for action-backed tools. You can either keep the model as the default source, or you can provide hardcoded static values for all interactions.
Model-provided inputs
By default, the model passes in parameter values at runtime based on the conversation between the agent and the end user. These values are dynamic and unknown until runtime.
User-provided inputs
You specify the parameter values during development. These values are typically hardcoded and stay the same across all interactions between the agent loop and the end user.