Add certificates to integration accounts for securing messages in workflows with Azure Logic Apps
Applies to: Azure Logic Apps (Consumption + Standard)
When you need to exchange confidential messages in a logic app business-to-business (B2B) workflow, you can increase the security around this communication by using certificates. A certificate is a digital document that helps secure communication in the following ways:
Checks the participants' identities in electronic communications.
Encrypts message content.
Digitally signs messages.
You can use the following certificate types in your workflows:
Public certificates, which you must purchase from a public internet certificate authority (CA). These certificates don't require any keys.
Private certificates or self-signed certificates, which you create and issue yourself. However, these certificates require private keys in an Azure key vault.
If you're new to logic apps, review What is Azure Logic Apps? For more information about B2B enterprise integration, review B2B enterprise integration workflows with Azure Logic Apps and Enterprise Integration Pack.
Prerequisites
An Azure account and subscription. If you don't have a subscription yet, sign up for a free Azure account.
An integration account resource where you define and store artifacts, such as trading partners, agreements, certificates, and so on, for use in your enterprise integration and B2B workflows. This resource has to meet the following requirements:
Is associated with the same Azure subscription as your logic app resource.
Exists in the same location or Azure region as your logic app resource.
If you have a Consumption logic app resource, you have to link your integration account to your logic app resource before you can use your artifacts in your workflow.
To create and add certificates for use in Logic App (Consumption) workflows, you don't need a logic app resource yet. However, when you're ready to use those certificates in your workflows, your logic app resource requires a linked integration account that stores those certificates.
If you have a Standard logic app resource, your integration account doesn't need a link to your logic app resource but is still required to store other artifacts, such as partners, agreements, and certificates, along with using the AS2, X12, and EDIFACT operations. Your integration account still has to meet other requirements, such as using the same Azure subscription and existing in the same location as your logic app resource.
For private certificates, you must meet the following prerequisites:
Add a private key in Azure Key Vault and have the Key Name. For more information, review Add your private key to Azure Key Vault.
Authorize the Azure Logic Apps service to perform operations on your key vault. To grant access to the Azure Logic Apps service principal, use Azure role-based access control to manage access to your key vault. For more information, see Provide access to Key Vault keys, certificates, and secrets with an Azure role-based access control.
Note
If you're using access policies with your key vault, considering migrating to the Azure role-based access control permission model.
Add the corresponding public certificate to your key vault. This certificate appears in your agreement's Send and Receive settings for signing and encrypting messages. For example, review Reference for AS2 messages settings in Azure Logic Apps.
At least two trading partners and an agreement between those partners in your integration account. An agreement requires a host partner and a guest partner. Also, an agreement requires that both partners use the same or compatible business identity qualifier that's appropriate for an AS2, X12, EDIFACT, or RosettaNet agreement.
Optionally, the logic app resource and workflow where you want to use the certificate. The workflow requires any trigger that starts your logic app's workflow. If you haven't created a logic app workflow before, review Quickstart: Create an example Consumption logic app workflow.
Use a public certificate
To use a public certificate in your workflow, you have to first add the certificate to your integration account.
In the Azure portal search box, enter
integration accounts, and select Integration accounts.Under Integration accounts, select the integration account where you want to add your certificate.
On the integration account menu, under Settings, select Certificates.
On the Certificates pane, select Add.
On the Add Certificate pane, provide the following information about the certificate:
Property Required Value Description Name Yes <certificate-name> Your certificate's name, which is publicCertin this exampleCertificate Type Yes Public Your certificate's type Certificate Yes <certificate-file-name> To browse for the certificate file that you want to add, select the folder icon next to the Certificate box. Select the certificate that you want to use. 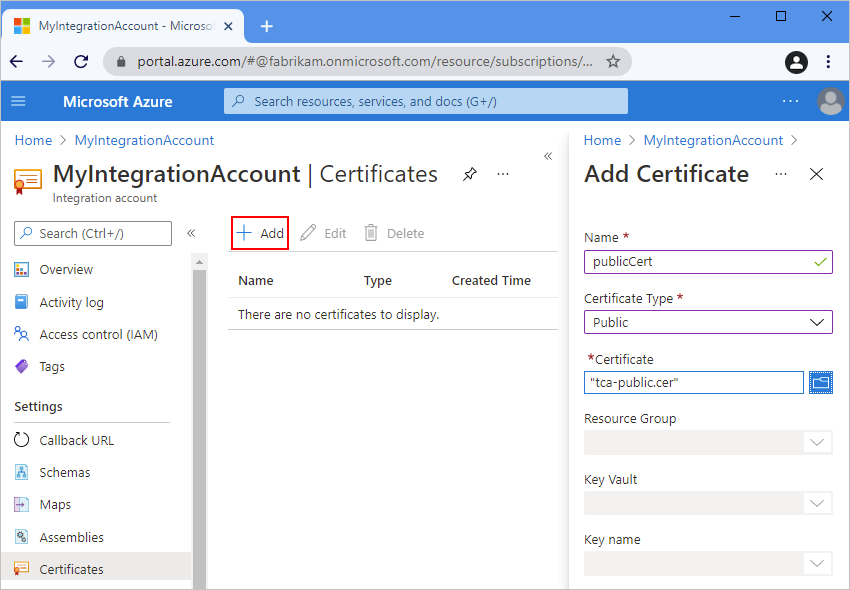
When you're done, select OK.
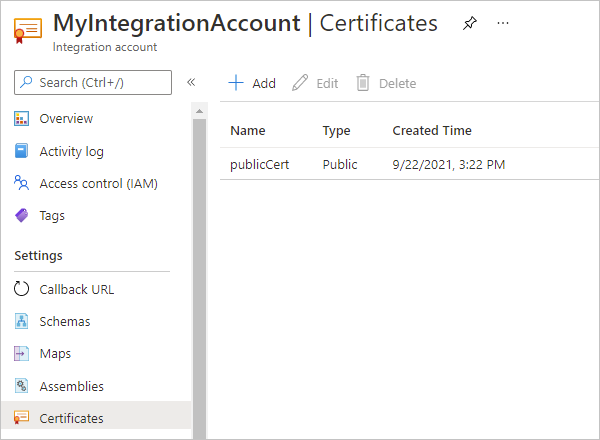
After Azure validates your selection, Azure uploads your certificate.
Use a private certificate
To use a private certificate in your workflow, you have to first meet the prerequisites for private keys, and add a public certificate to your integration account.
In the Azure portal search box, enter
integration accounts, and select Integration accounts.Under Integration accounts, select the integration account where you want to add your certificate.
On the integration account menu, under Settings, select Certificates.
On the Certificates pane, select Add.
On the Add Certificate pane, provide the following information about the certificate:
Property Required Value Description Name Yes <certificate-name> Your certificate's name, which is privateCertin this exampleCertificate Type Yes Private Your certificate's type Certificate Yes <certificate-file-name> To browse for the certificate file that you want to add, select the folder icon next to the Certificate box. Select the public certificate that corresponds to the private key that's stored in your key vault. Resource Group Yes <integration-account-resource-group> Your integration account's resource group, which is Integration-Account-RGin this exampleKey Vault Yes <key-vault-name> Your key vault name Key name Yes <key-name> Your key name 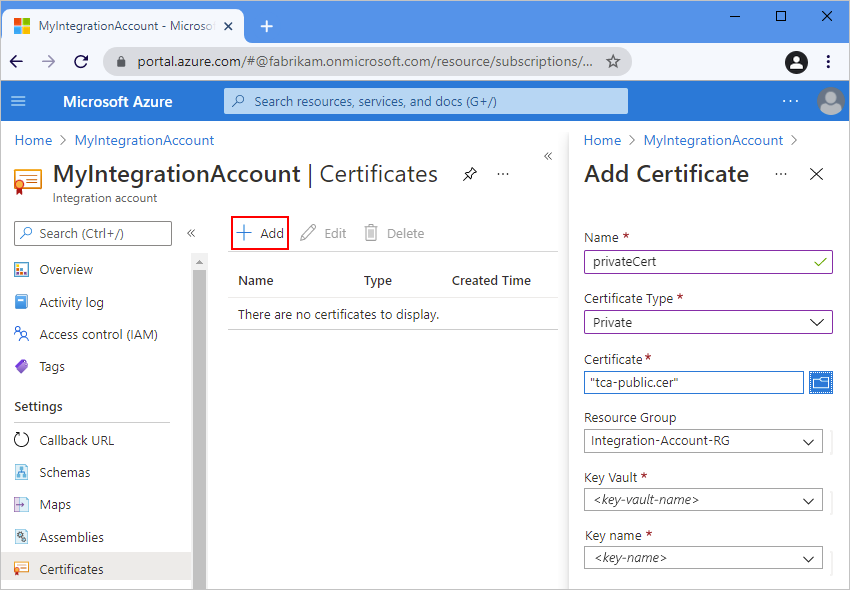
When you're done, select OK.
After Azure validates your selection, Azure uploads your certificate.

Next steps
Feedback
Coming soon: Throughout 2024 we will be phasing out GitHub Issues as the feedback mechanism for content and replacing it with a new feedback system. For more information see: https://aka.ms/ContentUserFeedback.
Submit and view feedback for