Note
Access to this page requires authorization. You can try signing in or changing directories.
Access to this page requires authorization. You can try changing directories.
APPLIES TO:
 Azure CLI ml extension v2 (current)
Python SDK azure-ai-ml v2 (current)
Azure CLI ml extension v2 (current)
Python SDK azure-ai-ml v2 (current)
In this article, you learn how to consume Azure Machine Learning batch deployments from Microsoft Fabric. Although the workflow uses models that are deployed to batch endpoints, it also supports the use of batch pipeline deployments from Fabric.
Important
This feature is currently in public preview. This preview version is provided without a service-level agreement, and we don't recommend it for production workloads. Certain features might not be supported or might have constrained capabilities.
For more information, see Supplemental Terms of Use for Microsoft Azure Previews.
Prerequisites
- Get a Microsoft Fabric subscription. Or sign up for a free Microsoft Fabric trial.
- Sign in to Microsoft Fabric.
- An Azure subscription. If you don't have an Azure subscription, create a free account before you begin. Try the free or paid version of Azure Machine Learning.
- An Azure Machine Learning workspace. If you don't have one, use the steps in How to manage workspaces to create one.
- Ensure that you have the following permissions in the workspace:
- Create/manage batch endpoints and deployments: Use roles Owner, contributor, or custom role allowing
Microsoft.MachineLearningServices/workspaces/batchEndpoints/*. - Create ARM deployments in the workspace resource group: Use roles Owner, contributor, or custom role allowing
Microsoft.Resources/deployments/writein the resource group where the workspace is deployed.
- Create/manage batch endpoints and deployments: Use roles Owner, contributor, or custom role allowing
- Ensure that you have the following permissions in the workspace:
- A model deployed to a batch endpoint. If you don't have one, use the steps in Deploy models for scoring in batch endpoints to create one.
- Download the heart-unlabeled.csv sample dataset to use for scoring.
Architecture
Azure Machine Learning can't directly access data stored in Fabric's OneLake. However, you can use OneLake's capability to create shortcuts within a Lakehouse to read and write data stored in Azure Data Lake Gen2. Since Azure Machine Learning supports Azure Data Lake Gen2 storage, this setup allows you to use Fabric and Azure Machine Learning together. The data architecture is as follows:

Configure data access
To allow Fabric and Azure Machine Learning to read and write the same data without having to copy it, you can take advantage of OneLake shortcuts and Azure Machine Learning datastores. By pointing a OneLake shortcut and a datastore to the same storage account, you can ensure that both Fabric and Azure Machine Learning read from and write to the same underlying data.
In this section, you create or identify a storage account to use for storing the information that the batch endpoint will consume and that Fabric users will see in OneLake. Fabric only supports storage accounts with hierarchical names enabled, such as Azure Data Lake Gen2.
Create a OneLake shortcut to the storage account
Open the Synapse Data Engineering experience in Fabric.
From the left-side panel, select your Fabric workspace to open it.
Open the lakehouse that you'll use to configure the connection. If you don't have a lakehouse already, go to the Data Engineering experience to create a lakehouse. In this example, you use a lakehouse named trusted.
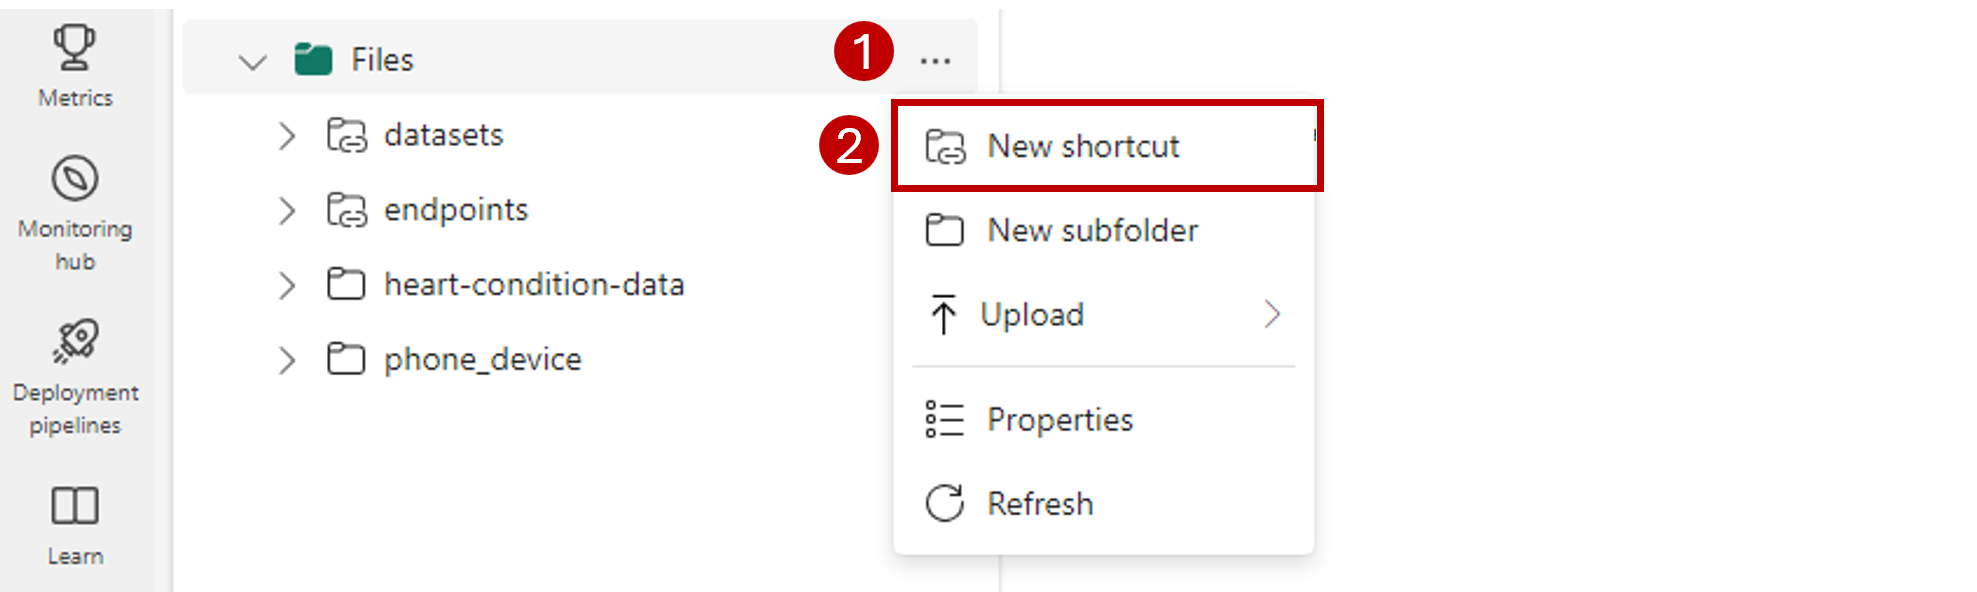
In the left-side navigation bar, open more options for Files, and then select New shortcut to bring up the wizard.
Select the Azure Data Lake Storage Gen2 option.

In the Connection settings section, paste the URL associated with the Azure Data Lake Gen2 storage account.
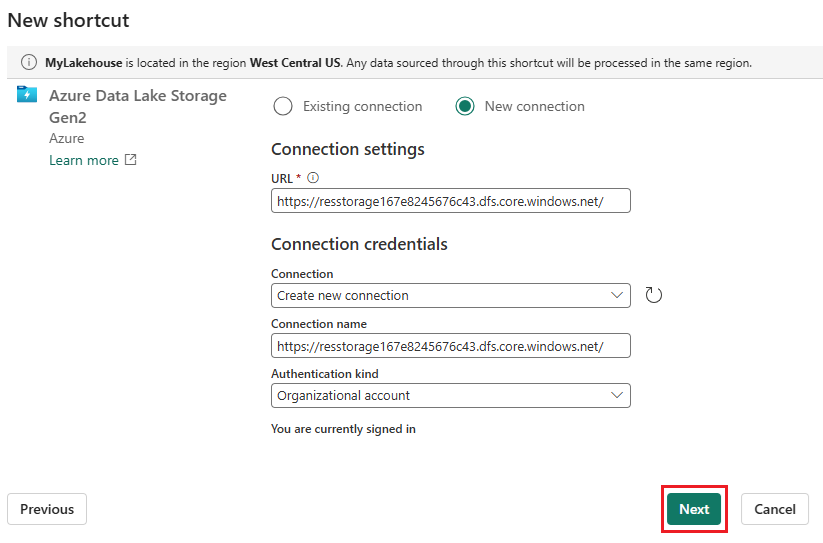
In the Connection credentials section:
- For Connection, select Create new connection.
- For Connection name, keep the default populated value.
- For Authentication kind, select Organizational account to use the credentials of the connected user via OAuth 2.0.
- Select Sign in to sign in.
Select Next.
Configure the path to the shortcut, relative to the storage account, if needed. Use this setting to configure the folder that the shortcut will point to.
Configure the Name of the shortcut. This name will be a path inside the lakehouse. In this example, name the shortcut datasets.
Save the changes.


Create a datastore that points to the storage account
Open the Azure Machine Learning studio.
Go to your Azure Machine Learning workspace.
Go to the Data section.
Select the Datastores tab.
Select Create.
Configure the datastore as follows:
For Datastore name, enter trusted_blob.
For Datastore type select Azure Blob Storage.
Tip
Why should you configure Azure Blob Storage instead of Azure Data Lake Gen2? Batch endpoints can only write predictions to Blob Storage accounts. However, every Azure Data Lake Gen2 storage account is also a blob storage account; therefore, they can be used interchangeably.
Select the storage account from the wizard, using the Subscription ID, Storage account, and Blob container (file system).
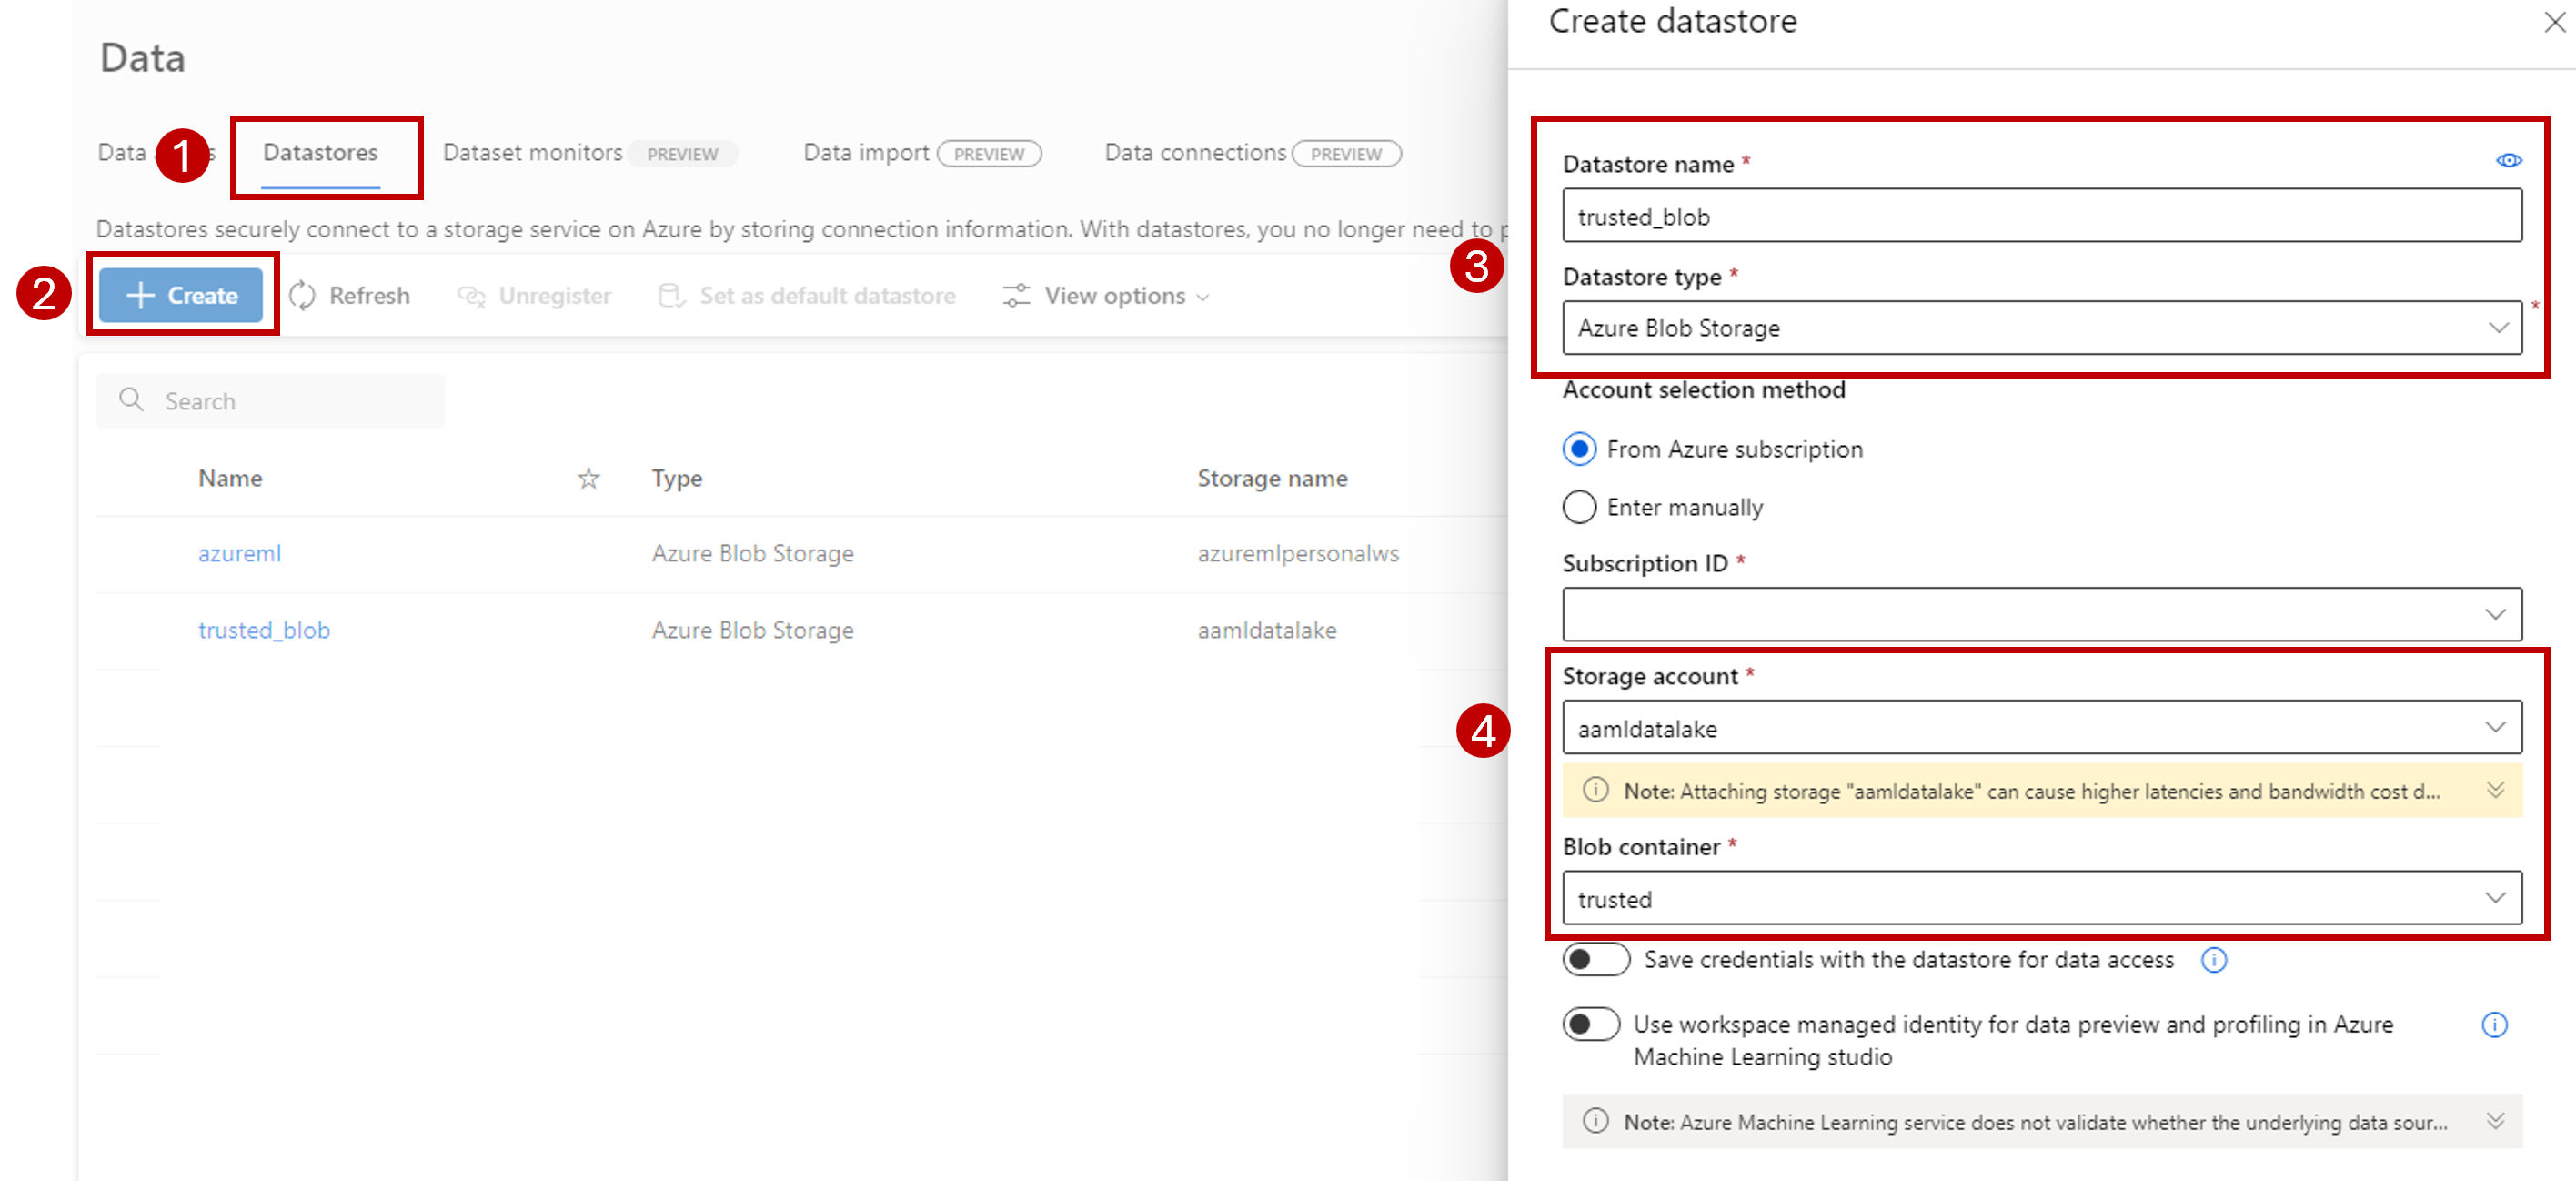
Select Create.
Ensure that the compute where the batch endpoint is running has permission to mount the data in this storage account. Although access is still granted by the identity that invokes the endpoint, the compute where the batch endpoint runs needs to have permission to mount the storage account that you provide. For more information, see Accessing storage services.
Upload sample dataset
Upload some sample data for the endpoint to use as input:
Go to your Fabric workspace.
Select the lakehouse where you created the shortcut.
Go to the datasets shortcut.
Create a folder to store the sample dataset that you want to score. Name the folder uci-heart-unlabeled.
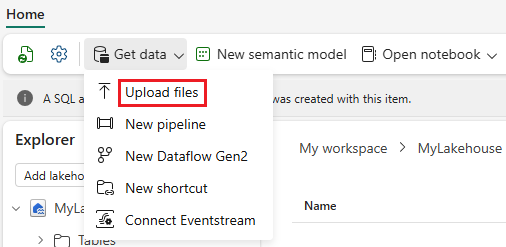
Use the Get data option and select Upload files to upload the sample dataset heart-unlabeled.csv.
Upload the sample dataset.
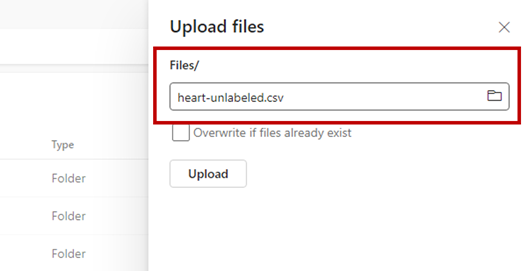
The sample file is ready to be consumed. Note the path to the location where you saved it.


Create a Fabric to batch inferencing pipeline
In this section, you create a Fabric-to-batch inferencing pipeline in your existing Fabric workspace and invoke batch endpoints.
Return to the Data Engineering experience (if you already navigated away from it), by using the experience selector icon in the lower left corner of your home page.
Open your Fabric workspace.
From the New section of the homepage, select Data pipeline.
Name the pipeline and select Create.
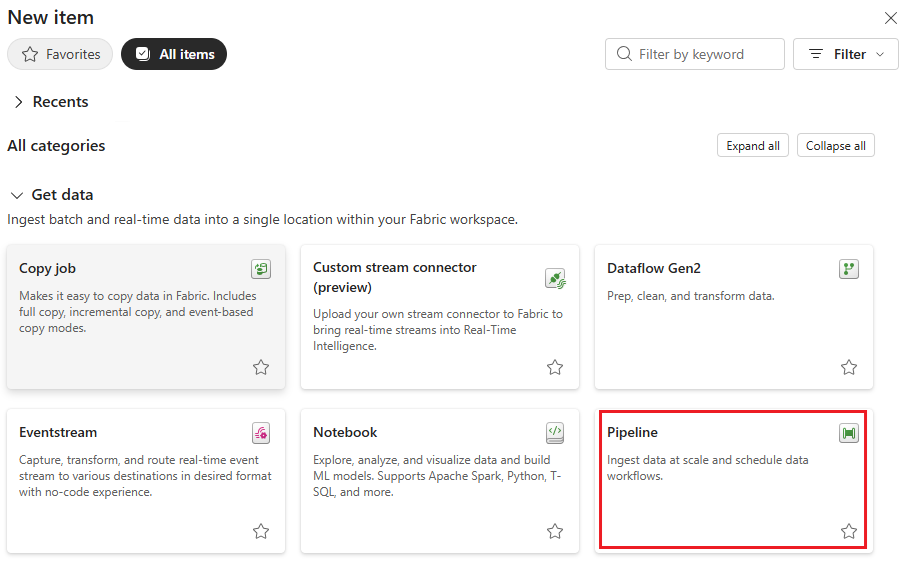
Select the Activities tab from the toolbar in the designer canvas.
Select more options at the end of the tab and select Azure Machine Learning.

Go to the Settings tab and configure the activity as follows:
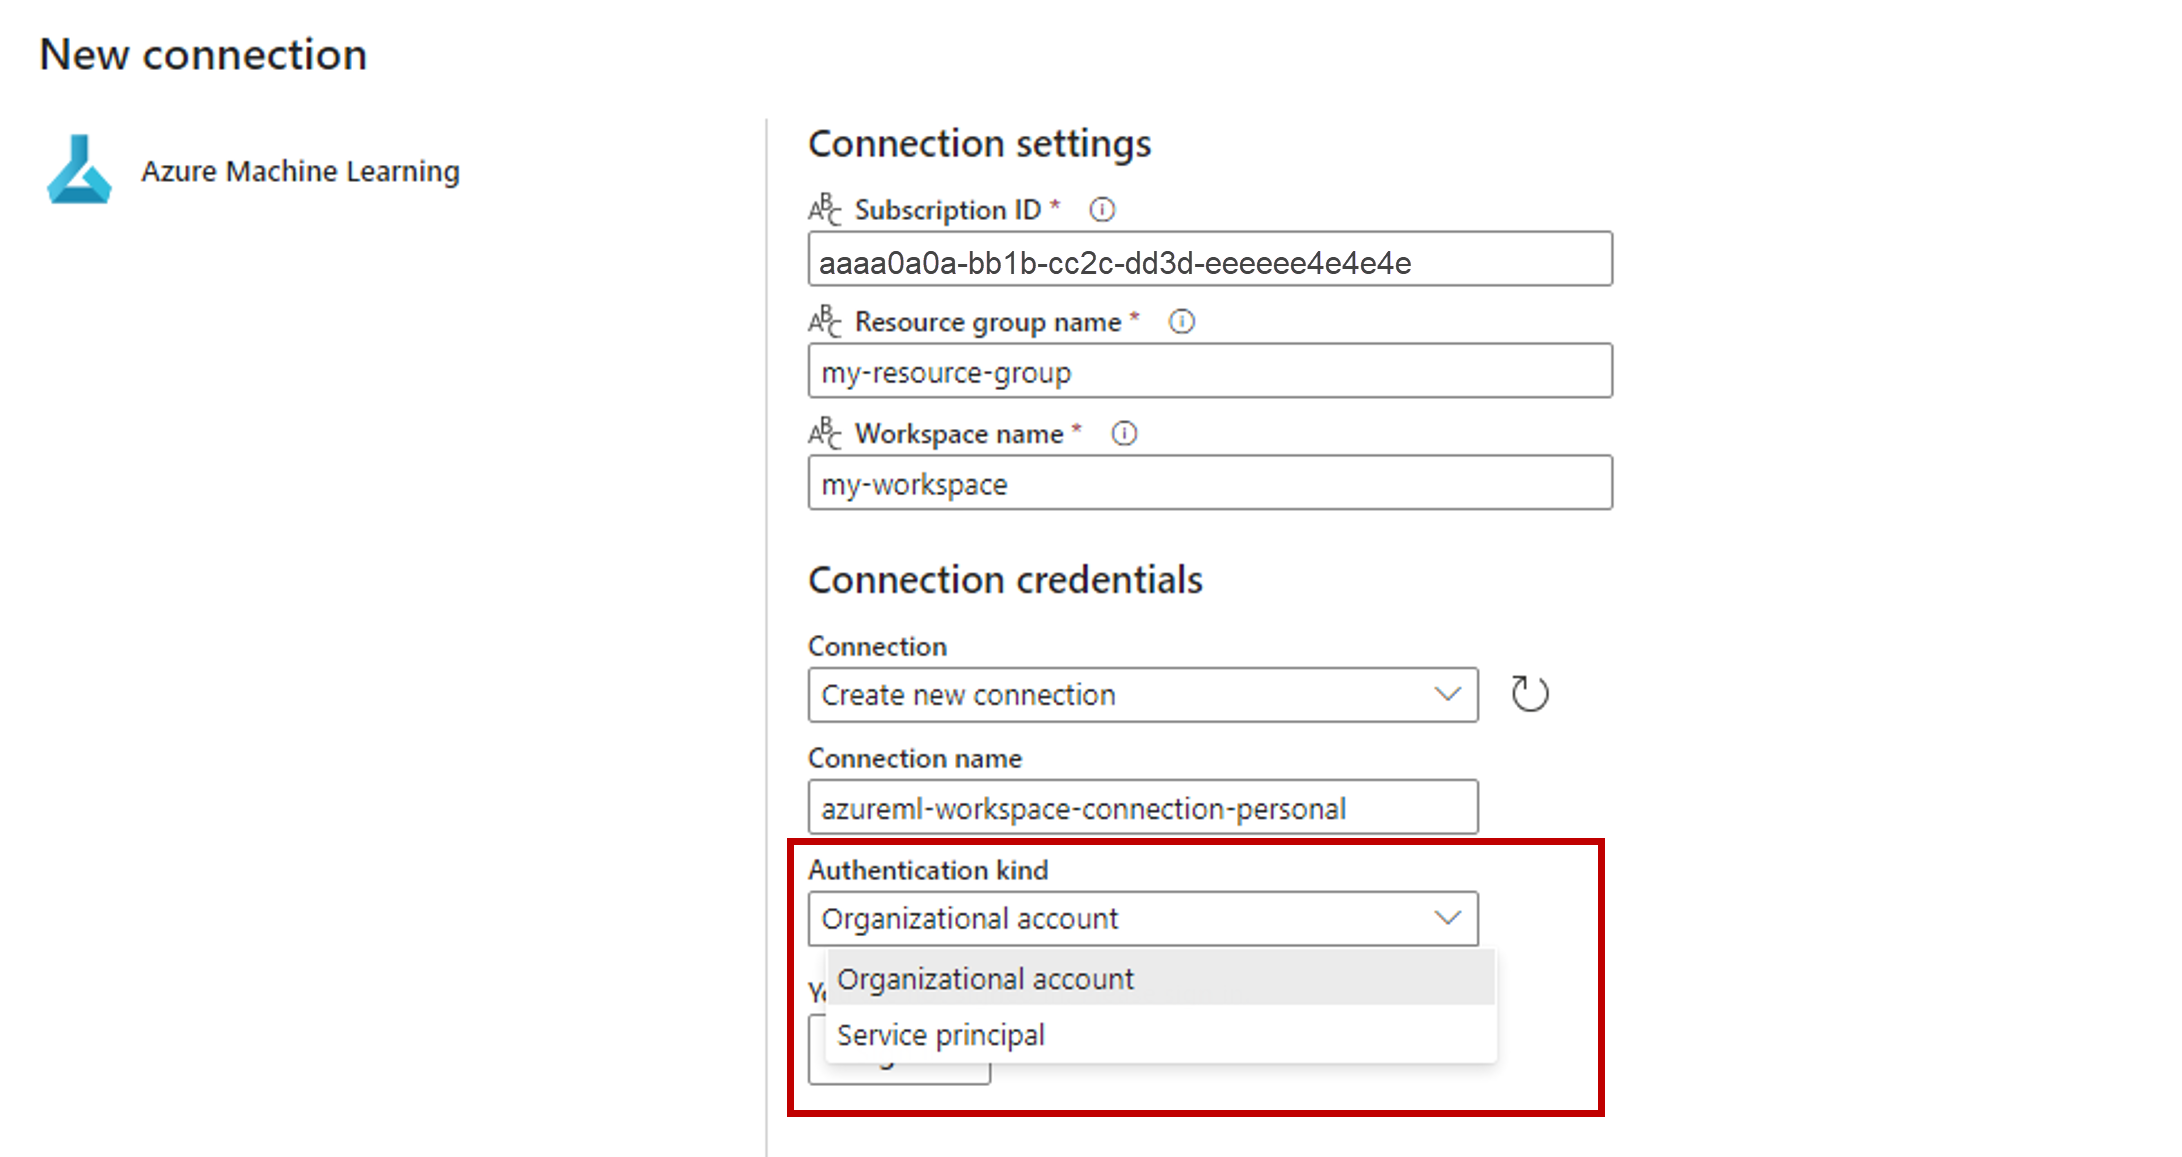
Select New next to Azure Machine Learning connection to create a new connection to the Azure Machine Learning workspace that contains your deployment.

In the Connection settings section of the creation wizard, specify the values of the subscription ID, Resource group name, and Workspace name, where your endpoint is deployed.
In the Connection credentials section, select Organizational account as the value for the Authentication kind for your connection. Organizational account uses the credentials of the connected user. Alternatively, you could use Service principal. In production settings, we recommend that you use a Service principal. Regardless of the authentication type, ensure that the identity associated with the connection has the rights to call the batch endpoint that you deployed.
Save the connection. Once the connection is selected, Fabric automatically populates the available batch endpoints in the selected workspace.
For Batch endpoint, select the batch endpoint you want to call. In this example, select heart-classifier-....
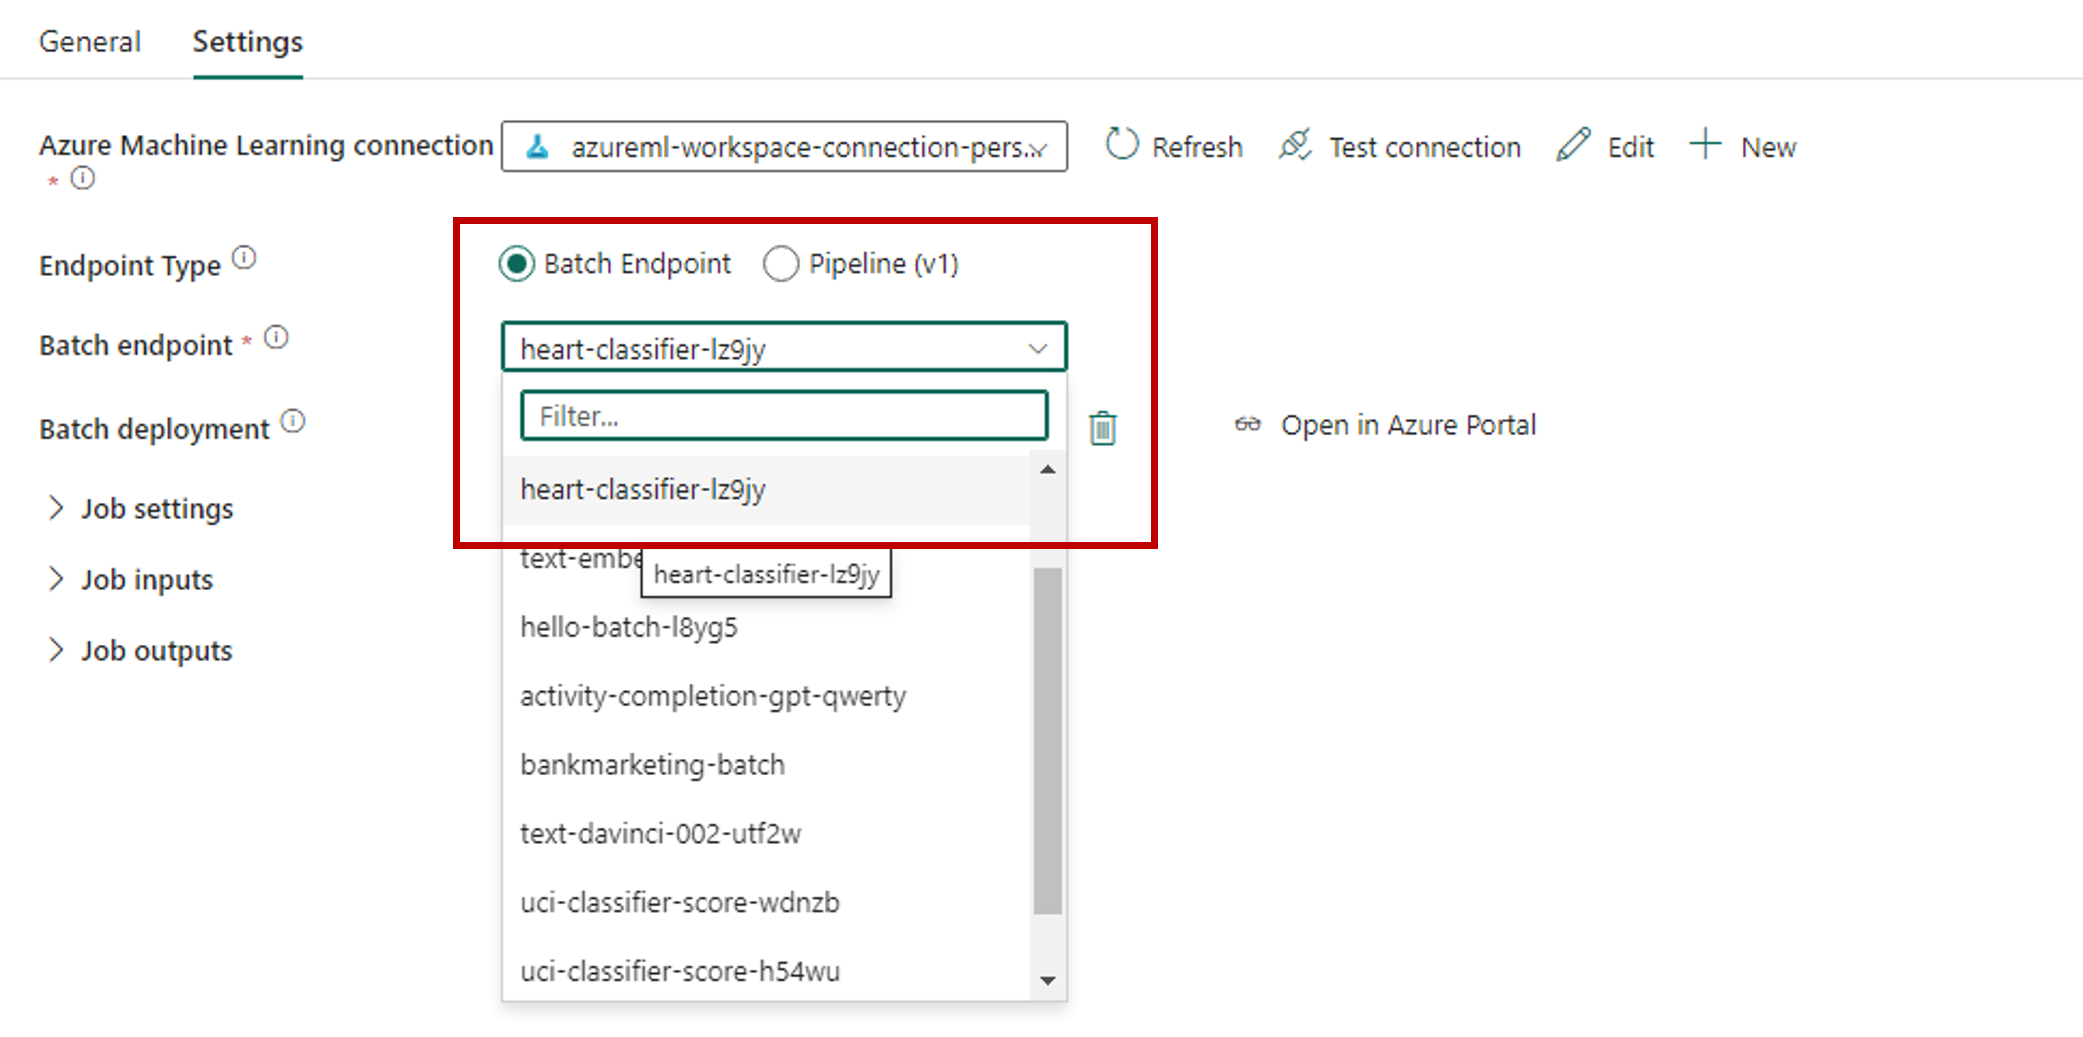
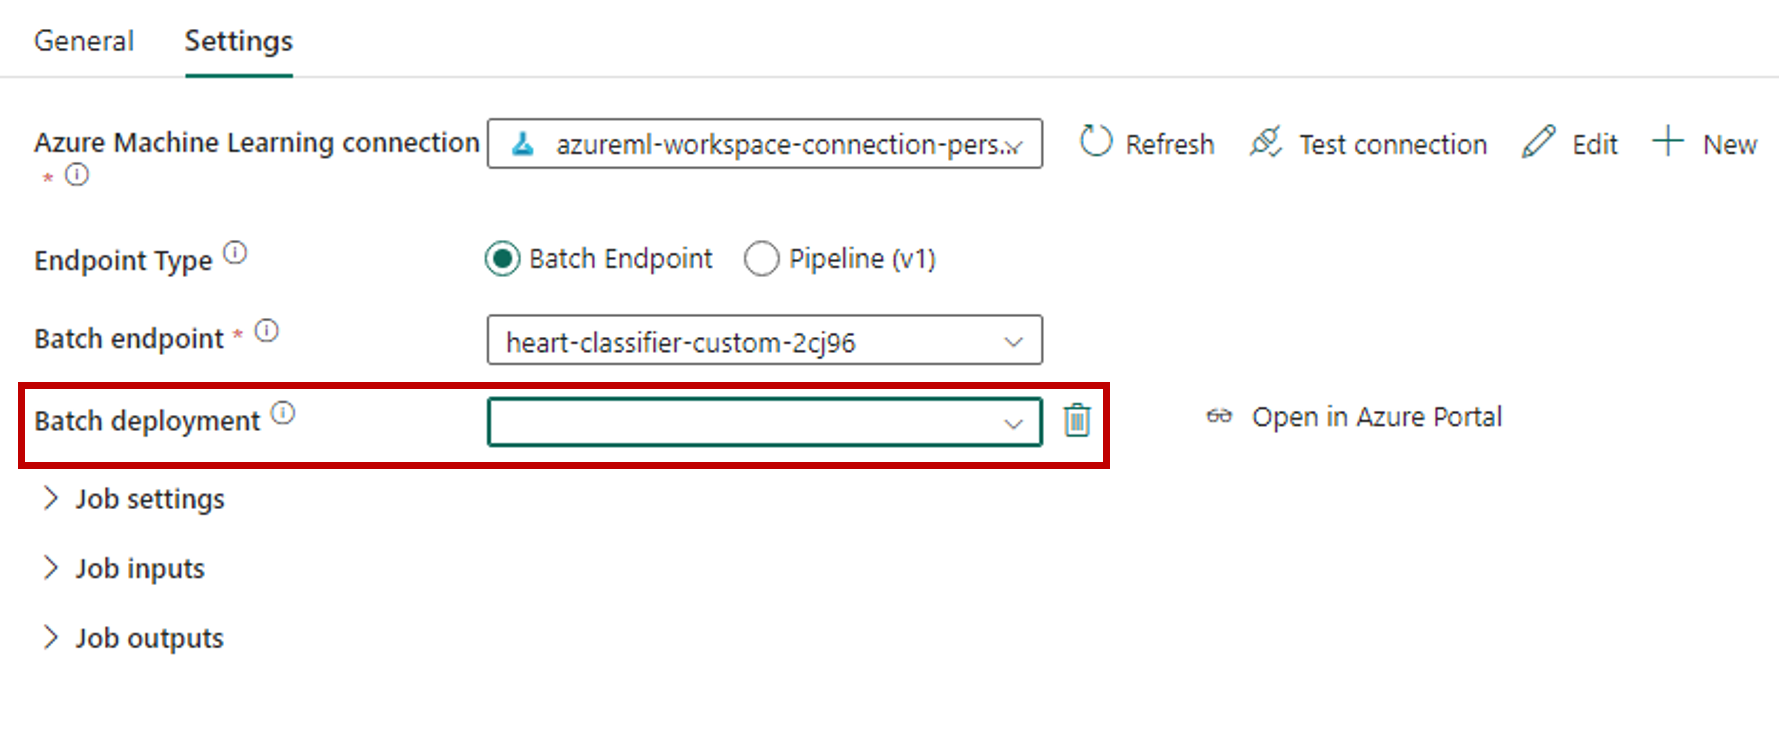
The Batch deployment section automatically populates with the available deployments under the endpoint.
For Batch deployment, select a specific deployment from the list, if needed. If you don't select a deployment, Fabric invokes the Default deployment under the endpoint, allowing the batch endpoint creator to decide which deployment is called. In most scenarios, you'd want to keep this default behavior.


Configure inputs and outputs for the batch endpoint
In this section, you configure inputs and outputs from the batch endpoint. Inputs to batch endpoints supply data and parameters needed to run the process. The Azure Machine Learning batch pipeline in Fabric supports both model deployments and pipeline deployments. The number and type of inputs you provide depend on the deployment type. In this example, you use a model deployment that requires exactly one input and produces one output.
For more information on batch endpoint inputs and outputs, see Understanding inputs and outputs in Batch Endpoints.
Configure the input section
Configure the Job inputs section as follows:
Expand the Job inputs section.
Select New to add a new input to your endpoint.
Name the input
input_data. Since you're using a model deployment, you can use any name. For pipeline deployments, however, you need to indicate the exact name of the input that your model is expecting.Select the dropdown menu next to the input you just added to open the input's property (name and value field).
Enter
JobInputTypein the Name field to indicate the type of input you're creating.Enter
UriFolderin the Value field to indicate that the input is a folder path. Other supported values for this field are UriFile (a file path) or Literal (any literal value like string or integer). You need to use the right type that your deployment expects.Select the plus sign next to the property to add another property for this input.
Enter
Uriin the Name field to indicate the path to the data.Enter
azureml://datastores/trusted_blob/datasets/uci-heart-unlabeled, the path to locate the data, in the Value field. Here, you use a path that leads to the storage account that is both linked to OneLake in Fabric and to Azure Machine Learning. azureml://datastores/trusted_blob/datasets/uci-heart-unlabeled is the path to CSV files with the expected input data for the model that is deployed to the batch endpoint. You can also use a direct path to the storage account, such ashttps://<storage-account>.dfs.azure.com.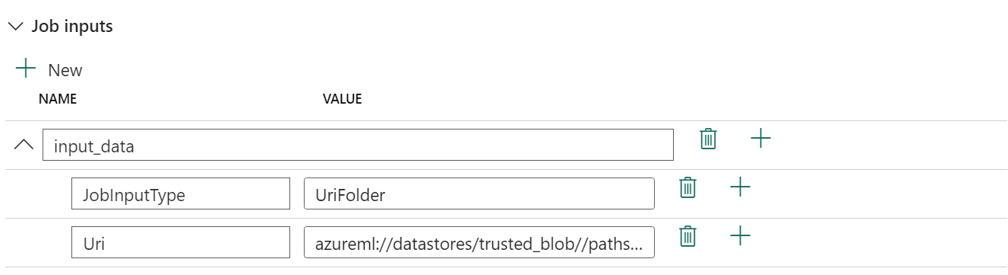
Tip
If your input is of type Literal, replace the property
Uriby `Value``.
If your endpoint requires more inputs, repeat the previous steps for each of them. In this example, model deployments require exactly one input.
Configure the output section
Configure the Job outputs section as follows:
Expand the Job outputs section.
Select New to add a new output to your endpoint.
Name the output
output_data. Since you're using a model deployment, you can use any name. For pipeline deployments, however, you need to indicate the exact name of the output that your model is generating.Select the dropdown menu next to the output you just added to open the output's property (name and value field).
Enter
JobOutputTypein the Name field to indicate the type of output you're creating.Enter
UriFilein the Value field to indicate that the output is a file path. The other supported value for this field is UriFolder (a folder path). Unlike the job input section, Literal (any literal value like string or integer) isn't supported as an output.Select the plus sign next to the property to add another property for this output.
Enter
Uriin the Name field to indicate the path to the data.Enter
@concat(@concat('azureml://datastores/trusted_blob/paths/endpoints', pipeline().RunId, 'predictions.csv'), the path to where the output should be placed, in the Value field. Azure Machine Learning batch endpoints only support use of data store paths as outputs. Since outputs need to be unique to avoid conflicts, you've used a dynamic expression,@concat(@concat('azureml://datastores/trusted_blob/paths/endpoints', pipeline().RunId, 'predictions.csv'), to construct the path.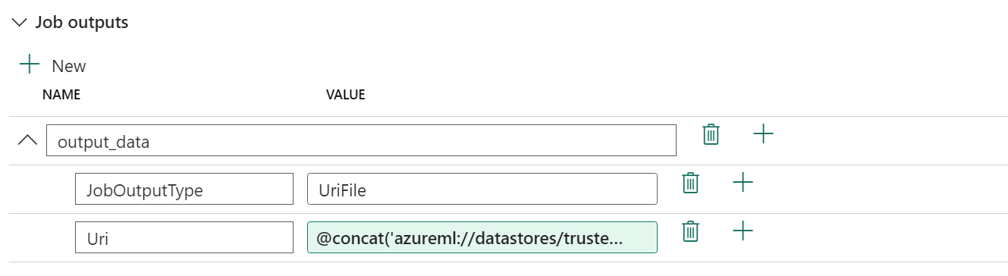
If your endpoint returns more outputs, repeat the previous steps for each of them. In this example, model deployments produce exactly one output.
(Optional) Configure the job settings
You can also configure the Job settings by adding the following properties:
For model deployments:
| Setting | Description |
|---|---|
MiniBatchSize |
The size of the batch. |
ComputeInstanceCount |
The number of compute instances to ask from the deployment. |
For pipeline deployments:
| Setting | Description |
|---|---|
ContinueOnStepFailure |
Indicates if the pipeline should stop processing nodes after a failure. |
DefaultDatastore |
Indicates the default data store to use for outputs. |
ForceRun |
Indicates if the pipeline should force all the components to run even if the output can be inferred from a previous run. |
Once configured, you can test the pipeline.