Note
Access to this page requires authorization. You can try signing in or changing directories.
Access to this page requires authorization. You can try changing directories.
In this article, learn how to create and connect to a secure Azure Machine Learning workspace. The steps in this article use an Azure Virtual Network to create a security boundary around resources used by Azure Machine Learning.
Important
We recommend using the Azure Machine Learning managed virtual network instead of an Azure Virtual Network. For a version of this tutorial that uses a managed virtual network, see Tutorial: Create a secure workspace with a managed virtual network.
In this tutorial, you accomplish the following tasks:
- Create an Azure Virtual Network (VNet) to secure communications between services in the virtual network.
- Create an Azure Storage Account (blob and file) behind the VNet. This service is used as default storage for the workspace.
- Create an Azure Key Vault behind the VNet. This service is used to store secrets used by the workspace. For example, the security information needed to access the storage account.
- Create an Azure Container Registry (ACR). This service is used as a repository for Docker images. Docker images provide the compute environments needed when training a machine learning model or deploying a trained model as an endpoint.
- Create an Azure Machine Learning workspace.
- Create a jump box. A jump box is an Azure Virtual Machine that is behind the VNet. Since the VNet restricts access from the public internet, the jump box is used as a way to connect to resources behind the VNet.
- Configure Azure Machine Learning studio to work behind a VNet. The studio provides a web interface for Azure Machine Learning.
- Create an Azure Machine Learning compute cluster. A compute cluster is used when training machine learning models in the cloud. In configurations where Azure Container Registry is behind the VNet, it is also used to build Docker images.
- Connect to the jump box and use the Azure Machine Learning studio.
Tip
If you're looking for a template that demonstrates how to create a secure workspace, see Bicep template, or Terraform template.
After completing this tutorial, you'll have the following architecture:
- An Azure Virtual Network, which contains three subnets:
- Training: Contains the Azure Machine Learning workspace, dependency services, and resources used for training models.
- Scoring: For the steps in this tutorial, it isn't used. However if you continue using this workspace for other tutorials, we recommend using this subnet when deploying models to endpoints.
- AzureBastionSubnet: Used by the Azure Bastion service to securely connect clients to Azure Virtual Machines.
- An Azure Machine Learning workspace that uses a private endpoint to communicate using the virtual network.
- An Azure Storage Account that uses private endpoints to allow storage services such as blob and file to communicate using the virtual network.
- An Azure Container Registry that uses a private endpoint communicate using the virtual network.
- Azure Bastion, which allows you to use your browser to securely communicate with the jump box VM inside the virtual network.
- An Azure Virtual Machine that you can remotely connect to and access resources secured inside the virtual network.
- An Azure Machine Learning compute instance and compute cluster.
Tip
The Azure Batch Service listed on the diagram is a back-end service required by the compute clusters and compute instances.
Prerequisites
- Familiarity with Azure Virtual Networks and IP networking. If you aren't familiar, try the Fundamentals of computer networking module.
- While most of the steps in this article use the Azure portal or the Azure Machine Learning studio, some steps use the Azure CLI extension for Machine Learning v2.
Create a virtual network
To create a virtual network, use the following steps:
In the Azure portal, select the portal menu in the upper left corner. From the menu, select + Create a resource and then enter Virtual Network in the search field. Select the Virtual Network entry, and then select Create.


From the Basics tab, select the Azure subscription to use for this resource and then select or create a new resource group. Under Instance details, enter a friendly name for your virtual network and select the region to create it in.

Select Security. Select to Enable Azure Bastion. Azure Bastion provides a secure way to access the VM jump box you create inside the virtual network in a later step. Use the following values for the remaining fields:
- Bastion name: A unique name for this Bastion instance
- Public IP address: Create a new public IP address.
Leave the other fields at the default values.

Select IP Addresses. The default settings should be similar to the following image:

Use the following steps to configure the IP address and configure a subnet for training and scoring resources:
Tip
While you can use a single subnet for all Azure Machine Learning resources, the steps in this article show how to create two subnets to separate the training & scoring resources.
The workspace and other dependency services will go into the training subnet. They can still be used by resources in other subnets, such as the scoring subnet.
Look at the default IPv4 address space value. In the screenshot, the value is 172.16.0.0/16. The value may be different for you. While you can use a different value, the rest of the steps in this tutorial are based on the 172.16.0.0/16 value.
Warning
Do not use the 172.17.0.0/16 IP address range for your VNet. This is the default subnet range used by the Docker bridge network, and will result in errors if used for your VNet. Other ranges may also conflict depending on what you want to connect to the virtual network. For example, if you plan to connect your on premises network to the VNet, and your on-premises network also uses the 172.16.0.0/16 range. Ultimately, it is up to you to plan your network infrastructure.
Select the Default subnet and then select the edit icon.

Change the subnet Name to Training. Leave the other values at the default settings, then select Save to save the changes.
To create a subnet for compute resources used to score your models, select + Add subnet and set the name and address range:
- Subnet name: Scoring
- Starting address: 172.16.2.0
- Subnet size: /24 (256 addresses)

Select Add to add the subnet.
Select Review + create.

Verify that the information is correct, and then select Create.

Create a storage account
In the Azure portal, select the portal menu in the upper left corner. From the menu, select + Create a resource and then enter Storage account. Select the Storage Account entry, and then select Create.
From the Basics tab, select the subscription, resource group, and region you previously used for the virtual network. Enter a unique Storage account name, and set Redundancy to Locally-redundant storage (LRS).

From the Networking tab, select Disable public access and then select + Add private endpoint.

On the Create private endpoint form, use the following values:
- Subscription: The same Azure subscription that contains the previous resources.
- Resource group: The same Azure resource group that contains the previous resources.
- Location: The same Azure region that contains the previous resources.
- Name: A unique name for this private endpoint.
- Target sub-resource: blob
- Virtual network: The virtual network you created earlier.
- Subnet: Training (172.16.0.0/24)
- Private DNS integration: Yes
- Private DNS Zone: privatelink.blob.core.windows.net
Select Add to create the private endpoint.
Select Review + create. Verify that the information is correct, and then select Create.
Once the Storage Account is created, select Go to resource:

From the left navigation, select Networking the Private endpoint connections tab, and then select + Private endpoint:
Note
While you created a private endpoint for Blob storage in the previous steps, you must also create one for File storage.

On the Create a private endpoint form, use the same subscription, resource group, and Region that you've used for previous resources. Enter a unique Name.

Select Next : Resource, and then set Target sub-resource to file.

Select Next : Virtual Network, and then use the following values:
- Virtual network: The network you created previously
- Subnet: Training

Continue through the tabs selecting defaults until you reach Review + Create. Verify that the information is correct, and then select Create.
Tip
If you plan to use a batch endpoint or an Azure Machine Learning pipeline that uses a ParallelRunStep, it is also required to configure private endpoints target queue and table sub-resources. ParallelRunStep internally uses queue and table for task scheduling and dispatching.
Create a key vault
In the Azure portal, select the portal menu in the upper left corner. From the menu, select + Create a resource and then enter Key Vault. Select the Key Vault entry, and then select Create.
From the Basics tab, select the subscription, resource group, and region you previously used for the virtual network. Enter a unique Key vault name. Leave the other fields at the default value.

From the Networking tab, deselect Enable public access and then select + create a private endpoint.

On the Create private endpoint form, use the following values:
- Subscription: The same Azure subscription that contains the previous resources.
- Resource group: The same Azure resource group that contains the previous resources.
- Location: The same Azure region that contains the previous resources.
- Name: A unique name for this private endpoint.
- Target sub-resource: Vault
- Virtual network: The virtual network you created earlier.
- Subnet: Training (172.16.0.0/24)
- Enable Private DNS integration: Yes
- Private DNS Zone: Select the resource group that contains the virtual network and key vault.
Select Add to create the private endpoint.

Select Review + create. Verify that the information is correct, and then select Create.
Once the key vault is created, select Go to resource.
From the left navigation, select Networking the Firewalls and virtual networks tab and then enable the checkbox for Allow trusted Microsoft services to bypass this firewall and Apply.
Create a container registry
In the Azure portal, select the portal menu in the upper left corner. From the menu, select + Create a resource and then enter Container Registry. Select the Container Registry entry, and then select Create.
From the Basics tab, select the subscription, resource group, and location you previously used for the virtual network. Enter a unique Registry name and set the SKU to Premium.

From the Networking tab, select Private endpoint and then select + Add.

On the Create private endpoint form, use the following values:
- Subscription: The same Azure subscription that contains the previous resources.
- Resource group: The same Azure resource group that contains the previous resources.
- Location: The same Azure region that contains the previous resources.
- Name: A unique name for this private endpoint.
- Target sub-resource: registry
- Virtual network: The virtual network you created earlier.
- Subnet: Training (172.16.0.0/24)
- Private DNS integration: Yes
- Resource group: Select the resource group that contains the virtual network and container registry.
Select Add to create the private endpoint.

Select Review + create. Verify that the information is correct, and then select Create.
After the container registry is created, select Go to resource.

From the left of the page, select Access keys, and then enable Admin user. This setting is required when using Azure Container Registry inside a virtual network with Azure Machine Learning.

Create a workspace
In the Azure portal, select the portal menu in the upper left corner. From the menu, select + Create a resource and then enter Machine Learning. Select the Machine Learning entry, and then select Create.

From the Basics tab, select the subscription, resource group, and Region you previously used for the virtual network. Use the following values for the other fields:
- Name: A unique name for your workspace.
- Storage account: Select the storage account you created previously.
- Key vault: Select the key vault you created previously.
- Application insights: Use the default value.
- Container registry: Use the container registry you created previously.
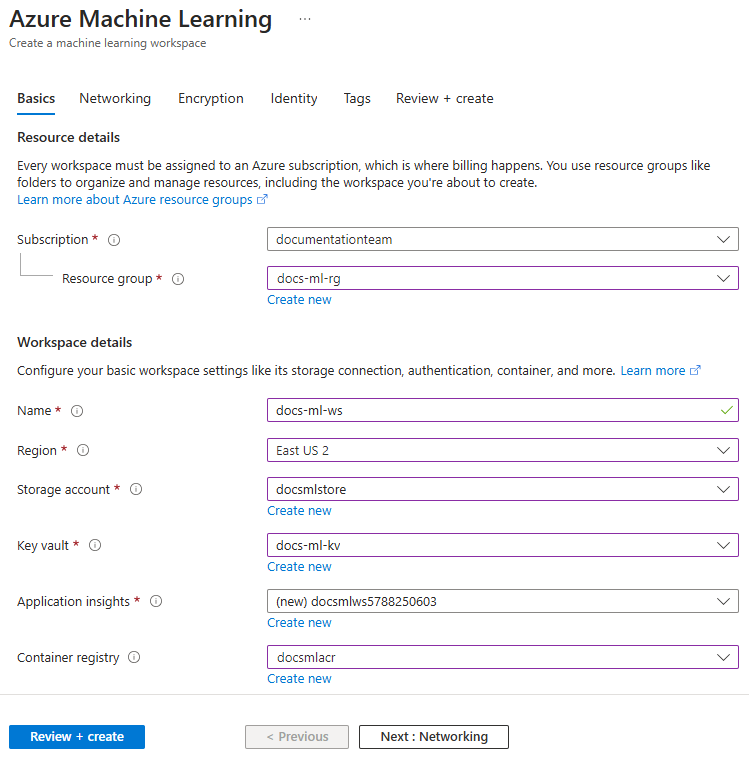
From the Networking tab, select Private with Internet Outbound. In the Workspace inbound access section, select + Add.
On the Create private endpoint form, use the following values:
- Subscription: The same Azure subscription that contains the previous resources.
- Resource group: The same Azure resource group that contains the previous resources.
- Location: The same Azure region that contains the previous resources.
- Name: A unique name for this private endpoint.
- Target sub-resource: amlworkspace
- Virtual network: The virtual network you created earlier.
- Subnet: Training (172.16.0.0/24)
- Private DNS integration: Yes
- Private DNS Zone: Leave the two private DNS zones at the default values of privatelink.api.azureml.ms and privatelink.notebooks.azure.net.
Select OK to create the private endpoint.

From the Networking tab, in the Workspace outbound access section, select Use my own virtual network.
Select Review + create. Verify that the information is correct, and then select Create.
Once the workspace is created, select Go to resource.
From the Settings section on the left, select Networking, Private endpoint connections, and then select the link in the Private endpoint column:

Once the private endpoint information appears, select DNS configuration from the left of the page. Save the IP address and fully qualified domain name (FQDN) information on this page.

Important
There are still some configuration steps needed before you can fully use the workspace. However, these require you to connect to the workspace.
Enable studio
Azure Machine Learning studio is a web-based application that lets you easily manage your workspace. However, it needs some extra configuration before it can be used with resources secured inside a virtual network. Use the following steps to enable studio:
When using an Azure Storage Account that has a private endpoint, add the service principal for the workspace as a Reader for the storage private endpoints. From the Azure portal, select your storage account and then select Networking. Next, select Private endpoint connections.

For each private endpoint listed, use the following steps:
Select the link in the Private endpoint column.

Select Access control (IAM) from the left side.
Select + Add, and then Add role assignment (Preview).

On the Role tab, select the Reader.

On the Members tab, select User, group, or service principal in the Assign access to area and then select + Select members. In the Select members dialog, enter the name as your Azure Machine Learning workspace. Select the service principal for the workspace, and then use the Select button.
On the Review + assign tab, select Review + assign to assign the role.
Secure Azure Monitor and Application Insights
Note
For more information on securing Azure Monitor and Application Insights, see the following links:
In the Azure portal, select Home, and then search for Private link. Select the Azure Monitor Private Link Scope result and then select Create.
From the Basics tab, select the same Subscription, Resource Group, and Resource group region as your Azure Machine Learning workspace. Enter a Name for the instance, and then select Review + Create. To create the instance, select Create.
Once the Azure Monitor Private Link Scope instance is created, select the instance in the Azure portal. From the Configure section, select Azure Monitor Resources and then select + Add.

From Select a scope, use the filters to select the Application Insights instance for your Azure Machine Learning workspace. Select Apply to add the instance.
From the Configure section, select Private Endpoint connections and then select + Private Endpoint.

Select the same Subscription, Resource Group, and Region that contains your virtual network. Select Next: Resource.

Select
Microsoft.insights/privateLinkScopesas the Resource type. Select the Private Link Scope you created earlier as the Resource. Selectazuremonitoras the Target sub-resource. Finally, select Next: Virtual Network to continue.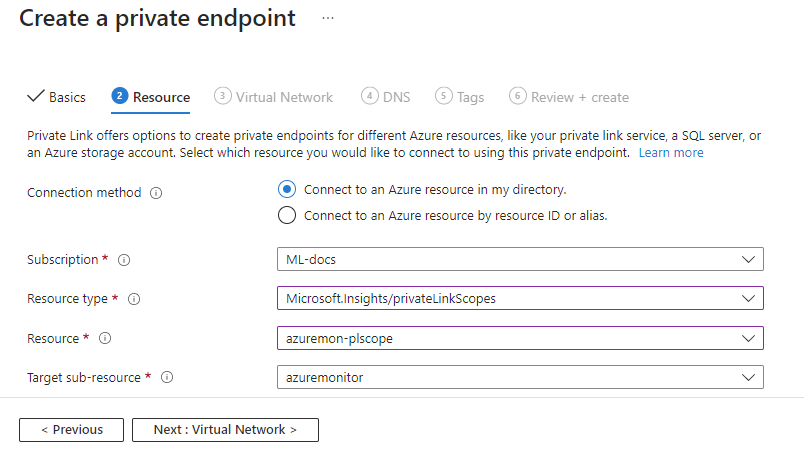
Select the Virtual network you created earlier, and the Training subnet. Select Next until you arrive at Review + Create. Select Create to create the private endpoint.

After the private endpoint is created, return to the Azure Monitor Private Link Scope resource in the portal. From the Configure section, select Access modes. Select Private only for Ingestion access mode and Query access mode, then select Save.

Connect to the workspace
There are several ways that you can connect to the secured workspace. The steps in this article use a jump box, which is a virtual machine in the virtual network. You can connect to it using your web browser and Azure Bastion. The following table lists several other ways that you might connect to the secure workspace:
| Method | Description |
|---|---|
| Azure VPN gateway | Connects on-premises networks to the virtual network over a private connection. Connection is made over the public internet. |
| ExpressRoute | Connects on-premises networks into the cloud over a private connection. Connection is made using a connectivity provider. |
Important
When using a VPN gateway or ExpressRoute, you will need to plan how name resolution works between your on-premises resources and those in the VNet. For more information, see Use a custom DNS server.
Create a jump box (VM)
Use the following steps to create an Azure Virtual Machine to use as a jump box. Azure Bastion enables you to connect to the VM desktop through your browser. From the VM desktop, you can then use the browser on the VM to connect to resources inside the virtual network, such as Azure Machine Learning studio. Or you can install development tools on the VM.
Tip
The following steps create a Windows 11 enterprise VM. Depending on your requirements, you might want to select a different VM image. The Windows 11 (or 10) enterprise image is useful if you need to join the VM to your organization's domain.
In the Azure portal, select the portal menu in the upper left corner. From the menu, select + Create a resource and then enter Virtual Machine. Select the Virtual Machine entry, and then select Create.
From the Basics tab, select the subscription, resource group, and Region you previously used for the virtual network. Provide values for the following fields:
Virtual machine name: A unique name for the VM.
Username: The username you use to sign in to the VM.
Password: The password for the username.
Security type: Standard.
Image: Windows 11 Enterprise.
Tip
If Windows 11 Enterprise isn't in the list for image selection, use See all images_. Find the Windows 11 entry from Microsoft, and use the Select drop-down to select the enterprise image.
You can leave other fields at the default values.
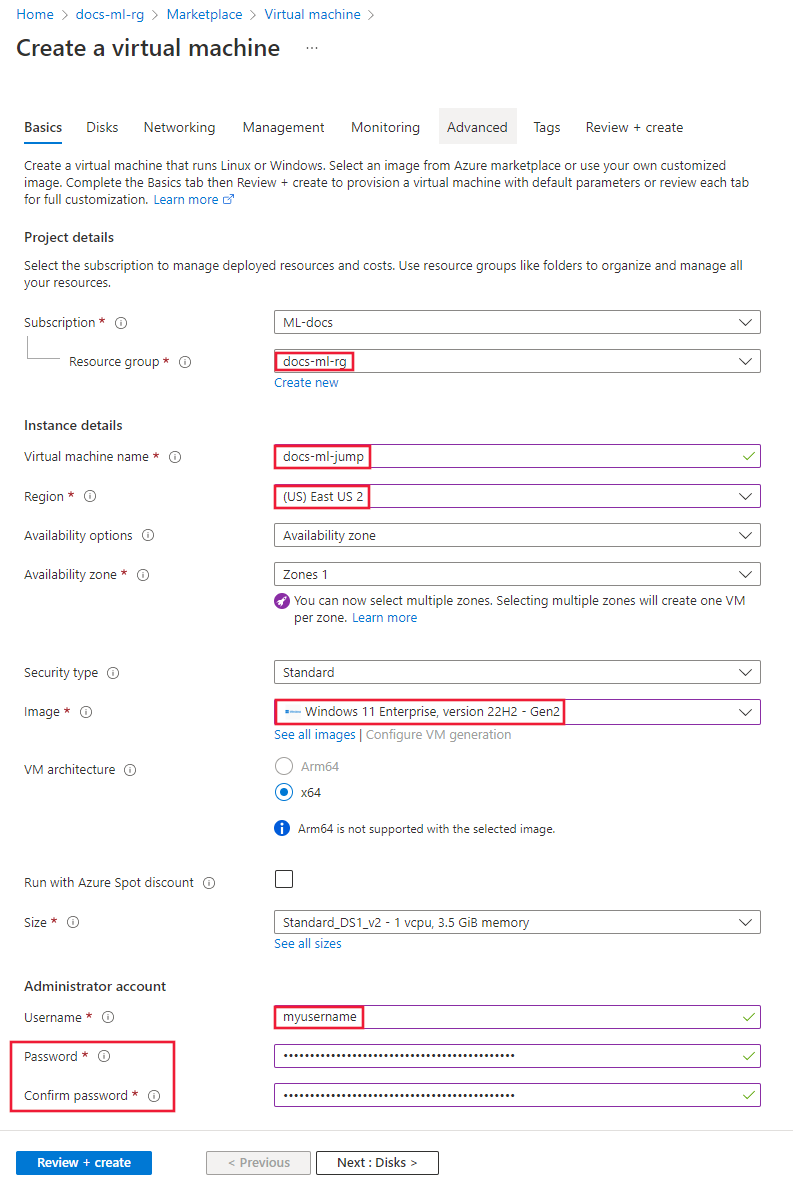
Select Networking, and then select the Virtual network you created earlier. Use the following information to set the remaining fields:
- Select the Training subnet.
- Set the Public IP to None.
- Leave the other fields at the default value.

Select Review + create. Verify that the information is correct, and then select Create.
Connect to the jump box
Once the virtual machine is created, select Go to resource.
From the top of the page, select Connect and then Connect via Bastion.
Tip
Azure Bastion uses port 443 for inbound communication. If you have a firewall that restricts outbound traffic, ensure that it allows traffic on port 443 to the Azure Bastion service. For more information, see Working with NSGs and Azure Bastion.

Provide your authentication information for the virtual machine, and a connection is established in your browser.
Create a compute cluster and instance
A compute instance provides a Jupyter Notebook experience on a shared compute resource attached to your workspace.
From an Azure Bastion connection to the jump box, open the Microsoft Edge browser on the remote desktop.
In the remote browser session, go to https://ml.azure.com. When prompted, authenticate using your Microsoft Entra account.
From the Welcome to studio! screen, select the Machine Learning workspace you created earlier and then select Get started.
Tip
If your Microsoft Entra account has access to multiple subscriptions or directories, use the Directory and Subscription dropdown to select the one that contains the workspace.

From studio, select Compute, Compute clusters, and then + New.
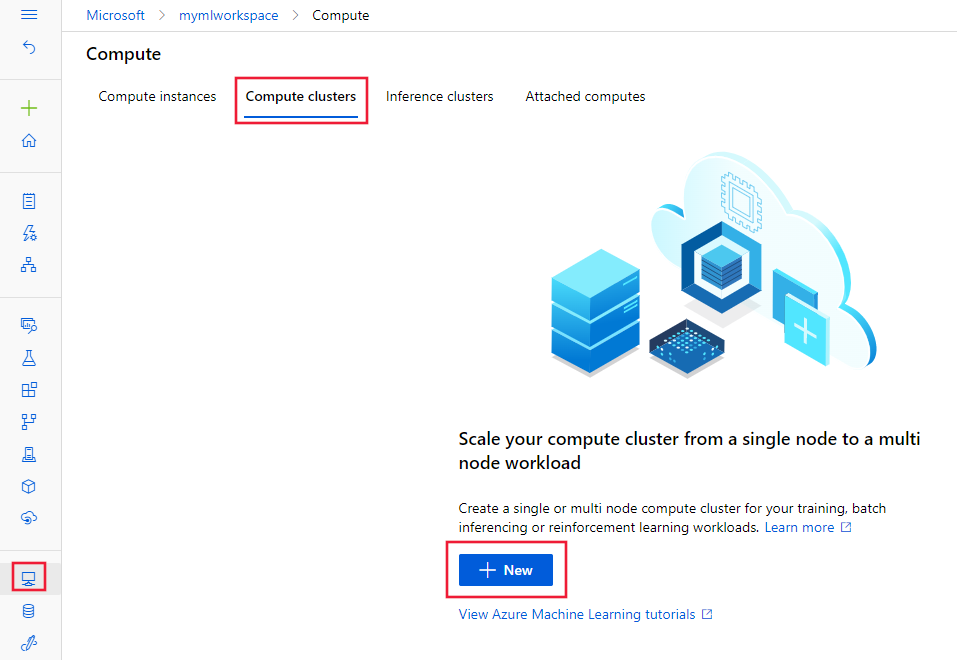
From the Virtual Machine dialog, select Next to accept the default virtual machine configuration.
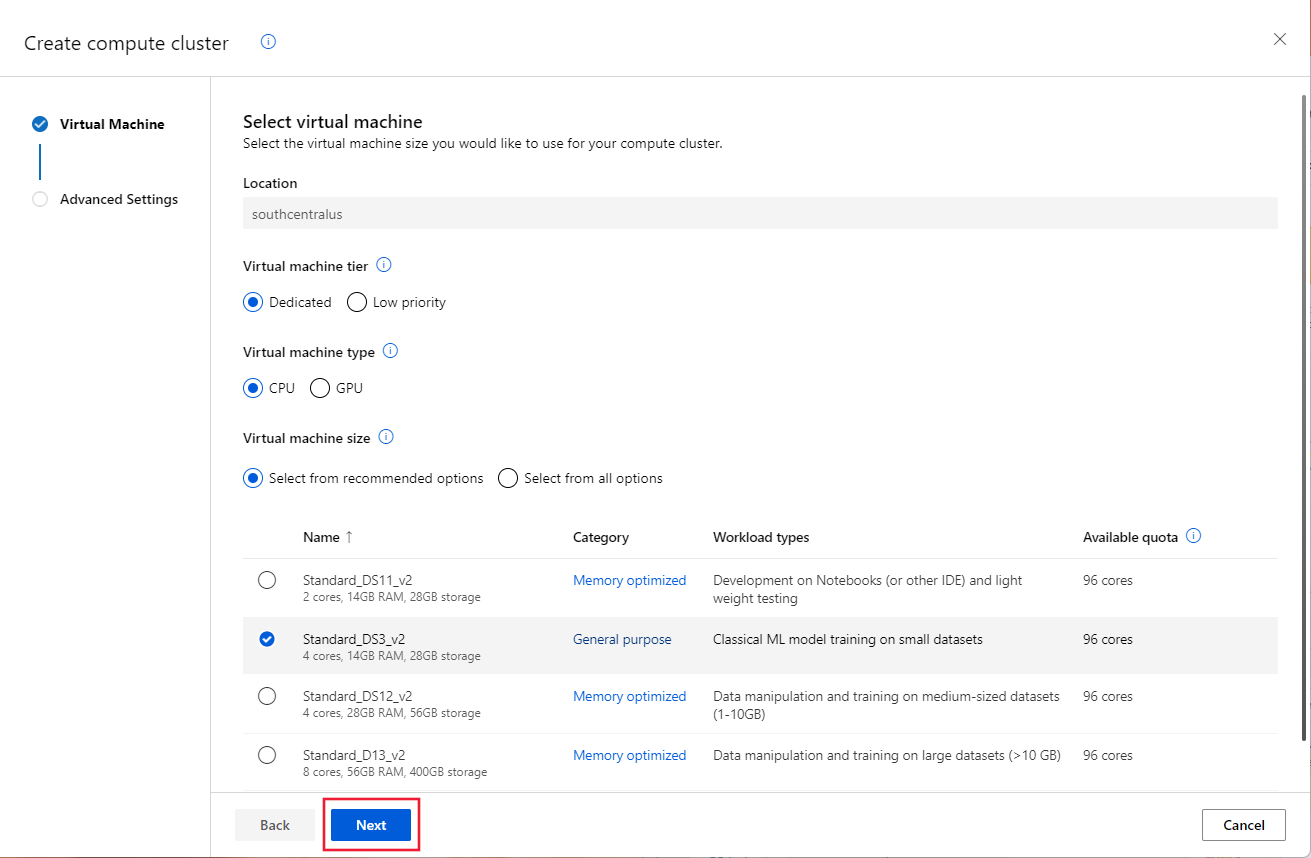
From the Configure Settings dialog, enter cpu-cluster as the Compute name. Set the Subnet to Training and then select Create to create the cluster.
Tip
Compute clusters dynamically scale the nodes in the cluster as needed. We recommend leaving the minimum number of nodes at 0 to reduce costs when the cluster isn't in use.

From studio, select Compute, Compute instance, and then + New.
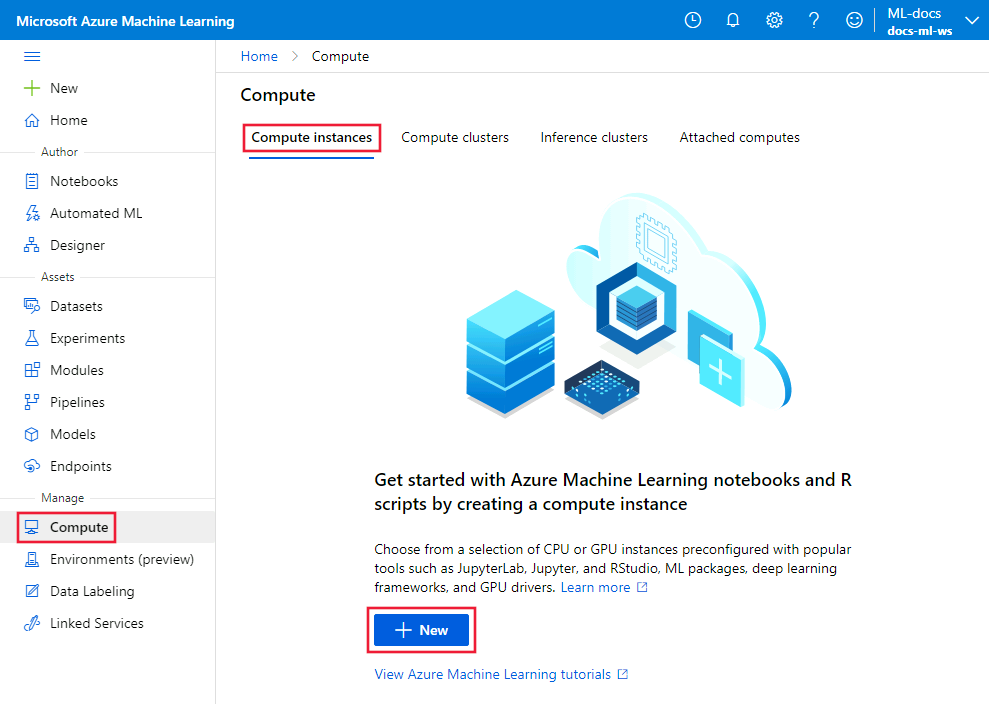
From Required settings, enter a unique Computer name and select Next.

Continue selecting Next until you arrive at Security dialog, select the Virtual network and set the Subnet to Training. Select Review + Create and then select Create.

Tip
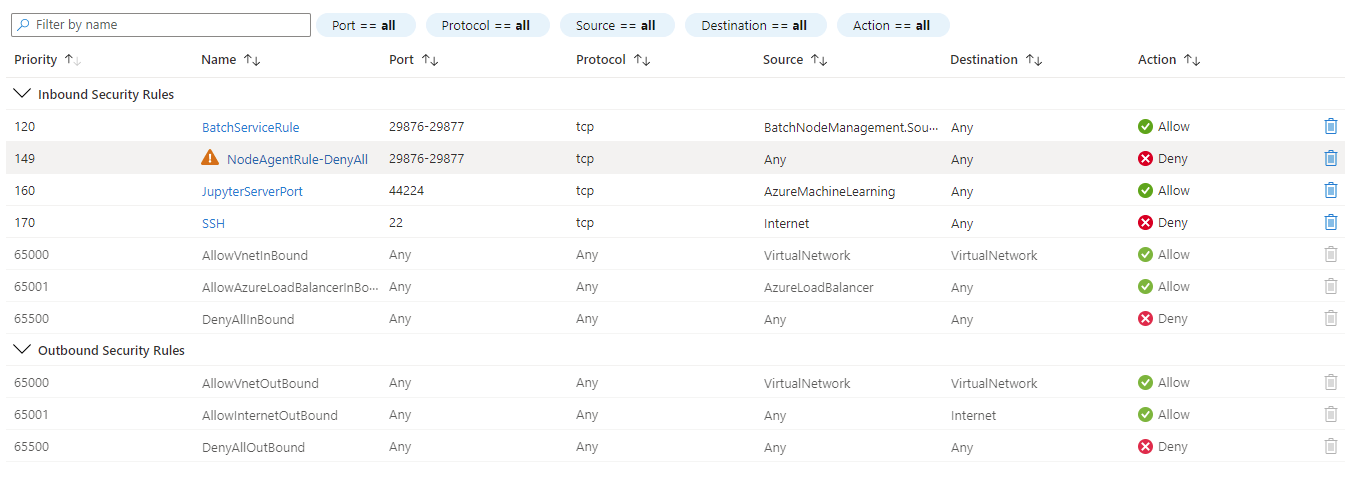
When you create a compute cluster or compute instance, Azure Machine Learning dynamically adds a Network Security Group (NSG). This NSG contains the following rules, which are specific to compute cluster and compute instance:
- Allow inbound TCP traffic on ports 29876-29877 from the
BatchNodeManagementservice tag. - Allow inbound TCP traffic on port 44224 from the
AzureMachineLearningservice tag.
The following screenshot shows an example of these rules:
For more information on creating a compute cluster and compute cluster, including how to do so with Python and the CLI, see the following articles:
Configure image builds
APPLIES TO:  Azure CLI ml extension v2 (current)
When Azure Container Registry is behind the virtual network, Azure Machine Learning can't use it to directly build Docker images (used for training and deployment). Instead, configure the workspace to use the compute cluster you created earlier. Use the following steps to create a compute cluster and configure the workspace to use it to build images:
Navigate to https://shell.azure.com/ to open the Azure Cloud Shell.
From the Cloud Shell, use the following command to install the 2.0 CLI for Azure Machine Learning:
az extension add -n mlTo update the workspace to use the compute cluster to build Docker images. Replace
docs-ml-rgwith your resource group. Replacedocs-ml-wswith your workspace. Replacecpu-clusterwith the compute cluster name:az ml workspace update \ -n docs-ml-ws \ -g docs-ml-rg \ -i cpu-clusterNote
You can use the same compute cluster to train models and build Docker images for the workspace.
Use the workspace
Important
The steps in this article put Azure Container Registry behind the VNet. In this configuration, you cannot deploy a model to Azure Container Instances inside the VNet. We do not recommend using Azure Container Instances with Azure Machine Learning in a virtual network. For more information, see Secure the inference environment (SDK/CLI v1).
As an alternative to Azure Container Instances, try Azure Machine Learning managed online endpoints. For more information, see Enable network isolation for managed online endpoints.
At this point, you can use the studio to interactively work with notebooks on the compute instance and run training jobs on the compute cluster. For a tutorial on using the compute instance and compute cluster, see Tutorial: Azure Machine Learning in a day.
Stop compute instance and jump box
Warning
While it is running (started), the compute instance and jump box will continue charging your subscription. To avoid excess cost, stop them when they are not in use.
The compute cluster dynamically scales between the minimum and maximum node count set when you created it. If you accepted the defaults, the minimum is 0, which effectively turns off the cluster when not in use.
Stop the compute instance
From studio, select Compute, Compute clusters, and then select the compute instance. Finally, select Stop from the top of the page.

Stop the jump box
Once created, select the virtual machine in the Azure portal and then use the Stop button. When you're ready to use it again, use the Start button to start it.

You can also configure the jump box to automatically shut down at a specific time. To do so, select Auto-shutdown, Enable, set a time, and then select Save.

Clean up resources
If you plan to continue using the secured workspace and other resources, skip this section.
To delete all resources created in this tutorial, use the following steps:
In the Azure portal, select Resource groups on the far left.
From the list, select the resource group that you created in this tutorial.
Select Delete resource group.

Enter the resource group name, then select Delete.
Next steps
Now that you have a secure workspace and can access studio, learn how to deploy a model to an online endpoint with network isolation.
Now that you have a secure workspace, learn how to deploy a model.