Note
Access to this page requires authorization. You can try signing in or changing directories.
Access to this page requires authorization. You can try changing directories.
You can create alerts for quotas and manage them.
Create an alert rule
Prerequisites
Users must have the necessary permissions to create alerts.
The managed identity must have the Reader role (or another role that includes read access) on the subscription.
Create alerts in the Azure portal
The simplest way to create a quota alert is to use the Azure portal. Follow these steps to create an alert rule for your quota.
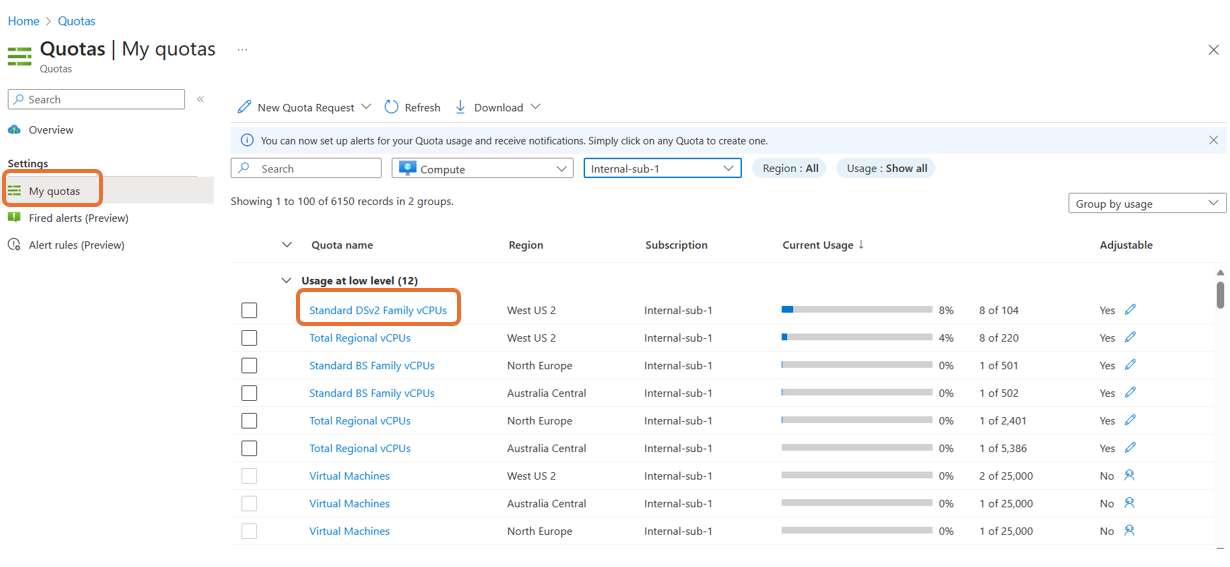
Sign in to the Azure portal and enter "quotas" in the search box, then select Quotas. In Quotas page, select My quotas and choose Compute Resource Provider. Once the page loads, select Quota Name to create a new alert rule.
When the Create usage alert rule page appears, populate the fields with data as shown in the table. Make sure you have the permissions to create alerts.

Fields Description Alert Rule Name Alert rule name must be distinct and can't be duplicated, even across different resource groups Alert me when the usage % reaches Adjust the slider to select your desired usage percentage for triggering alerts. For example, at the default 80%, you receive an alert when your quota reaches 80% capacity. Severity Select the severity of the alert when the rule’s condition is met. Frequency of evaluation Choose how often the alert rule should run, by selecting 5, 10, or 15 minutes. If the frequency is smaller than the aggregation granularity, frequency of evaluation results in sliding window evaluation. Resource Group Resource Group is a collection of resources that share the same lifecycles, permissions, and policies. Select a resource group similar to other quotas in your subscription, or create a new resource group. Managed identity Select from the dropdown, or Create New. Managed Identity should have read permissions for the selected Subscription (to read Usage data from ARG). Notify me by There are three notifications methods and you can check one or all three check boxes, depending on your notification preference. Use an existing action group Check the box to use an existing action group. An action group invokes a defined set of notifications and actions when an alert is triggered. You can create Action Group to automatically Increase the Quota whenever possible. Dimensions Here are the options for selecting multiple Quotas and regions within a single alert rule. Adding dimensions is a cost-effective approach compared to creating a new alert for each quota or region. Tip
Within the same subscription, we advise using the same Resource Group and Managed identity values for all alert rules.
After you've made your selections, select Create Alert. You'll see a confirmation if the rule was successfully created, or a message if any problems occurred.


Create alerts using API
Alerts can be created programmatically using the Monitoring API. This API can be used to create or update a log search rule.
PUT https://management.azure.com/subscriptions/{subscriptionId}/resourcegroups/{resourceGroupName}/providers/Microsoft.Insights/scheduledQueryRules/{ruleName}?api-version=2018-04-16
For a sample request body, see the API documentation
Create alerts using Azure Resource Graph query
You can use the Azure Monitor Alerts pane to create alerts using a query. Resource Graph Explorer lets you run and test queries before using them to create an alert. To learn more, see the Configure Azure alerts training module.
For quota alerts, make sure the Scope is your Subscription and the Signal type is the customer query log. Add a sample query for quota usages. Follow the remaining steps as described in the Create or edit an alert rule.
The following example shows a query that creates quota alerts.
arg("").QuotaResources
| where subscriptionId =~ '<SubscriptionId>'
| where type =~ 'microsoft.compute/locations/usages'
| where isnotempty(properties)
| mv-expand propertyJson = properties.value limit 400
| extend
    usage = propertyJson.currentValue,
    quota = propertyJson.['limit'],
    quotaName = tostring(propertyJson.['name'].value)
| extend usagePercent = toint(usage)*100 / toint(quota)| project-away properties| where location in~ ('westus2')| where quotaName in~ ('cores')
Manage quota alerts
Once you've created your alert rule, you can view and edit the alerts.
View alert rules
Select Quotas > Alert rules to see all quota alert rules that have been created for a given subscription. You can edit, enable, or disable rules from this page.

View Fired Alerts
Select Quotas > Fired Alert Rules to see all the alerts that have been triggered for a given subscription. Select an alert to view its details, including the history of how many times it was triggered and the status of each occurrence.

Edit, update, enable, or disable alerts
You can make changes from within an alert rule by expanding the options below the dots, then selecting an action.

When you select Edit, you can add multiple quotas or locations for the same alert rule.

You can also make changes by navigating to the Alert rules page, then select the specific alert rule you want to change.

Respond to alerts
For created alerts, an action group can be established to automate quota increases. By using an existing action group, you can invoke the Quota API to automatically increase quotas wherever possible, eliminating the need for manual intervention.
You can use functions to call the Quota API and request for more quota. Use Test_SetQuota() code to write an Azure function to set the quota. For more information, see this example on GitHub.
Query using Resource Graph Explorer
Using Azure Resource Graph, alerts can be managed programatically. This allows you to query your alert instances and analyze your alerts to identify patterns and trends.
The QuotaResources table in Azure Resource Graph explorer provides usage and limit/quota data for a given resource, region, and/or subscription. You can also query usage and quota data across multiple subscriptions with Azure Resource Graph queries.
You must have at least the Reader role for the subscription to query this data using Resource Graph Explorer.
Sample queries
Query to view current usages, quota/limit, and usage percentage for a subscription, region, and VCM family:
Note
Currently, Compute is the only supported resource for NRT limit/quota data. Don't rely on the below queries to pull other resource types such as Disks and/or Galleries. You can get the latest snapshot for the said resources with the current usages API.
QuotaResources
| where type =~ "microsoft.compute/locations/usages"
| where location =~ "northeurope" or location =~ "westeurope"
| where subscriptionId in~ ("<Subscription1>","<Subscription2>")
| mv-expand json = properties.value limit 400
| extend usagevCPUs = json.currentValue, QuotaLimit = json['limit'], quotaName = tostring(json['name'].localizedValue)
|where quotaName !contains "Disks" and quotaName !contains "Disk" and quotaName !contains "gallery" and quotaName !contains "Snapshots"
|where usagevCPUs > 0
|extend usagePercent = toint(usagevCPUs)*100 / toint(QuotaLimit)
|project subscriptionId,quotaName,usagevCPUs,QuotaLimit,usagePercent,location,json
| order by ['usagePercent'] desc
Query to summarize total vCPUs (On-demand, Low Priority/Spot) per subscription per region:
QuotaResources
| where type =~ "microsoft.compute/locations/usages"
| where subscriptionId in~ ("<Subscription1>","<Subscription2>")
| mv-expand json = properties.value limit 400
| extend usagevCPUs = json.currentValue, QuotaLimit = json['limit'], quotaName = tostring(json['name'].localizedValue)
|extend usagePercent = toint(usagevCPUs)*100 / toint(QuotaLimit)
|where quotaName =~ "Total Regional vCPUs" or quotaName =~ "Total Regional Low-priority vCPUs"
|project subscriptionId,quotaName,usagevCPUs,QuotaLimit,usagePercent,location,['json']
| order by ['usagePercent'] desc
Provide feedback
We encourage you to use the Feedback button on every Azure Quotas page to share your thoughts, questions, or concerns with our team.

If you encounter problems while creating alert rules for quotas, open a support request.
Next steps
- Learn about quota monitoring and alerting
- Learn more about quotas and Azure subscription and service limits, quotas, and constraints.
- Learn how to request increases for VM-family vCPU quotas, vCPU quotas by region, spot vCPU quotas, and storage accounts.