Note
Access to this page requires authorization. You can try signing in or changing directories.
Access to this page requires authorization. You can try changing directories.
For the Microsoft Sentinel solution for SAP applications to operate correctly, you must first get your SAP data into Microsoft Sentinel. Do this by either deploying the Microsoft Sentinel SAP data connector agent, or by connecting the Microsoft Sentinel agentless data connector for SAP. Select the option at the top of the page that matches your environment.
This article describes the third step in deploying one of the Microsoft Sentinel solutions for SAP applications.
Important
The data connector agent for SAP is being deprecated and will be permanently disabled by September 30th 2026. We recommend that you migrate to the agentless data connector. Learn more about the agentless approach from our blog post.

Content in this article is relevant for your security, infrastructure, and SAP BASIS teams. Make sure to perform the steps in this article in the order that they're presented.

Content in this article is relevant for your security team.
Prerequisites
Before you connect your SAP system to Microsoft Sentinel:
Make sure that all of the deployment prerequisites are in place. For more information, see Prerequisites for deploying Microsoft Sentinel solution for SAP applications.
Important
If you're working with the agentless data connector, you need the Entra ID Application Developer role or higher to successfully deploy the relevant Azure resources. If you don't have this permission, work with a colleague that has the permission to complete the process. For the full procedure, see the connect the agentless data connector step.
Make sure that you have the Microsoft Sentinel solution for SAP applications installed in your Microsoft Sentinel workspace
Make sure that your SAP system is fully prepared for the deployment.
If you're deploying the data connector agent to communicate with Microsoft Sentinel over SNC, make sure that you completed Configure your system to use SNC for secure connections.
Watch a demo video
Watch one of the following video demonstrations of the deployment process described in this article.
A deep dive on the portal options:
Includes more details about using Azure KeyVault. No audio, demonstration only with captions:
Create a virtual machine and configure access to your credentials
We recommend creating a dedicated virtual machine for your data connector agent container to ensure optimal performance and avoid potential conflicts. For more information, see System prerequisites for the data connector agent container.
We recommend that you store your SAP and authentication secrets in an Azure Key Vault. How you access your key vault depends on where your virtual machine (VM) is deployed:
| Deployment method | Access method |
|---|---|
| Container on an Azure VM | We recommend using an Azure system-assigned managed identity to access Azure Key Vault. If a system-assigned managed identity can't be used, the container can also authenticate to Azure Key Vault using a Microsoft Entra ID registered-application service principal, or, as a last resort, a configuration file. |
| A container on an on-premises VM, or a VM in a third-party cloud environment | Authenticate to Azure Key Vault using a Microsoft Entra ID registered-application service principal. |
If you can't use a registered application or a service principal, use a configuration file to manage your credentials, though this method isn't preferred. For more information, see Deploy the data connector using a configuration file.
For more information, see:
- Authentication in Azure Key Vault
- What are managed identities for Azure resources?
- Application and service principal objects in Microsoft Entra ID
Your virtual machine is typically created by your infrastructure team. Configuring access to credentials and managing key vaults is typically done by your security team.
Create a managed identity with an Azure VM
Run the following command to Create a VM in Azure, substituting actual names from your environment for the
<placeholders>:az vm create --resource-group <resource group name> --name <VM Name> --image Canonical:0001-com-ubuntu-server-focal:20_04-lts-gen2:latest --admin-username <azureuser> --public-ip-address "" --size Standard_D2as_v5 --generate-ssh-keys --assign-identity --role <role name> --scope <subscription Id>For more information, see Quickstart: Create a Linux virtual machine with the Azure CLI.
Important
After the VM is created, be sure to apply any security requirements and hardening procedures applicable in your organization.
This command creates the VM resource, producing output that looks like this:
{
  "fqdns": "",
  "id": "/subscriptions/xxxxxxxx-xxxx-xxxx-xxxx-xxxxxxxxxxxx/resourceGroups/resourcegroupname/providers/Microsoft.Compute/virtualMachines/vmname",
  "identity": {
    "systemAssignedIdentity": "yyyyyyyy-yyyy-yyyy-yyyy-yyyyyyyyyyyy",
    "userAssignedIdentities": {}
  },
  "location": "westeurope",
  "macAddress": "00-11-22-33-44-55",
  "powerState": "VM running",
  "privateIpAddress": "192.168.136.5",
  "publicIpAddress": "",
  "resourceGroup": "resourcegroupname",
  "zones": ""
}
Copy the systemAssignedIdentity GUID, as it will be used in the coming steps. This is your managed identity.
Create a key vault
This procedure describes how to create a key vault to store your agent configuration information, including your SAP authentication secrets. If you're using an existing key vault, skip directly to step 2.
To create your key vault:
Run the following commands, substituting actual names for the
<placeholder>values.az keyvault create \ --name <KeyVaultName> \ --resource-group <KeyVaultResourceGroupName>Copy the name of your key vault and the name of its resource group. You'll need these when you assign the key vault access permissions and run the deployment script in the next steps.
Assign key vault access permissions
In your key vault, assign the Azure Key Vault Secrets Reader role to the identity that you created and copied earlier.
In the same key vault, assign the following Azure roles to the user configuring the data connector agent:
- Key Vault Contributor, to deploy the agent
- Key Vault Secrets Officer, to add new systems
Deploy the data connector agent from the portal (Preview)
Now that you created a VM and a Key Vault, your next step is to create a new agent and connect to one of your SAP systems. While you can run multiple data connector agents on a single machine, we recommend that you start with one only, monitor the performance, and then increase the number of connectors slowly.
This procedure describes how to create a new agent and connect it to your SAP system using the Azure or Defender portals. We recommend that your security team perform this procedure with help from the SAP BASIS team.
Deploying the data connector agent from the portal is supported from both the Azure portal, and the Defender portal when Microsoft Sentinel is onboarded to the Defender portal.
While deployment is also supported from the command line, we recommend that you use the portal for typical deployments. Data connector agents deployed using the command line can be managed only via the command line, and not via the portal. For more information, see Deploy an SAP data connector agent from the command line.
Important
Deploying the container and creating connections to SAP systems from the portal is currently in PREVIEW. The Azure Preview Supplemental Terms include additional legal terms that apply to Azure features that are in beta, preview, or otherwise not yet released into general availability.
Prerequisites:
To deploy your data connector agent via the portal, you need:
- Authentication via a managed identity or a registered application
- Credentials stored in an Azure Key Vault
If you don't have these prerequisites, deploy the SAP data connector agent from the command line instead.
To deploy the data connector agent, you also need sudo or root privileges on the data connector agent machine.
If you want to ingest Netweaver/ABAP logs over a secure connection using Secure Network Communications (SNC), you need:
- The path to the
sapgenpsebinary andlibsapcrypto.solibrary - The details of your client certificate
For more information, see Configure your system to use SNC for secure connections.
- The path to the
To deploy the data connector agent:
Sign in to the newly created VM on which you're installing the agent, as a user with sudo privileges.
Download and/or transfer the SAP NetWeaver SDK to the machine.
In Microsoft Sentinel, select Configuration > Data connectors.
In the search bar, enter SAP. Select Microsoft Sentinel for SAP - agent-based from the search results and then Open connector page.
In the Configuration area, select Add new agent (Preview).
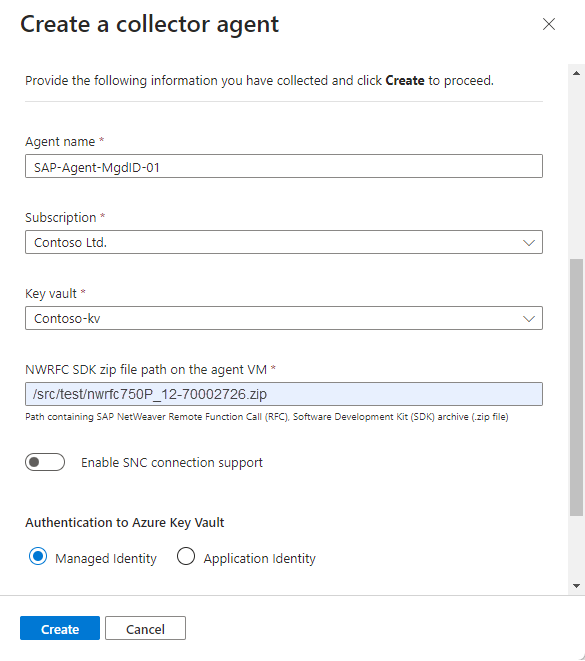
In the Create a collector agent pane, enter the following agent details:
Name Description Agent name Enter a meaningful agent name for your organization. We don't recommend any specific naming convention, except that the name can include only the following types of characters: - a-z
- A-Z
- 0-9
- _ (underscore)
- . (period)
- - (dash)
Subscription / Key vault Select the Subscription and Key vault from their respective drop-downs. NWRFC SDK zip file path on the agent VM Enter the path in your VM that contains the SAP NetWeaver Remote Function Call (RFC) Software Development Kit (SDK) archive (.zip file).
Make sure that this path includes the SDK version number in the following syntax:<path>/NWRFC<version number>.zip. For example:/src/test/nwrfc750P_12-70002726.zip.Enable SNC connection support Select to ingest NetWeaver/ABAP logs over a secure connection using SNC.
If you select this option, enter the path that contains thesapgenpsebinary andlibsapcrypto.solibrary, under SAP Cryptographic Library path on the agent VM.
If you want to use an SNC connection, make sure to select Enable SNC connection support at this stage as you can't go back and enable an SNC connection after you finish deploying the agent. If you want to change this setting afterwards, we recommend that you create a new agent instead.Authentication to Azure Key Vault To authenticate to your key vault using a managed identity, leave the default Managed Identity option selected. To authenticate to your key vault using a registered application, select Application Identity.
You must have the managed identity or registered application set up ahead of time. For more information, see Create a virtual machine and configure access to your credentials.For example:
Select Create and review the recommendations before you complete the deployment:
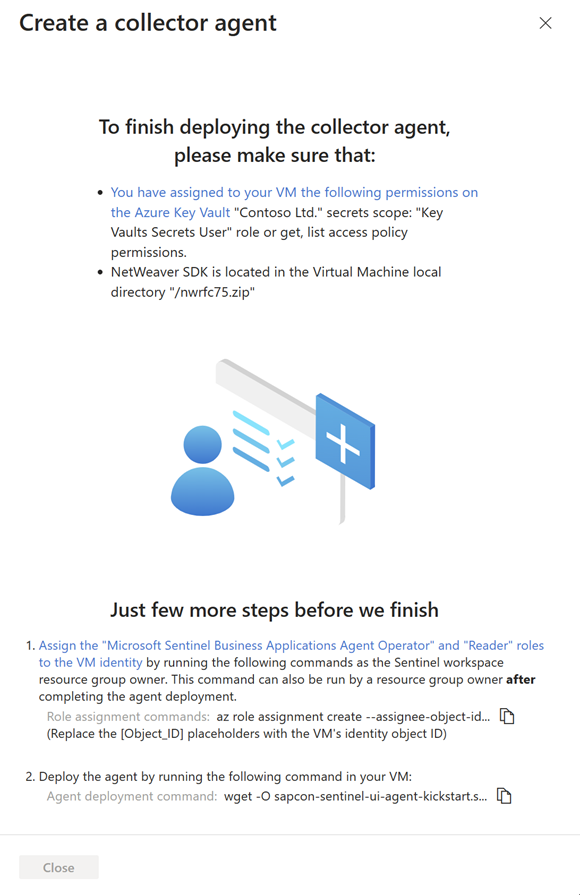
Deploying the SAP data connector agent requires that you grant your agent's VM identity with specific permissions to the Microsoft Sentinel workspace, using the Microsoft Sentinel Business Applications Agent Operator and Reader roles.
To run the commands in this step, you must be a resource group owner on your Microsoft Sentinel workspace. If you aren't a resource group owner on your workspace, this procedure can also be performed after the agent deployment is complete.
Under Just a few more steps before we finish, copy the Role assignment commands from step 1 and run them on your agent VM, replacing the
[Object_ID]placeholder with your VM identity object ID. For example: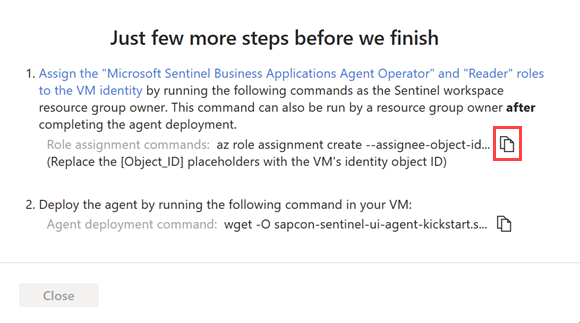
To find your VM identity object ID in Azure:
For a managed identity, the object ID is listed on the VM's Identity page.
For a service principal, go to Enterprise application in Azure. Select All applications and then select your VM. The object ID is displayed on the Overview page.
These commands assign the Microsoft Sentinel Business Applications Agent Operator and Reader Azure roles to your VM's managed or application identity, including only the scope of the specified agent's data in the workspace.
Important
Assigning the Microsoft Sentinel Business Applications Agent Operator and Reader roles via the CLI assigns the roles only on the scope of the specified agent's data in the workspace. This is the most secure, and therefore recommended option.
If you must assign the roles via the Azure portal, we recommend assigning the roles on a small scope, such as only on the Microsoft Sentinel workspace.
Select Copy
 next to the Agent deployment command in step 2. For example:
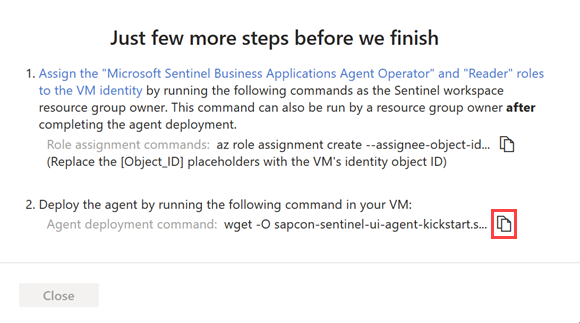
Copy the command line to a separate location and then select Close.
The relevant agent information is deployed into Azure Key Vault, and the new agent is visible in the table under Add an API based collector agent.
At this stage, the agent's Health status is "Incomplete installation. Please follow the instructions". Once the agent is installed successfully, the status changes to Agent healthy. This update can take up to 10 minutes. For example:
Note
The table displays the agent name and health status for only those agents you deploy via the Azure portal. Agents deployed using the command line aren't displayed here. For more information, see the Command line tab instead.
On the VM where you plan to install the agent, open a terminal and run the Agent deployment command that you copied in the previous step. This step requires sudo or root privileges on the data connector agent machine.
The script updates the OS components and installs the Azure CLI, Docker software, and other required utilities, such as jq, netcat, and curl.
Supply extra parameters to the script as needed to customize the container deployment. For more information on available command line options, see Kickstart script reference.
If you need to copy your command again, select View
 to the right of the Health column and copy the command next to Agent deployment command on the bottom right.
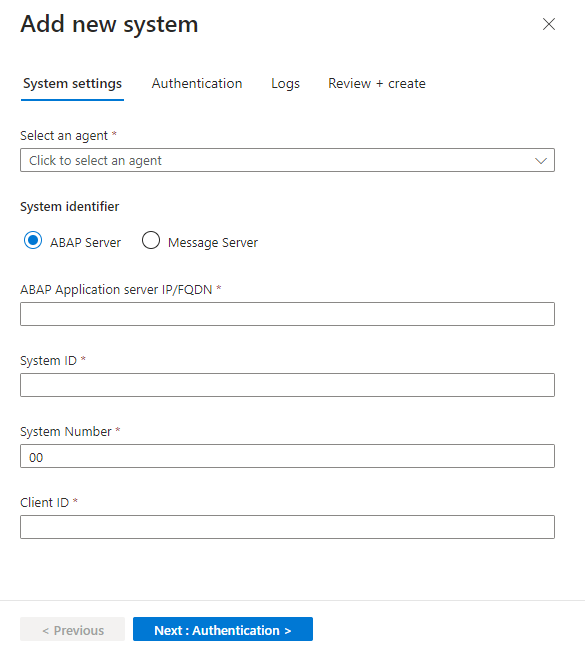
In the Microsoft Sentinel solution for SAP application's data connector page, in the Configuration area, select Add new system (Preview) and enter the following details:
Under Select an agent, select the agent you created earlier.
Under System identifier, select the server type:
- ABAP Server
- Message Server to use a message server as part of an ABAP SAP Central Services (ASCS).
Continue by defining related details for your server type:
- For an ABAP server, enter the ABAP Application server IP address/FQDN, the system ID and number, and the client ID.
- For a message server, enter the message server IP address/FQDN, the port number or service name, and the logon group
When you're done, select Next: Authentication.
For example:
On the Authentication tab, enter the following details:
- For basic authentication, enter the user and password.
- If you selected an SNC connection when you set up the agent, select SNC and enter the certificate details.
When you're done, select Next: Logs.
On the Logs tab, select the logs you want to ingest from SAP, and then select Next: Review and create. For example:

(Optional) For optimal results in monitoring the SAP PAHI table, select Configuration History. For more information, see Verify that the PAHI table is updated at regular intervals.
Review the settings you defined. Select Previous to modify any settings, or select Deploy to deploy the system.
The system configuration you defined is deployed into the Azure Key Vault you defined during the deployment. You can now see the system details in the table under Configure an SAP system and assign it to a collector agent. This table displays the associated agent name, SAP System ID (SID), and health status for systems that you added via the portal or otherwise.
At this stage, the system's Health status is Pending. If the agent is updated successfully, it pulls the configuration from Azure Key vault, and the status changes to System healthy. This update can take up to 10 minutes.
Connect your agentless data connector
In Microsoft Sentinel, go to the Configuration > Data connectors page and locate the Microsoft Sentinel for SAP - agentless data connector.
In the Configuration area, expand step 1. Trigger automatic deployment of required Azure resources / SOC Engineer, and select Deploy required Azure resources.
Important
If you don't have the Entra ID Application Developer role or higher, and you select deploy required Azure resources, an error message is displayed, for example: "Deploy required Azure resources" (errors may vary). This means that the data collection rule (DCR) and data collection endpoint (DCE) were created, but you need to ensure that your Entra ID app registration is authorized. Continue to set up the correct authorization.
Do one of the following:
If you have the Entra ID Application Developer role or higher, continue to the next step.
If you don't have the Entra ID Application Developer role or higher:
- Share the DCR ID with your Entra ID administrator or colleague with the required permissions.
- Ensure that the Monitoring Metrics Publisher role is assigned on the DCR, with the service principal assignment, using the client ID from the Entra ID app registration.
- Retrieve the client ID and client secret from the Entra ID app registration to use for authorization on the DCR.
The SAP admin uses the client ID and client secret information to post to the DCR.
Note
If you're a SAP administrator and don't have access to the connector installation, download the integration package directly.
Scroll down and select Add SAP client.
In the Connect to an SAP Client side pane, enter the following details:
Field Description RFC destination name The name of the RFC destination, taken from your BTP destination. SAP Agentless Client ID The clientid value taken from the Process Integration Runtime service key JSON file. SAP Agentless Client Secret The clientsecret value taken from the Process Integration Runtime service key JSON file. Authorization server URL The tokenurl value taken from the Process Integration Runtime service key JSON file. For example: https://your-tenant.authentication.region.hana.ondemand.com/oauth/tokenIntegration Suite Endpoint The url value taken from the Process Integration Runtime service key JSON file. For example: https://your-tenant.it-account-rt.cfapps.region.hana.ondemand.comSelect Connect.
Important
There may be some wait time on initial connect. Find more details to verify the connector here.
Customize data connector behavior (optional)
If you have an SAP agentless data connector for Microsoft Sentinel, you can use the SAP Integration Suite to customize how the agentless data connector ingests data from your SAP system into Microsoft Sentinel.
This procedure is only relevant when you want to customize the SAP agentless data connector behavior. Skip this procedure if you're satisfied with the default functionality. For example, if you're using Sybase, we recommend that you turn off ingestion for Change Docs logs in the iflow by configuring the collect-changedocs-logs parameter. Due to database performance issues, ingesting Change Docs logs Sybase isn't supported.
Tip
See this blog for more insights on the implications of overriding the defaults.
Prerequisites for customizing data connector behavior
- You must have access to the SAP Integration Suite, with permissions to edit value mappings.
- An SAP integration package, either existing or new, to upload the default value mapping file.
Download the configuration file and customize settings
Download the default example-parameters.zip file, which provides settings that define default behavior and is a good starting point to start customizing.
Save the example-parameters.zip file to a location accessible to your SAP Integration Suite environment.
Use the standard SAP procedures for uploading a Value Mapping file and making changes to customize your data connector settings:
Upload the example-parameters.zip file to the SAP Integration Suite as a value mapping artifact. For more information, see the SAP documentation.
Use one of the following methods to customize your settings:
- To customize settings across all SAP systems, add value mappings for the global bi-directional mapping agency.
- To customize settings for specific SAP systems, add new bi-directional mapping agencies for each SAP system, and then add value mappings for each one. Name your agencies to exactly match the name of the RFC destination that you want to customize, such as myRfc, key, myRfc, value.
For more information, see SAP documentation on configuring Value Mappings
Make sure to deploy the artifact when you're done customizing to activate the updated settings.
The following table lists the customizable parameters for the SAP agentless data connector for Microsoft Sentinel:
| Parameter | Description | Allowed values | Default value |
|---|---|---|---|
| changedocs-object-classes | List of object classes that are ingested from Change Docs logs. | Comma separated list of object classes | BANK, CLEARING, IBAN, IDENTITY, KERBEROS, OA2_CLIENT, PCA_BLOCK, PCA_MASTER, PFCG, SECM, SU_USOBT_C, SECURITY_POLICY, STATUS, SU22_USOBT, SU22_USOBX, SUSR_PROF, SU_USOBX_C, USER_CUA |
| collect-audit-logs | Determines whether Audit Log data is ingested or not. | true: Ingested false: Not ingested |
true |
| collect-changedocs-logs | Determines whether Change Docs logs are ingested or not. | true: Ingested false: Not ingested |
true |
| collect-user-master-data | Determines whether User Master data is ingested or not. | true: Ingested false: Not ingested |
true |
| force-audit-log-to-read-from-all-clients | Determines whether the Audit Log is read from all clients. | true: Read from all clients false: Not read from all clients |
false |
| ingestion-cycle-days | Time, in days, given to ingest the full User Master data, including all roles and users. This parameter doesn't affect the ingestion of changes to User Master data. | Integer, between 1-14 | 1 |
| offset-in-seconds | Determines the offset, in seconds, for both the start and end times of a data collection window. Use this parameter to delay data collection by the configured number of seconds. | Integer, between 1-600 | 60 |
| max-rows | Acts as a safeguard that limits the number of records processed in a single data collection window. This helps prevent performance or memory issues in CPI caused by a sudden increase in event volume. | Integer, between 1–1000000 | 150000 |
Check connectivity and health
After you deploy the SAP data connector, check your agent's health and connectivity. For more information, see Monitor the health and role of your SAP systems.
Next step
Once the connector is deployed, proceed to configure the Microsoft Sentinel solution for SAP applications content. Specifically, configuring details in the watchlists is an essential step in enabling detections and threat protection.
