Deploy and configure the container hosting the SAP data connector agent
This article shows you how to deploy the container that hosts the SAP data connector agent, and how to use it to create connections to your SAP systems. This two-step process is required to ingest SAP data into Microsoft Sentinel, as part of the Microsoft Sentinel solution for SAP applications.
The recommended method to deploy the container and create connections to SAP systems is via the Azure portal. This method is explained in the article, and also demonstrated in this video on YouTube. Also shown in this article is a way to accomplish these objectives by calling a kickstart script from the command line.
Alternatively, you can deploy the data connector Docker container agent manually, such as in a Kubernetes cluster. For more information, open a support ticket.
Important
Deploying the container and creating connections to SAP systems via the Azure portal is currently in PREVIEW. The Azure Preview Supplemental Terms include additional legal terms that apply to Azure features that are in beta, preview, or otherwise not yet released into general availability.
Microsoft Sentinel is available as part of the public preview for the unified security operations platform in the Microsoft Defender portal. For more information, see Microsoft Sentinel in the Microsoft Defender portal.
Deployment milestones
Deployment of the Microsoft Sentinel solution for SAP® applications is divided into the following sections:
Deploy the Microsoft Sentinel solution for SAP applications® from the content hub
Deploy the data connector agent (You are here)
Optional deployment steps
Data connector agent deployment overview
For the Microsoft Sentinel solution for SAP applications to operate correctly, you must first get your SAP data into Microsoft Sentinel. To accomplish this, you need to deploy the solution's SAP data connector agent.
The data connector agent runs as a container on a Linux virtual machine (VM). This VM can be hosted either in Azure, in a third-party cloud, or on-premises. We recommend that you install and configure this container using the Azure portal (in PREVIEW); however, you can choose to deploy the container using a kickstart script. If you want to deploy the data connector Docker container agent manually, such as in a Kubernetes cluster, open a support ticket for more details.
The agent connects to your SAP system to pull logs and other data from it, then sends those logs to your Microsoft Sentinel workspace. To do this, the agent has to authenticate to your SAP system—that's why you created a user and a role for the agent in your SAP system in the previous step.
You have a few choices of how and where to store your agent configuration information, including your SAP authentication secrets. The decision of which one to use can be affected by where you deploy your VM and by which SAP authentication mechanism you decide to use. These are the options, in descending order of preference:
- An Azure Key Vault, accessed through an Azure system-assigned managed identity
- An Azure Key Vault, accessed through a Microsoft Entra ID registered-application service principal
- A plaintext configuration file
For any of these scenarios, you have the extra option to authenticate using SAP's Secure Network Communication (SNC) and X.509 certificates. This option provides a higher level of authentication security, but it's only a practical option in a limited set of scenarios.
Deploying the data connector agent container includes the following steps:
Creating the virtual machine and setting up access to your SAP system credentials. This procedure may need to be performed by another team in your organization, but must be performed before the other procedures in this article.
Prerequisites
Before you deploy the data connector agent, make sure that have all the deployment prerequisites in place. For more information, see Prerequisites for deploying Microsoft Sentinel solution for SAP applications.
Also, if you plan to ingest NetWeaver/ABAP logs over a secure connection using Secure Network Communications (SNC), take the relevant preparatory steps. For more information, see Deploy the Microsoft Sentinel for SAP data connector by using SNC.
Create a virtual machine and configure access to your credentials
Ideally, your SAP configuration and authentication secrets can and should be stored in an Azure Key Vault. How you access your key vault depends on where your VM is deployed:
A container on an Azure VM can use an Azure system-assigned managed identity to seamlessly access Azure Key Vault.
In the event that a system-assigned managed identity can't be used, the container can also authenticate to Azure Key Vault using a Microsoft Entra ID registered-application service principal, or, as a last resort, a configuration file.
A container on an on-premises VM, or a VM in a third-party cloud environment, can't use Azure managed identity, but can authenticate to Azure Key Vault using a Microsoft Entra ID registered-application service principal.
If for some reason a registered-application service principal can't be used, you can use a configuration file, though this is not preferred.
Note
This procedure may need to be performed by another team in your organization, but must be performed before the other procedures in this article.
Select one of the following tabs, depending on how you plan to store and access your authentication credentials and configuration data.
Create a managed identity with an Azure VM
Run the following command to Create a VM in Azure (substitute actual names from your environment for the
<placeholders>):az vm create --resource-group <resource group name> --name <VM Name> --image Canonical:0001-com-ubuntu-server-focal:20_04-lts-gen2:latest --admin-username <azureuser> --public-ip-address "" --size Standard_D2as_v5 --generate-ssh-keys --assign-identity --role <role name> --scope <subscription Id>For more information, see Quickstart: Create a Linux virtual machine with the Azure CLI.
Important
After the VM is created, be sure to apply any security requirements and hardening procedures applicable in your organization.
The command above will create the VM resource, producing output that looks like this:
{
  "fqdns": "",
  "id": "/subscriptions/xxxxxxxx-xxxx-xxxx-xxxx-xxxxxxxxxxxx/resourceGroups/resourcegroupname/providers/Microsoft.Compute/virtualMachines/vmname",
  "identity": {
    "systemAssignedIdentity": "yyyyyyyy-yyyy-yyyy-yyyy-yyyyyyyyyyyy",
    "userAssignedIdentities": {}
  },
  "location": "westeurope",
  "macAddress": "00-11-22-33-44-55",
  "powerState": "VM running",
  "privateIpAddress": "192.168.136.5",
  "publicIpAddress": "",
  "resourceGroup": "resourcegroupname",
  "zones": ""
}
Copy the systemAssignedIdentity GUID, as it will be used in the coming steps. This is your managed identity.
Create a key vault
This procedure describes how to create a key vault to store your agent configuration information, including your SAP authentication secrets. If you'll be using an existing key vault, skip directly to step 2.
To create your key vault:
Run the following commands, substituting actual names for the
<placeholder>values.az keyvault create \ --name <KeyVaultName> \ --resource-group <KeyVaultResourceGroupName>Copy the name of your key vault and the name of its resource group. You'll need these when you assign the key vault access permissions and run the deployment script in the next steps.
Assign key vault access permissions
In your key vault, assign the following Azure role-based access control or vault access policy permissions on the secrets scope to the identity that you created and copied earlier.
Permission model Permissions required Azure role-based access control Key Vault Secrets User Vault access policy get,listUse the options in the portal to assign the permissions, or run one of the following commands to assign key vault secrets permissions to your identity, substituting actual names for the
<placeholder>values. Select the tab for the type of identity you'd created.Run one of the following commands, depending on your preferred Key Vault permission model, to assign key vault secrets permissions to your VM's system-assigned managed identity. The policy specified in the commands allows the VM to list and read secrets from the key vault.
Azure role-based access control permission model:
az role assignment create --assignee-object-id <ManagedIdentityId> --role "Key Vault Secrets User" --scope /subscriptions/<KeyVaultSubscriptionId>/resourceGroups/<KeyVaultResourceGroupName> /providers/Microsoft.KeyVault/vaults/<KeyVaultName>Vault access policy permission model:
az keyvault set-policy -n <KeyVaultName> -g <KeyVaultResourceGroupName> --object-id <ManagedIdentityId> --secret-permissions get list
In the same key vault, assign the following Azure role-based access control or vault access policy permissions on the secrets scope to the user configuring the data connector agent:
Permission model Permissions required Azure role-based access control Key Vault Secrets Officer Vault access policy get,list,set,deleteUse the options in the portal to assign the permissions, or run one of the following commands to assign key vault secrets permissions to the user, substituting actual names for the
<placeholder>values:Azure role-based access control permission model:
az role assignment create --role "Key Vault Secrets Officer" --assignee <UserPrincipalName> --scope /subscriptions/<KeyVaultSubscriptionId>/resourceGroups/<KeyVaultResourceGroupName>/providers/Microsoft.KeyVault/vaults/<KeyVaultName>Vault access policy permission model:
az keyvault set-policy -n <KeyVaultName> -g <KeyVaultResourceGroupName> --upn <UserPrincipalName>--secret-permissions get list set delete
Deploy the data connector agent
Now that you've created a VM and a Key Vault, your next step is to create a new agent and connect to one of your SAP systems.
Sign in to the newly created VM on which you are installing the agent, as a user with sudo privileges.
Download or transfer the SAP NetWeaver SDK to the machine.
Use one of the following sets of procedures, depending on whether you're using a managed identity or a registered application to access your key vault, and whether you're using the Azure portal or the command line to deploy the agent:
Tip
The Azure portal can only be used with an Azure key vault. If you're using a configuration file instead, use the relevant command line option.
Azure portal options (Preview)
Select one of the following tabs, depending on the type of identity you're using to access your key vault.
Note
If you previously installed SAP connector agents manually or using the kickstart scripts, you can't configure or manage those agents in the Azure portal. If you want to use the portal to configure and update agents, you must reinstall your existing agents using the portal.
This procedure describes how to create a new agent through the Azure portal, authenticating with a managed identity:
From the Microsoft Sentinel navigation menu, select Data connectors.
In the search bar, enter SAP.
Select Microsoft Sentinel for SAP from the search results, and select Open connector page.
To collect data from an SAP system, you must follow these two steps:
Create a new agent
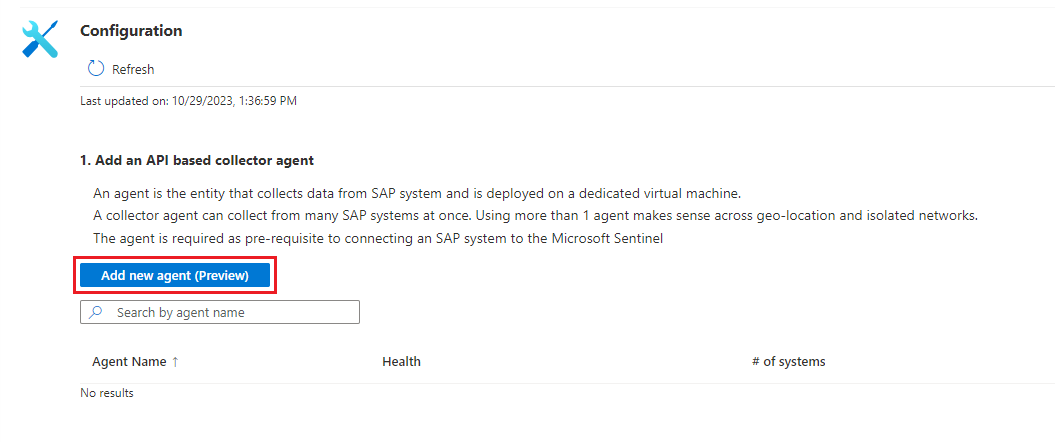
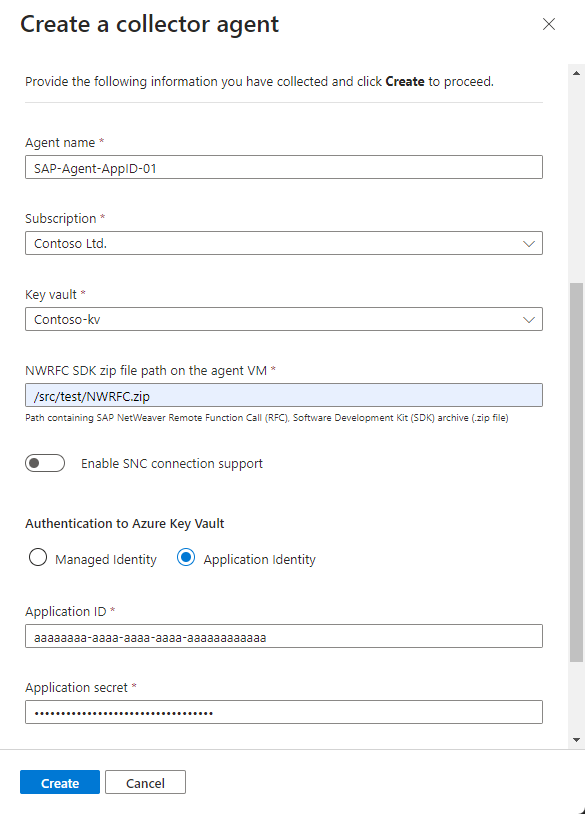
In the Configuration area, select Add new agent (Preview).
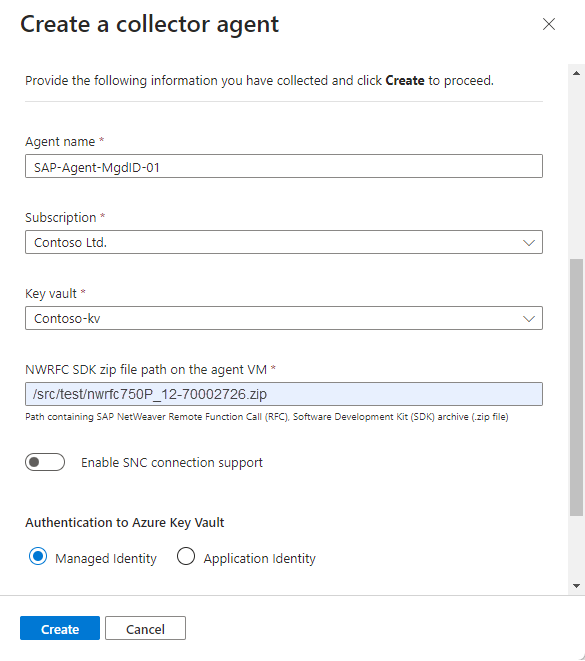
Under Create a collector agent on the right, define the agent details:
Name Description Agent name Enter an agent name, including any of the following characters: - a-z
- A-Z
- 0-9
- _ (underscore)
- . (period)
- - (dash)
Subscription / Key vault Select the Subscription and Key vault from their respective drop-downs. NWRFC SDK zip file path on the agent VM Enter the path in your VM that contains the SAP NetWeaver Remote Function Call (RFC) Software Development Kit (SDK) archive (.zip file).
Make sure that this path includes the SDK version number in the following syntax:<path>/NWRFC<version number>.zip. For example:/src/test/nwrfc750P_12-70002726.zip.Enable SNC connection support Select to ingest NetWeaver/ABAP logs over a secure connection using Secure Network Communications (SNC).
If you select this option, enter the path that contains thesapgenpsebinary andlibsapcrypto.solibrary, under SAP Cryptographic Library path on the agent VM.Authentication to Azure Key Vault To authenticate to your key vault using a managed identity, leave the default Managed Identity option selected.
You must have the managed identity set up ahead of time. For more information, see Create a virtual machine and configure access to your credentials.Note
If you want to use an SNC connection, make sure to select Enable SNC connection support at this stage as you can't go back and enable an SNC connection after you finish deploying the agent. For more information, see Deploy the Microsoft Sentinel for SAP data connector by using SNC.
For example:
Select Create and review the recommendations before you complete the deployment:
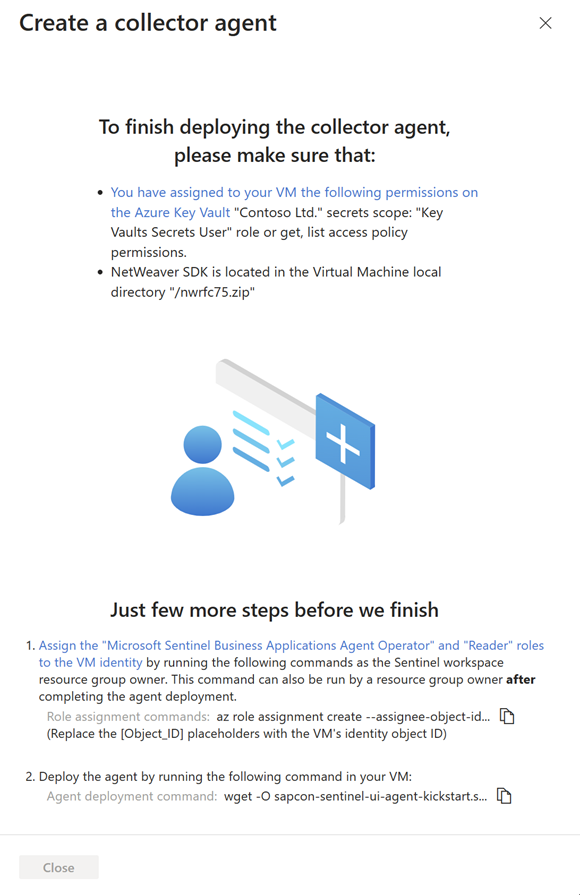
Deploying the SAP data connector agent requires that you grant your agent's VM identity with specific permissions to the Microsoft Sentinel workspace, using the Microsoft Sentinel Business Applications Agent Operator role.
To run the command in this step, you must be a resource group owner on your Microsoft Sentinel workspace. If you aren't a resource group owner on your workspace, this procedure can also be performed after the agent deployment is complete.
Copy the Role assignment command from step 1 and run it on your agent VM, replacing the
Object_IDplaceholder with your VM identity object ID. For example: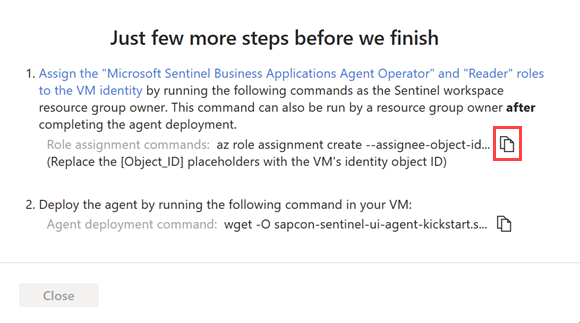
To find your VM identity object ID in Azure, go to Enterprise application > All applications, and select your VM name. Copy the value of the Object ID field to use with your copied command.
This command assigns the Microsoft Sentinel Business Applications Agent Operator Azure role to your VM's managed identity, including only the scope of the specified agent's data in the workspace.
Important
Assigning the Microsoft Sentinel Business Applications Agent Operator role via the CLI assigns the role only on the scope of the specified agent's data in the workspace. This is the most secure, and therefore recommended option.
If you must assign the role via the Azure portal, we recommend assigning the role on a small scope, such as only on the Microsoft Sentinel workspace.
Select Copy
 next to the Agent command in step 2. For example:
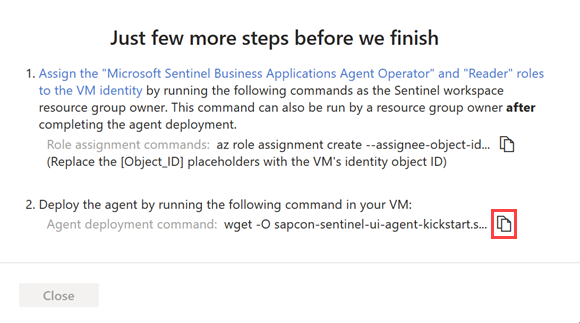
After you've copied the command line, select Close.
The relevant agent information is deployed into Azure Key Vault, and the new agent is visible in the table under Add an API based collector agent.
At this stage, the agent's Health status is "Incomplete installation. Please follow the instructions". Once the agent is installed successfully, the status changes to Agent healthy. This update can take up to 10 minutes. For example:

Note
The table displays the agent name and health status for only those agents you deploy via the Azure portal. Agents deployed using the command line aren't displayed here.
On the VM where you plan to install the agent, open a terminal and run the Agent command that you'd copied in the previous step.
The script updates the OS components and installs the Azure CLI, Docker software, and other required utilities, such as jq, netcat, and curl.
Supply additional parameters to the script as needed to customize the container deployment. For more information on available command line options, see Kickstart script reference.
If you need to copy your command again, select View
 to the right of the Health column and copy the command next to Agent command on the bottom right.


Connect to a new SAP system
Anyone adding a new connection to an SAP system must have write permission to the key vault where the SAP credentials are stored. For more information, see Create a virtual machine and configure access to your credentials.
In the Configuration area, select Add new system (Preview).
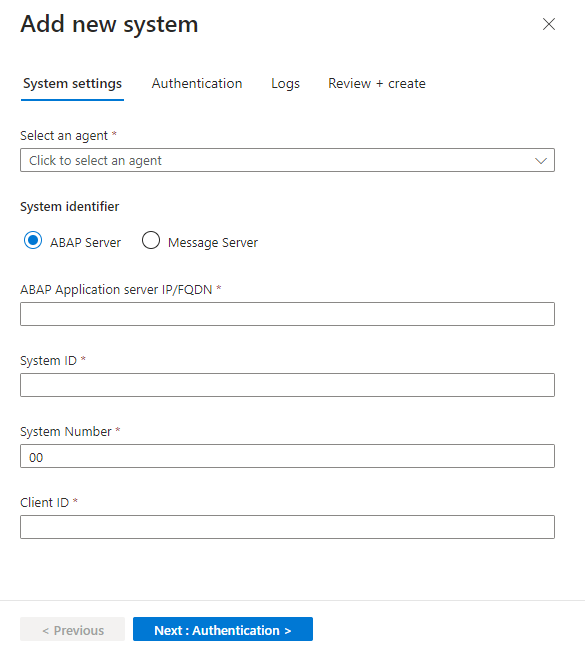
Under Select an agent, select the agent you created in the previous step.
Under System identifier, select the server type and provide the server details.
Select Next: Authentication.
For basic authentication, provide the user and password. If you selected an SNC connection when you set up the agent, select SNC and provide the certificate details.
Select Next: Logs.
Select which logs you want to pull from SAP, and select Next: Review and create.
Review the settings you defined. Select Previous to modify any settings, or select Deploy to deploy the system.
The system configuration you defined is deployed into Azure Key Vault. You can now see the system details in the table under Configure an SAP system and assign it to a collector agent. This table displays the associated agent name, SAP System ID (SID), and health status for systems that you added via the Azure portal or via other methods.
At this stage, the system's Health status is Pending. If the agent is updated successfully, it pulls the configuration from Azure Key vault, and the status changes to System healthy. This update can take up to 10 minutes.
Learn more about how to monitor your SAP system health.
Command line options
Select one of the following tabs, depending on the type of identity you're using to access your key vault:
- Deploy with a managed identity
- Deploy with a registered application
- Deploy with a configuration file
Create a new agent using the command line, authenticating with a managed identity:
Download and run the deployment Kickstart script:
For the Azure public commercial cloud, the command is:
wget -O sapcon-sentinel-kickstart.sh https://raw.githubusercontent.com/Azure/Azure-Sentinel/master/Solutions/SAP/sapcon-sentinel-kickstart.sh && bash ./sapcon-sentinel-kickstart.shFor Microsoft Azure operated by 21Vianet, add
--cloud mooncaketo the end of the copied command.For Azure Government - US, add
--cloud fairfaxto the end of the copied command.
The script updates the OS components, installs the Azure CLI and Docker software and other required utilities (jq, netcat, curl), and prompts you for configuration parameter values. You can supply additional parameters to the script to minimize the number of prompts or to customize the container deployment. For more information on available command line options, see Kickstart script reference.
Follow the on-screen instructions to enter your SAP and key vault details and complete the deployment. When the deployment is complete, a confirmation message is displayed:
The process has been successfully completed, thank you!Note the Docker container name in the script output. To see the list of docker containers on your VM, run:
docker ps -aYou'll use the name of the docker container in the next step.
Deploying the SAP data connector agent requires that you grant your agent's VM identity with specific permissions to the Microsoft Sentinel workspace, using the Microsoft Sentinel Business Applications Agent Operator role.
To run the command in this step, you must be a resource group owner on your Microsoft Sentinel workspace. If you aren't a resource group owner on your workspace, this procedure can also be performed later on.
Assign the Microsoft Sentinel Business Applications Agent Operator role to the VM's identity:
Get the agent ID by running the following command, replacing the
<container_name>placeholder with the name of the docker container that you'd created with the Kickstart script:docker inspect <container_name> | grep -oP '"SENTINEL_AGENT_GUID=\K[^"]+For example, an agent ID returned might be
234fba02-3b34-4c55-8c0e-e6423ceb405b.Assign the Microsoft Sentinel Business Applications Agent Operator by running the following command:
az role assignment create --assignee <OBJ_ID> --role "Microsoft Sentinel Business Applications Agent Operator" --scope /subscriptions/<SUB_ID>/resourcegroups/<RESOURCE_GROUP_NAME>/providers/microsoft.operationalinsights/workspaces/<WS_NAME>/providers/Microsoft.SecurityInsights/BusinessApplicationAgents/<AGENT_IDENTIFIER>Replace placeholder values as follows:
Placeholder Value <OBJ_ID>Your VM identity object ID.
To find your VM identity object ID in Azure, go to Enterprise application > All applications, and select your VM name. Copy the value of the Object ID field to use with your copied command.<SUB_ID>Your Microsoft Sentinel workspace subscription ID <RESOURCE_GROUP_NAME>Your Microsoft Sentinel workspace resource group name <WS_NAME>Your Microsoft Sentinel workspace name <AGENT_IDENTIFIER>The agent ID displayed after running the command in the previous step. To configure the Docker container to start automatically, run the following command, replacing the
<container-name>placeholder with the name of your container:docker update --restart unless-stopped <container-name>
Next steps
Once the connector is deployed, proceed to deploy Microsoft Sentinel solution for SAP® applications content:
See this YouTube video, on the Microsoft Security Community YouTube channel, for guidance on checking the health and connectivity of the SAP connector.
Feedback
Coming soon: Throughout 2024 we will be phasing out GitHub Issues as the feedback mechanism for content and replacing it with a new feedback system. For more information see: https://aka.ms/ContentUserFeedback.
Submit and view feedback for