Note
Access to this page requires authorization. You can try signing in or changing directories.
Access to this page requires authorization. You can try changing directories.
Power your analytics rules with your threat indicators to automatically generate alerts based on the threat intelligence that you integrated.
Prerequisites
- Threat indicators. These indicators can be from threat intelligence feeds, threat intelligence platforms, bulk import from a flat file, or manual input.
- Data sources. Events from your data connectors must be flowing to your Microsoft Sentinel workspace.
- An analytics rule of the format
TI map.... It must use this format so that it can map the threat indicators you have with the events you ingested.
Configure a rule to generate security alerts
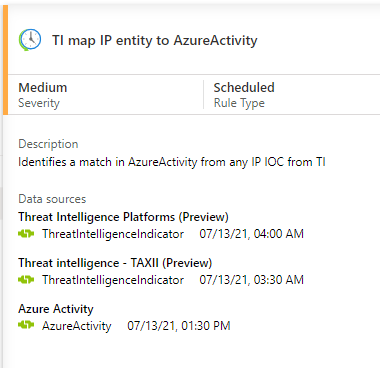
The following example shows how to enable and configure a rule to generate security alerts by using the threat indicators that you imported into Microsoft Sentinel. For this example, use the rule template called TI map IP entity to AzureActivity. This rule matches any IP address-type threat indicator with all your Azure Activity events. When a match is found, an alert is generated along with a corresponding incident for investigation by your security operations team.
This particular analytics rule requires the Azure Activity data connector (to import your Azure subscription-level events). It also requires one or both of the Threat Intelligence data connectors (to import threat indicators). This rule also triggers from imported indicators or manually created ones.
In the Azure portal, go to Microsoft Sentinel.
Choose the workspace to which you imported threat indicators by using the Threat Intelligence data connectors and Azure Activity data by using the Azure Activity data connector.
On the Microsoft Sentinel menu, under the Configuration section, select Analytics.
Select the Rule templates tab to see the list of available analytics rule templates.
Find the rule titled TI map IP entity to AzureActivity, and ensure that you connected all the required data sources.
Select the TI map IP entity to AzureActivity rule. Then select Create rule to open a rule configuration wizard. Configure the settings in the wizard, and then select Next: Set rule logic >.
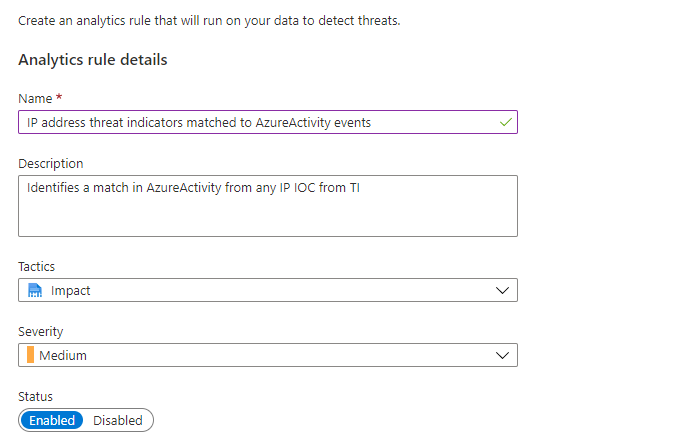
The rule logic portion of the wizard is prepopulated with the following items:
- The query that's used in the rule.
- Entity mappings, which tell Microsoft Sentinel how to recognize entities like accounts, IP addresses, and URLs. Incidents and investigations can then understand how to work with the data in any security alerts that were generated by this rule.
- The schedule to run this rule.
- The number of query results needed before a security alert is generated.
The default settings in the template are:
- Run once an hour.
- Match any IP address threat indicators from the
ThreatIntelligenceIndicatortable with any IP address found in the last one hour of events from theAzureActivitytable. - Generate a security alert if the query results are greater than zero to indicate that matches were found.
- Ensure that the rule is enabled.
You can leave the default settings or change them to meet your requirements. You can define incident-generation settings on the Incident settings tab. For more information, see Create custom analytics rules to detect threats. When you're finished, select the Automated response tab.
Configure any automation you want to trigger when a security alert is generated from this analytics rule. Automation in Microsoft Sentinel uses combinations of automation rules and playbooks powered by Azure Logic Apps. To learn more, see Tutorial: Use playbooks with automation rules in Microsoft Sentinel. When you're finished, select Next: Review > to continue.
When you see a message stating that the rule validation passed, select Create.
Review your rules
Find your enabled rules on the Active rules tab of the Analytics section of Microsoft Sentinel. Edit, enable, disable, duplicate, or delete the active rule from there. The new rule runs immediately upon activation and then runs on its defined schedule.
According to the default settings, each time the rule runs on its schedule, any results that are found generate a security alert. To see security alerts in Microsoft Sentinel in the Logs section of Microsoft Sentinel, under the Microsoft Sentinel group, see the SecurityAlert table.
In Microsoft Sentinel, the alerts generated from analytics rules also generate security incidents. On the Microsoft Sentinel menu, under Threat Management, select Incidents. Incidents are what your security operations teams triage and investigate to determine the appropriate response actions. For more information, see Tutorial: Investigate incidents with Microsoft Sentinel.
Note
Because analytic rules constrain lookups beyond 14 days, Microsoft Sentinel refreshes indicators every 12 days to make sure they're available for matching purposes through the analytic rules.
Related content
In this article, you learned how to use threat intelligence indicators to detect threats. For more about threat intelligence in Microsoft Sentinel, see the following articles:
- Work with threat indicators in Microsoft Sentinel.
- Connect Microsoft Sentinel to STIX/TAXII threat intelligence feeds.
- Connect threat intelligence platforms to Microsoft Sentinel.
- See which TIP platforms, TAXII feeds, and enrichments can be readily integrated with Microsoft Sentinel.