Note
Access to this page requires authorization. You can try signing in or changing directories.
Access to this page requires authorization. You can try changing directories.
The S3 (Simple Storage Service) source migration feature in Azure Storage Mover securely transfers data from S3-compatible Google Cloud Storage (GCS) object stores to Azure Blob Storage.
Unlike AWS S3 (Amazon Simple Storage Services) migrations that use Azure Arc multicloud connectors, S3-compatible source migrations use a simplified approach. When you store the source endpoint URL and HMAC (Hash-based Message Authentication Code) credentials securely in Azure Key Vault, you don't need a multicloud connector or automated source discovery.
This article guides you through the complete process of configuring Storage Mover to migrate your data from a GCS S3-compatible source to Azure Blob Storage. The process consists of storing source credentials in Azure Key Vault, configuring source and target endpoints, and creating and running a migration job.
Prerequisites
Before you begin, ensure that you have:
- An active Azure subscription with permissions to create and manage Azure Storage Mover resources.
- A Google Cloud account with access to the GCS bucket from which you want to migrate.
- An Azure Storage account to use as the destination.
- A Storage Mover resource deployed in your Azure subscription.
- An Azure Key Vault to securely store your source HMAC credentials.
- HMAC keys generated for your GCS bucket. See Generate HMAC keys for GCS.
- A private connection setup on Azure, if your source data is accessible only through a private network.
Limits
The S3-compatible GCS source migration feature in Azure Storage Mover has the following limits:
- Each migration job supports the transfer of 500 million objects.
- A maximum of 10 concurrent jobs is supported per subscription. If you need to run more than 10, create a support request.
- Only HTTPS access to the S3-compatible source is supported.
- The S3-compatible source must support AWS Signature Version 4 (SigV4) style authentication.
Things to know
Before you begin your migration, review the following considerations specific to GCS S3-compatible source migrations:
Authentication method
GCS S3-compatible access uses HMAC keys (Access Key ID and Secret Key) associated with a GCS service account or user account. These keys enable GCS to respond to standard S3 API requests by using the AWS Signature Version 4 authentication process.
Generate HMAC keys for GCS
To access your GCS bucket using the S3-compatible interface, you need to generate HMAC keys in the Google Cloud Console.
Navigate to the Google Cloud Console.
Go to Cloud Storage > Settings > Interoperability tab.
If you haven't already, select Set a default project for interoperability access.
In the Access keys for service accounts section, select the service account you want to use and select Create a key.
Note the Access Key and Secret Key values. You need these values in the next step.
Important
Store these keys securely. The Secret Key is shown only once. The key is only visible during initial creation and can't be retrieved later.
Ensure the HMAC credentials have a minimum validity period of one week to ensure job completion and optimal security.
Store source credentials in Azure Key Vault
After generating HMAC keys for your GCS bucket, store them as secrets in Azure Key Vault for secure access by the Storage Mover service.
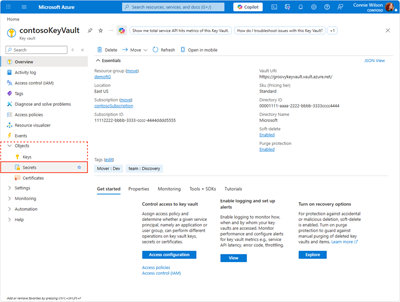
Using the Azure portal, navigate to the Azure Key Vault that resides within the same subscription as your Storage Mover resource.
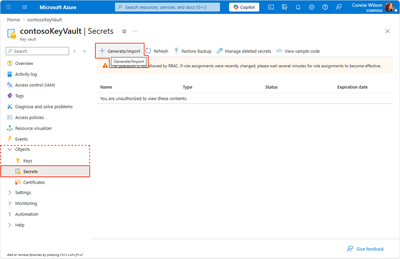
Within the left navigation, expand the Objects menu and select Secrets. Next, select Generate/Import.
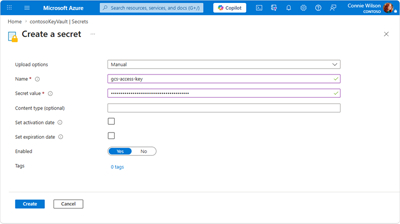
Create a secret for the Access Key:
- Name: Provide a meaningful name (for example,
gcs-access-key). - Secret value: Paste the HMAC Access Key value from the previous section.
- Select Create.
- Name: Provide a meaningful name (for example,
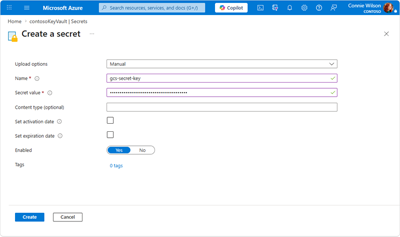
Create a second secret for the Secret Key:
- Name: Provide a meaningful name (for example,
gcs-secret-key). - Secret value: Paste the HMAC Secret Key value from the previous section.
- Select Create.
- Name: Provide a meaningful name (for example,
Note the full Secret Identifier URI for each secret. You need these identifiers when creating the source endpoint.


Note
To ensure optimal security, we recommend disabling public access on the Key Vault containing HMAC secrets and adding Storage Mover as a trusted service.
For more information, see Set and retrieve a secret from Key Vault using Azure portal.
Configure source and target endpoints
After you store your HMAC credentials within your Azure Key Vault, the next step is to create your migration's source and target endpoints.
In the context of the Azure Storage Mover service, an endpoint is a resource that contains the path to either a source or target location and other relevant information. Storage Mover job definitions use endpoints to define the source and target locations for copy operations.
Configure a GCS S3-compatible source endpoint
Source endpoints identify locations from which your data is migrated. Source endpoints are used to define the origin the data specified within your migration project.
The following steps describe the process of creating a source endpoint.
Navigate to your Storage Mover instance in the Azure portal.
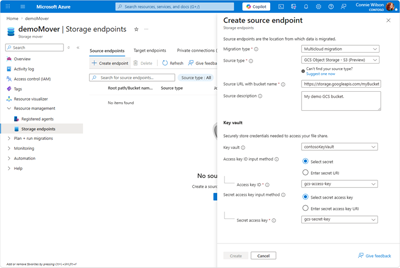
From the Resource management group within the left navigation, select Storage endpoints. Select the Source endpoints tab, and then select Create endpoint to open the Create source endpoint pane.
In the Create source endpoint pane:
- Select Multicloud migration as the Migration type.
- Select GCS Object Storage- S3 as the Source type.
- Source URL: Enter the full HTTPS URL to your GCS bucket in S3-compatible format. Use the format:
https://storage.googleapis.com/<bucket-name>/orhttps://storage.googleapis.com/<bucket-name>/<prefix>/to migrate only a subset of objects. - Access Key Vault Secret URI: Enter the full URI of the secret containing your HMAC Access Key
- Secret Key Vault Secret URI: Enter the full URI of the secret containing your HMAC Secret Key
- Optionally, provide a Description for the endpoint.
Verify that your selections are correct and select Create to create the endpoint.
Note
When the source endpoint is created, a system-assigned managed identity is automatically provisioned. This identity requires Key Vault Secrets User Role-Based Access Control (RBAC) role access on your Azure Key Vault to retrieve the HMAC credentials during migration. The portal attempts to assign this role automatically. If the assignment fails due to insufficient permissions, assign them manually or contact your Azure administrator to grant the role manually.

Configure an Azure Blob Storage target endpoint
From the Resource management group within the left navigation, select Storage endpoints. Select the Target endpoints tab, and then select Add endpoint to open the Create target endpoint pane.
In the Create target endpoint pane:
- Select your Subscription and Storage account from the respective drop-down lists.
- Select Blob container from the Target Type field.
- Choose the Blob container to which you want to migrate from the drop-down list.
- Optionally, provide a Description for the endpoint.
Verify that your selections are correct and select Create to create the endpoint.
Assign RBAC roles
When you create endpoints through the Azure portal, the required RBAC roles are automatically assigned to the system-assigned managed identities:
| Endpoint | Role | Target resource |
|---|---|---|
| Source endpoint | Key Vault Secrets User | Your Azure Key Vault |
| Target endpoint | Storage Blob Data Contributor | Your Azure Blob container |
If automatic assignment fails (for example, due to insufficient permissions), you must manually assign these roles or contact your Azure administrator.
Create a migration project and job definition
After you define source and target endpoints for your migration, the next steps are to create a Storage Mover migration project and job definition.
A migration project allows you to organize large migrations into smaller, more manageable units. A job definition describes resources and migration options for a specific set of copy operations. These resources include, for example, the source and target endpoints, and any migration settings you want to apply.
Follow the steps in this section to create a migration project and run a migration job.
Create a project
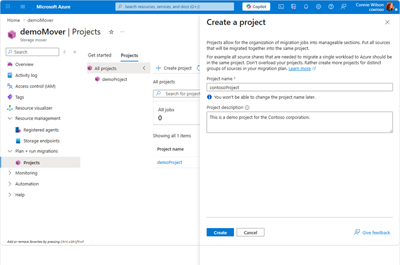
Navigate to the Projects section under Plan + run migrations in your Storage Mover instance and select Create project in Projects tab.
Provide values for the following fields:
- Name: A meaningful name for the migration project.
- Project description: A useful description for the project.
Select Create to create the project.

Create a job definition
Select the project after it appears, then select Create a job. The job creation wizard has four tabs: Basics, Schedule, Settings, and Review.
Basics tab
Provide values for the following fields:
Field Value Migration type Select Multicloud migration Source type Select GCS Object Storage - S3 (Preview) S3 bucket type Select Public or Private (Preview) Name A meaningful name for the job Description (Optional) A description for the job (1,024 characters max) 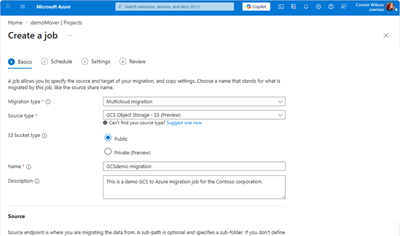
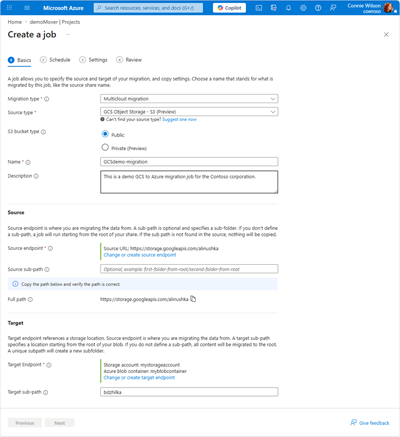
In the Source section:
- Source endpoint: Select Add source endpoint to create a new endpoint, or select an existing GCS S3-compatible source endpoint.
- Source sub-path: (Optional) Specify a subfolder path to migrate only part of your bucket. If left empty, the job starts from the root of the bucket.
- Verify the Full path shown is correct.
In the Target section:
- Target Endpoint: Select Add target endpoint to create a new endpoint, or select an existing Azure Blob Storage target endpoint.
- Target sub-path: (Optional) Specify a target subfolder. If left empty, all content is migrated to the container root. A unique subpath creates a new subfolder.
If you selected Private for the S3 bucket type, a Private connections section appears:
- Select Add to associate approved private connections with this job.
- Only connections in Approved state can be added.
- You can associate multiple private connections for load balancing.
Note
Private buckets require private connections. You must have at least one approved private connection before you can start a job with Private bucket type. See Private network connectivity for GCS for setup steps.
Select Next to continue.


Schedule tab
Choose when you want the migration to run:
| Option | Description |
|---|---|
| No schedule | Start the migration manually |
| One-time schedule | Run the migration once at a specific time |
| Recurring schedule | Run the migration on a daily, weekly, or monthly schedule |
Important
Scheduling isn't currently available for the GCS Object Storage - S3 source type. Jobs can only be run manually. Select No schedule and select Next to continue.
Settings tab
Select the desired Copy mode from the drop-down list:
Copy mode Behavior Merge content into target Files are kept in the target even if they don't exist in the source. Files with matching names and paths are updated to match the source. Folder renames between copies might lead to duplicative content in the target. Mirror source to target Makes the target an exact replica of the source. Objects deleted from the source are also deleted from the target. Review the Migration outcomes section to understand how your data is mapped:
Outcome Description Directory structure The target supports "virtual" folders. Files get their source path prepended to their name and are placed in a flat list. Empty folders are represented as an empty blob with folder metadata preserved in custom metadata. Create timestamp Preserved as custom blob metadata. The blob-native timestamp reflects the time the file was migrated. Change timestamp Preserved as custom blob metadata. No blob-native timestamp of this type exists. Modified timestamp Preserved as custom blob metadata. The blob-native timestamp reflects the time the file was migrated. Last accessed timestamp Preserved as custom blob metadata if it exists on the source. No blob-native timestamp of this type. Other metadata Persisted in custom metadata on the target blob. Only 4 KiB of metadata can be stored. Metadata larger than 4 KiB isn't migrated. Cloud migration protocol Blob REST API Select Next to continue.
Review tab
Review the summary of your configuration:
- Basics: Job name, migration type
- Source: Source type, source URL with bucket name, cloud name (GCS), source subpath
- Target: Storage account, Azure blob container, target subpath
- Schedule: Migration frequency
- Settings: Copy mode
If all settings are correct, select Create to deploy the job. Select Previous to make changes.
Run a migration job
Start a job
Azure portal
- Navigate to the Projects tab. Your newly created job appears in the list under your project.
- Select your job definition to view its details in the Properties tab.
- Select the Start job button.
- In the Start job pane, confirm the job details and select Start to begin the migration.
The job runs in the background. You can monitor its progress in the Migration overview tab.
Monitor migration progress
As you use Storage Mover to migrate your data, you should monitor the copy operations for potential issues. Data relating to the operations being performed during your migration are displayed within the Migration overview tab. This data allows you to track the progress of your migration by providing current status and key information such as progress, speed, and estimated completion time.
When configured, Azure Storage Mover also provides Copy logs and Job run logs. These logs allow you to trace the migration result of job runs and of individual files.
- Navigate to the Migration Jobs tab.
- Select your job to view progress, speed, and estimated completion time.
- Select Logs to check for any errors or warnings.
- After the migration is complete, verify the data in Azure Blob Storage.
To learn more about Storage Mover Copy and Job logs, refer to the How to enable Azure Storage Mover copy and job logs article.
Post-migration validation
Post-migration data validation ensures that your data is accurate and that the transfer from GCS to Azure Blob Storage is complete. This validation process verifies data integrity by comparing migrated data to the same data from the source.
Follow these steps to complete manual validation and clean up unused GCS resources:
- Compare source and target: Verify that all expected objects are transferred by comparing object counts and total data size between the GCS bucket and the Azure Blob container.
- Spot-check data integrity: Download a representative sample of objects from both source and target and compare checksums.
- Enable incremental sync (if needed): If you need to keep your GCS bucket and Azure Blob container in sync over time, schedule recurring job runs.
- Decommission source: Delete the GCS bucket and HMAC keys after migration is fully completed and verified. Remove the corresponding secrets from Azure Key Vault when no longer needed.
Troubleshooting and support
If you encounter issues during your migration, begin troubleshooting by taking the following steps.
| Issue | Resolution |
|---|---|
| Migration job failed | Check the Copy and Job logs for detailed error messages. Common causes include invalid credentials or network connectivity issues. |
| Authentication error | Verify that the HMAC Access Key and Secret Key stored in Azure Key Vault are correct and not expired. Ensure the source endpoint's managed identity has Key Vault Secrets User access on your Key Vault. |
| Permission error on target | Verify that the target endpoint's managed identity has Storage Blob Data Contributor role on the target Blob container. |
| Data transfer is slow | Ensure your network bandwidth is sufficient. GCS might implement rate limits to S3-compatible API requests. Consider reducing the number of concurrent jobs if throttling occurs. |
| Objects missing after sync | Due to GCS timestamp second-level granularity, objects modified within the same second as the last sync might not be detected until the next job run. Wait and execute a supplementary sync. |
| Unexpected objects in target | GCS directory placeholder objects (zero-byte objects ending in /) are automatically skipped and shouldn't appear in the target. If unexpected objects exist, review the Copy logs for details. |
| Source URL rejected | Ensure the source URL uses HTTPS, doesn't contain query parameters, fragments, or IP addresses, and points to a valid fully qualified domain name. |
If you're unable to resolve your issue, create an Azure support request.
Related content
The following articles can help you become more familiar with the Storage Mover service:
- Understanding the Storage Mover resource hierarchy.
- Deploying a Storage Mover resource.
- How to enable Azure Storage Mover copy and job logs.
- Manage Azure Storage Mover endpoints.