Note
Access to this page requires authorization. You can try signing in or changing directories.
Access to this page requires authorization. You can try changing directories.
This article shows you how to authorize access to SFTP clients so that you can securely connect to the Blob Storage endpoint of your Azure Storage account by using an SFTP client.
To learn more about SFTP support for Azure Blob Storage, see SSH File Transfer Protocol (SFTP) in Azure Blob Storage.
Prerequisites
- Enable SFTP support for Azure Blob Storage. See Enable or disable SFTP support.
Create a local user
Azure Storage doesn't support shared access signature (SAS), or Microsoft Entra authentication for accessing the SFTP endpoint. Instead, you must use an identity called local user that can be secured with an Azure generated password or a secure shell (SSH) key pair. To grant access to a connecting client, the storage account must have an identity associated with the password or key pair. That identity is called a local user.
In this section, you'll learn how to create a local user, choose an authentication method, and assign permissions for that local user.
To learn more about the SFTP permissions model, see SFTP Permissions model.
Tip
This section shows you how to configure local users for an existing storage account. To view an Azure Resource Manager template that configures a local user as part of creating an account, see Create an Azure Storage Account and Blob Container accessible using SFTP protocol on Azure.
Choose an authentication method
You can authenticate local users connecting from SFTP clients by using a password or a Secure Shell (SSH) public-private key pair.
Important
While you can enable both forms of authentication, SFTP clients can connect by using only one of them. Multifactor authentication, whereby both a valid password and a valid public and private key pair are required for successful authentication is not supported.
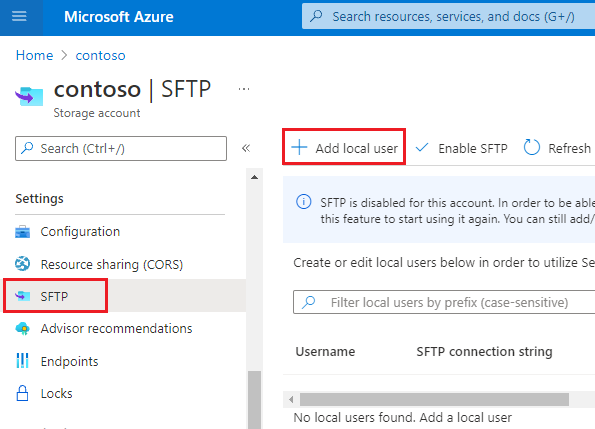
In the Azure portal, navigate to your storage account.
Under Settings, select SFTP, and then select Add local user.
In the Add local user configuration pane, add the name of a user, and then select which methods of authentication you'd like associate with this local user. You can associate a password and / or an SSH key.
If you select SSH Password, then your password appears when complete all of the steps in the Add local user configuration pane. SSH passwords are generated by Azure and are minimum 32 characters in length.
If you select SSH Key pair, then select Public key source to specify a key source.
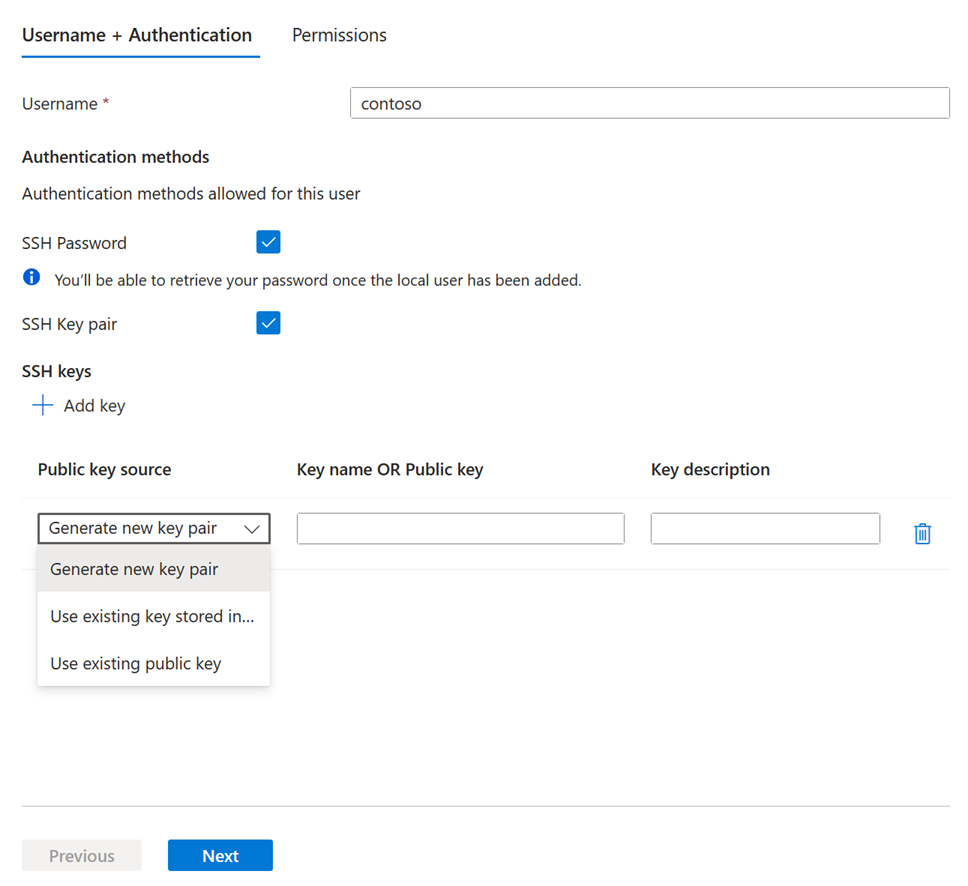
The following table describes each key source option:
Option Guidance Generate a new key pair Use this option to create a new public / private key pair. The public key is stored in Azure with the key name that you provide. The private key can be downloaded after the local user has been successfully added. Use existing key stored in Azure Use this option if you want to use a public key that is already stored in Azure. To find existing keys in Azure, see List keys. When SFTP clients connect to Azure Blob Storage, those clients need to provide the private key associated with this public key. Use existing public key Use this option if you want to upload a public key that is stored outside of Azure. If you don't have a public key, but would like to generate one outside of Azure, see Generate keys with ssh-keygen. Important
Only OpenSSH formatted public keys are supported. The key that you provide must use this format:
<key type> <key data>. For example, RSA keys would look similar to this:ssh-rsa AAAAB3N.... If your key is in another format, then a tool such asssh-keygencan be used to convert it to OpenSSH format.Select Next to open the Permissions tab of the configuration pane.
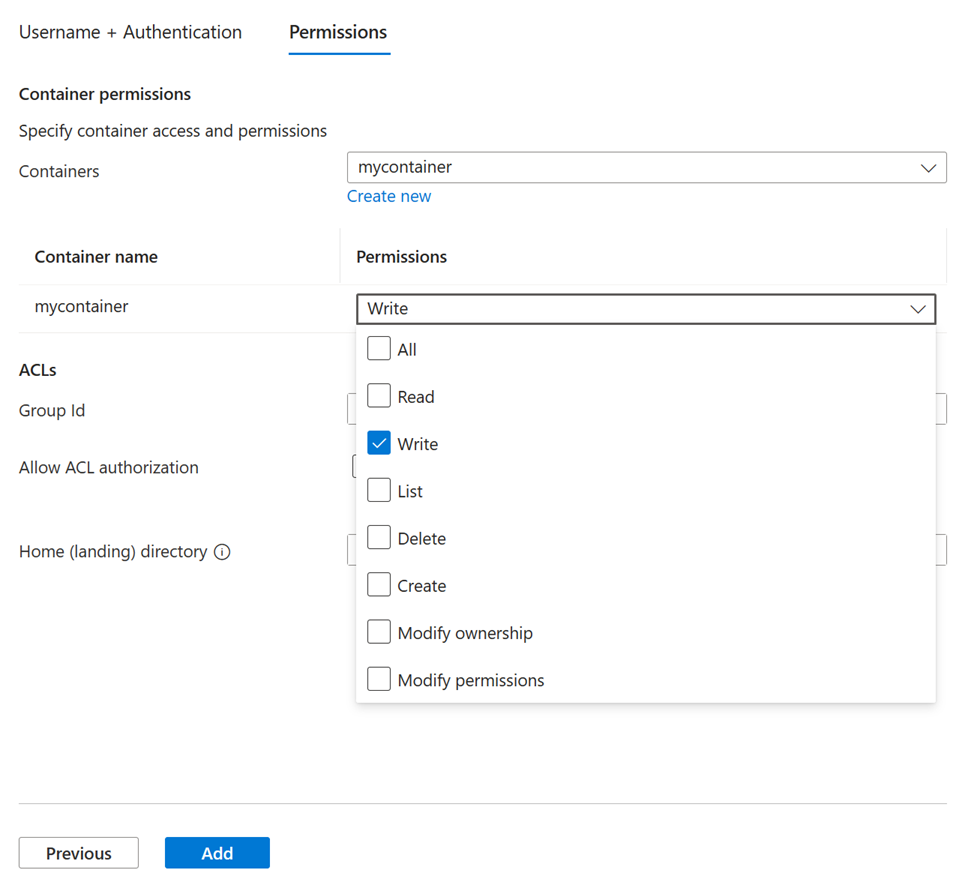
Give permission to containers
Choose which containers you want to grant access to and what level of access you want to provide. Those permissions apply to all directories and subdirectories in the container. To learn more about each container permission, see Container permissions.
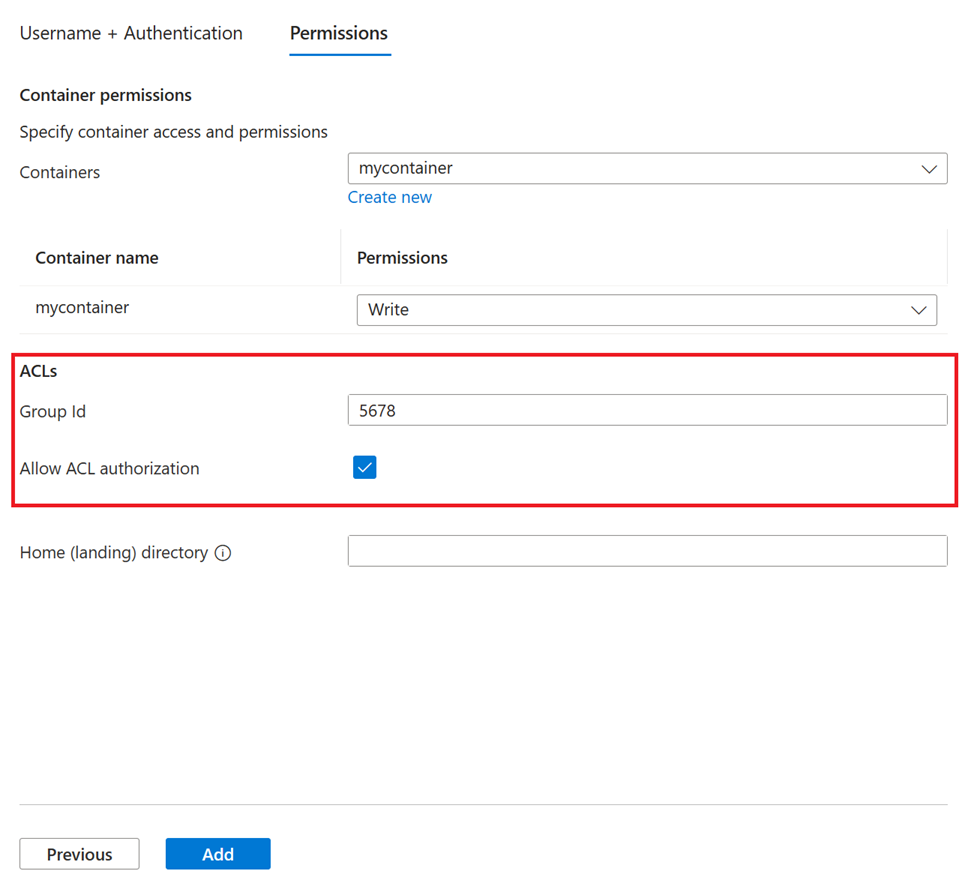
If you want to authorize access at the file and directory level, you can enable ACL authorization.
In the Permissions tab, select the containers that you want to make available to this local user. Then, select which types of operations you want to enable this local user to perform.
Important
The local user must have at least one container permission or ACL permission to the home directory of that container. Otherwise a connection attempt to that container will fail.
If you want to authorize access by using the access control lists (ACLs) associated with files and directories in this container, then select the Allow ACL authorization checkbox. To learn more about using ACLs to authorize SFTP clients, see ACLs.
You can also add this local user to a group by assigning that user to a group ID. That ID can be any number or number scheme that you want. Grouping users allow you to add and remove users without the need to reapply ACLs to an entire directory structure. Instead, you can just add or remove users from the group.
Note
A user ID for the local user is automatically generated. You can't modify this ID, but you can see the ID after you create the local user by reopening that user in the Edit local user pane.
In the Home directory edit box, type the name of the container or the directory path (including the container name) that will be the default location associated with this local user (For example:
mycontainer/mydirectory).To learn more about the home directory, see Home directory.
Select the Add button to add the local user.
If you enabled password authentication, then the Azure generated password appears in a dialog box after the local user has been added.
Important
You can't retrieve this password later, so make sure to copy the password, and then store it in a place where you can find it.
If you chose to generate a new key pair, then you'll be prompted to download the private key of that key pair after the local user has been added.
Note
Local users have a
sharedKeyproperty that is used for SMB authentication only.
Next steps
- Connect to Azure Blob Storage by using an SFTP client. See Connect from an SFTP client.
Related content
- SSH File Transfer Protocol (SFTP) support for Azure Blob Storage
- Enable or disable SSH File Transfer Protocol (SFTP) support in Azure Blob Storage
- Authorize access to Azure Blob Storage from an SSH File Transfer Protocol (SFTP) client
- Limitations and known issues with SSH File Transfer Protocol (SFTP) support for Azure Blob Storage
- Host keys for SSH File Transfer Protocol (SFTP) support for Azure Blob Storage
- SSH File Transfer Protocol (SFTP) performance considerations in Azure Blob storage