Note
Access to this page requires authorization. You can try signing in or changing directories.
Access to this page requires authorization. You can try changing directories.
This article shows you how to set up Private Link with Azure Virtual Desktop to privately connect to your remote resources. For more information about using Private Link with Azure Virtual Desktop, including limitations, see Azure Private Link with Azure Virtual Desktop.
Prerequisites
In order to use Private Link with Azure Virtual Desktop, you need the following things:
An existing host pool with session hosts, an application group, and workspace.
An existing virtual network and subnet you want to use for private endpoints.
The required Azure role-based access control permissions to create private endpoints.
A supported app on a local device to access a remote session:
- Remote Desktop app on any platform. If you're using the Remote Desktop client for Windows, you must use version 1.2.4066 or later to connect using a private endpoint.
- Windows App on macOS or iOS/iPadOS.
If you want to use Azure CLI or Azure PowerShell locally, see Use Azure CLI and Azure PowerShell with Azure Virtual Desktop to make sure you have the desktopvirtualization Azure CLI extension or the Az.DesktopVirtualization PowerShell module installed. Alternatively, use the Azure Cloud Shell.
Azure PowerShell cmdlets for Azure Virtual Desktop that support Private Link are in preview. You'll need to download and install the preview version of the Az.DesktopVirtualization module to use these cmdlets, which have been added in version 5.0.0.
Enable Private Link with Azure Virtual Desktop on a subscription
To use Private Link with Azure Virtual Desktop, you need to re-register the Microsoft.DesktopVirtualization resource provider on each subscription you want to use Private Link with Azure Virtual Desktop.
Select the relevant tab for your scenario.
Re-register the Azure Virtual Desktop resource provider
Before you can use Private Link with Azure Virtual Desktop, you need to re-register the Microsoft.DesktopVirtualization resource provider. You need to do this for each subscription you want to use for Private Link with Azure Virtual Desktop:
Sign in to the Azure portal.
In the search bar, enter Subscriptions and select the matching service entry.
Select the name of your subscription, then in the section Settings, select Resource providers.
Search for and select Microsoft.DesktopVirtualization, then select Re-register.
Verify that the status of Microsoft.DesktopVirtualization is Registered.
Create private endpoints
During the setup process, you need to create private endpoints to the following resources, depending on your scenario.
All parts of the connection - initial feed discovery, feed download, and remote session connections for clients and session hosts - use private routes. You need the following private endpoints:
Purpose Resource type Target sub-resource Endpoint quantity Connections to host pools Microsoft.DesktopVirtualization/hostpools connection One per host pool Feed download Microsoft.DesktopVirtualization/workspaces feed One per workspace Initial feed discovery Microsoft.DesktopVirtualization/workspaces global Only one for all your Azure Virtual Desktop deployments Feed download and remote session connections for clients and session hosts use private routes, but initial feed discovery uses public routes. You need the following private endpoints. The endpoint for initial feed discovery isn't required.
Purpose Resource type Target sub-resource Endpoint quantity Connections to host pools Microsoft.DesktopVirtualization/hostpools connection One per host pool Feed download Microsoft.DesktopVirtualization/workspaces feed One per workspace Only remote session connections for clients and session hosts use private routes, but initial feed discovery and feed download use public routes. You need the following private endpoint(s). Endpoints to workspaces aren't required.
Purpose Resource type Target sub-resource Endpoint quantity Connections to host pools Microsoft.DesktopVirtualization/hostpools connection One per host pool Both clients and session host VMs use public routes. Private Link isn't used in this scenario.
Important
If you create a private endpoint for initial feed discovery, the workspace used for the global sub-resource governs the shared Fully Qualified Domain Name (FQDN), facilitating the initial discovery of feeds across all workspaces. You should create a separate workspace that is only used for this purpose and doesn't have any application groups registered to it. Deleting this workspace will cause all feed discovery processes to stop working.
You can't control access to the workspace used for the initial feed discovery (global sub-resource). If you configure this workspace to only allow private access, the setting is ignored. This workspace is always accessible from public routes.
IP address allocations are subject to change as the demand for IP addresses increases. During capacity expansions, additional addresses are needed for private endpoints. It's important you consider potential address space exhaustion and ensure sufficient headroom for growth. For more information on determining the appropriate network configuration for private endpoints in either a hub or a spoke topology, see Decision tree for Private Link deployment.
Connections to host pools
To create a private endpoint for the connection sub-resource for connections to a host pool, select the relevant tab for your scenario and follow the steps.
Here's how to create a private endpoint for the connection sub-resource for connections to a host pool using the Azure portal.
Sign in to the Azure portal.
In the search bar, type Azure Virtual Desktop and select the matching service entry to go to the Azure Virtual Desktop overview.
Select Host pools, then select the name of the host pool for which you want to create a connection sub-resource.
From the host pool overview, select Networking, then Private endpoint connections, and finally New private endpoint.
On the Basics tab, complete the following information:
Parameter Value/Description Subscription Select the subscription you want to create the private endpoint in from the drop-down list. Resource group This automatically defaults to the same resource group as your workspace for the private endpoint, but you can also select an alternative existing one from the drop-down list, or create a new one. Name Enter a name for the new private endpoint. Network interface name The network interface name fills in automatically based on the name you gave the private endpoint, but you can also specify a different name. Region This automatically defaults to the same Azure region as the workspace and is where the private endpoint is deployed. This must be the same region as your virtual network and session hosts. Once you've completed this tab, select Next: Resource.
On the Resource tab, validate the values for Subscription, Resource type, and Resource, then for Target sub-resource, select connection. Once you've completed this tab, select Next: Virtual Network.
On the Virtual Network tab, complete the following information:
Parameter Value/Description Virtual network Select the virtual network you want to create the private endpoint in from the drop-down list. Subnet Select the subnet of the virtual network you want to create the private endpoint in from the drop-down list. Network policy for private endpoints Select edit if you want to choose a subnet network policy. For more information, see Manage network policies for private endpoints. Private IP configuration Select Dynamically allocate IP address or Statically allocate IP address. The address space is from the subnet you selected.
If you choose to statically allocate IP addresses, you need to fill in the Name and Private IP for each listed member.Application security group Optional: select an existing application security group for the private endpoint from the drop-down list, or create a new one. You can also add one later. Once you've completed this tab, select Next: DNS.
On the DNS tab, choose whether you want to use Azure Private DNS Zone by selecting Yes or No for Integrate with private DNS zone. If you select Yes, select the subscription and resource group in which to create the private DNS zone
privatelink.wvd.microsoft.com. For more information, see Azure Private Endpoint DNS configuration.Once you've completed this tab, select Next: Tags.
Optional: On the Tags tab, you can enter any name/value pairs you need, then select Next: Review + create.
On the Review + create tab, ensure validation passes and review the information that is used during deployment.
Select Create to create the private endpoint for the connection sub-resource.
Important
You need to create a private endpoint for the connection sub-resource for each host pool you want to use with Private Link.
Feed download
To create a private endpoint for the feed sub-resource for a workspace, select the relevant tab for your scenario and follow the steps.
From the Azure Virtual Desktop overview, select Workspaces, then select the name of the workspace for which you want to create a feed sub-resource.
From the workspace overview, select Networking, then Private endpoint connections, and finally New private endpoint.
On the Basics tab, complete the following information:
Parameter Value/Description Subscription Select the subscription you want to create the private endpoint in from the drop-down list. Resource group This automatically defaults to the same resource group as your workspace for the private endpoint, but you can also select an alternative existing one from the drop-down list, or create a new one. Name Enter a name for the new private endpoint. Network interface name The network interface name fills in automatically based on the name you gave the private endpoint, but you can also specify a different name. Region This automatically defaults to the same Azure region as the workspace and is where the private endpoint is deployed. This must be the same region as your virtual network. Once you've completed this tab, select Next: Resource.
On the Resource tab, validate the values for Subscription, Resource type, and Resource, then for Target sub-resource, select feed. Once you've completed this tab, select Next: Virtual Network.
On the Virtual Network tab, complete the following information:
Parameter Value/Description Virtual network Select the virtual network you want to create the private endpoint in from the drop-down list. Subnet Select the subnet of the virtual network you want to create the private endpoint in from the drop-down list. Network policy for private endpoints Select edit if you want to choose a subnet network policy. For more information, see Manage network policies for private endpoints. Private IP configuration Select Dynamically allocate IP address or Statically allocate IP address. The address space is from the subnet you selected.
If you choose to statically allocate IP addresses, you need to fill in the Name and Private IP for each listed member.Application security group Optional: select an existing application security group for the private endpoint from the drop-down list, or create a new one. You can also add one later. Once you've completed this tab, select Next: DNS.
On the DNS tab, choose whether you want to use Azure Private DNS Zone by selecting Yes or No for Integrate with private DNS zone. If you select Yes, select the subscription and resource group in which to create the private DNS zone
privatelink.wvd.microsoft.com. For more information, see Azure Private Endpoint DNS configuration.Once you've completed this tab, select Next: Tags.
Optional: On the Tags tab, you can enter any name/value pairs you need, then select Next: Review + create.
On the Review + create tab, ensure validation passes and review the information that is used during deployment.
Select Create to create the private endpoint for the feed sub-resource.
Important
You need to create a private endpoint for the feed sub-resource for each workspace you want to use with Private Link.
Initial feed discovery
To create a private endpoint for the global sub-resource used for the initial feed discovery, select the relevant tab for your scenario and follow the steps.
Important
Only create one private endpoint for the global sub-resource for all your Azure Virtual Desktop deployments.
A private endpoint to the global sub-resource of any workspace controls the shared fully qualified domain name (FQDN) for initial feed discovery. This in turn enables feed discovery for all workspaces. Because the workspace connected to the private endpoint is so important, deleting it will cause all feed discovery processes to stop working. We recommend you create an unused placeholder workspace for the global sub-resource.
From the Azure Virtual Desktop overview, select Workspaces, then select the name of a workspace you want to use for the global sub-resource.
- Optional: Instead, create a placeholder workspace to terminate the global endpoint by following the instructions to Create a workspace.
From the workspace overview, select Networking, then Private endpoint connections, and finally New private endpoint.
On the Basics tab, complete the following information:
Parameter Value/Description Subscription Select the subscription you want to create the private endpoint in from the drop-down list. Resource group This automatically defaults to the same resource group as your workspace for the private endpoint, but you can also select an alternative existing one from the drop-down list, or create a new one. Name Enter a name for the new private endpoint. Network interface name The network interface name fills in automatically based on the name you gave the private endpoint, but you can also specify a different name. Region This automatically defaults to the same Azure region as the workspace and is where the private endpoint will be deployed. This must be the same region as your virtual network. Once you've completed this tab, select Next: Resource.
On the Resource tab, validate the values for Subscription, Resource type, and Resource, then for Target sub-resource, select global. Once you've completed this tab, select Next: Virtual Network.
On the Virtual Network tab, complete the following information:
Parameter Value/Description Virtual network Select the virtual network you want to create the private endpoint in from the drop-down list. Subnet Select the subnet of the virtual network you want to create the private endpoint in from the drop-down list. Network policy for private endpoints Select edit if you want to choose a subnet network policy. For more information, see Manage network policies for private endpoints. Private IP configuration Select Dynamically allocate IP address or Statically allocate IP address. The address space is from the subnet you selected.
If you choose to statically allocate IP addresses, you need to fill in the Name and Private IP for each listed member.Application security group Optional: select an existing application security group for the private endpoint from the drop-down list, or create a new one. You can also add one later. Once you've completed this tab, select Next: DNS.
On the DNS tab, choose whether you want to use Azure Private DNS Zone by selecting Yes or No for Integrate with private DNS zone. If you select Yes, select the subscription and resource group in which to create the private DNS zone
privatelink-global.wvd.microsoft.com. For more information, see Azure Private Endpoint DNS configuration.Once you've completed this tab, select Next: Tags.
Optional: On the Tags tab, you can enter any name/value pairs you need, then select Next: Review + create.
On the Review + create tab, ensure validation passes and review the information that is used during deployment.
Select Create to create the private endpoint for the global sub-resource.
Closing public routes
Once you've created private endpoints, you can also control if traffic is allowed to come from public routes. You can control this at a granular level using Azure Virtual Desktop, or more broadly using a network security group (NSG) or Azure Firewall.
Control routes with Azure Virtual Desktop
With Azure Virtual Desktop, you can independently control public traffic for workspaces and host pools. Select the relevant tab for your scenario and follow the steps. You can't configure this in Azure CLI. You need to repeat these steps for each workspace and host pool you use with Private Link.
Workspaces
From the Azure Virtual Desktop overview, select Workspaces, then select the name of the workspace to control public traffic.
From the host pool overview, select Networking, then select the Public access tab.
Select one of the following options:
Setting Description Enable public access from all networks End users can access the feed over the public internet or the private endpoints. Disable public access and use private access End users can only access the feed over the private endpoints. Select Save.
Host pools
From the Azure Virtual Desktop overview, select Host pools, then select the name of the host pool to control public traffic.
From the host pool overview, select Networking, then select the Public access tab.
Select one of the following options:
Setting Description Enable public access from all networks End users can access the feed and session hosts securely over the public internet or the private endpoints. Enable public access for end users, use private access for session hosts End users can access the feed securely over the public internet but must use private endpoints to access session hosts. Disable public access and use private access End users can only access the feed and session hosts over the private endpoints. Select Save.
Important
Changing access for session hosts won't affect existing sessions. After you've changed a private endpoint to a host pool, you must restart the Remote Desktop Agent Loader (RDAgentBootLoader) service on each session host in the host pool. You also need to restart this service whenever you change a host pool's network configuration. Instead of restarting the service, you can restart each session host.
Block public routes with network security groups or Azure Firewall
If you're using network security groups or Azure Firewall to control connections from user client devices or your session hosts to the private endpoints, you can use the WindowsVirtualDesktop service tag to block traffic from the public internet. If you block public internet traffic using this service tag, all service traffic uses private routes only.
Caution
Make sure you don't block traffic between your private endpoints and the addresses in the required URL list.
Don't block certain ports from either the user client devices or your session hosts to the private endpoint for a host pool resource using the connection sub-resource. The entire TCP dynamic port range of 1 - 65535 to the private endpoint is needed because port mapping is used to all global gateways through the single private endpoint IP address corresponding to the connection sub-resource. If you restrict ports to the private endpoint, your users may not be able to connect successfully to Azure Virtual Desktop.
Validate Private Link with Azure Virtual Desktop
Once you've closed public routes, you should validate that Private Link with Azure Virtual Desktop is working. You can do this by checking the connection state of each private endpoint, the status of your session hosts, and testing your users can refresh and connect to their remote resources.
Check the connection state of each private endpoint
To check the connection state of each private endpoint, select the relevant tab for your scenario and follow the steps. You should repeat these steps for each workspace and host pool you use with Private Link.
Workspaces
From the Azure Virtual Desktop overview, select Workspaces, then select the name of the workspace for which you want to check the connection state.
From the workspace overview, select Networking, then Private endpoint connections.
For the private endpoint listed, check the Connection state is Approved.
Host pools
From the Azure Virtual Desktop overview, select Host pools, then select the name of the host pool for which you want to check the connection state.
From the host pool overview, select Networking, then Private endpoint connections.
For the private endpoint listed, check the Connection state is Approved.
Check the status of your session hosts
Check the status of your session hosts in Azure Virtual Desktop.
From the Azure Virtual Desktop overview, select Host pools, then select the name of the host pool.
In the Manage section, select Session hosts.
Review the list of session hosts and check their status is Available.
Check your users can connect
To test that your users can connect to their remote resources:
Use the Remote Desktop client and make sure you can subscribe to and refresh workspaces.
Finally, make sure your users can connect to a remote session.
Enable UDP over Private Link (opt‑in)
To use UDP-based transports such as RDP Shortpath for managed networks over Azure Virtual Desktop Private Link, you must explicitly enable UDP on the workspace or host pool and ensure that public Shortpath options are disabled
In the Azure portal, open your Azure Virtual Desktop Host pools or Workspaces resource.
Go to Networking → Public access.
Under Public access, choose one of the following:
Enable public access for end users, use private access for session hosts, or
Disable public access and use private access
When either of these options is selected, the portal displays an additional opt‑in checkbox:
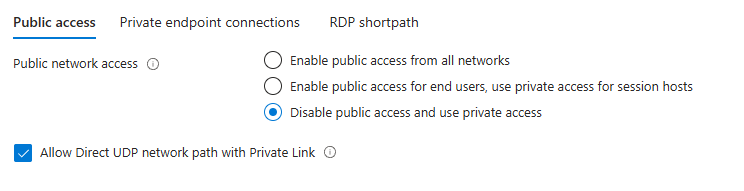
Turn on Allow Direct UDP network path over Private Link to allow UDP‑based transports (for example, RDP Shortpath for managed networks).
Go to the RDP Shortpath tab and disable the public Shortpath options:
RDP Shortpath for public networks (via STUN)
RDP Shortpath for public networks (via TURN) The portal will block Save and show a Configuration Error if these public options are still enabled.

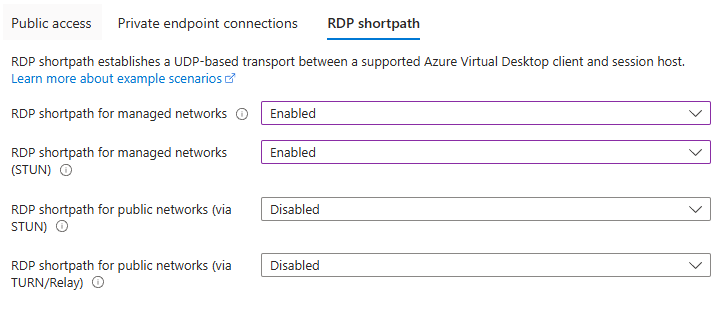
Select Save.
RDP Shortpath for managed networks – configuration validation
When RDP Shortpath for managed networks is enabled, the portal prevents enabling public Shortpath options (STUN or TURN) and blocks Save until you resolve the conflict.
If the private‑only option is not enabled, all Shortpath options should be disabled; the portal blocks Save if they are not
Prerequisites and limitations
Opt‑in is required for UDP transports over Private Link: Allow Direct UDP network path over Private Link must be enabled on the workspace/host pool Networking page.
Public network Shortpath (STUN/TURN) is not supported with Private Link; use RDP Shortpath for managed networks or RDP Shortpath for managed networks (STUN) with Private Link.
Important
The UDP opt-in checkbox will become mandatory for enabling RDP Shortpath with Private link. If the checkbox is not checked, RDP Shortpath will be blocked for Private Link connections.
Next steps
Learn more about configuring RDP Shortpath at Configure RDP Shortpath.
Learn more about how Private Link for Azure Virtual Desktop at Use Private Link with Azure Virtual Desktop.
Learn how to configure Azure Private Endpoint DNS at Private Link DNS integration.
For general troubleshooting guides for Private Link, see Troubleshoot Azure Private Endpoint connectivity problems.
Understand how connectivity for the Azure Virtual Desktop service works at Azure Virtual Desktop network connectivity.
See the Required URL list for the list of URLs you need to unblock to ensure network access to the Azure Virtual Desktop service.